Table of Contents >> Show >> Hide
- Before You Build: The 5-Minute Plan That Saves You 5 Hours
- 13 Charming DIY Garden Arch Ideas
- 1) The Classic Cedar Lattice Arch (Timeless + Cottagey)
- 2) A “Less Than a Day” Simple Garden Arch (Minimal Parts, Big Impact)
- 3) The Cattle Panel Veggie Tunnel Arch (Strong, Trendy, Surprisingly Cute)
- 4) The Arched “Room Divider” with Slatted Sides (Privacy + Structure)
- 5) The Gate-and-Arch Combo (Instant “Garden Rooms” Energy)
- 6) The Rebar & Concrete-Mesh Arch (Industrial, Lightweight, Very Climby)
- 7) The Copper Pipe Arch (Polished… Then Perfectly Patinated)
- 8) The PVC + Vinyl Lattice Arch (Budget-Friendly and Lightweight)
- 9) The “Planter Base” Arch (No Digging, No Drama)
- 10) The Salvaged Doorframe Arch (Vintage Charm on a Budget)
- 11) The Branch-and-Twine Woodland Arch (Rustic and Almost Free)
- 12) The Living Willow Arch (Whimsical, Alive, and Slightly Witchyin a Good Way)
- 13) The Metal Conduit Arch (Modern, Clean Lines, Surprisingly Strong)
- Plant Pairings That Look Great (and Won’t Break Your Arch)
- Maintenance & Safety: Keep It Cute, Keep It Standing
- Experience Section: of Realistic DIY Lessons (So You Don’t Learn Them the Hard Way)
- Conclusion
- SEO Tags
A garden arch is basically your yard’s way of saying, “Welcome… and also, look how cute I am.” It frames a path, creates a little “garden room” moment, and gives climbing plants a joblike an adorable leafy internship. The best part? You don’t need a fancy woodworking shop or a medieval blacksmith apprenticeship to build one. With a weekend, a few tools, and a willingness to measure twice (or three times, because gardens are humbling), you can DIY an arch that looks custom and feels like it’s always belonged there.
Below are 13 charming DIY garden arch ideas that range from classic cedar to veggie-tunnel cattle panels, plus practical tips on choosing materials, anchoring for wind, and picking plants that won’t turn your arch into a collapsing green burrito. At the end, you’ll also find a longer “experience” sectionrealistic lessons and gotchas DIYers run intoso your build goes smoother than your last attempt at keeping basil alive.
Before You Build: The 5-Minute Plan That Saves You 5 Hours
1) Pick the arch’s “job”
- Entry statement: Mark a gate, patio opening, or path start.
- Pathway frame: Make a walkway feel intentional (and slightly magical).
- Plant support: Train climbing roses, clematis, beans, cucumbers, gourds, or wisteria.
- Privacy + backdrop: Add lattice or panels to screen a view or highlight a bed.
2) Size it for humans (and for future pumpkins)
- Height: Aim for at least 7 feet so you’re not ducking with pruning shears in hand.
- Width: 4–5 feet is comfortable for a path; 5+ feet feels roomy (and wheelbarrow-friendly).
- Depth: Even a shallow arch looks great, but deeper structures handle heavy vines better.
3) Match your structure to your vine type
Vines don’t all climb the same way. Some twine, some grab with tendrils, and some cling with little rootlets or “holdfast” pads. Choosing the right support style makes training easier and prevents your vine from sulking on the ground like a teenager asked to unload the dishwasher.
- Twining vines (like wisteria and honeysuckle) like poles, lattice, wires, or slats they can wrap around.
- Tendril climbers (like grapes and many cucurbits) love thin wires, netting, or small-diameter rungs.
- Clinging vines can attach to rough surfacesgreat on masonry, not always great for delicate paint jobs.
4) Anchor like you mean it
Even a lightweight arch becomes a sail once vines leaf out. If your area gets strong winds or freeze/thaw cycles, treat your arch like a “real” structure: stable base, rot resistance, and hardware that won’t quit after the first storm.
5) Choose materials that fit your maintenance vibe
- Cedar/redwood: Naturally rot-resistant and pretty.
- Pressure-treated lumber: Budget-friendly and durable (seal/cap end grain for longevity).
- Metal panels or conduit: Sleek, strong, and great for edible tunnels.
- Living materials (willow): Whimsical, but needs seasonal upkeep.
13 Charming DIY Garden Arch Ideas
1) The Classic Cedar Lattice Arch (Timeless + Cottagey)
If you want “storybook garden” without going full fairytale cosplay, cedar + lattice is the sweet spot. It works for climbing roses, clematis, jasmine, and even lightweight veggies.
- Materials: Cedar 4x4s (or 4x6s), 2x4s, lattice panels, exterior screws, brackets, optional post bases.
- DIY steps: Set two posts per side (or one per side for a simpler arch), add a curved or flat header, screw lattice to the sides, and cap the top with slats for extra rigidity.
- Charm boost: Paint the lattice white and leave the header natural wood for an instant “garden wedding venue” feel.
2) A “Less Than a Day” Simple Garden Arch (Minimal Parts, Big Impact)
Love the idea of an arch, hate the idea of 47 cuts? Build a straightforward wooden arch with a few pieces, then let the plants do the decorating.
- Materials: Two posts, a header, two curved braces, a few trim pieces, exterior screws.
- DIY steps: Cut an arch curve (a bucket makes an easy curve template), attach braces, and mount the header. Add a couple of horizontal slats on the sides if you want climbing help.
- Best for: Ornamental vines and lighter climbers.
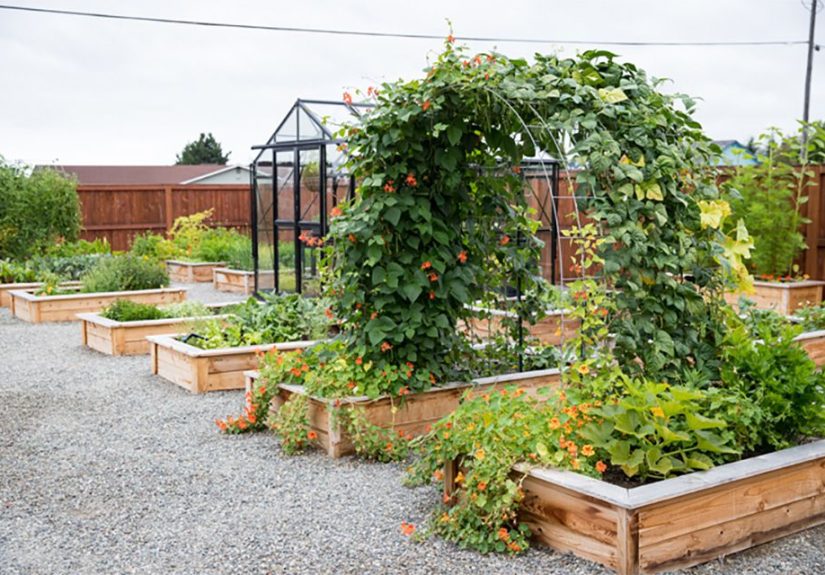
3) The Cattle Panel Veggie Tunnel Arch (Strong, Trendy, Surprisingly Cute)
A cattle panel arch is the MVP for edible gardens: beans, cucumbers, squash, gourds, loofahbring it on. It’s also one of the fastest builds for the amount of “wow” you get.
- Materials: One 16-foot cattle panel, 4 T-posts (or U-posts), zip ties or wire, post driver, gloves.
- DIY steps: Drive posts on both sides of your path, bend the panel into an arch, and fasten it tightly to posts. Keep the “legs” about 5 feet apart so it doesn’t pinch inward at the base.
- Pro tip: Plant climbers on both sides to balance weight, and prune weekly once growth explodes.
4) The Arched “Room Divider” with Slatted Sides (Privacy + Structure)
Want your arch to do more than be a pretty doorway? Add slatted side panels. You’ll get privacy, wind buffering, and more places for vines to latch onto.
- Materials: Posts, 1×2 or 1×3 slats, a header beam, exterior screws.
- DIY steps: Build two narrow “screens,” set them upright, and connect with an arched or flat top beam. Space slats 2–4 inches apart for a modern look.
- Best for: Screening compost bins, hoses, or the neighbor’s inflatable holiday collection.
5) The Gate-and-Arch Combo (Instant “Garden Rooms” Energy)
Add a simple gate under your arch and suddenly your yard feels designed. It’s also practical if you’re trying to keep pets, kids, or “helpful” deer from wandering into beds.
- Materials: Standard arch frame + a prebuilt gate kit (or DIY gate), hinges, latch.
- DIY steps: Build your arch sturdy and square, then hang a gate with adjustable hinges. Leave a small ground gap for mulch changes and seasonal swelling.
- Charm boost: Add an overhead name plaque (“Rose Walk,” “Snack Tunnel,” “Definitely Not a Weed Patch”).
6) The Rebar & Concrete-Mesh Arch (Industrial, Lightweight, Very Climby)
This is a great “hardware store sculpture” build: thin, strong, and easy to tuck into small spaces. Concrete remesh or welded wire makes a nice climbing surface.
- Materials: Rebar lengths, concrete remesh or welded wire panel, wire ties, rebar caps (for safety).
- DIY steps: Drive rebar into the ground as uprights, bend remesh into an arch, then wire it securely. Add caps to any exposed ends so nobody gets a surprise villain-origin story.
- Best for: Clematis, sweet peas, runner beans, and lightweight roses.
7) The Copper Pipe Arch (Polished… Then Perfectly Patinated)
Copper is charming because it changes over time. Start shiny, then let it weather into a soft, artsy patina. It’s like your arch is aging gracefully while you’re out there negotiating with squirrels.
- Materials: Copper pipe, fittings (tees/elbows), pipe straps, concrete or heavy planters for anchoring.
- DIY steps: Build two uprights and a top curve/rectangle. Secure joints, then mount to bases. Use wire or thin trellis netting for tendril climbers.
- Best for: Lightweight vines and decorative training.
8) The PVC + Vinyl Lattice Arch (Budget-Friendly and Lightweight)
If you want a quick arch for annual vines, events, or a temporary “try it before you commit” moment, PVC and lattice are easy to work with and forgiving.
- Materials: Bendable PVC (or PVC hoops), vinyl lattice sheet, zip ties, PVC connectors.
- DIY steps: Form the PVC into an arch, attach lattice to create a climbable surface, and anchor the base with stakes or planters.
- Best for: Morning glory, nasturtiums, black-eyed Susan vine, and other annual climbers.
9) The “Planter Base” Arch (No Digging, No Drama)
Renting? Hate digging? Want flexibility? Mount your arch uprights into two large planters (or whiskey barrels) filled with gravel + soil. It’s portable-ish and surprisingly stable when weighted correctly.
- Materials: Two large planters, 4x4s or metal uprights, quick-set concrete (optional), arch header, soil.
- DIY steps: Set uprights in planters, weight with gravel and/or a bit of concrete at the bottom, then fill and plant. Connect uprights with a header or curved top.
- Best for: Patio entrances and small-space gardens.
10) The Salvaged Doorframe Arch (Vintage Charm on a Budget)
Old doors, antique transoms, and reclaimed windows can become a garden arch that looks like it came from a boutique garden store (the expensive one that also sells candles).
- Materials: Salvaged doorframe or architectural piece, posts, screws, exterior-grade sealant.
- DIY steps: Seal the salvage wood, reinforce it with a simple post frame, then attach the decorative piece as the “face” of the arch.
- Charm boost: Add a small shelf for a lantern or seasonal decor (yes, your arch can have a tiny hat).
11) The Branch-and-Twine Woodland Arch (Rustic and Almost Free)
This is the “I’m one with nature” arch: branches, stakes, and twine. It’s charming in cottage gardens, woodland paths, and wildflower meadowsespecially when paired with airy vines.
- Materials: Straight-ish branches, sturdy stakes, garden twine or wire, pruners.
- DIY steps: Drive stakes, lash branches into an arch shape, then add diagonal cross-bracing. Replace parts as they weather.
- Best for: Lightweight annual vines and seasonal decor.
12) The Living Willow Arch (Whimsical, Alive, and Slightly Witchyin a Good Way)
A living willow arch is exactly what it sounds like: woven willow that can root and leaf out, forming a living tunnel. It’s magicaljust know it’s also a relationship. You will be maintaining this arch.
- Materials: Fresh willow whips (in season), shovel, twine, patience.
- DIY steps: Plant willow whips in pairs along a path, bend them toward each other, and weave/tie at the top. Weave side pieces for strength.
- Maintenance: Prune to shape and prevent it from turning into a willow octopus.
13) The Metal Conduit Arch (Modern, Clean Lines, Surprisingly Strong)
EMT conduit (electrical metallic tubing) can make a sleek arch that feels modern. Add cable lines or a wire grid and you’ve got a minimalist trellis that’s strong enough for serious climbers.
- Materials: EMT conduit, conduit bender, fittings, clamps, wire or trellis netting.
- DIY steps: Bend two matching arches, secure them into ground anchors or concrete, connect with crossbars, then add wire runs for climbing.
- Best for: Grapes, hardy kiwi (with a beefier build), and vigorous ornamentalswhen properly anchored.
Plant Pairings That Look Great (and Won’t Break Your Arch)
When choosing climbing plants, think about weight, growth speed, and how the plant climbs. Heavy growers (some roses, wisteria, mature gourds) need stout frames. Lighter climbers (clematis, annual vines) are flexible and forgiving.
- Easy ornamentals: Clematis, honeysuckle, jasmine (choose non-invasive varieties where needed).
- Edibles: Pole beans, cucumbers, small-fruited gourds, peas.
- Bold statement vines: Wisteria (only on a truly sturdy, well-anchored structure and with regular pruning).
- Shadier spots: Some climbing hydrangeas and shade-tolerant vines (double-check your zone and site conditions).
Maintenance & Safety: Keep It Cute, Keep It Standing
- Seal wood end grain: That’s where water sneaks in and causes rot.
- Use exterior-rated hardware: Galvanized or stainless helps prevent rust streaks and failures.
- Keep wood off wet concrete: A post base with a standoff helps reduce rot risk.
- Prune like it’s your part-time job: Vines can get heavy fast. Training and thinning reduce wind load and breakage.
- Check fasteners each season: Tighten, replace zip ties, and touch up protective finishes.
Experience Section: of Realistic DIY Lessons (So You Don’t Learn Them the Hard Way)
Most DIY garden arch builds go through the same emotional phases: excitement, confidence, mild confusion, a quick trip back to the hardware store, and finally the deeply satisfying moment when you step back and think, “Oh wow, I made that.” To help you reach that last phase faster, here are the most common “experience-based” lessons DIYers tend to pick up after building one (or rebuilding one).
First, the ground is almost never as cooperative as your sketch. Even if your yard looks flat, holes reveal the truth: rocks, roots, surprise rubble from an ancient patio, or soil that turns into peanut butter when wet. Plan for extra time just to set posts or anchors correctly. If you’re doing a no-dig planter base, the lesson shifts from “digging is hard” to “weight is everything.” People often underestimate how much ballast it takes to keep an arch stable once plants climb and winds push. The fix is simple: bigger planters, more gravel at the bottom, and a wider footprint.
Second, “lightweight now” does not mean “lightweight later.” A bare arch feels feather-light compared to the same arch in July when it’s wearing a full leafy coat. Vines trap wind and add leverage, and vegetables add literal pounds. DIYers frequently report that their first arch looked perfectuntil the plants hit peak growth. This is why it’s smart to overbuild a little: add cross braces, use thicker posts, and choose hardware like it’s holding a tiny porch swing instead of a few innocent leaves.
Third, measuring for comfort matters more than you expect. An arch that’s even a few inches too narrow can feel annoying every single time you pass throughespecially with a wheelbarrow, a hose, or a basket of tomatoes. Many DIYers end up widening the base or moving the posts after living with a too-tight passage for a week. If you’re building a cattle panel tunnel, spacing the legs wide enough is the difference between “luxurious garden walkway” and “awkward squeeze through a wire burrito.”
Fourth, plant training is half the project. New climbers don’t automatically know your design goals. They’ll wander, flop, and grab the nearest thing (often not the arch). The “experienced DIYer” move is to start training early: gently tie young growth where you want it, guide it weekly, and prune anything that’s turning your arch into a lopsided haircut. Also: match the plant’s climbing style to your structure. When you give tendrils thin wires to grabor twining vines something they can wrapeverything becomes easier and looks better faster.
Finally, accept that your arch will evolve. Hardware gets upgraded. Finishes get refreshed. Zip ties get swapped for nicer wire. You might add solar lights, a sign, or a second arch because you’ve caught the “now everything needs an arch” bug. That’s normal. In fact, it’s part of the charm: a good garden arch doesn’t just sit thereit becomes a living, changing feature that looks better each season.
Conclusion
A DIY garden arch is one of the fastest ways to make your yard feel more intentional, more inviting, andlet’s be honestmore photogenic. Whether you go classic cedar lattice, a modern metal conduit frame, or a cattle panel veggie tunnel that doubles as a snack corridor, the best arch is the one that fits your space, your plants, and your willingness to maintain it. Build it sturdy, anchor it smart, and let your climbers do their thing. By midsummer, you’ll have a shaded little gateway that makes every garden walk feel like an entrance scene in your own backyard movie.


