Table of Contents >> Show >> Hide
- Before You Clean: Know What Type of Drywall Mess You Have
- Way 1: Clean Drywall Dust from New or Sanded Drywall
- Way 2: Clean Painted Drywall Walls Without Damaging Paint
- Way 3: Clean Stains, Mildew, and Mold on Drywall Safely
- Common Mistakes When Cleaning Drywall
- Best Products and Tools for Cleaning Drywall
- How Often Should You Clean Drywall?
- Real-World Experience: What Cleaning Drywall Actually Feels Like
- Conclusion
Drywall is the quiet workhorse of the house. It holds your paint, hides your studs, frames your rooms, and politely pretends it is not collecting dust, fingerprints, scuffs, sanding powder, mystery smudges, and the occasional “how did spaghetti sauce get up there?” stain. The good news is that cleaning drywall is not complicated. The slightly dramatic news is that cleaning it the wrong way can leave water marks, torn paper, fuzzy patches, or paint that looks like it survived a tiny indoor weather event.
The best way to clean drywall depends on what kind of mess you are facing. Fresh drywall dust needs a dry-first cleanup. Painted drywall usually wants a gentle wash. Water stains, mildew, and mold require a more cautious approach because drywall is porous and moisture-loving in all the wrong ways. Below are three practical, homeowner-friendly methods for cleaning drywall without turning a simple chore into a weekend renovation saga.
Before you begin, remember one rule: drywall does not enjoy being soaked. It is made with a gypsum core wrapped in paper, which means too much water can soften the surface, damage the paper facing, and create conditions where mold can return. Think “slightly damp,” not “monsoon season.”
Before You Clean: Know What Type of Drywall Mess You Have
Cleaning drywall starts with identifying the surface and the problem. Bare drywall, freshly sanded joint compound, painted walls, textured walls, and water-damaged drywall all behave differently. A method that works beautifully on semi-gloss painted drywall may ruin unfinished drywall. A sponge that removes a scuff from washable paint may chew up raw joint compound like it is auditioning for a demolition crew.
Quick drywall cleaning checklist
- Is the drywall bare or painted? Bare drywall needs minimal moisture and gentle dust removal.
- Is the wall dusty from sanding? Use vacuuming and dry wiping first.
- Is there a stain or greasy mark? Use mild soap and water on painted drywall only.
- Is there mold or water damage? Fix the moisture source first and consider replacement if the drywall is soft, swollen, or moldy inside.
- Was the home built before 1978? Be cautious around old paint because sanding or scraping may release lead dust.
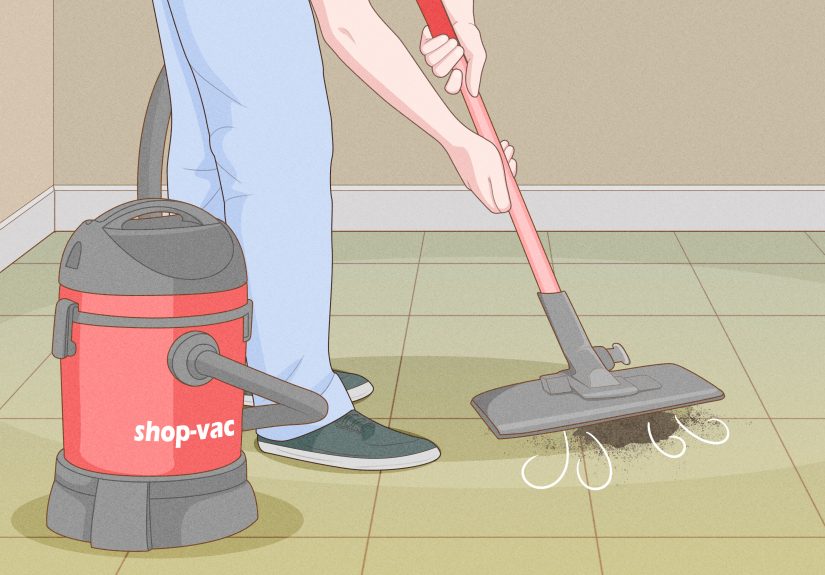
Safety also matters. Drywall dust can irritate the eyes, skin, and lungs. When cleaning sanding dust, wear safety goggles, gloves, and a well-fitting N95 respirator or similar dust mask. For large dusty projects, use a shop vacuum with a HEPA filter or fine-dust collection system. Drywall dust is very fine, and a regular household vacuum may simply blow it around like a tiny indoor snowstorm.
Way 1: Clean Drywall Dust from New or Sanded Drywall
Drywall dust is sneaky. It looks harmless, but it gets into corners, baseboards, outlets, floors, hair, coffee cups, and places you are certain were in another room. If you have just sanded joint compound or finished drywall repairs, removing this dust is essential before priming or painting. Paint needs a clean, dry surface to adhere properly. If dust remains, primer may look patchy, paint may peel, and your wall may feel gritty enough to exfoliate a rhinoceros.
What you need
- N95 respirator or dust mask
- Safety goggles
- Soft-bristle brush or microfiber duster
- Shop vacuum with HEPA filter or fine-dust bag
- Clean microfiber cloths
- Large cellulose sponge or barely damp cloth
- Drop cloths or plastic sheeting
Step-by-step: removing drywall dust
Step 1: Let the dust settle. After sanding, wait a short while before cleaning. Airborne dust needs time to fall. If you start wiping while dust is still floating, you will simply clean the same surface twice, which is not a hobby anyone needs.
Step 2: Brush from top to bottom. Use a soft-bristle brush, microfiber duster, or broom wrapped in a clean microfiber cloth. Start at the ceiling line and work downward. Be gentle. Pressing hard can scratch joint compound or roughen drywall paper.
Step 3: Vacuum carefully. Use a shop vacuum with a HEPA filter or fine-dust bag. Vacuum the wall lightly, then clean corners, floors, baseboards, and window trim. Keep the nozzle slightly off the surface if the wall is unfinished, because aggressive suction or a hard nozzle can mark fresh compound.
Step 4: Wipe with a barely damp sponge. Once most loose dust is gone, use a clean sponge or microfiber cloth that is damp, not dripping. Wring it out thoroughly. Wipe in broad, light strokes. Rinse the sponge often and change the water when it turns cloudy.
Step 5: Let the drywall dry completely. Before applying primer or paint, allow the wall to dry fully. Even a small amount of trapped moisture can interfere with primer and may cause uneven absorption.
Pro tip: avoid over-cleaning fresh joint compound
Freshly finished drywall should be smooth, dry, and dust-free, but it does not need to be scrubbed like a kitchen floor. If you wipe too aggressively, you can soften the compound, raise the paper fibers, or create shiny patches that show through paint. The goal is dust removal, not a spa treatment.
Way 2: Clean Painted Drywall Walls Without Damaging Paint
Painted drywall is easier to clean than bare drywall, especially if the paint has an eggshell, satin, semi-gloss, or gloss finish. Flat paint is more delicate and can burnish, meaning it develops shiny spots when rubbed too hard. If your wall has flat paint, proceed gently and test your cleaning method in a hidden area first. Behind a door is a classic test spot; behind a refrigerator is even better if you enjoy mild acrobatics.
What you need
- Microfiber cloths
- Vacuum with soft brush attachment
- Bucket of warm water
- Mild dish soap
- Soft sponge
- Clean towel
- Baking soda for stubborn scuffs
Step-by-step: washing painted drywall
Step 1: Dust first. Start with a dry microfiber cloth or a vacuum with a soft brush attachment. Remove cobwebs, loose dust, and surface grit. Skipping this step can turn dust into muddy streaks once water touches it.
Step 2: Mix a mild cleaning solution. Add a few drops of gentle dish soap to a bucket of warm water. You do not need a bubble festival. Too much soap leaves residue, and residue attracts more dirt.
Step 3: Test the paint. Dip a sponge into the solution, wring it out well, and clean a small hidden spot. Wait a few minutes. If the paint color transfers to the sponge or the finish changes, stop and use dry cleaning only.
Step 4: Wash gently from bottom to top. This sounds backward, but cleaning from the bottom upward helps prevent long drip marks. Use light circular motions and work in small sections. Keep the sponge damp, not wet.
Step 5: Rinse lightly. Use a second sponge or cloth dampened with clean water to remove soap residue. Again, wring it out well.
Step 6: Dry the wall. Pat the area with a clean towel. Drying helps prevent streaks, especially on darker paint colors or lower-sheen finishes.
How to remove scuffs from painted drywall
For light scuffs, try a dry microfiber cloth first. If that fails, use a paste made from baking soda and a small amount of water. Apply it gently with a soft cloth, rub lightly, then wipe with clean water and dry. Baking soda is mildly abrasive, so do not scrub like you are polishing a bowling ball. On delicate paint, even mild abrasion can leave a visible mark.
How to clean greasy marks
Kitchen walls, especially near stoves and trash cans, often collect a thin film of grease. Use warm water with mild dish soap, since dish soap is designed to cut grease. Work slowly and change your rinse water often. If grease remains, repeat the process rather than increasing pressure. Patience is safer than scrubbing.
What not to use on painted drywall
- Harsh abrasive pads
- Strong degreasers without testing
- Too much water
- Bleach mixed with other cleaners
- Magic eraser-style products on flat paint without testing
The gentler you are, the more likely the paint will survive with dignity. If a stain refuses to budge, touch-up paint may be the cleaner-looking solution.
Way 3: Clean Stains, Mildew, and Mold on Drywall Safely
Stains on drywall can come from water leaks, smoke, handprints, pets, furniture rubs, or mystery marks that nobody in the house has ever seen before. Mildew and mold are more serious because they usually mean moisture is present. Cleaning the visible surface is not enough if the source of moisture remains. Fix the leak, improve ventilation, reduce humidity, or the stain may return with the confidence of a sequel nobody asked for.
First, inspect the drywall
Press gently around the stained area. If the drywall is soft, swollen, crumbling, sagging, or smells musty, cleaning may not be enough. Damaged drywall often needs to be cut out and replaced. Mold can grow into porous materials, and drywall paper gives it a friendly surface when moisture is available.
Cleaning light stains on painted drywall
For ordinary stains on painted drywall, start with the mild soap-and-water method from Way 2. If the stain is from dirt, fingerprints, or light grease, this may solve the problem. For tougher marks, try a baking soda paste or a small amount of white vinegar diluted in water, but always test first. Some paints dislike vinegar, and they will express that dislike by dulling, streaking, or transferring color.
Cleaning water stains
Water stains are tricky because the brown or yellow mark often comes from minerals, tannins, or materials pulled through the wall surface. First, fix the leak and let the area dry completely. Clean the surface lightly with a damp cloth and mild soap if the paint is washable. If the stain remains, apply a stain-blocking primer before repainting. Regular paint alone may allow the stain to bleed through, which is drywall’s way of saying, “Nice try.”
Cleaning mildew on painted drywall
Mildew often appears as small gray, black, or brown spots in bathrooms, laundry rooms, basements, and poorly ventilated corners. For small areas on painted drywall, put on gloves and eye protection, ventilate the room, and clean with mild detergent and water. Dry the area thoroughly. If spots remain, some homeowners use a diluted bleach solution, but never mix bleach with ammonia, vinegar, or any other cleaner. Mixing chemicals can create dangerous fumes.
When moldy drywall should be replaced
If mold is growing on unpainted drywall, inside the wall, behind wallpaper, or across a large area, replacement is often safer than surface cleaning. Porous materials can hold mold below the visible surface. If the area is large, recurring, caused by flooding, or affecting people with asthma, allergies, immune concerns, or other health sensitivities, consider professional assessment. The most important step is always moisture control. Without that, cleaning is just a temporary ceasefire.
Preventing mold from coming back
- Repair roof, plumbing, window, and foundation leaks promptly.
- Use bathroom and kitchen exhaust fans.
- Keep indoor humidity under control.
- Dry wet materials quickly after leaks or spills.
- Avoid pushing furniture tightly against cold exterior walls where condensation may form.
- Prime and paint repaired drywall with the right products for the room.
Common Mistakes When Cleaning Drywall
Using too much water
This is the big one. Drywall is not tile. It is not vinyl siding. It is not a frying pan after taco night. Too much water can soften the paper, loosen joint compound, damage paint, and encourage mold. Always wring out your sponge or cloth until it is only slightly damp.
Skipping the dust removal step
Dust plus water equals paste. If you wash a dusty wall without dry dusting first, you may create streaks that are harder to remove than the original dust. Vacuum or wipe dry before wet cleaning.
Scrubbing flat paint
Flat paint hides wall imperfections beautifully, but it does not love scrubbing. Heavy rubbing can create shiny spots or remove pigment. Use the lightest pressure possible.
Painting over dirt or moisture
Paint is not a cleaning product. If you paint over dust, grease, or damp drywall, the finish may fail. Clean, dry, and prime when needed.
Ignoring the source of stains
A water stain is not just a cosmetic issue. It is evidence. Find out where the water came from before you clean or repaint. Otherwise, the stain will return, probably right after you put the ladder away.
Best Products and Tools for Cleaning Drywall
You do not need a garage full of specialized equipment to clean drywall. Most jobs can be handled with basic tools: microfiber cloths, a soft sponge, mild dish soap, a vacuum with a brush attachment, and a shop vacuum with a HEPA filter for drywall dust. For repainting after cleaning, use a quality drywall primer or stain-blocking primer depending on the condition of the wall.
For dust-heavy jobs, a fine-dust bag or HEPA filter is worth the money. Drywall dust can clog ordinary filters quickly, reducing suction and sending fine particles back into the room. If you are sanding a large area, dust-control sanding tools or vacuum-assisted sanders can greatly reduce cleanup.
How Often Should You Clean Drywall?
In most rooms, painted drywall only needs occasional dusting and spot cleaning. High-traffic spaces such as hallways, mudrooms, kids’ rooms, and kitchens may need more frequent attention. Bathrooms and basements should be checked regularly for mildew, especially around corners, ceilings, vents, and areas with poor airflow.
Bare drywall should not be cleaned routinely. It should be kept dry, dusted gently when needed, and primed or finished as soon as practical. Once drywall is properly primed and painted, it becomes much easier to maintain.
Real-World Experience: What Cleaning Drywall Actually Feels Like
Cleaning drywall sounds simple until you are standing in the middle of a room after sanding one tiny patch and realizing the dust has somehow migrated to the windowsill, the floor, your shoes, and possibly your future. The first lesson from experience is this: drywall dust always travels farther than expected. Even a small repair around a nail pop or anchor hole can create a surprising amount of powder. That is why preparing the room matters. Move furniture away from the wall, cover what you can, close nearby doors, and turn off forced-air heating or cooling while dust is airborne. Otherwise, the HVAC system may help distribute the dust like it has been hired for the job.
Another practical lesson is to clean in stages. Many beginners try to wipe the wall with a damp sponge right away. It feels efficient, but it often creates gray streaks. A better approach is dry first, vacuum second, damp wipe last. When the wall is freshly sanded, use a soft brush or microfiber cloth to knock down loose dust. Then vacuum the wall, trim, floor edge, and corners. Only after that should you use a barely damp sponge. The sponge should be wrung out so well that it feels almost too dry. That is usually the perfect amount of moisture for drywall.
Painted drywall teaches a different lesson: the paint finish decides how brave you can be. Semi-gloss paint in a bathroom or kitchen can usually handle gentle washing. Flat paint in a living room may show every rub mark. If you have ever cleaned one spot too aggressively and created a shiny patch, you know the pain. It is small, but once you notice it, your eyes go there every time you enter the room. Testing in a hidden area prevents that. So does using light pressure and letting the cleaning solution do the work.
Greasy kitchen marks are another common surprise. They may not come off in one pass, especially near the stove or trash area. Instead of scrubbing harder, repeat the mild soap wash two or three times with clean water and a fresh cloth. Slow cleaning often works better than strong cleaning. Strong cleaners can dull paint or leave a residue that catches light differently.
Water stains are where experience says, “Pause before you beautify.” A stain on drywall may look like an old mark, but it can point to an active leak. Check above, behind, and around the area. Is there a bathroom overhead? A roof line nearby? A window that leaks during storms? Cleaning and repainting before solving the leak is like putting a nice hat on a raccoon and calling it civilized. The problem remains. Once the moisture source is fixed and the wall is fully dry, stain-blocking primer is usually the difference between a clean finish and a yellow ghost returning through fresh paint.
Mold and mildew require the most judgment. Small surface mildew on painted drywall in a bathroom may clean up with detergent and better ventilation. But mold on soft, swollen, or unpainted drywall is a different situation. In those cases, replacement is often the cleaner and safer long-term answer. The wall may look better after wiping, but if moisture and mold are inside the material, the problem can return.
The best drywall cleaning habit is not dramatic: keep walls dry, dust before washing, use mild products, and treat stains as clues. Drywall rewards patience. It does not reward soaking, scrubbing, or chemical experiments performed with the confidence of a mad scientist in a laundry room.
Conclusion
Learning how to clean drywall comes down to matching the method to the mess. For drywall dust, remove loose powder first with brushing, vacuuming, and a barely damp wipe. For painted drywall, use mild soap, warm water, and gentle pressure. For stains, mildew, or mold, fix the underlying cause before cleaning, and replace drywall that is soft, swollen, or contaminated below the surface.
Drywall may look tough once it is painted, but it prefers a careful hand. Keep water under control, avoid harsh scrubbing, and always let the wall dry completely before priming or painting. Do that, and your walls will look cleaner, paint will adhere better, and your next drywall project will involve fewer sighs, fewer streaks, and much less dust in your coffee.