Table of Contents >> Show >> Hide
- What Does “Julienne” Mean (And Why Peppers Are Great At It)
- Before You Start: Setup, Pepper Prep, and Safety
- Method 1: The Classic “Unroll the Pepper” Knife Julienne
- Method 2: The “Cut Around the Core” Plank Method (Fast + Minimal Seeds)
- Method 3: The Mandoline Julienne (Ultra-Uniform, Ultra-Respectful-of-the-Blade)
- How Thick Should Julienned Pepper Strips Be?
- Common Mistakes (And How to Fix Them)
- Best Ways to Use Julienned Peppers
- Storage and Meal-Prep Tips (So Your Peppers Don’t Turn Sad)
- Quick Troubleshooting: “What If…”
- of Real-World Julienne Pepper “Experience” (The Stuff You Only Learn Mid-Recipe)
- Conclusion
Julienned peppers are one of those small kitchen upgrades that quietly improve everything: fajitas cook more evenly, salads look restaurant-y,
and stir-fries stop turning into a mix of “some pieces are perfect” and “some pieces are still basically a whole pepper.”
The best part? You don’t need chef-level knife skillsjust a method that matches your comfort level and the right setup.
In this guide, you’ll learn three reliable ways to julienne peppers: a classic knife method that “unrolls” the pepper into a flat sheet,
a fast no-seed-mess approach that creates neat planks, and a mandoline method for ultra-uniform matchsticks (with serious safety tips,
because mandolines are basically tiny vegetable guillotines).
What Does “Julienne” Mean (And Why Peppers Are Great At It)
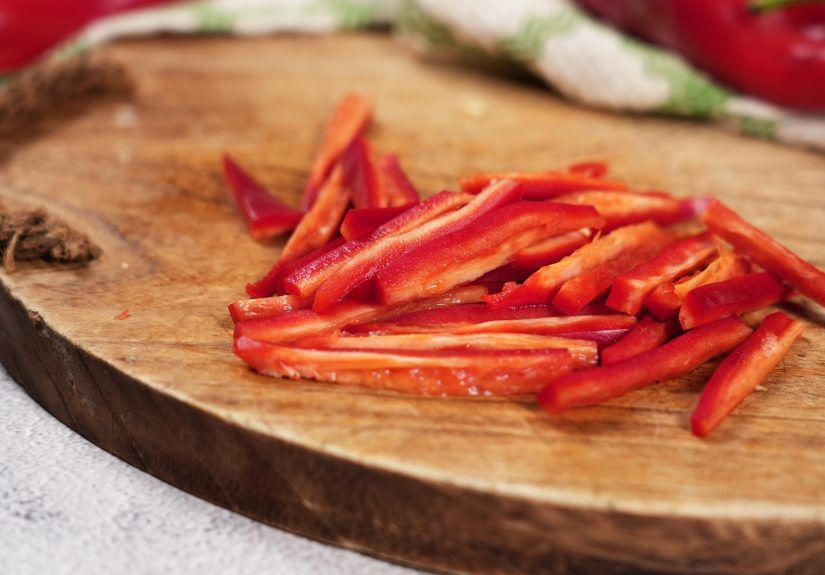
“Julienne” is a classic knife cut that means thin, matchstick-like strips. In culinary-school terms, a standard julienne is roughly
about 2 to 2 1/2 inches long and about 1/8 inch thick, while a “fine julienne” goes thinner (around 1/16 inch).
In real-home-cook terms: think “skinny strips that cook fast and look intentional.”
Peppers are perfect for julienning because their walls are naturally flat-ish once you remove the core and ribs. That flat surface is the key:
flat food = stable cutting = fewer weird wobble-slices and fewer “why did my knife suddenly teleport?” moments.
Before You Start: Setup, Pepper Prep, and Safety
Pick the right pepper for the job
- Bell peppers are easiest: thick walls, mild flavor, lots of flat surface.
- Poblanos and jalapeños can work with the “cut-around-the-core” method, but they’re narrower and may need more careful handling.
- Small, thin, or very delicate chiles are harder to “plank” cleanlysave the fancy cuts for bigger peppers.
Tools that make this easy (and safer)
- A sharp chef’s knife (sharp beats “kind of sharp” every day of the week)
- A stable cutting board (add a damp towel underneath if it slides)
- Optional: mandoline with julienne attachment, plus a hand guard and/or cut-resistant glove
- Optional: paper towel (for seed cleanup and for storing cut peppers)
Knife safety in one minute
- Use the “claw” hand: curl fingertips under and let your knuckles guide the blade.
- Go slow on the first cuts: the first cut is where food is round and most likely to roll.
- Keep your board steady: slipping boards are the villain origin story of many home cooks.
- If you use a mandoline: use the guard or a cut-resistant glove (or both). Speed is not a personality trait.
Method 1: The Classic “Unroll the Pepper” Knife Julienne
This is the most common, most controllable method. You turn the pepper into a flat sheet, trim out ribs, then slice into thin strips.
It’s ideal when you want consistent, good-looking julienne without special tools.
Step-by-step
-
Trim the top and bottom.
Slice off the stem end and the bottom end just enough to expose the interior. You’re not trying to remove half the pepperjust open it up. -
Make one vertical cut and open it up.
Slice down one side from top to bottom, then gently “unroll” the pepper. -
Remove the core, seeds, and ribs.
Pull out the seed cluster and trim away the white ribs/membrane. (They’re edible, but they’re bitter-ish and create uneven strips.) -
Lay it skin-side down and flatten.
Press it gently so it sits stable. If it’s still curving, cut it into smaller panels. -
Slice into julienne strips.
Cut long, even strips about 1/8-inch wide. For fajitas, you can go slightly thicker. For salads or spring rolls, go thinner.
Why this works
Once the pepper is flat, you control thickness with your knife, not with luck. You also remove ribs early, which helps your strips stay flexible
(instead of snapping into random trapezoids).
Best uses
- Fajitas and sheet-pan dinners (consistent cook time)
- Stir-fries (fast sauté, even bite)
- Salads and slaws (pretty, crunchy strands)
Method 2: The “Cut Around the Core” Plank Method (Fast + Minimal Seeds)
If seeds drive you up the wall (or across the kitchen floor), this method is for you. Instead of opening the pepper and wrestling the core,
you slice off the outer “walls” in neat panels and leave the core behind like it’s a bad date.
Step-by-step
-
Slice off the top and bottom.
This gives you stable ends and a clear view inside. -
Stand the pepper upright.
Place it on a cut end so it’s stable. -
Slice down the sides to remove flat panels.
Cut down along the pepper’s natural curves, avoiding the core and white ribs. You’ll end up with several flat “walls.” -
Trim any remaining rib/membrane.
Quick swipe with your knife, done. -
Julienne the panels.
Lay each panel skin-side down and slice into thin matchsticks.
Why this works
You avoid the fiddliest partcutting around a slippery, curved interiorand you get flat pieces immediately, which makes julienne slicing easier.
It’s also a great “confidence builder” method if peppers feel awkward under a knife.
Pro tip: the “upside-down” variation
Some cooks like starting from the bottom (stem side down) and separating the pepper along its natural grooves so the core stays attached to the stem end.
It’s quick, clean, and often results in fewer runaway seedsespecially helpful when you’re meal prepping a pile of peppers.
Method 3: The Mandoline Julienne (Ultra-Uniform, Ultra-Respectful-of-the-Blade)
Want perfect matchsticks like you’re prepping for a cooking show montage? A mandoline with a julienne blade gets you there fast.
It’s also the method most likely to turn “pepper prep” into “why am I holding a paper towel on my hand,” so let’s do it safely.
Step-by-step (safely)
-
Prep the pepper into flat panels.
Use Method 1 or 2 to remove the core and ribs, then flatten panels. Mandolines love flat pieces. -
Set up the mandoline and stabilize it.
Use the non-slip feet or set it on a damp towel so it doesn’t skate around. -
Use a hand guard or a cut-resistant glove (ideally both).
Keep fingers away from the blade. This is not the time for bravery. -
Slide steadilydon’t rush.
Smooth, controlled passes produce better strips and fewer “oops” moments. -
Stop early.
When the pepper piece gets small, stop. Yes, even if you could “totally get one more pass.” That’s how the mandoline wins.
When a mandoline is worth it
- You’re making a big batch (meal prep, party platters, slaws)
- You want extremely consistent strips for quick, even cooking
- You’re comfortable using safety gear and slowing down
How Thick Should Julienned Pepper Strips Be?
Thickness isn’t just aestheticsit changes how peppers cook and how they feel in a bite.
Here are practical guidelines:
- Fine julienne (about 1/16-inch): spring rolls, delicate salads, fancy garnishes, quick pickles.
- Standard julienne (about 1/8-inch): stir-fries, fajitas, sautéed peppers and onions, noodle bowls.
- Thicker strips: roasting, sheet-pan meals, or when you want peppers to stay a little crisp-tender.
Common Mistakes (And How to Fix Them)
1) Your pepper won’t lie flat
Cut it into smaller panels. A smaller piece is easier to flatten and safer to slice.
2) You’re fighting the ribs
Trim them out first. White ribs make your knife ride up and down, which creates uneven strips and accidental “pepper confetti.”
3) Your strips are uneven
Slow down and use a guide: line the pepper edge up with your knuckles (claw grip) and aim for repeated, consistent spacing.
Uniformity improves quickly with practicethis is one of those “two peppers today, and you’ll be noticeably better” skills.
4) Seeds keep escaping
Try Method 2 (cut around the core) or the upside-down approach. Also, pat the pepper drywet seeds cling to everything like they pay rent.
Best Ways to Use Julienned Peppers
- Fajitas: peppers and onions julienned to a similar thickness cook at the same speed.
- Stir-fries: matchsticks soften quickly without turning mushy.
- Salads + slaws: thin strips distribute crunch in every forkful.
- Spring rolls: fine julienne makes neat bundles and easier biting.
- Pizza or flatbreads: thin strips roast nicely and don’t puddle water as easily as chunky pieces.
- Snack plates: slightly thicker julienne = great for dipping (hummus, ranch, guac).
Storage and Meal-Prep Tips (So Your Peppers Don’t Turn Sad)
For whole peppers
Store whole peppers in the refrigerator for best quality. Keep them drytoo much moisture speeds up spoilage.
If you’re not using them right away, wait to wash them until you’re ready to cut.
For cut/julienned peppers
Store cut peppers in an airtight container in the fridge. To manage moisture (the enemy of crispness), line the container with a paper towel or add one on top.
For best quality, use within a few days.
For freezing
Julienned peppers freeze well for cooked dishes (stir-fries, soups, fajitas). Freeze on a sheet pan first so the strips don’t fuse into one icy pepper brick,
then transfer to a freezer bag. Frozen peppers soften as they thaw, so they’re best for cooking rather than raw salads.
Quick Troubleshooting: “What If…”
- …I need pepper halves for stuffing? Skip Method 2. Use Method 1 but keep the pepper halved.
- …I’m julienning hot peppers? Consider gloves, avoid touching your face, and keep seeds contained. The “cut-around-the-core” method can work on larger chiles.
- …my knife feels like it’s tearing instead of slicing? It’s probably dull. A sharp knife is safer and makes cleaner cuts.
of Real-World Julienne Pepper “Experience” (The Stuff You Only Learn Mid-Recipe)
Most people don’t decide to julienne peppers because they woke up craving geometry. It usually happens like this:
you’re making fajitas, the skillet is hot, you’re feeling confident… and then you realize your pepper pieces are
three different shapes and one of them is basically a pepper boulder. Suddenly, “julienne” sounds less like a fancy word
and more like a lifeline.
The first real-world lesson: peppers are slippery little athletes. If your cutting board moves even a tiny bit,
the pepper will take that as permission to slide around like it’s auditioning for a soap commercial. A damp towel
under the board fixes this instantly, and it feels like a secret chef trick even though it’s basically “add friction.”
The second lesson: seeds are chaos with a crisp exterior. The moment you slice the pepper the “wrong way” (which mostly means:
you cut through the core and then shake the pepper around like a maraca), the seeds go everywhere. They land on your board,
your counter, and somehow, spiritually, in your socks. That’s why Method 2 is such a sanity-saver on busy nights: you keep the core intact,
slice off clean panels, and the seeds stay mostly where they belonginside the pepper’s “trash core” that you can discard in one go.
The third lesson: thickness is the difference between “perfect sauté” and “why is one strip burned and another still crunchy?”
If you’ve ever had peppers that were half caramelized and half raw, it wasn’t a moral failingit was uneven cuts.
Once you aim for a consistent 1/8-inch strip, your pan behaves better. You also get better flavor: thinner strips soften quickly and pick up seasoning,
while thicker strips hold more crunch. So if you’re cooking fajitas fast and hot, go standard julienne. If you’re building a fresh salad or spring rolls,
go finer so every bite gets a little snap without feeling like you’re chewing a seatbelt.
And yes, the mandoline is amazingright up until it isn’t. The best “experienced cook” move is stopping early.
When the pepper piece gets small, you quit while you’re ahead. You can always finish the last bit with a knife.
Nobody ever says, “Wow, these peppers are delicious… but I wish you’d risked your fingertips for the final two inches.”
Finally, don’t underestimate the snack factor. Those little curved leftover pieces? Slice them thicker and dip them in hummus.
Pepper prep gets a lot more cheerful when your cutting board comes with appetizers.
Conclusion
If you want reliable julienned peppers, the secret isn’t fancy techniqueit’s choosing a method that keeps the pepper flat and stable.
Use the classic unroll-and-slice approach for maximum control, the cut-around-the-core plank method for speed and fewer seeds,
or a mandoline when you want super-uniform strips (and you’re willing to treat the blade with the respect it deserves).
Once you get the hang of it, julienning peppers becomes one of those “why didn’t I always do it this way?” habits.


