Table of Contents >> Show >> Hide
- Why Tying Down a Canopy Tent Matters
- 1. Use Canopy Weights
- 2. Stake the Tent into the Ground
- 3. Add Guy Lines or Ratchet Straps
- The Smartest Setup Usually Uses More Than One Method
- Common Mistakes to Avoid
- Examples of the Best Method for Different Situations
- Experience and Lessons Learned from Tying Down Canopy Tents
- Final Thoughts
- SEO Tags
Note: Body-only HTML for direct web publishing.
A canopy tent is one of those purchases that feels brilliantly simple right up until the wind starts acting like it has a personal grudge. One minute your pop-up tent is providing glorious shade for burgers, crafts, or soccer snacks. The next minute it is shimmying, rattling, and auditioning for a low-budget disaster movie. That is why learning how to tie down a canopy tent is not just a nice little bonus skill. It is the difference between a calm outdoor setup and a flying aluminum headache.
The good news is that securing a canopy tent does not require wizardry, a construction degree, or a wrestling match with the frame. In most situations, three methods do the heavy lifting: weights, stakes or ground anchors, and guy lines or ratchet straps. Used properly, these methods help keep your canopy stable on grass, dirt, asphalt, concrete, and even sand. Used together, they make your setup far more dependable.
In this guide, you will learn the three best ways to tie down a canopy tent, when to use each one, and which mistakes tend to turn “outdoor convenience” into “why is my tent in the neighbor’s yard?” You will also get practical examples, setup tips, and real-world experience so you can secure your canopy like someone who has already learned the hard way, without actually learning the hard way.
Why Tying Down a Canopy Tent Matters
People often think the weight of the frame alone will keep a canopy in place. That is an adorable theory. Unfortunately, wind does not care. Even a sturdy frame can shift, lift, or collapse if it is not anchored correctly. A canopy top acts like a sail, which means a gust can create surprising force in a very short time.
That risk gets bigger in real-life situations: a parking-lot vendor booth, a backyard birthday party, a beach picnic, or a sports sideline setup where the ground is uneven and the weather changes fast. Tie-down methods help by resisting lift, reducing sway, and keeping each leg from skating across the surface. In other words, they keep your tent where your tent is supposed to be: directly above your head, not halfway to the snack table.
Before using any method, keep three rules in mind. First, secure all four legs, not just the two that seem “most exposed.” Second, attach your tie-down system as soon as the canopy goes up, not after the wind starts. Third, always follow the lower limit between the manufacturer’s instructions and the venue’s rules. If conditions get rough, take the tent down. Pride is cheaper than replacing a busted frame.
1. Use Canopy Weights
The first and most common way to tie down a canopy tent is with canopy weights. This is the go-to method for hard surfaces where stakes are not practical, such as concrete, asphalt, patios, driveways, parking lots, and event plazas. If you have ever set up at a street fair, school fundraiser, or farmers market, this is usually your first line of defense.
How canopy weights work
Weights add downward force at each leg, which makes the tent harder to lift and less likely to slide. The best options are purpose-built canopy weights, weight plates, filled weight bags, or heavy sandbags designed to wrap tightly around the frame legs. The key word there is tightly. A heavy object sitting near the tent is not the same as a weight attached to the tent.
Best situations for weights
- Parking lots and sidewalks
- Concrete patios
- School or church events
- Street markets and vendor booths
- Any location where ground penetration is not allowed
How to do it right
Start by placing one weight on each leg. Make sure the weight sits low and snug against the leg, not dangling awkwardly like it lost a bet. If you are using weight bags, fill them fully and fasten them securely with straps or hook-and-loop closures. If you are using metal or molded plates, lock them around the leg base so they cannot slide off if the tent shifts.
For a basic backyard or calm-weather setup, properly attached weights may be enough. For breezier conditions, weights should be combined with guy lines or straps. That is especially true for pop-up canopies with tall legs and large tops, since more height usually means more wobble. Lowering the canopy height also helps because a shorter profile catches less wind.
Pros of using weights
- Excellent for hard surfaces
- Fast to install and remove
- No holes in the ground
- Cleaner and more event-friendly than improvised anchoring
Cons of using weights
- Bulkier to transport than stakes
- Can create trip hazards if placed carelessly
- May not be enough alone in gusty conditions
One more thing: avoid the lazy “I’ll just use whatever is lying around” method. Random bricks, half-filled jugs, and wobbly concrete chunks may look creative, but they are often less secure and more hazardous. If the goal is safety, “kind of heavy” is not a professional standard.
2. Stake the Tent into the Ground
The second way to tie down a canopy tent is by using stakes or ground anchors. This is usually the strongest and simplest method when you are setting up on grass, dirt, compact soil, or another penetrable surface. On the right ground, a well-staked canopy can be impressively stable.
Why stakes are so effective
Stakes resist both lifting and shifting. Instead of just adding weight, they create resistance against the ground itself. When used at each leg and paired with straps or ropes, they can hold a canopy much more securely than loose objects placed around the frame.
Best situations for stakes
- Backyards and parks
- Sports fields
- Campgrounds
- Fairgrounds with dirt or grass surfaces
- Any event site where ground anchoring is allowed
How to stake a canopy properly
Use heavy-duty stakes that match the surface. Standard pegs may work for small recreational setups, but longer or spiral-style anchors usually perform better in looser soil or sand. Drive the stake into the ground at an outward angle rather than straight down. This improves holding strength and helps the anchor resist pull.
Once the stake is in place, connect it to the tent leg or the tie-down point with a strong strap or rope. Keep the connection taut, but do not crank it so tight that you bend the frame. Repeat on all four corners. Yes, all four. The tent does not award bonus points for optimism.
Pros of staking
- Strong holding power on suitable ground
- Affordable and easy to carry
- Great for windy open spaces
- Works well with guy lines for extra support
Cons of staking
- Not usable on concrete or asphalt
- May be prohibited at some venues
- Performance depends on soil quality
- Poorly placed stakes can create tripping hazards
Also, be smart about what is under the surface. Some venues require permission before staking because of irrigation lines, cables, or utilities. The last thing you want is to “secure” your tent by accidentally introducing your stake to something expensive underground.
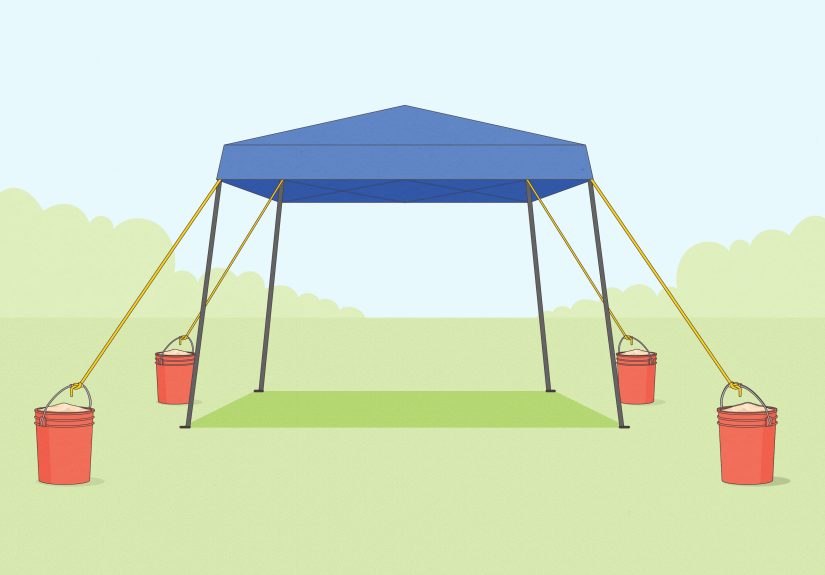
3. Add Guy Lines or Ratchet Straps
The third way to tie down a canopy tent is by using guy lines, tie-down ropes, or ratchet straps. Think of this method as the stabilizer. While weights and stakes anchor the legs, guy lines help control sway and reduce side-to-side movement caused by gusts.
How guy lines help
Guy lines pull outward from the frame, which spreads force more evenly and makes the canopy less likely to rock, twist, or lift at the corners. Ratchet straps do something similar, but with a more rigid and adjustable connection. They are especially useful when you want a taut, dependable hold.
Best situations for guy lines or straps
- Open fields and breezy parks
- Beach setups
- Vendor booths in exposed areas
- Larger canopies with more wind exposure
- Any setup where you want to reinforce weights or stakes
How to install them
Attach the line to a strong point on the canopy frame, preferably near the upper corners. Avoid relying only on weak fabric edges unless the canopy is specifically designed for that attachment. Run the line outward at an angle to a stake, anchor, or heavy weight. Tighten it enough to steady the frame without distorting it.
Use one line at each corner when possible. On windy days, this setup can make a dramatic difference. A tent with leg weights and corner guy lines feels planted. A tent with no side stabilization often looks like it has had three cups of coffee too many.
Pros of guy lines and straps
- Excellent for reducing sway
- Great add-on to weights or stakes
- Useful in wind-prone areas
- Flexible for many surfaces and setups
Cons of guy lines and straps
- Need space around the tent
- Can create trip hazards if poorly placed
- Require more setup time
- Less effective when used alone without solid anchors
The Smartest Setup Usually Uses More Than One Method
If you want the short version, here it is: the safest answer is often not choosing one method. It is combining them. On grass, use stakes plus guy lines. On asphalt, use weights plus ratchet straps. On sand, use heavy sandbags plus spiral anchors and lines. A canopy tent does not care about your minimalism. It cares about physics.
That is why experienced users rarely rely on a single point of security when conditions are uncertain. Redundancy is your friend. If one anchor loosens, the others help keep the structure stable long enough for you to fix it or take the canopy down.
Common Mistakes to Avoid
- Waiting too long: Anchor the tent during setup, not after the wind picks up.
- Securing only two legs: All four corners need attention.
- Using weak cords: Thin cord and bargain-bin string are not tie-down systems.
- Ignoring the weather: If strong gusts or storms are approaching, take the canopy down.
- Attaching weights badly: Weights should be secured to the legs, not merely parked nearby.
- Creating trip hazards: Keep straps neat, visible, and outside normal walk paths.
- Leaving it up overnight: A temporary shelter should not become an overnight gamble.
Examples of the Best Method for Different Situations
Backyard cookout on grass
Use stakes at each leg, then add guy lines at the corners if there is any noticeable breeze. Keep the canopy at a moderate height and check the lines once or twice during the day.
Farmers market on pavement
Use dedicated canopy weights on every leg and add ratchet straps if the site is exposed. Keep the weights tight to the frame and make sure customers are not stepping over loose lines.
Beach shade setup
Sand changes everything. Use heavy sandbags attached low on the legs, plus spiral sand anchors or long stakes and guy lines. Beaches are famous for beautiful views and absolutely no mercy when it comes to gusts.
Soccer sideline tent
If you are on grass, stakes are usually the cleanest solution. If you are on a track or paved area, weights are essential. Since open fields can be windy, adding corner lines is a smart move even when the day starts calm.
Experience and Lessons Learned from Tying Down Canopy Tents
Anyone who uses canopy tents more than once eventually becomes a little more humble, a little more organized, and a lot less trusting of “light breeze” forecasts. One of the biggest lessons people learn is that the weather can look friendly while still being sneaky. A calm morning can turn into a gusty afternoon with almost no warning, especially in open parking lots, beaches, school fields, and sports complexes. That is why experienced canopy users stop asking, “Do I really need to anchor this?” and start asking, “What is my backup if the wind picks up?”
Another common experience is realizing that setup speed is not the same thing as setup quality. Pop-up tents are famous for being fast, which is great, but that convenience tricks people into thinking the job is done once the frame clicks open. It is not. The real setup is not finished until the legs are weighted, the stakes are in, or the lines are tightened. Veteran vendors and event regulars usually build this into their routine. Tent up. Anchor immediately. Then tables, signs, snacks, and whatever else makes the day feel civilized.
A lot of people also discover that surfaces matter more than they expected. Grass looks easy until the soil is soft from rain and the stakes loosen. Pavement seems simple until you remember you cannot drive anything into it. Sand looks fun until your canopy starts acting like it wants to vacation in another zip code. With time, users learn to bring more than one anchoring option. That usually means a kit with stakes, straps, and weights rather than betting everything on a single method.
There is also a strong practical lesson about neatness. Messy tie-downs do not just look sloppy. They cause problems. Loose ropes become trip hazards. Weights placed too far from the legs bump into feet and carts. Twisted straps rub against the frame and create awkward tension. People who use canopy tents often get much better at clean, low, deliberate setups because they realize safe anchoring is part engineering and part housekeeping.
And then there is the emotional lesson, which is both funny and slightly painful: almost everyone becomes serious about tent anchoring right after one bad moment. Maybe a sudden gust lifted one leg. Maybe a frame scooted across the pavement at a craft fair. Maybe a friend had to dive heroically for the snack table while someone shouted, “Grab the canopy!” Once that happens, even the most casual user becomes the person who says, “Hold on, we are not done until all four corners are secure.”
In the end, the best experience-based advice is simple. Treat a canopy tent like temporary equipment that deserves permanent respect. Bring the right anchors. Use more security than you think you need. Watch the weather. Recheck your setup during the day. And if the conditions start turning ugly, take the tent down before it makes the decision for you. That is not being paranoid. That is just being the only person at the event whose canopy is still exactly where they left it.
Final Thoughts
If you want to know how to tie down a canopy tent the right way, the answer comes down to three reliable methods: use weights, use stakes or ground anchors, and use guy lines or ratchet straps. Which one works best depends on the surface, the weather, and the kind of canopy you own. In many cases, the most secure setup uses a combination of all three.
A well-anchored canopy tent is safer, more stable, and far less stressful to use. That means fewer surprises, fewer repairs, and a much better chance that your outdoor event will be remembered for the food, fun, or sales instead of the airborne shade structure. And honestly, that feels like a pretty good goal.


