Table of Contents >> Show >> Hide
- Why Ranch Houses and Garages Make Such a Good Creative Pair
- The Case Study: A Santa Ynez Garage Becomes a Real Art Studio (Not a Sad Folding Table)
- The California-Creative Formula: How to Turn Your Garage into a Legit Art Studio
- 1) Decide what “studio” means for you (and be specific)
- 2) Permits and code: the unsexy step that saves your future self
- 3) Make the garage comfortable year-round (without turning it into a hermetically sealed box)
- 4) Light it for making art, not for finding a lost screwdriver
- 5) Plan power and water like a grown-up (future you will send a thank-you note)
- 6) Storage that shows your tools (and hides the chaos)
- 7) Ventilation and studio safety: protect your lungs, protect your work
- Design Details That Feel “California” (Without Becoming a Theme Park)
- Conclusion: The Best Studio Is the One You’ll Actually Use
- Experiences: What It Really Feels Like to Work in a Garage-Turned-Studio (The Good, the Funny, the Fixable)
In California, garages have a second job description. Yes, they can shelter cars. But they also moonlight as woodshops, surfboard warehouses, pottery labs, and the occasional “I’m totally going to start a band” rehearsal space. The best conversions don’t fight that identitythey lean in and make the garage the most useful room on the property.
One of my favorite examples comes from Santa Ynez in Santa Barbara wine country, where a multi-car garage in a 1971 ranch house renovation became a bright, organized art studiowithout losing the garage’s original “do stuff here” attitude. The result is pure California Creative: airy light, honest materials, and a layout that says, “Yes, you can make a mess. That’s literally the point.”
Why Ranch Houses and Garages Make Such a Good Creative Pair
Ranch homes are famously practical: typically single-story, low-slung, and designed to connect indoors and outdoors with big windows and easy flow. That simplicity is exactly why they’re so adaptable. When you add a creative workspace, you’re not disrupting a tower of tiny roomsyou’re extending a house style that already values openness and everyday use.
Garages, especially in ranch properties, also tend to be generous: wider footprints, straightforward rooflines, and fewer precious finishes to “protect.” That’s great news for an art studio. A studio needs three things more than it needs fancy trim: space, light, and permission to be imperfect.
The Case Study: A Santa Ynez Garage Becomes a Real Art Studio (Not a Sad Folding Table)
In the Santa Ynez project, one stall of a redesigned four-car garage was transformed into an art studio while the overall building still functioned asbrace yourselfa garage. Historically, the structure had a reason to be oversized: past owners used it for building and restoring horse-drawn carriages and wagons. Translation: the building already understood big, messy projects.
Smart move #1: Build the studio like a workspace, not a guest room
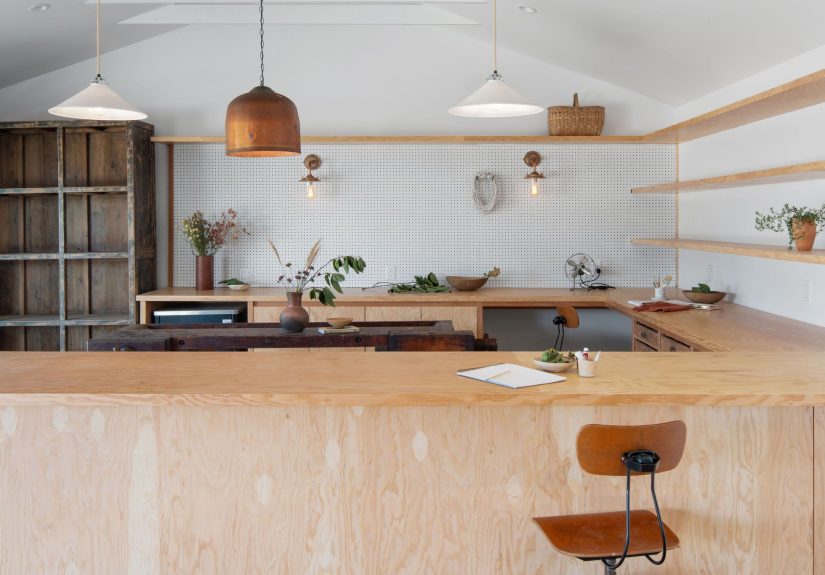
The studio’s backbone is a wrap-around counter with built-in storage made from marine plywood. That choice is quietly brilliant: marine plywood is durable and stable, and it keeps the vibe groundedclean, modern, and a little rugged (like a studio should be). The back wall uses classic pegboard, which is basically the unsung hero of creative spaces: flexible, visible, and easy to reconfigure when your tools multiply (they will).
Smart move #2: Mix “can take a beating” surfaces with warm, lived-in pieces
This studio doesn’t feel clinical. Patinated and vintage elements add warmth: an antique work table, repurposed drawers reincarnated into new cabinetry, and metal shelving that looks like it could survive an earthquake and still hold your paint jars in alphabetical order.
The original concrete slab was finished with a matte gray epoxyanother practical upgrade that matters more than people realize. Art studios are spill zones. A sealed floor helps with cleanup, reduces dusting, and makes the space feel intentional instead of “temporarily functional for the last eight years.”
Smart move #3: Treat heat like the villain it is
Anyone who has ever stepped into a closed garage on a warm afternoon knows the truth: garages can turn into toaster ovens. This project addressed that with a cupola designed to let heat escape and provide natural ventilation. It’s a simple idea with a big payoffespecially in climates where the studio might otherwise be usable only between “morning coffee” and “the sun chose violence.”
On the exterior, the garage was clad in shou sugi ban (charred wood) with a standing seam metal roof, helping the building visually recede into the landscape while still feeling crisp and modern.
The California-Creative Formula: How to Turn Your Garage into a Legit Art Studio
You don’t need a four-car garage or a design team to borrow the best ideas. Whether you’re carving out one bay or converting the whole thing, the winning formula is the same: define the studio zone, control the climate, upgrade light, and design for real work.
1) Decide what “studio” means for you (and be specific)
“Art studio” can mean a lot of things, and your definition determines the build.
- Painting & drawing: prioritize cleanable surfaces, vertical storage, and consistent lighting.
- Photography: prioritize wall space, blackout options, power, and flexible backdrops.
- Ceramics or sculpture: prioritize dust control, heavy-duty flooring, ventilation, and storage for materials.
- Mixed media: plan separate “clean” and “dirty” zones so you’re not sanding next to fresh canvases.
A helpful trick: write down the three messiest things you do. Design for those first. Everything else is easier.
2) Permits and code: the unsexy step that saves your future self
If you’re changing how a garage is usedespecially if you’re adding electrical circuits, plumbing, insulation, new windows/doors, or conditioning the spaceyour city may require permits and plan review. Many California jurisdictions publish garage conversion requirements and emphasize that multiple permits can apply (building, mechanical, plumbing, electrical, and sometimes fire).
Even if you’re not building a full ADU, garage-to-habitable conversions often trigger common upgrades that show up in garage conversion guidelines: structural changes at openings, moisture barriers at slabs, foundation considerations, insulation, and energy-code compliance when the space becomes conditioned.
Translation: before you buy a single sheet of plywood, call your local building department (or check their published handouts) and learn what counts as “habitable” or “conditioned” space in your area. It’s not a creativity killerit’s how you avoid the plot twist where your “studio glow-up” becomes a “please undo everything” situation.
3) Make the garage comfortable year-round (without turning it into a hermetically sealed box)
Comfort is what makes a studio usable. And usability is what keeps your supplies from migrating back into the dining room. Garage conversion guidance commonly highlights these upgrades:
- Moisture control: garages sit on slabs that can wick moisture; consider an appropriate moisture barrier before new flooring.
- Insulation & air sealing: if you’re heating/cooling the studio, insulating and sealing gaps improves comfort and energy efficiency.
- Structural reality check: adding windows or replacing a garage door opening can require reinforcement.
If your goal is “pleasant studio,” not “seasonal storage unit,” treat the envelope (walls/ceiling/doors) like it matters because it does. Air leaks and poor insulation are basically the reason garages feel like refrigerators in winter and pizza ovens in summer.
4) Light it for making art, not for finding a lost screwdriver
Garages are usually lit like interrogation rooms: one bulb, one switch, infinite regret. An art studio needs layered lighting: natural light where possible, plus consistent artificial light so your colors don’t change every time a cloud strolls by.
- Natural light: add windows or a glazed door if allowed; diffuse harsh light with shades so you can control glare.
- Task lighting: put adjustable lights at your work surfaces, especially for detail work.
- General lighting: use multiple ceiling fixtures to reduce shadows and “spotlight drama.”
Pro tip: photograph your work in the space at different times of day. If your paintings look like they’re changing moods, your lighting plan needs help.
5) Plan power and water like a grown-up (future you will send a thank-you note)
Studios quietly become plug-heavy: lights, chargers, printers, small tools, fans, maybe a space heater, maybe a small kiln (depending on your medium). If you’re upgrading electrical, think in zones: one set of outlets near the main workbench, another near storage or photography backdrops, and dedicated circuits where needed.
If you paint or use inks, a utility sink is a game-changer for cleanupbut follow local rules about disposal and don’t treat drains like magical portals where paint sludge disappears. “Out of sight” is not the same as “not a problem.”
6) Storage that shows your tools (and hides the chaos)
The Santa Ynez studio nails a principle that works everywhere: make storage part of the architecture. Built-ins, pegboards, drawers, and long counters create a home for supplies so the room stays ready for work.
A simple storage strategy that keeps things sane:
- Visible storage for tools you grab daily (brushes, cutters, cameras, tape).
- Closed storage for cluttery or dusty items (paper stacks, extra frames, backup supplies).
- One “project parking” shelf so works-in-progress don’t take over every flat surface you own.
7) Ventilation and studio safety: protect your lungs, protect your work
Good ventilation matters even for “low-odor” projects. Painting, adhesives, sprays, solvents, wood dust, resin fumesdifferent mediums, same reality: your studio should have a plan for fresh air and contaminant control.
Common, practical habits include using fresh air and fans during painting projects, keeping lids on chemicals, and continuing ventilation after painting so vapors can clear. If you use oil paints or pigments, follow manufacturer safety guidance on handling materials and avoiding dust exposure from sanding or dry pigments.
And yes, a cupola is a gorgeous architectural solutionbut even a basic exhaust strategy and cross-ventilation can dramatically improve comfort and safety.
Design Details That Feel “California” (Without Becoming a Theme Park)
California style is less about a specific look and more about a specific energy: light, ease, and a little bit of “we’ll deal with it later” optimismbalanced by smart planning so later never becomes never.
- Keep finishes honest: plywood, concrete, and metal can look intentional when they’re clean and well-detailed.
- Add warmth with patina: vintage tables, copper accents, and repurposed storage make studios feel human.
- Connect to outdoors: even one door with glass can shift the room from “garage” to “creative space.”
- Make heat escape: high vents, operable windows, fans, and smart shading keep the studio usable.
The goal isn’t to pretend the studio isn’t a former garage. The goal is to give it a new identityone where making something is easier than postponing it.
Conclusion: The Best Studio Is the One You’ll Actually Use
A ranch house garage turned art studio is a very California kind of upgrade: it’s practical, flexible, and deeply personal. The Santa Ynez example works because it treats creativity like a daily activity, not a special occasion. Durable counters, built-in storage, breathable ventilation, and a floor that can handle spills all send the same message: Come in. Make something. Clean up later. Repeat.
If you’re planning your own garage conversion ideas, start with how you work, then build the room around that reality: light where you need it, storage where you drop things, comfort that lasts past noon, and code compliance so you can enjoy the space without a paperwork hangover.
Experiences: What It Really Feels Like to Work in a Garage-Turned-Studio (The Good, the Funny, the Fixable)
People don’t convert garages into studios because it’s trendy. They do it because creative work needs a home that can tolerate the weirdness of making things. And the first “experience” almost everyone reports is not a spiritual awakeningit’s relief. Relief that the kitchen table is no longer covered in paint water. Relief that you can leave a project out overnight without doing the nightly ritual of “shove everything into a box and pretend you’re organized.”
That relief turns into momentum fast. Once your brushes, paper, cameras, or clay tools live in one place, you spend less time setting up and more time working. Many artists describe the first week in a real studio as oddly productive because the barrier to starting is suddenly tiny: walk in, flip on lights, begin. No scavenger hunt for a missing ruler. No “Where did I put the tape?” (It’s on the pegboard. Of course it’s on the pegboard. You’re a new person now.)
Then reality shows upusually as temperature. The garage is honest about its origins. On hot days, it can feel like you’re creating inside a hair dryer. On cold mornings, the floor reminds you it’s basically a slab of outdoors with a roof. That’s why comfort upgrades become the second big “experience” people remember. The moment insulation goes in, drafts get sealed, and ventilation gets planned, the space stops feeling like a compromise and starts feeling like a studio you can depend on.
Lighting is the next surprise. Plenty of folks begin with “a bright bulb” and quickly realize that one overhead fixture is great for parking a car and terrible for color mixing. After a few paintings that look perfect in the studio and haunted in daylight, people start adding layered lighting: general lights across the ceiling, task lights near the workbench, and better control over glare. The experience here is almost universal: once lighting improves, confidence improves. You trust your eyes again.
Storage is where the studio becomes emotionally supportive. That sounds dramatic until you’ve lived the alternative. When supplies are stacked in random bins, your brain reads the mess as “unfinished business,” and it’s exhausting. When storage is visible and intentional drawers for small tools, shelves for paper, a dedicated spot for works-in-progressthe room feels calmer. People often describe this as “I didn’t realize how much the clutter was blocking me.” They start finishing projects more often, not because they suddenly gained superpowers, but because the environment stopped resisting them.
And yes, there’s humor in the day-to-day. A garage studio tends to become the household’s most magnetic room. Someone will wander in “just to look” and accidentally start rearranging your brushes like it’s a museum exhibit. Pets will claim the warmest patch of floor. Friends will say, “I wish I had a studio like this,” while standing next to a perfectly normal garage they could also convert if they stopped using it as a storage unit for 23 half-empty paint cans and a treadmill from 2016.
The best part of the experience, though, is identity. A garage turned art studio doesn’t just give you square footageit gives you a consistent place to practice being creative. Over time, people stop saying “I’m trying to paint more” and start saying “I’m working in the studio.” That small language shift is big. It means the space is doing its job: not just holding supplies, but holding the habit.


