Table of Contents >> Show >> Hide
- Quick Recipe Snapshot
- Why This Classic Chocolate Cake Works
- Ingredients
- Equipment You’ll Want
- Step-by-Step Instructions
- Make the Frosting
- How to Assemble Like a Calm Person
- Flavor Variations (Still Classic, Just Wearing Different Shoes)
- Ingredient Swaps (Because Life Happens)
- Troubleshooting: Fix the Usual Chocolate Cake Drama
- Storage and Make-Ahead Tips
- Serving Ideas
- Conclusion
- Kitchen Stories and Real-Life Experiences (About )
Every generation deserves one chocolate cake recipe that simply behaves: it mixes fast, bakes up fluffy and moist,
tastes deeply chocolatey, and doesn’t demand a fancy mixer or a culinary pep talk.
This is that cakethe “classic cocoa cake” style you’ve seen across America for decades, upgraded with a few smart (but still easy) moves.
Translation: You can make it on a random Tuesday, but it still feels worthy of birthdays, potlucks, and “I had a long week” therapy.
And yes, the batter will look thin at one point. That’s not a mistake; that’s chocolate science doing a little jazz hands.
Quick Recipe Snapshot
- Skill level: Beginner-friendly
- Time: 15 minutes prep + 30–35 minutes bake
- Makes: One 2-layer cake (two 8-inch rounds) or one 9×13-inch sheet cake
- Flavor profile: Classic, cocoa-forward, moist crumb, not overly sweet
Why This Classic Chocolate Cake Works
“Classic and easy” doesn’t mean boringit means smart.
This recipe is built around four reliable principles that show up again and again in beloved American chocolate cakes:
1) Hot coffee (or boiling water) “blooms” cocoa
When hot liquid hits cocoa powder, it dissolves stubborn clumps and pulls out deeper chocolate flavor.
Think of it like waking cocoa up with a warm shower.
Coffee is optional, but it’s a famous flavor booster: it deepens chocolate without making the cake taste like a latte.
2) Oil keeps the cake moist for days
Butter tastes amazing, but oil stays liquid at room temperatureso the crumb stays softer longer.
This is why many “forever moist” chocolate cakes lean on oil (sometimes paired with buttermilk for balance).
3) Buttermilk (or a simple substitute) makes it tender
Buttermilk’s acidity helps soften gluten (tender crumb) and works with baking soda for lift.
If you don’t have buttermilk, you can make a quick DIY version in minutes (details below).
4) One-bowl method = fewer dishes, fewer chances to overmix
Overmixing can turn cake crumb tough.
A quick, streamlined mixing method reduces the “oops-I-went-too-far” riskand keeps cleanup merciful.
Ingredients
This is a pantry-friendly cake. The only “special” thing is cocoa powderand even that can be the basic kind.
(If your cocoa has been living in the back of the cabinet since the last decade, consider replacing it. Cocoa does go stale.)
For the Chocolate Cake (Two 8-Inch Layers)
- 1 3/4 cups (210g) all-purpose flour
- 2 cups (400g) granulated sugar
- 3/4 cup (65–75g) unsweetened cocoa powder (natural or Dutch-process)
- 1 1/2 tsp baking powder
- 1 1/2 tsp baking soda
- 1 tsp fine salt
- 2 large eggs (room temperature is best)
- 1 cup (240ml) milk or buttermilk (see swaps)
- 1/2 cup (120ml) neutral oil (canola/vegetable/avocado)
- 2 tsp vanilla extract
- 1 cup (240ml) hot brewed coffee or boiling water
For Classic Chocolate Buttercream (Easy, Frosts Like a Dream)
- 1 cup (226g) unsalted butter, softened
- 1 cup (90–100g) unsweetened cocoa powder
- 4 cups (about 480g) powdered sugar, sifted if lumpy
- 1/3 to 1/2 cup (80–120ml) milk (add gradually)
- 2 tsp vanilla extract
- Pinch of salt (optional, but highly recommended)
Equipment You’ll Want
- Two 8-inch round cake pans (or two 9-inch pans; see bake-time note)
- Parchment paper (worth it for stress-free release)
- Mixing bowl + whisk
- Rubber spatula
- Cooling rack
Step-by-Step Instructions
Step 1: Prep the pans (future you will be grateful)
- Heat oven to 350°F.
- Grease two 8-inch round pans. Line bottoms with parchment circles, then grease again.
- Lightly dust with cocoa powder or flour; tap out excess.
Why cocoa powder instead of flour? Because flour can leave a pale “ghost ring” on dark cake.
Cocoa is the stealth option.
Step 2: Mix dry ingredients
In a large bowl, whisk together flour, sugar, cocoa powder, baking powder, baking soda, and salt until evenly combined.
Break up any cocoa lumps you see.
Step 3: Add wet ingredients (except the hot liquid)
Add eggs, milk (or buttermilk), oil, and vanilla. Whisk until smoothabout 30–45 seconds.
You’re aiming for “well mixed,” not “whipped into a foam.”
Step 4: Add hot coffee (or boiling water) last
Slowly pour in the hot coffee or boiling water while whisking.
The batter will become thin. This is normal and correct.
(If you’re feeling concerned, you’re officially participating in the proud tradition of chocolate cake anxiety.)
Step 5: Bake
- Divide batter evenly between the two pans.
- Bake for 30–35 minutes, or until a toothpick comes out with a few moist crumbs (not wet batter).
- Cool in pans 10 minutes, then turn out onto racks to cool completely.
Important: Don’t frost warm cake unless you want buttercream lava. (It’s delicious, but messy.)
Make the Frosting
Classic Chocolate Buttercream
- Beat softened butter until smooth and creamy (about 1 minute).
- Add cocoa powder and beat again until fully combined.
- Add powdered sugar in batches, alternating with a splash of milk, beating until fluffy.
- Beat in vanilla and a pinch of salt. Adjust consistency:
- Too thick? Add milk 1 tablespoon at a time.
- Too thin? Add powdered sugar 2–3 tablespoons at a time.
Optional flavor upgrade: Replace 2–3 tablespoons of the milk with cooled coffee.
It won’t taste like coffee; it’ll taste like “more chocolate than chocolate.”
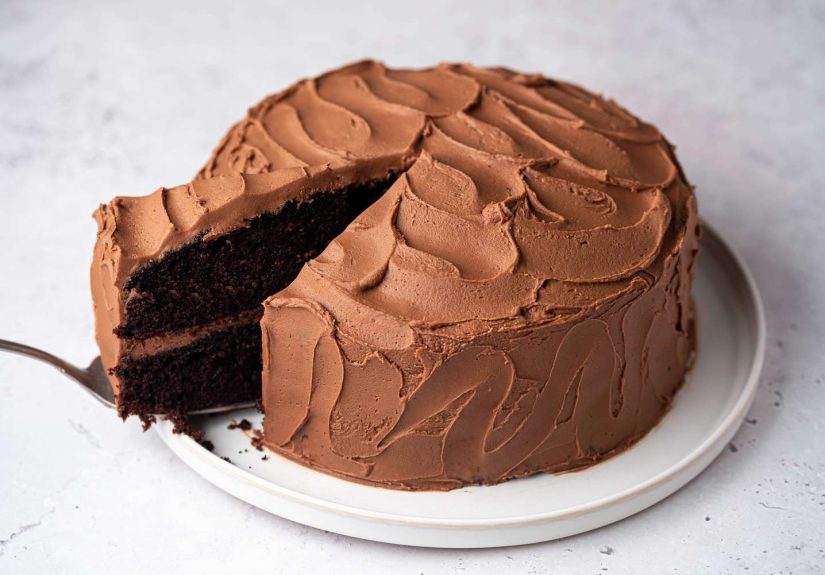
How to Assemble Like a Calm Person
- If the cake layers domed, level them gently with a serrated knife (snack on the scrapschef’s tax).
- Place one layer on a plate or stand. Add a generous swirl of frosting and spread evenly.
- Top with the second layer (cut-side down for a flatter top).
- Apply a thin “crumb coat,” chill 15–20 minutes, then add the final frosting layer.
Flavor Variations (Still Classic, Just Wearing Different Shoes)
1) Classic Devil’s Food Vibes
Add 1 teaspoon espresso powder to the dry ingredients and use coffee as the hot liquid.
The cake tastes darker and richer without extra effort.
2) Old-School Sheet Cake
Bake in a greased 9×13-inch pan for about 30–38 minutes.
Frost right in the pan. Bring it to gatherings and watch it disappear suspiciously fast.
3) Cupcakes for Maximum Convenience
Fill liners 2/3 full and bake at 350°F for 18–22 minutes.
This recipe usually makes about 24 cupcakes, depending on scoop enthusiasm.
4) “Bakery-Style” Ganache Finish
Skip buttercream and pour a simple ganache over the cooled cake:
heat 1 cup heavy cream until steaming, pour over 8 oz chopped chocolate, wait 2 minutes, whisk smooth.
Cool slightly, then pour.
Ingredient Swaps (Because Life Happens)
No buttermilk?
Make your own: add 1 tablespoon lemon juice or white vinegar to 1 cup milk.
Let sit 5 minutes, then use.
No coffee?
Use boiling water. Or add 1/2 teaspoon espresso powder to hot water if you want the flavor boost without brewing.
Natural vs. Dutch-process cocoa
Both can work here. Natural cocoa is more classic and slightly brighter; Dutch-process is smoother and darker.
Because this recipe includes both baking soda and baking powder (and dairy), it’s forgiving.
If your cake tastes “flat,” try switching cocoa brandscocoa quality matters more than people think.
Troubleshooting: Fix the Usual Chocolate Cake Drama
“My cake is dry.”
- Most common causes: overbaking, too much flour, or oven running hot.
- Quick save: brush layers with a light simple syrup (equal parts sugar and water, warmed to dissolve).
- Next time: spoon flour into the measuring cup and level it (don’t scoop and pack).
“My cake sank in the middle.”
- Likely causes: opening the oven early, underbaking, or expired leaveners.
- Fix: check baking powder/soda freshness; don’t open the oven until at least 25 minutes.
“My frosting is gritty.”
- Sift powdered sugar if it’s clumpy.
- Beat longer and add a tiny splash of milk to help dissolve sugar.
Storage and Make-Ahead Tips
- Room temp: Frosted cake keeps 2–3 days covered.
- Fridge: 4–5 days covered; let slices sit 20 minutes before serving for best texture.
- Freeze: Wrap unfrosted layers tightly; freeze up to 2–3 months. Thaw wrapped at room temp.
Serving Ideas
- Classic: a tall slice + cold milk.
- Grown-up classic: a pinch of flaky salt on top of the frosting.
- Celebration mode: sprinkles, shaved chocolate, or fresh berries for contrast.
Conclusion
This classic and easy chocolate cake recipe is the kind of dependable dessert you’ll make oncethen memorize by accident.
It’s moist without being heavy, chocolatey without being fussy, and flexible enough for layers, cupcakes, or sheet cake.
When a recipe has been loved in American kitchens for decades, it’s not just nostalgiait’s proof it works.
Kitchen Stories and Real-Life Experiences (About )
If you’ve ever made a classic cocoa-based chocolate cake for the first time, you’ve probably met the moment of panic:
you pour in the hot liquid and the batter suddenly looks like chocolate soup. Many home bakers pause right there,
whisk hovering midair, wondering if they just ruined dessert and also their reputation. The funny part?
That thin batter is exactly what makes this style of cake so reliably moist. It bakes up tender, not watery,
and the cocoa flavor comes through stronger because the heat helps the cocoa “wake up.”
Another very common experience: the cake smells so good in the oven that people start “checking on it”
every five minutesaka opening the door and letting heat escape. Classic chocolate cake can be forgiving,
but it’s still a cake, not a miracle. In real kitchens, the easiest upgrade isn’t a fancy ingredient;
it’s simply waiting until the cake has set before peeking. A lot of bakers learn this the hard way
after one sunken middle. The good news is that chocolate frosting is basically edible spackle. Even if a layer dips,
you can level it, frost it, and suddenly everyone calls it “rustic.”
Frosting brings its own set of relatable moments. Many people expect buttercream to be instantly silky,
but in practice you often have to “tune” itlike adjusting a guitar string. Too thick? Add milk by the tablespoon.
Too loose? Add powdered sugar. And if you taste it and think, “Wow, sweet,” the pinch of salt is the secret handshake
that turns sugary into balanced. It’s one of those small changes that makes a homemade cake taste more like
something you’d proudly carry into a party rather than quietly eat over the sink.
Then there’s the classic layer-cake rite of passage: the first time you try to flip a cake out of the pan and it sticks.
That experience converts people into parchment-paper believers for life. In fact, you’ll hear many bakers say the “real”
difference between a calm cake day and a chaotic cake day is lining the pans. Once you’ve had a perfect releaseclean,
intact layersfrosting becomes fun instead of frantic.
And finally, the most universal experience: chocolate cake gets better when shared. It’s the dessert that shows up for birthdays,
breakups, promotions, school events, and “just because.” People remember the feeling of being handed a slice more than they remember
whether you used Dutch-process or natural cocoa. So if you’re aiming for perfect, aim for perfectly enjoyedand keep this recipe
in your back pocket for the next time you need a win that tastes like chocolate.


