Table of Contents >> Show >> Hide
- Why DIY Cement Planters Are Worth the Mess
- Tools and Materials You’ll Need
- Step-by-Step: How to Make a Simple Bucket Cement Planter
- Make Your Planter Plant-Friendly: Drainage, Sealing, and Soil
- Hometalk-Style Cement Planter Ideas to Try
- Common Cement Planter Problems (and How to Fix Them)
- DIY Cement Planter | Hometalk – Real-World Experience
If you’ve ever scrolled through Hometalk and thought, “Wait, they made that out of cement?” welcome, friend. DIY cement planters look fancy and expensive, but they’re basically a science experiment with a bag of mix, some containers, and a bit of patience. Once you understand the basics, you can turn recycling-bin junk into modern, minimalist planters that look like they came straight out of a high-end garden shop.
In this guide, we’ll walk through how to make a simple cement planter using everyday molds (think buckets or plastic containers), plus smart tips for drainage, sealing, and plant care. Then we’ll lean into the Hometalk spirit with creative ideas like towel-draped planters and quirky shapes and finish with real-world, hands-on experience so you know what to expect the first time you pour.
Why DIY Cement Planters Are Worth the Mess
Before you commit to hauling a bag of cement home, it helps to know what you’re getting out of this project:
- Durability: Cement planters hold up outdoors in sun, rain, and wind far better than thin plastic pots.
- Modern style on a budget: That clean, concrete look you see in designer catalogs? You can get it for a fraction of the price with one bag of mix and some creativity.
- Custom size and shape: Want a long trough for a balcony railing or a tall cylinder for a fiddle-leaf fig? Just choose different molds.
- Fun to decorate: Cement takes paint, limewash, stain, and even carved texture beautifully once it’s cured.
- Heavy = stable: Cement planters don’t blow away in a storm and are perfect for tall plants that like a sturdy base.
Yes, cement is dusty, messy, and a little intimidating at first but once you try it, you’ll start looking at every container in your house and thinking, “Could this be a planter mold?”
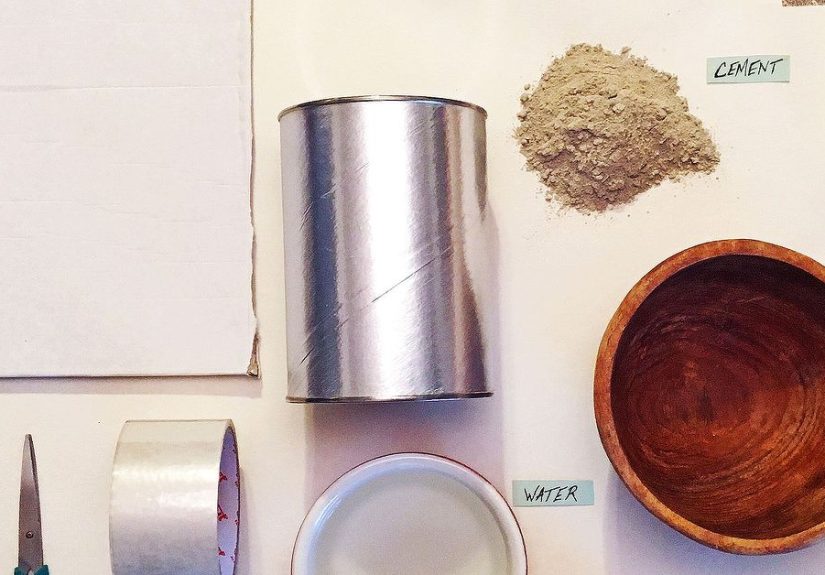
Tools and Materials You’ll Need
You don’t need pro-level tools to make a cement planter. Most of this list comes from the hardware aisle and your kitchen.
Core materials
- Cement or concrete mix: A basic pre-mixed concrete or sand/cement mix works well for planters. Look for a general-purpose bag; fast-setting mixes are fine if you’re ready to work quickly.
- Water: Clean tap water is all you need.
- Outer mold: A bucket, plastic storage bin, or large yogurt tub. This will shape the outside of your planter.
- Inner mold: A smaller bucket or container to create the cavity for the soil and plant.
- Release agent: Cooking spray, vegetable oil, or a bit of petroleum jelly so the concrete doesn’t bond to the plastic.
Basic tools
- Mixing bucket or tub
- Sturdy mixing stick, trowel, or old plastic spoon
- Measuring cup or small container for adding water
- Rubber mallet (optional, but helpful for tapping out air bubbles)
- Drill with masonry bit or a straw/chopstick for drainage holes
- Sandpaper (medium and fine grit) for smoothing edges
Safety gear (non-negotiable)
- Heavy-duty, waterproof gloves: Wet cement is alkaline and can cause skin irritation or even burns.
- Dust mask or respirator: Dry cement dust is not something you want in your lungs.
- Safety glasses or goggles: To protect your eyes from splashes when mixing.
- Long sleeves and long pants: To avoid direct skin contact with wet cement.
Set up your workspace outside or in a well-ventilated area. Lay down a tarp or cardboard so cleanup is as easy as folding everything up and tossing the dust into the trash.
Step-by-Step: How to Make a Simple Bucket Cement Planter
Let’s start with a classic: a round cement planter made using two buckets. This is a great “first project” that teaches all the basics.
Step 1: Prep your molds
- Choose a large bucket for your outer mold and a smaller bucket (or container) for the inner mold. You want at least 1–1.5 inches of space between them for strong walls.
- Clean and dry both molds.
- Spray the inside of the larger bucket with cooking oil or wipe it with vegetable oil.
- Coat the outside of the smaller bucket the same way. This release layer makes it much easier to demold later.
If your inner bucket is flimsy or tends to float, you can tape or strap small wood slats to it, or plan to weigh it down with rocks or bricks once it’s in place.
Step 2: Mix the cement
- Put on your gloves, mask, and eye protection.
- Pour some dry cement mix into your mixing container. Start with less than you think you’ll need you can always mix more.
- Add water gradually, mixing as you go. Aim for a texture like thick oatmeal or creamy peanut butter, not soup. Too much water can weaken the planter and make it prone to cracking.
- Stir well and scrape the sides and bottom so there are no dry pockets of powder.
You’ll have a limited working time before the mix starts to stiffen, so have your molds prepped and ready to go before you add water.
Step 3: Pour and form the base
- Spoon or pour a layer of cement mix into the bottom of the larger bucket, about 1–2 inches deep. This will be the base of your planter.
- Use your gloved hands or a trowel to press cement into the corners and compact it. Tap the sides of the bucket or gently bump it on the ground to help air bubbles rise to the surface.
- Place the smaller bucket into the center of the larger one, pressing it down so it sits on top of that base layer. Make sure it’s centered, with equal space all around.
If the inner bucket wants to float, add some weights (rocks, bricks, a bag of sand) inside it to hold it firmly in place.
Step 4: Build up the walls and add drainage
- Carefully pack cement mix around the sides between the two buckets. Work your way around in layers, pressing down to remove air pockets.
- Continue until the cement reaches your desired height. Leave at least an inch below the top of the outer bucket so everything stays contained.
- Tap the outer bucket all the way around with your hands or a mallet to bring air bubbles up and compact the mix.
- For drainage, you have two options:
- Built-in hole: Before the cement fully sets, push a straw, chopstick, or dowel through the bottom area between the two buckets where you want the drainage hole. Once the cement firms up, twist and remove it to leave a clean channel.
- Drilled hole: Let the planter cure, then drill one or more drainage holes through the base using a masonry bit.
Don’t skip drainage plants sitting in waterlogged soil will suffer, no matter how pretty the planter is.
Step 5: Let the planter cure
- Carefully cover the top of the molds with plastic (like a trash bag) to slow down evaporation and encourage even curing.
- Let the planter sit undisturbed for at least 24–48 hours before attempting to demold. Thicker planters or cooler temperatures may require more time.
- For long-term strength, concrete continues to cure over several days. Many makers give planters 3–5 days before putting them into heavy use.
Curing is where patience really pays off. Rushing this step is one of the quickest ways to get cracks and chips later.
Step 6: Demold, smooth, and finish
- Remove any weights from the inner bucket.
- Gently twist the inner bucket to break the bond, then pull it out. If it’s stubborn, tap around the edges or run warm water on the outside to help it release.
- Flex or cut away the outer mold if necessary. Thin plastic can usually be squeezed until the planter loosens. If you used a cardboard mold, you can simply peel or cut it away.
- Use medium-grit sandpaper to smooth rough edges, then follow with fine-grit for a softer finish.
- Brush away dust and let the planter dry completely before sealing or planting.
Make Your Planter Plant-Friendly: Drainage, Sealing, and Soil
Cement planters are tough, but they’re a little different from plastic or ceramic pots. A few extra steps will help your plants thrive.
Get drainage right
- Always have at least one drainage hole.
- Consider adding a layer of gravel or broken pottery at the bottom to keep roots from sitting in water.
- Use a saucer if your planter will sit on wood or indoors cement can “sweat” moisture through the base over time.
Seal (or soak) to prevent lime issues
Cement can leach lime into the soil, making it more alkaline. Some plants don’t mind, but others prefer neutral conditions. To play it safe:
- Brush dust off the planter once it’s fully cured.
- Apply a concrete-safe sealer inside the planter (and outside, if you want to protect the finish). Many DIYers use two coats inside and one or two outside, letting each coat dry as directed.
- Alternatively, if you don’t want to seal, you can soak the planter in water for a few days, changing the water periodically, to flush out some of the lime before planting.
Choose the right plants and soil mix
- Great choices: succulents, herbs, grasses, and compact shrubs anything that appreciates good drainage.
- Soil: use a high-quality potting mix; for succulents and cacti, choose a gritty mix or add perlite/sand.
- Because cement planters can be heavy, place them where you want them before filling with soil and plants.
Hometalk-Style Cement Planter Ideas to Try
Once you’ve made one simple planter, it’s time to experiment this is where the Hometalk fun really kicks in.
1. Pumpkin or novelty bucket planters
Plastic trick-or-treat buckets and novelty containers make fantastic molds. Just oil the inside, pour in your cement, and you’ve got a sculpted planter with instant character. These are especially cute for seasonal front-porch decor imagine a concrete pumpkin overflowing with mums or succulents.
2. Towel-draped “fabric” planters
For a soft, draped look, mix a thinner cement slurry and dip an old towel or piece of thick fabric into it. Drape the cement-soaked towel over an upside-down bucket or mold and let it harden. The result looks like a stone “cloth” frozen in motion perfect for a rustic or boho garden corner.
3. Sneaker or shoe planters
Got old sneakers that are too beat up to donate? You can turn them into molds by coating the outside in a cement slurry or packing them in a thicker mix. Once cured, you’ll have a quirky, conversation-starting planter that looks like a stone version of the shoe.
4. Fluted or ribbed planters
To get that trendy fluted look, use molds with ribbed sides (like certain plastic bins or trash cans) or add flexible trim to the top before coating with microcement. Once painted or limewashed, these planters look surprisingly high-end.
5. Cardboard box planters
Cardboard boxes make great disposable molds. Line the inside with duct tape to strengthen the box and keep the cement from soaking through. When the planter is cured, just peel the cardboard away. It’s a smart way to recycle packaging and test out new shapes without spending extra money on molds.
Common Cement Planter Problems (and How to Fix Them)
Cracks in the planter
Cracks usually come from too much water in the mix, curing too fast, or very thin walls. To reduce cracking:
- Keep water content moderate you want thick and workable, not runny.
- Make sure walls are at least an inch thick, preferably 1.5 inches for larger planters.
- Cover your project while it cures to keep moisture from evaporating too quickly.
Planter stuck in the mold
If the inner container won’t come out, don’t panic:
- First, try twisting the inner mold gently instead of pulling straight up.
- Tap around the sides with your palm or a rubber mallet to loosen it.
- If all else fails, cut or destroy the inner mold (this is why cheap or recycled containers are ideal).
Rough edges or pinholes
Small imperfections are part of concrete’s charm, but if the texture is harsher than you’d like:
- Sand the rim and edges with medium-grit sandpaper, then smooth with fine grit.
- For pinholes, you can apply a thin skim coat of cement or microcement to even things out before sealing or painting.
Planter too heavy to move
Cement is dense, especially in larger sizes. To make big planters more manageable:
- Use a hollow-core design or add lightweight filler (like upside-down smaller containers) in the base area where you don’t need soil.
- Place the empty planter in its final location before filling with soil.
- Use a plant caddy or wheeled base under very large pieces if they’ll be moved seasonally.
DIY Cement Planter | Hometalk – Real-World Experience
Here’s what this project really feels like when you’re standing there in your driveway in old clothes, bag of cement at your feet, wondering if you’ve made a mistake.
The first time you open that cement bag, there’s always a tiny moment of doubt: “Am I actually going to do this?” The dust puffs up into the air, you suddenly feel like you’re on a construction site, and you realize why everyone keeps nagging about masks and goggles. Once the dry mix hits the bucket, though, it’s oddly satisfying like making a giant batch of gray brownie batter.
I learned very quickly that prep is everything. When I didn’t oil my molds enough, the inner container clung to the cured cement like it had signed a lifetime lease. I ended up wrestling with a plastic bucket on the lawn, twisting, tapping, and muttering motivational speeches at it until it finally popped free. After that, I treated the release step like nonstick spray on a cake pan: more is more.
Another big lesson: cement goes from “soupy” to “nope” faster than you think. On my first planter, I mixed a big batch, then leisurely checked my phone and adjusted the inner mold three times. By the time I got around to packing the walls, the mix was already stiffening. Now I work in smaller batches, mixing just enough to build the base and a few inches of wall, then mixing more if I need it. It feels slower, but the results are much cleaner.
Curing requires patience and trust. The planter looks done after a day, but if you demold too early, it’s still fragile inside. I once rushed a piece at around the 24-hour mark, and while it looked great at first, hairline cracks showed up days later. Now I leave my planters covered and curing for at least 2–3 days before I touch them. It’s the cement equivalent of letting bread dough rise you can’t cheat time.
What surprised me most was how customizable cement planters are once you get the hang of the basics. I started with a simple cylinder, then tried a “towel planter” that looked like stone fabric draped over a bucket. Another day, I used a ribbed trash can as a mold and ended up with a fluted planter that honestly could have passed for something from a boutique garden catalog.
There’s also something a little magical about planting into a container you literally built from dust and water. The first time you tuck in a rosemary plant or a string of pearls into your finished cement planter, the whole thing suddenly feels elevated. It’s not just a pot anymore it’s a project, a tiny piece of architecture you made yourself. And because cement is so sturdy, it has this “heirloom” energy; you know it’ll be around for seasons, maybe years.
DIY cement planters are messy, a bit heavy, and occasionally stubborn but they’re also incredibly rewarding. Once you’ve made one, you’ll start seeing potential molds everywhere: chip cans, storage containers, cardboard boxes, even old shoes. That’s exactly the Hometalk spirit: everyday things, a little creativity, and a finished piece that makes people ask, “You made that?!”