Table of Contents >> Show >> Hide
- Why DIY Macrame Christmas Trees Are So Popular
- Materials You Need for a DIY Macrame Christmas Tree
- Macrame Knots to Know Before You Start
- How to Make a Classic DIY Macrame Christmas Tree
- Easy Variations to Try
- Common Mistakes and How to Avoid Them
- How to Style DIY Macrame Christmas Trees in Your Home
- Why Handmade Macrame Christmas Trees Feel More Meaningful
- Extra Experience: What Making DIY Macrame Christmas Trees Really Feels Like
- Conclusion
If your holiday decorating style lives somewhere between “cozy cabin” and “I absolutely bought more twinkle lights than any one human needs,” then DIY macrame Christmas trees might be your perfect seasonal craft. They are soft, textured, handmade, and just boho enough to make your space feel festive without looking like Santa exploded in your living room. Better still, they are beginner-friendly, budget-friendly, and wonderfully giftable.
A macrame Christmas tree can be a wall hanging, an ornament, a mantel accent, a topper for wrapped gifts, or a tiny handmade detail that makes your holiday decor feel more personal. Unlike mass-produced decorations, these pieces have real character. A few knots, a little fringe, maybe a bead or two, and suddenly you have holiday decor that feels warm, stylish, and pleasantly smug in that “Yes, I made it myself” kind of way.
In this guide, you will learn how to make a classic DIY macrame Christmas tree, what materials work best, which knots actually matter, how to customize the design, and how to avoid the common mistakes that turn a charming craft session into a dramatic pile of tangled cord. We will also cover display ideas, beginner tips, and the kind of hands-on crafting experience that makes this project so addictive once you start.
Why DIY Macrame Christmas Trees Are So Popular
There is a reason handmade holiday decor keeps winning people over. It adds texture, nostalgia, and personality in a season that can sometimes drift toward plastic overload. Macrame Christmas trees fit beautifully into several decorating styles at once: rustic, minimalist, farmhouse, Scandinavian-inspired, vintage, and boho. That is a rare decorating trick, and frankly, a little rude to all the other crafts trying their best.
These trees also work because they balance softness and structure. The shape is unmistakably Christmas, but the fibers make them feel relaxed and artisanal. Instead of shiny store-bought perfection, you get movement, fringe, and natural charm. They also pair beautifully with wood beads, dried oranges, bells, greenery, and neutral color palettes, which makes them easy to blend into modern holiday decor.
Another big advantage is flexibility. You can make a large wall hanging above a console table, create mini versions for your tree, or use leftover cord to make matching garlands. One idea tends to multiply into seven. This is how holiday crafting quietly steals your weekend.
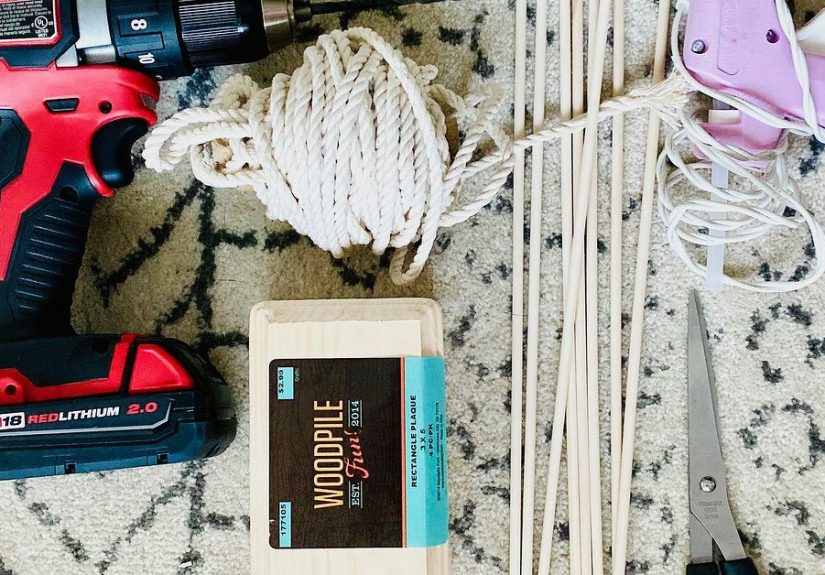
Materials You Need for a DIY Macrame Christmas Tree
You do not need a craft room worthy of a lifestyle magazine to make this project. Most macrame Christmas trees use a short list of easy-to-find supplies.
Basic supplies
- Single-strand cotton macrame cord, usually 3mm to 5mm
- A small wooden dowel, driftwood stick, branch, or metal ring
- Sharp fabric scissors
- Measuring tape or ruler
- A comb, pet brush, or fine-tooth brush for fringe
- Optional wood beads, bells, ribbon, twine, or tiny ornaments
- Optional fabric stiffener or light hairspray for shaping
Single-strand cotton cord is popular for this project because it unravels into soft fringe more easily than tightly twisted rope. If you want that fluffy, feathery look on the branches of your tree, this is your friend. If you prefer a crisp, structured design, a slightly firmer cord can help hold shape better.
Natural cotton is the classic choice, but green, cream, red, rust, gold, or even blush cord can create a more customized holiday look. For a modern minimalist tree, stick with ivory or beige. For a vintage-inspired Christmas vibe, add muted red beads or mustard and forest-green accents. For a bold tree, go full emerald and let your craft supplies behave like they have opinions.
Macrame Knots to Know Before You Start
The good news is that you do not need to master fifty fancy knots to make a beautiful macrame Christmas tree. Most beginner versions use just a few essential techniques.
Lark’s head knot
This is the knot used to attach cord to your dowel or hanging bar. It is often the starting point for macrame projects because it is simple, secure, and neat. If macrame had a handshake, this would be it.
Square knot
The square knot creates the main body and structure in many macrame patterns. It is sturdy, symmetrical, and easy to repeat. Once you understand the rhythm, it becomes oddly satisfying, like wrapping gifts that actually turn out square.
Gathering knot
This knot helps bundle cords together neatly and is useful for trunks, tassels, or finishing details. It gives your project a polished, intentional look.
Some designs also use alternating square knots or simple half knots to create variation, but if you can confidently do a lark’s head and a square knot, you are already in business.
How to Make a Classic DIY Macrame Christmas Tree
This version creates a classic wall-hanging style tree with layered branches and a soft fringe. It is approachable for beginners and easy to customize.
Step 1: Cut your cord
Cut several lengths of cord in graduated sizes. For a medium wall hanging, you might cut the top cords shorter and each lower row a little longer. The exact length depends on your desired size, but the basic idea is simple: short pieces at the top, longer pieces toward the bottom so the finished shape resembles a triangle.
Step 2: Attach the cords
Fold each cord in half and attach it to the dowel using a lark’s head knot. Space them evenly from top to bottom if you are using a vertical center cord design, or work in rows if your pattern is more horizontal. Keep the spacing consistent so the finished tree looks intentional rather than like it lost a fight with a vacuum cleaner.
Step 3: Build the tree shape
Use square knots to create structure near the center if you want a more detailed design. For a simpler tree, you can let the lark’s head knots create the branches and rely on trimming for the final silhouette. Many beautiful macrame Christmas trees are more about clean shape and soft fringe than complicated knotwork.
Step 4: Create the trunk
At the bottom center, gather a few cords and secure them with a gathering knot to form a trunk. If you want a more decorative finish, thread on a bead before tying the knot or wrap the trunk in contrasting cord.
Step 5: Brush out the fringe
Use a comb or brush to gently unravel and fluff the cord ends. This is where the tree really starts to look magical. The fringe turns soft and airy, giving the piece that feathery evergreen effect. Work slowly so you do not yank out fibers or create uneven patches.
Step 6: Trim the silhouette
Lay the piece flat and trim the sides into a clean Christmas tree shape. Start conservatively. You can always trim more, but you cannot glue dignity back onto overcut fringe. A sharp pair of scissors makes a huge difference here.
Step 7: Add embellishments
Add small wood beads, a tiny bell, mini ribbon bows, or even subtle metallic thread if you want a more decorated look. Keep it balanced. A macrame tree shines when the texture is the star, so you do not need to pile on every holiday supply in a five-mile radius.
Step 8: Hang and style
Tie a loop of twine or ribbon to the dowel and hang your tree on a wall, cabinet knob, mirror, or peg rail. You can also scale the project down for ornaments and gift toppers.
Easy Variations to Try
1. Mini macrame Christmas tree ornaments
Use thinner cord and smaller dowels or sticks to make ornament-sized versions. These are excellent for gift exchanges, stocking stuffers, or tree decorating. A set of three in different sizes looks especially charming on a real or faux tree.
2. Layered boho wall tree
For a bigger statement piece, create multiple rows of fringe and include alternating square knots in the center. Add a star bead or brass ring at the top for extra flair. This version looks beautiful in apartments, small homes, or anywhere you want a Christmas tree feeling without a full-size tree.
3. Rustic natural tree
Swap the dowel for a real branch and keep the palette neutral. Add dried orange slices, twine bows, or tiny pine sprigs nearby for a more natural holiday look. This style works especially well in farmhouse or Scandinavian-inspired interiors.
4. Color-blocked modern tree
Use two or three cord colors, such as cream, forest green, and muted gold. Keep embellishments minimal and let the color story do the work. This version feels fresh and contemporary without losing the handmade charm.
Common Mistakes and How to Avoid Them
Choosing the wrong cord: If the cord is too stiff, it may not brush out nicely. If it is too limp, the tree can lose shape. Single-strand cotton is the safest beginner choice.
Cutting too much too soon: Trim slowly. The difference between “clean silhouette” and “sad mop” is about three aggressive snips.
Uneven tension: If your knots are too loose in one section and tight in another, the tree can warp. Try to keep a steady hand and consistent pull.
Overdecorating: Macrame already has texture and visual interest. A few thoughtful embellishments beat a craft-store avalanche every time.
Skipping the brush-out step: The fringe makes the project look finished. Do not rush it. Brushing and shaping are what transform it from “bundle of strings” into actual holiday decor.
How to Style DIY Macrame Christmas Trees in Your Home
One of the best things about DIY macrame Christmas trees is how flexible they are in real homes. They do not require a dedicated holiday village or a staircase that looks like it belongs in a movie. They work in normal spaces occupied by normal people who also need room for groceries and laundry baskets.
Hang a large macrame tree above a console table with candles and greenery for a focal point. Add small versions to cabinet handles in the kitchen. Use one as part of a gallery wall with winter art. Tie mini trees onto wrapped gifts instead of traditional bows. Hang a set in a child’s room for soft, non-breakable decor. These projects are especially good for smaller homes, dorms, apartments, and offices where a full tree is not practical.
You can also pair macrame trees with dried citrus garlands, paper stars, bottle-brush trees, or wood bead strands for a layered handmade holiday look. The contrast of soft fiber and natural materials makes everything feel warmer and less generic.
Why Handmade Macrame Christmas Trees Feel More Meaningful
Holiday decor is not really about owning the most decorations. It is about atmosphere, memory, and the tiny details that make a season feel personal. A handmade macrame Christmas tree does that beautifully. It slows you down. It gives you something tactile and creative to work on when everything else in December starts moving at cartoon speed.
It is also a thoughtful gift. Giving someone a handmade ornament or wall hanging says, “I spent time on this because you matter.” That lands differently than a last-minute candle from the checkout aisle. No shade to candles. Candles have done a lot for society. But handmade gifts carry a different weight.
And because no two macrame trees are exactly alike, each one feels individual. Slightly imperfect fringe, a bead placed just off center, a branch instead of a dowel, a favorite ribbon tied at the topthose details are not flaws. They are the charm.
Extra Experience: What Making DIY Macrame Christmas Trees Really Feels Like
The first time I sat down to make a DIY macrame Christmas tree, I had the usual unreasonable confidence that comes from watching a neat thirty-second craft clip online. In my mind, I would casually tie a few knots, sip something festive, and emerge an hour later with a handmade masterpiece worthy of a boutique holiday catalog. In reality, I spent the first ten minutes asking my cord why it seemed personally offended by being measured.
But that is exactly why this craft becomes memorable. Once you begin, the process pulls you in. There is something calming about repeating knots, brushing out fringe, and trimming the shape little by little. It is not fast in the rushed, instant-gratification sense. It is satisfying in the deeper sense. You can actually see the tree taking shape in your hands, and every adjustment makes it look more finished, more intentional, more yours.
One of the best parts is how forgiving the project can be. A slightly uneven row often disappears once the fringe is brushed and the edges are trimmed. A tree that looks messy halfway through can turn gorgeous in the final five minutes. That makes it a surprisingly good craft for people who claim they are “not crafty,” which is often code for “I tried one complicated project in 2019 and I’m still emotionally recovering.”
I also found that making more than one tree is where the fun really starts. The first version teaches you the rhythm. The second gives you confidence. By the third, you are making design choices like a holiday art director: maybe a longer trunk, maybe wood beads, maybe a branch from the backyard because suddenly you are the kind of person who sees decorative potential in sticks.
Another experience that stands out is how different these trees feel from store-bought decor once they are displayed. A handmade macrame Christmas tree has softness and movement. It catches light differently. It looks warm in the daytime and cozy at night, especially near string lights or candles. Even small versions on gifts or on the tree itself stand out because they do not look mass-produced. People notice them. They touch them. They ask where you bought them, which is one of the great joys of crafting because you get to say, with the appropriate amount of casual pride, “Oh, I made those.”
There is also the memory factor. Holiday crafts have a way of attaching themselves to moments. A rainy Saturday afternoon. A kitchen table covered in cord and scissors. A playlist in the background. A child brushing out fringe too enthusiastically. A friend helping choose beads. These details linger. Long after the season is over, the project is tied to that experience, which makes the decoration feel more meaningful the next year when you unpack it again.
That may be the real magic of DIY macrame Christmas trees. Yes, they are stylish. Yes, they are affordable. Yes, they fit beautifully into modern holiday decor. But beyond all of that, they create a slower, more personal kind of festive energy. They remind you that holiday decorating does not have to be loud to be memorable. Sometimes a little cord, a few knots, and a handmade tree are more than enough to make the whole season feel warmer.
Conclusion
DIY macrame Christmas trees are one of those rare holiday crafts that manage to be easy, beautiful, customizable, and genuinely fun to make. They work for beginners, look elevated without being fussy, and fit into almost any holiday decorating style. Whether you make a large wall hanging, a set of ornaments, or a handful of gift toppers, you end up with decor that feels personal and timeless.
If you want a holiday craft that blends handmade charm with modern style, this is it. Gather your cord, practice a couple of knots, and let the fringe do its festive thing. Your home gets a cozy seasonal upgrade, and you get the kind of project that feels creative instead of chaotic. That is a Christmas miracle in its own right.


