Table of Contents >> Show >> Hide
- Why You’ll Love This Individual Cherry Cobbler
- What Is Cherry Cobbler?
- Ingredients for Easy Individual Cherry Cobbler
- Fresh, Frozen, or Canned Cherries: Which Works Best?
- Best Ramekin Size for Individual Cherry Cobbler
- How to Make Individual Cherry Cobbler
- Recipe Card: Easy Individual Cherry Cobbler
- Tips for the Best Mini Cherry Cobbler
- Easy Variations
- What to Serve With Individual Cherry Cobbler
- How to Store and Reheat Cherry Cobbler
- Can You Make Individual Cherry Cobbler Ahead?
- Common Mistakes to Avoid
- Experience Notes: What Makes This Easy Individual Cherry Cobbler So Reliable
- Conclusion
Some desserts arrive at the table politely. Others show up bubbling, golden, and wearing a scoop of vanilla ice cream like a tiny crown. This easy individual cherry cobbler recipe belongs firmly in the second group. It is warm, juicy, buttery, and portioned into personal ramekins, which means no one has to perform awkward dessert math while pretending they only want “a small piece.”
Individual cherry cobblers are perfect for weeknight treats, dinner parties, holidays, date nights, or those very specific evenings when your kitchen needs to smell like a bakery and your mood needs a rescue mission. Instead of baking one large cobbler in a deep dish, this recipe uses small ramekins so each serving gets its own bubbling cherry filling and tender biscuit-style topping.
The best part? You can make it with fresh cherries, frozen cherries, or cherry pie filling, depending on your time, season, and patience level. Fresh cherries taste bright and summery, frozen cherries make this dessert possible all year, and canned pie filling turns it into a “dessert emergency kit” you can pull together faster than someone can ask, “Is there anything sweet?”
Why You’ll Love This Individual Cherry Cobbler
This recipe is designed for real life. It does not require a pastry degree, a marble countertop, or the emotional strength needed to roll pie crust on a humid day. The topping is mixed in one bowl, the filling is simple, and the ramekin format makes serving effortless.
Each mini cherry cobbler has the classic contrast that makes cobbler so lovable: soft, jammy fruit underneath and a tender golden topping above. The edges get slightly crisp, the center stays fluffy, and the cherry juices bubble up around the sides like they are trying to win a beauty pageant.
Because the cobblers are baked individually, they cook faster than a large pan and feel more special when served. A ramekin on a dessert plate says, “I planned this.” Even if your plan began 40 minutes ago while standing in front of the pantry.
What Is Cherry Cobbler?
Cherry cobbler is a baked fruit dessert made with sweetened cherries and a soft topping. Unlike a crisp or crumble, which usually has a streusel-like topping, cobbler typically features biscuit dough, cake-style batter, or a pastry-like topping spooned over the fruit. As it bakes, the topping rises and browns while the fruit thickens into a glossy sauce.
The name “cobbler” is often said to come from the uneven, cobbled appearance of the topping. In other words, it is supposed to look charmingly rustic. This is excellent news for anyone whose baking style is best described as “enthusiastic but not symmetrical.”
Ingredients for Easy Individual Cherry Cobbler
For the Cherry Filling
- 3 cups pitted cherries, fresh or frozen
- 1/3 cup granulated sugar, adjusted to taste
- 1 tablespoon cornstarch
- 1 tablespoon lemon juice
- 1/2 teaspoon vanilla extract
- 1/8 teaspoon almond extract, optional but highly recommended
- 1 pinch salt
For the Cobbler Topping
- 1 cup all-purpose flour
- 1/4 cup granulated sugar
- 1 1/2 teaspoons baking powder
- 1/4 teaspoon salt
- 4 tablespoons cold unsalted butter, cut into small cubes
- 1/3 cup whole milk or buttermilk
- 1/2 teaspoon vanilla extract
- 1 tablespoon coarse sugar for sprinkling, optional
Optional Toppings
- Vanilla ice cream
- Whipped cream
- Powdered sugar
- Toasted sliced almonds
- A small drizzle of chocolate sauce
Fresh, Frozen, or Canned Cherries: Which Works Best?
Fresh cherries give the cobbler a lively, natural flavor and a beautiful texture. Sweet cherries are easy to find in many grocery stores during cherry season, while tart cherries create a brighter, more classic pie-style flavor. If using fresh sweet cherries, lemon juice helps balance the sweetness.
Frozen cherries are the most reliable option for year-round baking. They are already pitted, which is a huge gift to humanity, and they usually have excellent flavor. If your frozen cherries release a lot of liquid as they thaw, drain off a tablespoon or two before mixing the filling, or add an extra teaspoon of cornstarch.
Cherry pie filling is the shortcut version. It is sweeter and thicker than homemade filling, so you can reduce or skip the added sugar and cornstarch. For four ramekins, use about 2 cups of cherry pie filling and add lemon juice, vanilla, and almond extract to make it taste more homemade.
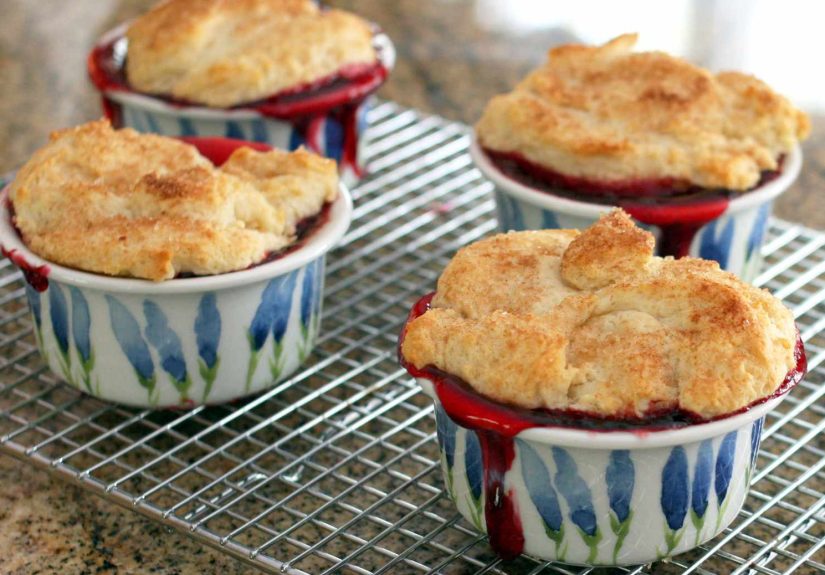
Best Ramekin Size for Individual Cherry Cobbler
For this recipe, 6-ounce ramekins work beautifully. They hold enough filling and topping for a satisfying dessert without becoming a fruit volcano in your oven. If you use 8-ounce ramekins, the cobblers will have a little extra room and may bake slightly faster because the filling is more spread out.
Always place the ramekins on a rimmed baking sheet before baking. Cherry filling likes to bubble, and while bubbling is delicious, scrubbing burnt cherry syrup from the bottom of the oven is not the kind of character-building activity anyone needs.
How to Make Individual Cherry Cobbler
Step 1: Prepare the Oven and Ramekins
Preheat the oven to 375°F. Lightly butter four 6-ounce ramekins or coat them with nonstick baking spray. Set them on a rimmed baking sheet lined with parchment paper or foil for easier cleanup.
Step 2: Make the Cherry Filling
In a medium bowl, combine the cherries, sugar, cornstarch, lemon juice, vanilla extract, almond extract, and salt. Stir until the cherries are evenly coated and the cornstarch disappears into the juices. Let the mixture sit for 5 to 10 minutes while you make the topping.
This short resting time helps the sugar draw out some cherry juice, which gives the cornstarch something to work with. In plain kitchen language: it helps the filling become saucy instead of watery.
Step 3: Divide the Filling
Spoon the cherry mixture evenly into the prepared ramekins. Fill each ramekin about two-thirds full. If the cherries are piled too high, the topping may slide off dramatically, like it has somewhere else to be.
Step 4: Make the Cobbler Topping
In a separate bowl, whisk together the flour, sugar, baking powder, and salt. Add the cold butter cubes and work them into the flour mixture using your fingertips, a pastry cutter, or a fork. The mixture should look like coarse crumbs with small pea-sized bits of butter.
Stir in the milk and vanilla extract just until a soft dough forms. Do not overmix. A few lumps are fine. Cobbler topping is supposed to be tender, not auditioning for a bread competition.
Step 5: Add the Topping
Drop spoonfuls of dough over each ramekin of cherries. Leave a few small gaps so steam can escape and the cherry filling can bubble up around the topping. Sprinkle with coarse sugar if you want a lightly crunchy top.
Step 6: Bake Until Golden and Bubbly
Bake for 22 to 28 minutes, or until the topping is golden brown and the filling is bubbling around the edges. If using frozen cherries, the cobblers may need a few extra minutes.
Step 7: Cool Before Serving
Let the individual cherry cobblers cool for at least 10 minutes before serving. The filling thickens as it cools, and the ramekins will be very hot. This is dessert, not a finger-scorching challenge.
Recipe Card: Easy Individual Cherry Cobbler
Prep Time: 15 minutes
Cook Time: 25 minutes
Total Time: 40 minutes
Servings: 4 individual cobblers
Difficulty: Easy
Ingredients
- 3 cups pitted cherries, fresh or frozen
- 1/3 cup sugar
- 1 tablespoon cornstarch
- 1 tablespoon lemon juice
- 1 teaspoon vanilla extract, divided
- 1/8 teaspoon almond extract
- 1 pinch salt
- 1 cup all-purpose flour
- 1/4 cup sugar
- 1 1/2 teaspoons baking powder
- 1/4 teaspoon salt
- 4 tablespoons cold unsalted butter
- 1/3 cup milk or buttermilk
- 1 tablespoon coarse sugar, optional
Instructions
- Preheat oven to 375°F. Butter four 6-ounce ramekins and place them on a rimmed baking sheet.
- Mix cherries, sugar, cornstarch, lemon juice, 1/2 teaspoon vanilla, almond extract, and a pinch of salt in a bowl.
- Divide the cherry filling evenly among the ramekins.
- In another bowl, whisk flour, sugar, baking powder, and salt.
- Cut in the cold butter until the mixture resembles coarse crumbs.
- Stir in milk and remaining vanilla just until a soft dough forms.
- Drop spoonfuls of topping over the cherry filling and sprinkle with coarse sugar if desired.
- Bake for 22 to 28 minutes, until golden and bubbling.
- Cool for 10 minutes before serving with ice cream or whipped cream.
Tips for the Best Mini Cherry Cobbler
Use Cold Butter
Cold butter creates a more tender, slightly flaky topping. If the butter softens too much before baking, the topping can turn dense. Cut it into small cubes and keep it chilled until you are ready to mix.
Do Not Overmix the Dough
Once the milk touches the flour mixture, stir gently. Overmixing can make the topping tough. Stop as soon as the dough comes together, even if it looks a little rustic. Rustic is the cobbler’s whole personality.
Balance Sweetness With Lemon Juice
Cherry desserts need a little acidity to taste bright. Lemon juice keeps the filling from becoming flat or overly sweet, especially if you are using sweet cherries or canned pie filling.
Add Almond Extract Carefully
Almond extract and cherries are a classic match, but almond extract is powerful. Use just a tiny amount. Too much can make the cobbler taste like it accidentally joined a perfume counter.
Let the Cobbler Rest
The filling thickens as it cools. If you dig in immediately, it may be thinner and extremely hot. Give it 10 minutes, then add ice cream and enjoy the dramatic melting moment.
Easy Variations
Cherry Almond Cobbler
Add 2 tablespoons of toasted sliced almonds to the topping or sprinkle them over the cobblers after baking. The nutty crunch pairs beautifully with the cherries.
Chocolate Cherry Cobbler
Add 2 tablespoons of mini chocolate chips to the topping or drizzle warm chocolate sauce over the finished cobblers. Cherry and chocolate together are basically dessert’s power couple.
Cherry Berry Cobbler
Replace 1 cup of cherries with blueberries, raspberries, or blackberries. Mixed berries add color, tartness, and a more complex fruit flavor.
Shortcut Cherry Cobbler
Use canned cherry pie filling instead of homemade filling. Add lemon juice, vanilla, and a small pinch of salt to brighten the flavor. Skip the cornstarch and reduce the sugar in the topping slightly if desired.
Buttermilk Cherry Cobbler
Use buttermilk instead of regular milk in the topping. It adds a subtle tang and helps create a tender biscuit-like texture.
What to Serve With Individual Cherry Cobbler
The classic choice is vanilla ice cream. The hot cobbler melts the ice cream into the cherry filling, creating a creamy sauce that tastes like summer and good decisions. Whipped cream is lighter and works well if you want a softer finish.
For brunch or a casual afternoon dessert, serve the cobblers with coffee. For a holiday meal, add a dusting of powdered sugar and a few toasted almonds. If you want a dramatic restaurant-style plate, place each ramekin on a small dessert dish with a spoon and a napkin. Suddenly your kitchen has a pastry chef, and that pastry chef is you.
How to Store and Reheat Cherry Cobbler
Cool leftover cobblers completely, cover the ramekins, and refrigerate them for up to 3 days. For best texture, reheat them in a 325°F oven for 10 to 15 minutes, or until warmed through. You can also microwave an individual cobbler for 30 to 45 seconds, but the topping will be softer.
Because the dessert contains cooked fruit and dairy in the topping, do not leave it sitting at room temperature for long periods. Refrigerating leftovers promptly keeps the cobbler fresher and safer to enjoy later.
Can You Make Individual Cherry Cobbler Ahead?
Yes, but the best method is to prepare the filling and topping separately. Mix the cherry filling and refrigerate it in a covered container. Prepare the dry topping mixture and keep it chilled with the butter worked in. When ready to bake, stir in the milk, assemble the ramekins, and bake fresh.
This prevents the topping from absorbing too much cherry juice before baking. A fresh-baked topping is lighter, fluffier, and more golden than one that has been sitting on fruit for hours.
Common Mistakes to Avoid
Using Too Much Cornstarch
Cornstarch thickens the cherry juices, but too much can make the filling gummy. One tablespoon for 3 cups of cherries is a good starting point. Add a little more only if your cherries are especially juicy.
Filling Ramekins Too Full
Leave room for bubbling. If the ramekins are filled to the top, the cobbler will overflow. It may still taste good, but your baking sheet will look like a cherry crime scene.
Skipping the Baking Sheet
Always bake ramekins on a rimmed baking sheet. It catches drips, makes the ramekins easier to move, and saves you from oven cleanup drama.
Serving Too Soon
Freshly baked cobbler smells amazing, but the filling needs a few minutes to settle. A short cooling time improves texture and prevents molten cherry surprises.
Experience Notes: What Makes This Easy Individual Cherry Cobbler So Reliable
The charm of an easy individual cherry cobbler recipe is that it feels personal without being fussy. A full-size cobbler is wonderful, but mini cobblers have a different kind of magic. Everyone gets their own ramekin, their own golden topping, and their own little pool of cherry filling bubbling at the edges. It turns a simple dessert into something that feels prepared with intention.
In testing and everyday baking, the ramekin method has a few practical advantages. First, the serving size is already decided. That is helpful for dinner parties, family meals, or small households where a full baking dish might linger in the refrigerator longer than planned. Second, individual cobblers bake quickly and evenly. The smaller portion of fruit heats faster, which helps the topping brown before the filling becomes overcooked.
The best texture usually comes from leaving small spaces between the spoonfuls of topping. It may be tempting to cover the cherries completely, but a few open areas allow steam to escape and fruit juices to bubble up. Those bubbling edges are not just pretty; they are a sign that the filling has reached the heat it needs to thicken properly. When the topping is golden and the fruit is visibly bubbling, the cobbler is usually ready.
Another experience-based tip is to taste the cherries before adding sugar. Sweet cherries may need less sugar, while tart cherries may need a little more. Frozen cherries can vary by brand, and canned pie filling is already sweetened. A flexible recipe is better than a rigid one because fruit is not manufactured by robots wearing tiny chef hats. It changes with season, variety, and storage.
For the most balanced flavor, lemon juice is essential. Even a small amount brightens the filling and keeps the dessert from tasting heavy. Almond extract is optional, but when used carefully, it gives the cobbler that old-fashioned bakery flavor many people associate with cherry desserts. The key is restraint. A tiny splash is charming; a heavy pour is chaos in a bottle.
Serving matters too. Individual cherry cobblers are at their best when warm, not blazing hot. After 10 minutes of cooling, the fruit thickens, the topping settles, and ice cream melts at just the right speed. If served immediately from the oven, the filling may be too loose and too hot to enjoy fully. Waiting briefly is difficult, but it is worth it. Consider it dessert discipline, the sweetest kind of discipline there is.
This recipe also adapts well to different occasions. For a casual weeknight, serve the cobblers straight from the ramekins with spoons. For guests, place each ramekin on a small plate, add a scoop of vanilla ice cream, and sprinkle a few toasted almonds over the top. For summer gatherings, use fresh cherries if available. For cozy winter nights, frozen cherries bring a taste of summer to the table with almost no extra effort.
The biggest lesson from making individual cobblers is that easy desserts can still feel special. You do not need complicated pastry work or a long ingredient list to create something memorable. Warm cherries, buttery topping, a little vanilla, and the right baking dish can do a lot. This is the kind of recipe that makes people ask for seconds while pretending they are “just cleaning up the last bite.” Very noble of them.
Conclusion
This easy individual cherry cobbler recipe proves that a simple dessert can still feel cozy, impressive, and deeply satisfying. With juicy cherries, a tender golden topping, and charming single-serving ramekins, it is a recipe that works for busy weeknights, holidays, casual dinners, and special moments that deserve something warm from the oven.
Whether you use fresh cherries, frozen cherries, or a smart shortcut with cherry pie filling, the result is a comforting mini dessert with big flavor. Serve it warm with vanilla ice cream, let the cherry juices bubble proudly, and enjoy every spoonful. After all, individual cobbler means you do not have to share unless you are feeling unusually generous.


