Table of Contents >> Show >> Hide
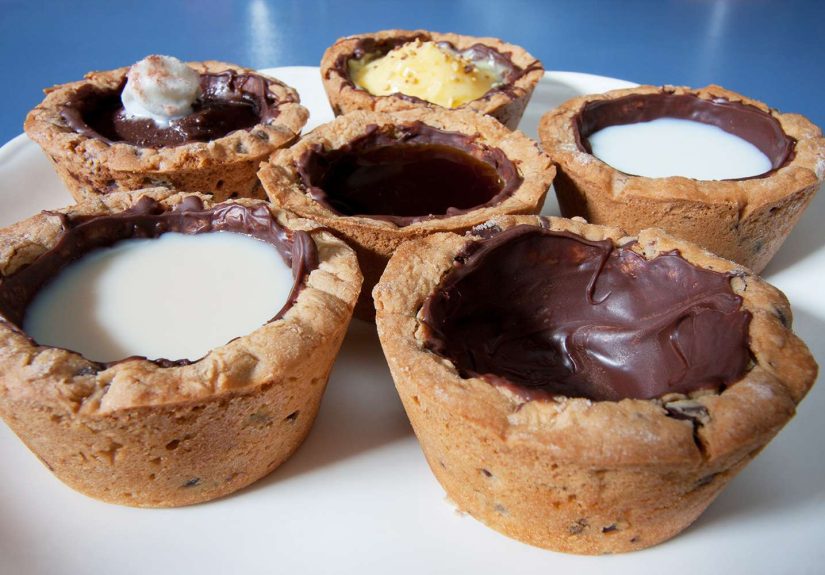
There are desserts that are delicious, and then there are desserts that make people stop mid-sentence, point dramatically, and say, “Wait… you can drink from that?” Edible cookie shots belong in the second category. They are part cookie, part dessert cup, part party trick, and fully committed to making your snack table look far more impressive than the effort suggests. Best of all, they are actually practical. A good cookie shot is sturdy enough to hold milk, hot cocoa, cold brew, or a creamy dessert filling for a short stretch, then delicious enough to disappear right after.
This edible cookie shots recipe is built for real kitchens, not fantasy baking shows where nothing sticks, cracks, or collapses under pressure. The goal here is simple: make cookie cups with crisp edges, chewy centers, and enough structure to hold a sip of something tasty without turning into a sugary landslide. Along the way, you will also learn how to keep the dough from slumping, how to create a smooth interior, and why a thin chocolate lining is the secret weapon that deserves a standing ovation.
If you have ever seen cookie shot glasses online and assumed they required a custom mold, a pastry diploma, and emotional support, good news: they are much more doable than they look. With a mini muffin pan or a specialty shot-glass pan, a chocolate chip-style dough, and a few strategic moves, you can make a batch that tastes homemade, looks festive, and gives your guests something to talk about besides the weather.
Why Edible Cookie Shots Work So Well
Cookie shots are successful because they combine two textures people already love: a chewy cookie and a creamy drink or filling. The contrast is what makes them memorable. The shell should be firm enough to stand on its own, but not so hard that biting into it feels like arguing with a brick. That balance usually comes from a dough that has butter for flavor, brown sugar for chewiness, enough flour for structure, and a short chill time so the cups hold their shape while baking.
The other big factor is timing. Cookie dough rises and puffs in the oven, which is helpful because it creates volume, but it also means the center often needs to be pressed down while the cookies are still warm. That little step is the difference between “adorable dessert vessel” and “tiny cookie crater with no career direction.” Once cooled, the cups become sturdy. Add a chocolate coating inside, and they become even better at holding milk or other fillings for serving.
In other words, edible cookie shots are not a gimmick. They are a smart baking project with built-in crowd appeal. They are fun for birthday parties, holiday dessert boards, movie nights, bake sales, or a weekend baking session when regular cookies suddenly feel a little too ordinary.
Edible Cookie Shots Recipe
Yield, Time, and Equipment
Yield: 12 to 16 cookie shots, depending on pan size
Prep time: 25 minutes
Chill time: 30 minutes
Bake time: 12 to 16 minutes per batch
Total time: About 1 hour 15 minutes
You will need: mini muffin pan or cookie shot pan, mixing bowls, hand mixer or stand mixer, measuring cups or kitchen scale, small spoon or narrow shot glass for shaping, pastry brush or spoon for coating the inside with chocolate.
Ingredients
- 2 1/4 cups all-purpose flour
- 1/2 teaspoon baking soda
- 1/2 teaspoon baking powder
- 1/2 teaspoon fine salt
- 3/4 cup unsalted butter, softened
- 3/4 cup packed light brown sugar
- 1/2 cup granulated sugar
- 1 large egg
- 1 large egg yolk
- 2 teaspoons pure vanilla extract
- 3/4 cup mini semisweet chocolate chips
- 8 ounces semisweet chocolate, chopped or in melting wafers
- 1 teaspoon coconut oil or neutral oil, optional, for smoother melted chocolate
- Cold milk, chocolate milk, or cooled hot cocoa for serving
Step-by-Step Instructions
1. Prepare the pan.
Preheat your oven to 350 degrees Fahrenheit. Generously grease a mini muffin pan or cookie shot mold. Be thorough here. This is not the moment for optimistic half-greasing. Cookie cups like to cling to pans with the loyalty of a stage-five clinger, so coat every cavity well.
2. Mix the dry ingredients.
In a medium bowl, whisk together the flour, baking soda, baking powder, and salt. Set aside.
3. Cream the butter and sugars.
In a large bowl, beat the softened butter, brown sugar, and granulated sugar until the mixture is light and fluffy, about 2 to 3 minutes. This step helps create a better texture, so do not rush it like you are trying to escape your own kitchen.
4. Add the wet ingredients.
Beat in the egg, egg yolk, and vanilla extract until smooth and fully combined. The extra yolk adds richness and helps the cookie shots stay chewy rather than crumbly.
5. Combine the dough.
Add the dry ingredients to the wet ingredients and mix on low speed just until combined. Fold in the mini chocolate chips. Mini chips work better than full-size ones here because they distribute more evenly and make the dough easier to press into the pan without giant chocolate boulders getting in the way.
6. Chill the dough.
Cover and chill the dough for about 30 minutes. This helps control spread and makes shaping easier. If your kitchen is warm, do not skip this step. Warm dough is wonderful for many things, but structural integrity is not one of them.
7. Shape the cookie shots.
Scoop portions of dough into the prepared pan, filling each cavity about two-thirds full. Press the dough up the sides slightly if using a muffin pan, or follow the shape of your specialty cookie shot mold. Keep the thickness fairly even so the cups bake uniformly and do not end up with one paper-thin wall and one wall that could survive a natural disaster.
8. Bake.
Bake for 12 to 16 minutes, depending on pan size, until the edges are golden and the tops look set. Do not wait for them to get deeply browned all over. Overbaked cookie shots are less fun to eat and more likely to crack.
9. Shape while warm.
As soon as the pan comes out of the oven, press the center of each cookie gently with the back of a rounded teaspoon, a narrow measuring spoon, or a lightly greased shot glass. This creates the well. Work carefully but promptly; once the cookies cool, they lose their flexibility.
10. Cool completely.
Let the cookie shots cool in the pan for 15 to 20 minutes, then carefully loosen and remove them. Transfer to a rack and cool completely. If one cracks a bit, do not panic. That is what the chocolate lining is for. Baking, like life, rewards a good recovery strategy.
11. Add the chocolate seal.
Melt the semisweet chocolate with the optional teaspoon of oil until smooth. Brush or spoon a thin layer of melted chocolate inside each cookie cup, covering the bottom and sides. You can also coat the rim for a more dramatic dessert look. Let the chocolate set completely at room temperature or in the refrigerator for 10 to 15 minutes.
12. Fill and serve.
Fill the cookie shots just before serving with cold milk, chocolate milk, strawberry milk, espresso-style milk, or cooled hot cocoa. Serve immediately. The longer the liquid sits, the softer the shell becomes. That is not a crisis, but it does move the dessert from “snappy cookie experience” toward “delicious spoon situation.”
Best Tips for Perfect Cookie Shots Every Time
Use Brown Sugar for a Chewier Texture
Brown sugar helps produce a softer, chewier bite because it contains molasses and holds more moisture than white sugar. For edible cookie shots, that matters. A dry, crumbly shell may taste fine, but it is not ideal when you want a sturdy little cup that can survive filling.
Do Not Overmeasure the Flour
Too much flour can turn your dough stiff, dry, and overly cakey. If you have a kitchen scale, use it. If not, spoon the flour into the measuring cup and level it off. Scooping directly from the bag often packs in more than you need, and then suddenly your cookie shots taste like they were designed by drywall.
Shape the Centers While the Cookies Are Warm
This is the non-negotiable step. Warm cookie dough is flexible; cool cookie dough is stubborn. If the centers puff up in the oven, press them down as soon as the pan comes out. A quick re-press can also help create a cleaner, deeper well.
Cool Fully Before Removing
Fresh-from-the-oven cookie cups are delicate. Give them time to firm up in the pan before you try to remove them. If you rush this step, you may end up with cookie rubble. Tasty rubble, yes, but still rubble.
Line with Chocolate
The chocolate coating is not just decorative. It seals small cracks, adds flavor, and helps the cookie shots hold liquid longer. This one move takes the recipe from cute to clever. If you want a stronger chocolate flavor, use dark chocolate. If you want a sweeter finish, use milk chocolate.
Fill at the Last Minute
Cookie shots are best when filled right before serving. That keeps the shell from softening too quickly and preserves the contrast between crisp edges and creamy filling.
Easy Variations to Try
Chocolate Cookie Shots
Replace 1/4 cup of the flour with unsweetened cocoa powder for a deeper chocolate flavor. These pair beautifully with vanilla milk or marshmallow cream.
Peanut Butter Cookie Shots
Add 1/3 cup creamy peanut butter to the dough and reduce the butter slightly. Fill with chocolate milk for a peanut-butter-cup vibe that disappears quickly at parties.
Hot Cocoa Cookie Shots
Fill the finished cups with cooled hot cocoa and top with mini marshmallows. This is a cozy holiday dessert that feels both playful and nostalgic.
Sprinkle Cookie Shots
Stir rainbow sprinkles into a vanilla-forward dough and coat the rim with white chocolate and extra sprinkles. These are ideal for birthdays, baby showers, or any event that could use a little more confetti energy.
Serving Ideas and Make-Ahead Advice
Edible cookie shots shine on dessert boards, after-school snack platters, and holiday tables. Arrange them on a tray with small pitchers of milk, flavored milks, or thick dessert sauces so guests can fill their own. They also work well with pudding, mousse, whipped cheesecake filling, or even a scoop of softened ice cream for a dessert hybrid that politely ignores portion control.
You can make the cookie cups a day or two ahead. Store them unfilled in an airtight container once the chocolate lining has set. Wait to add any liquid until the moment you serve them. If you want to prepare dough in advance, chill it for up to 48 hours before baking, or freeze scooped dough portions and bake later.
Why This Edible Cookie Shots Recipe Is Worth Making
Some recipes are about efficiency. Some are about nostalgia. This one is about delight. Edible cookie shots bring a little theatrical flair to baking, but they still deliver where it counts: flavor, texture, and fun. They look special without requiring especially fancy ingredients, and they invite creativity without punishing you for improvising. That is the sweet spot.
Once you make them the first time, you start seeing possibilities everywhere. Birthday dessert? Cookie shots. Winter movie night? Cookie shots with cocoa. Weekend baking project with the family? Absolutely cookie shots. They are charming, genuinely tasty, and just impractical enough to feel exciting, which, frankly, is part of their charm.
Experiences Related to Making Edible Cookie Shots
The first time I made edible cookie shots, I expected a flawless victory. I had seen pretty pictures, read enough baking tips to feel unreasonably confident, and assumed the cookies would emerge from the oven already aware of their purpose in life. That did not happen. The first batch puffed up like tiny domes, the centers nearly vanished, and one cup cracked on removal like it had been personally offended by the whole project. But once I pressed the centers back down, brushed in some melted chocolate, and filled them with cold milk, the magic happened. Suddenly the tray looked festive, playful, and far more impressive than the amount of chaos that had preceded it.
That is probably what makes this recipe so satisfying. It is interactive. You are not just mixing, scooping, and baking. You are shaping, adjusting, rescuing, decorating, and then, at the very end, watching someone’s face light up when they realize the cup is edible too. It has the same delight factor as an ice cream cone bowl or a chocolate-dipped waffle cup, but it feels even more personal because the structure is homemade. People do not expect cookies to be useful containers, which gives the whole dessert a tiny element of surprise.
I have also found that edible cookie shots create the kind of kitchen memories regular cookies do not always manage on their own. Standard chocolate chip cookies disappear fast, sure, but nobody usually gathers around the counter to debate which filling is best. Cookie shots start conversations. Some people want classic cold milk. Some vote for chocolate milk. Someone always asks if strawberry milk would be weird. It would not, by the way. It would be excellent. Then another person suggests adding whipped cream, and before long the kitchen has turned into a very cheerful dessert lab.
They are especially fun to make for parties because they invite a little customization without requiring a full-scale baking production. You can line some with dark chocolate, some with white chocolate, and add different toppings around the rim. Crushed cookies, mini chocolate chips, sprinkles, toasted coconut, or finely chopped nuts all work beautifully. Guests love choosing their favorite, and the dessert table instantly looks more thoughtful. It is one of those tricks that makes people think you planned everything with cinematic precision, even if you were still washing the mixing bowl ten minutes earlier.
There is also a practical lesson hidden inside the experience: cookie shots teach patience. You cannot rush the cooling stage. You cannot skip the shaping step. You cannot fill them too early and expect crisp perfection forever. The recipe rewards timing and restraint, two qualities that desserts do not always encourage. In a strange way, that makes these little treats feel more satisfying. They are playful, but they still ask you to pay attention.
Perhaps my favorite part is what happens after serving. With cake, there are usually forks left on plates and frosting smears on napkins. With cookie shots, there is this wonderful final moment where everyone drinks the filling and then eats the container. Nothing feels wasted, and the dessert ends with a bite instead of a cleanup problem. That alone gives the recipe major points in my book.
So yes, edible cookie shots are fun to look at, but the real experience is bigger than that. They turn baking into an event. They make ordinary milk feel like a dessert course. They create little moments of surprise, laughter, and “I need this recipe immediately” energy. And in a world full of rushed snacks and forgettable sweets, that is more than enough reason to keep this recipe in rotation.