Table of Contents >> Show >> Hide
- What “Fab Freebie” Really Means (And Why It Works)
- A Little Bit Bunny (Williams): The Design Inspiration Behind the Pun
- Why Mirrors Are the MVP of “Instant Upgrade” Decor
- How to Get the “Bunny-ish” Statement Mirror Look on a Real-World Budget
- The “Little Bit Bunny” Freebie Toolkit: Printables & Templates That Actually Get Used
- Bring Both Bunnies Together: A Mirror Moment + Printable Art Hack
- Printing Tips for a Fab Freebie That Looks Legit
- Hosting Your Own “Fab Freebie” (Giveaway or Download) Without the Headache
- Eco-Friendly Bunny: Make It Cute, Make It Smarter
- Wrap-Up: A Fab Freebie Is a Mood
- Experience Notes: 10 Real-World Lessons From “Little Bit Bunny” Season (Approx. )
- 1) The Mirror Shuffle Is Normal
- 2) The “Pretty Thing” Rule Beats Every Measuring Tape
- 3) Printables That Get Used Are the Ones That Do a Job
- 4) Cardstock Is the MVP, but Only If Your Printer Agrees
- 5) Kids Love Decorating More Than Cutting (Adults Too, Quietly)
- 6) The Best “Fab Freebie” Feeling Is When It Looks Custom
Every spring, the internet collectively remembers two truths: (1) pastels are basically a food group, and (2) bunnies
have an unfair advantage in the “most likely to end up on your mantel” competition. But this post isn’t just about
fluffy-eared cuteness. It’s about a Fab Freebie mindset: using one “wow” element (often free or
budget-friendly) to refresh a space, spark a craft night, or level up your seasonal decor without lighting your wallet
on fire.
The phrase “It’s A Little Bit Bunny” is a wink-and-nod pun (you know the one) and it also points to a very real design
world Bunny: Bunny Williams, a beloved American interior designer known for warm, layered, livable rooms.
So today we’re going to do both kinds of bunny: design Bunny (mirrors, style, light, “ooh, fancy”) and
spring Bunny (printables, crafts, and the kind of cheerful chaos that involves glue sticks).
What “Fab Freebie” Really Means (And Why It Works)
A great freebiewhether it’s a printable, a template, a community giveaway, or a simple patterndoes something powerful:
it removes the “I’d do it if I had the right stuff” barrier. When the starting line is free (or close to it),
creativity shows up in sweatpants and somehow still looks good in photos.
From a design perspective, freebies also do something sneaky-smart: they help you test a look. Not sure
if your entry needs a big statement mirror? Try the placement first with paper. Not sure if bunny art will feel “sweet”
or “nursery”? Print it, tape it up, live with it for 48 hours, and let your brain vote.
A Little Bit Bunny (Williams): The Design Inspiration Behind the Pun
Bunny Williams has built a reputation for interiors that feel collected, comfortable, and confidentclassic without
being predictable. Her work often mixes old and new pieces, celebrates texture, and prioritizes how a room actually
lives (because a home is not a museum… unless your museum has snack drawers and a dog bed).
One reason she’s such an easy springtime muse is that her approach pairs beautifully with seasonal layers: a mirror to
bounce light, a fresh arrangement, a small dose of whimsy, and suddenly the room feels awake again.
Why Mirrors Are the MVP of “Instant Upgrade” Decor
If decor had a superhero draft, mirrors would go in the first round. A well-placed mirror can:
- Reflect natural light and brighten darker corners.
- Make rooms feel larger by adding visual depth.
- Create a focal point without needing a full furniture redo.
- Double as art when the frame is sculptural or bold.
The trick is not just “add mirror, receive compliments.” It’s where, what size, and what it reflects.
If your mirror is reflecting a gorgeous window view: congratulations, you’re a genius. If it’s reflecting your laundry
pile: congratulations, you’ve invented the world’s most honest installation.
The Three Reflection Rules (No Math Required)
- Opposite a window is the classic move for brighter rooms.
- At an angle can catch light without mirroring the entire outdoors like a surveillance system.
- Reflect something pretty: art, greenery, a lamp, or a styled vignette.
Size Matters (Yes, In Mirrors)
Undersized mirrors can look like they got lost on the way to a dollhouse. When in doubt, go biggerespecially in
entries, dining rooms, and living rooms where you want impact. Oversized mirrors also feel more “designer,” which is a
polite way of saying “it looks expensive even when it wasn’t.”
How to Get the “Bunny-ish” Statement Mirror Look on a Real-World Budget
Designer mirrors can be breathtaking… and also cost the same as a small used car with a decent cup holder. The good news:
you can capture the vibe without paying luxury prices.
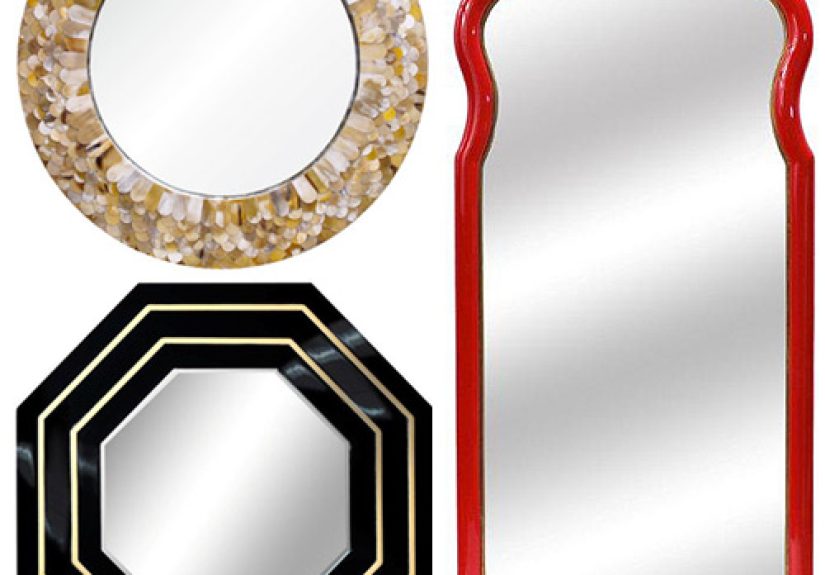
1) Hunt for Shape: Curves, Octagons, Sunbursts, and Scallops
The fastest way to make a mirror feel special is the outline. Look for:
- Octagonal or geometric frames (classic with a crisp edge)
- Scalloped/ruffled frames (playful, feminine, high-impact)
- Bold color lacquer (one statement piece does the heavy lifting)
- Antiqued finishes (warmth, depth, and “I have stories” energy)
2) Upgrade a Plain Mirror in One Afternoon
If you already have a basic mirror, you can upgrade it with a DIY frame. Options include:
- Trim molding + paint (clean and tailored)
- Plywood base + scalloped edge (hello, ruffle effect)
- Rub ’n Buff or metallic paint (instant “aged brass” mood)
- Leather strap hanger (a modern touch that looks custom)
Pro tip: before committing, tape kraft paper to the wall in the mirror’s size. Stand back. If it looks too small, it is.
Paper doesn’t lie. Paper is brutally honest. Paper is your friend.
3) Hang It Like You Mean It (Safety Edition)
Mirrors are not the place for “eh, that nail seems fine.” Use hardware rated for the mirror’s weight, and anchor into
studs or use appropriate wall anchors. If you’re placing a large mirror in a high-traffic spot (hello, hallway), treat
it like you would a heavy piece of art: stable, secure, and not one accidental elbow away from disaster.
The “Little Bit Bunny” Freebie Toolkit: Printables & Templates That Actually Get Used
Now for the other bunny: the one that hops into crafts, classroom parties, and that one neighbor who goes hard on seasonal
porch decor (we respect the dedication). Here are freebie-style ideas that tend to deliver big joy for minimal effort:
Printable Bunny Ear Headbands
A classic for kids (and adults who are willing to commit to a theme). Print on cardstock, cut, decorate, and attach to a
paper band. Add florals, polka dots, or glitter if your household believes restraint is a rumor.
Bunny Gift Tags & Treat Toppers
The smallest printable can make a store-bought treat look handmade. Use them for favor bags, carrot-themed snack cups,
or “some bunny loves you” notes. (Yes, we’re doing bunny puns. It’s spring. It’s allowed.)
Bunny Garland & Bunting
If you want maximum decor per minute, garland wins. Print, cut, string, done. Hang it on a mantel, across a dining
hutch, or in an entry where it greets guests like, “Welcome, please enjoy the whimsy.”
Coloring Pages That Double as Decor
Free printable coloring pages aren’t just for keeping kids busy while you attempt to drink coffee while it’s still warm.
Once colored, they can become:
- Fridge art (the original gallery wall)
- Gift wrap panels for small boxes
- Place mats for a spring brunch
- Mini posters in inexpensive frames
Bring Both Bunnies Together: A Mirror Moment + Printable Art Hack
Want a fast, photo-friendly project that nods to Bunny Williams style and the season? Try this:
create a “mirror vignette” that pairs a statement mirror with a rotating, free printable art piece.
Step-by-Step: The Rotating Printable Art Shelf
- Pick your spot: entry table, mantel, or a console under a mirror.
- Add a frame: thrifted, modern, or even a clipboard for casual charm.
- Choose a printable theme: bunny silhouette, spring botanicals, or a simple typographic pun.
- Layer in texture: a small plant, a woven basket, a candle, or a stack of books.
- Finish with one “real” element: fresh tulips, faux stems, or a bowl for keys.
This works because the mirror provides the “designer anchor,” while the printable provides seasonal personality you can
swap whenever the mood changes (or whenever you decide it’s officially “too early” for summer decoran argument as old as time).
Printing Tips for a Fab Freebie That Looks Legit
The difference between “cute printable” and “wow, you made that?” is often just paper and settings.
Paper Picks
- Cardstock for garlands, tags, and headbands (sturdier, cleaner edges).
- Matte photo paper for art prints (less glare, richer color).
- Sticker paper for labels and treat toppers (fast and mess-free).
Printer Settings That Save Your Sanity
- Select the correct paper type (plain vs. heavyweight vs. photo) so ink lays down properly.
- If ink smears on thicker stock, look for a “thick paper” or similar setting.
- Print a test page firstespecially for color-heavy designs.
If You Use a Cutting Machine
Tools like Cricut can be a game-changer for stickers, labels, and precise cutouts. “Print Then Cut” workflows let you
print a design on your home printer, then have the machine cut it accuratelygreat for bunny tags, cupcake toppers, and
anything with tiny ears you don’t want to hand-cut at midnight.
Hosting Your Own “Fab Freebie” (Giveaway or Download) Without the Headache
If you run a blog, small shop, or community group, a spring freebie can be a smart way to build goodwill and grow an
audience. Keep it simple:
For Giveaways
- Pick one standout prize (mirrors, frames, craft bundles).
- Set clear eligibility (especially if shipping is involved).
- Keep entry actions reasonablenobody wants to “like 80 pages and promise their first-born.”
- Give a firm close date and announce winners transparently.
For Free Downloads
- Offer a one-page printable that solves a real need (tags, labels, simple wall art).
- Include print instructions (paper type, scale, trimming notes).
- Make it easy to use on mobile and desktopfriction kills fun.
Eco-Friendly Bunny: Make It Cute, Make It Smarter
Spring crafts can be joyful and less wasteful. Save packaging and paper scraps for crafts, reuse gift bags,
and keep a “craft stash” box so every printable doesn’t require a brand-new shopping run. Bonus: it makes you look
mysteriously organized, like someone who definitely folds fitted sheets.
Wrap-Up: A Fab Freebie Is a Mood
“It’s A Little Bit Bunny” can mean a lot of things: a design nod to Bunny Williams’ timeless comfort, a spring refresh
powered by mirrors and light, or a bunny-craft moment that turns your kitchen table into a glitter-adjacent studio.
The common thread is simple: start with one delightful piecefree or budget-friendlyand build from there.
Experience Notes: 10 Real-World Lessons From “Little Bit Bunny” Season (Approx. )
You can read a hundred tips, but the best craft-and-decor wisdom usually comes from lived realityaka the moment your
printer decides it’s on strike because you loaded cardstock “slightly too confidently.” Here are some experience-based
lessons DIY folks tend to learn every spring, gathered from the kinds of patterns you see across homes, classrooms,
and community craft nights.
1) The Mirror Shuffle Is Normal
People rarely hang a mirror once and call it a day. The first placement is a hypothesis. The second is “closer,” and
the third is the one you keep. A common win: moving a mirror so it reflects a window or a lamp instead of a blank wall.
Suddenly the whole room looks brighter, and everyone swears you “changed the lighting.” You didn’t. You changed the
reflection. That’s the secret sauce.
2) The “Pretty Thing” Rule Beats Every Measuring Tape
When people feel like a mirror looks “off,” it’s often not heightit’s what the mirror is reflecting. Households that
love their mirror setups usually have the mirror facing something intentional: a plant, a piece of art, a console
vignette, even a simple bowl for keys. The reflection becomes a second styled moment, which makes the space feel more
finished without adding clutter.
3) Printables That Get Used Are the Ones That Do a Job
Bunny coloring pages are adorable, but the printables that truly earn their keep tend to be functional: gift tags, treat
toppers, labels, place cards, and garlands. They solve a “how do I make this look special fast?” problem. People print
them, cut them, and actually use themespecially for school parties and quick brunch setups.
4) Cardstock Is the MVP, but Only If Your Printer Agrees
A very common experience: regular paper looks floppy, so you upgrade to cardstock… and now the printer smears ink or
feeds crooked. The fix is usually boring (and therefore powerful): adjust paper type settings, slow the print with a
thick-paper option if available, and load fewer sheets at a time. Once people find the settings that work, they tend to
stick with one or two “trusted” paper weights all year.
5) Kids Love Decorating More Than Cutting (Adults Too, Quietly)
In group settings, the happiest tables usually split tasks: one person cuts, everyone else decorates. Bunny ear
headbands are a perfect examplecutouts go faster with a helper, and the decorating is where the personality shows up:
polka dots, watercolor washes, fake flowers, dramatic eyelashes (yes, really), and glitter that will still be found in
June.
6) The Best “Fab Freebie” Feeling Is When It Looks Custom
The magic moment is when someone sees your setup and assumes you bought it from a boutique. That usually happens when
you keep the palette simple (two or three colors), repeat one motif (bunny silhouette, scallop edge, or pastel stripe),
and add one “real” texture like greenery, a woven basket, or a metallic frame. Freebie + styling = looks expensive,
feels fun.
Bottom line: the most successful bunny season isn’t the one with the most projects. It’s the one where one mirror,
one printable, and one cheerful afternoon make your home feel lighterliterally and emotionally.


