Table of Contents >> Show >> Hide
- Why a Denim Wall Pocket Organizer Is So Fantastic
- Supplies: What You’ll Need for a Wall Pocket Organizer from Old Jeans
- Step-by-Step: How to Make a Fantastic Wall Pocket Organizer from Old Jeans
- Room-by-Room Ideas for Your Denim Wall Organizer
- Care, Durability, and Safety Tips
- Frequently Asked Questions About Denim Wall Pocket Organizers
- Real-Life Experiences with a Wall Pocket Organizer from Old Jeans
Got a stack of old jeans that are too worn to wear but too beloved to toss?
Instead of letting them hog closet space, turn them into a fantastic wall pocket organizer.
Inspired by popular Hometalk-style denim projects, this simple DIY transforms ripped knees and faded pockets
into seriously useful storage for kids’ rooms, teen spaces, craft corners, and even entryways.
Think of it as a mash-up of a bulletin board, a shoe organizer, and your favorite pair of jeans.
You get tons of pockets for mail, markers, school supplies, remotes, and random “I’ll deal with this later” stuff,
all hanging neatly on the wall instead of living permanently on the counter.
Why a Denim Wall Pocket Organizer Is So Fantastic
1. It’s the ultimate upcycled storage project
A wall pocket organizer from old jeans is an easy way to upcycle denim that’s too stained or torn
for donation. The heavy fabric is made to take a beating, so it handles daily use better than flimsy fabric
organizers. Plus, all those pockets, rivets, and stitching details instantly give your wall a cool,
casual vibe that store-bought organizers can’t match.
2. It looks great in kids’ and teen rooms
Denim organizers show up again and again in kids’ and teens’ room inspiration because they’re:
- Sturdy enough to hold phones, notebooks, controllers, and small toys.
- Easy to customize with patches, paint, embroidery, or iron-on letters.
- Neutral enough to match everythingfrom superhero decor to boho bedrooms.
If you’ve ever stood in the doorway of a teen’s room wondering where to even start,
a large denim wall pocket organizer gives everything a “designated landing zone.”
3. It works in almost every room
Upcycled jeans organizers aren’t just for kids. Hang one in:
- The entryway for keys, sunglasses, mail, and dog leashes.
- The office for pens, notepads, chargers, and sticky notes.
- The craft room for scissors, glue sticks, ribbons, and small tools.
- The bathroom for brushes, hair ties, toiletries, and makeup palettes.
Because the pockets come in different shapes and sizes, they’re perfect for corralling little things
that never quite find a home.
Supplies: What You’ll Need for a Wall Pocket Organizer from Old Jeans
Exact supplies will vary depending on the size and style of your organizer, but here’s a reliable
starting list based on popular denim organizers:
- 3–5 pairs of old jeans (more pairs = more pockets and variety).
- Backing material, such as:
- A large piece of denim cut from the legs of the jeans.
- Sturdy cotton canvas.
- Thin plywood, MDF, or heavy cardboard if you prefer a rigid base.
- Hanging hardware:
- Dowel, curtain rod, or rustic branch.
- Hooks, nails, or a French cleat for heavier organizers.
- Sewing supplies:
- Sewing machine with a needle for denim (or heavy-duty hand needle).
- Strong thread.
- Pins or clips.
- Fabric scissors or rotary cutter.
- Iron and ironing board.
- Optional extras:
- Fusible interfacing to stiffen your backing.
- Fabric glue for a low- or no-sew version.
- Fabric paint, patches, stencils, or iron-on letters for decorating.
- Ribbon, twill tape, or jean waistbands for hanging loops.
Step-by-Step: How to Make a Fantastic Wall Pocket Organizer from Old Jeans
Step 1: Choose and prep your jeans
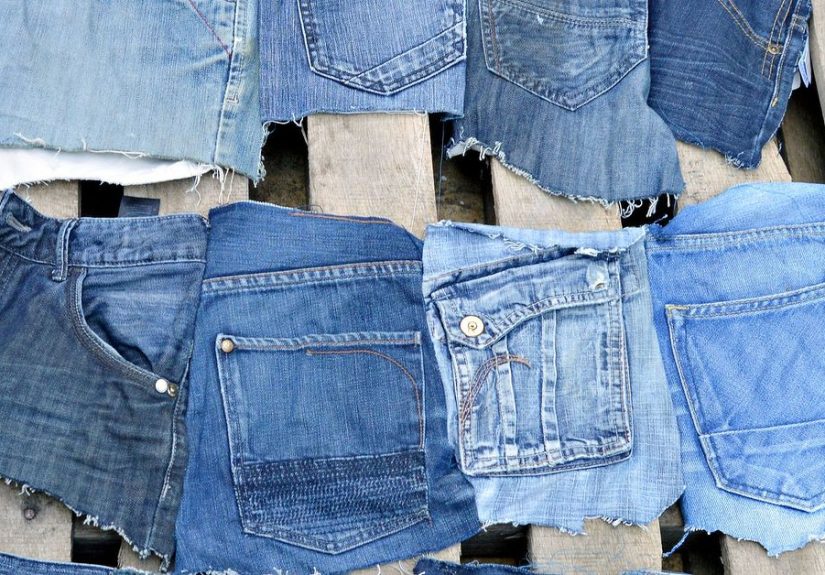
Pull out several pairs of jeans in different washeslight, medium, dark, black, even colored denim.
Mix-and-match denim gives your organizer that patchwork “crafted on purpose” look.
- Wash and dry the jeans first to remove dust, dirt, and any lingering chemicals.
- Iron the areas you’ll be cutting so the pockets lay flat and are easier to work with.
Step 2: Cut out the pockets
Lay each pair of jeans flat and cut around the pockets, leaving about 1/2–1 inch of fabric
around the pocket edges. This extra border gives you room to sew or glue without sacrificing pocket space.
Don’t forget:
- Back pockets usually make larger, deeper storage spots.
- Front pockets, coin pockets, and side cargo pockets are great for small items like lip balm or USB drives.
- Waistbands and belt loops can be trimmed off and saved for decorative trim or hanging loops.
Step 3: Prepare your backing
Decide how big you want your organizer to be. A common size is roughly
18–24 inches wide by 24–36 inches tall, but you can go longer or wider depending on wall space.
For a fabric backing:
- Cut denim or canvas about 1–2 inches larger on all sides than your final desired size.
- Press the edges under and stitch all around to create a neat hem.
- For a sturdier finish, fuse heavy interfacing to the back of your fabric before hemming.
For a rigid backing:
- Cut cardboard, MDF, or thin plywood to your chosen dimensions.
- Wrap it in denim like you’d wrap a present, gluing or stapling the fabric on the back.
Step 4: Plan your pocket layout
This is the fun design part. Spread your backing on a table or floor and start arranging the pockets.
- Mix different pocket shapes and sizes in a grid, staggered rows, or a more organic layout.
- Put deeper pockets at the bottom to hold heavier items like notebooks or chargers.
- Use small pockets near the top for pens, scissors, and spare change.
Snap a quick photo of the layout you like so you can remember it once you start sewing or gluing.
Step 5: Attach the pockets
If you’re sewing:
- Pin each pocket in place, starting from the bottom row and working upward.
- Sew around the sides and bottom of each pocket, staying close to the original pocket seam for strength.
- Backstitch at the top corners of each pocket to help prevent the corners from tearing with use.
If you’re going with a low- or no-sew organizer:
- Use a strong fabric glue rated for heavy fabrics like denim.
- Apply glue close to the edges and press firmly.
- Allow full drying time before hanging or stuffing the pockets.
Step 6: Add hanging loops and hardware
You can hang your denim wall organizer like a small tapestry. Popular options include:
- Waistband loops: Cut jean waistbands into short sections and sew them along the top as loops.
- Ribbon or twill tape: Stitch 3–5 evenly spaced loops along the top edge.
- Grommets: Install metal grommets across the top and thread a rod or rope through.
Slide a dowel, curtain rod, or rustic branch through the loops and rest it on hooks or nails in the wall.
Step 7: Style and personalize
Now the fun really starts. Dress up your denim wall organizer with:
- Iron-on patches, numbers, or letters (great for labeling pockets).
- Fabric paint or stencils for room themes (galaxy, sports, boho, etc.).
- Embroidery around certain pockets for a handmade look.
You can even turn it into a reusable advent or countdown calendar by numbering each pocket.
Room-by-Room Ideas for Your Denim Wall Organizer
In a kids’ room
- Assign each pocket a category: art supplies, trading cards, small toys, hair accessories, and more.
- Let kids pick patches or stickers for their “own” pockets so they’re more likely to use them.
- Hang it low enough that little hands can reach the pockets safely.
In a teen room
- Use pockets for phone chargers, earbuds, sunglasses, and favorite beauty products.
- Add metal studs or fabric paint to match their stylegrunge, minimalist, boho, or sporty.
- Reserve one pocket for “stuff that must leave this room today” (like forms that need signatures).
In a craft or hobby space
- Store scissors, rotary cutters, rulers, markers, glue sticks, and paintbrushes.
- Use small pockets for pins, bobbins, washi tape, and embroidery floss.
- Label pockets with tags or chalkboard labels so everything has a permanent home.
In an entryway or mudroom
- Sort incoming and outgoing mail into separate pockets.
- Keep keys, dog leashes, and transit passes in easy reach.
- Dedicate one row of pockets to each family member for their grab-and-go essentials.
Care, Durability, and Safety Tips
A wall pocket organizer from old jeans is sturdy, but a little extra care will help it
last for years:
- Don’t overload the pockets. Phones, remotes, and small notebooks are fine; textbooks and heavy tools are better stored elsewhere.
- Secure it well. Use wall anchors or heavy-duty hooks if your organizer is large or heavily loaded.
- Dust occasionally. Vacuum the organizer with a brush attachment or give it a quick shake outside.
- Spot-clean only. Use a damp cloth and mild detergent on stains; avoid saturating the backing.
- Watch the hardware. Rivets and metal buttons can be sharp; avoid placing the organizer where a small child might bump into it.
Frequently Asked Questions About Denim Wall Pocket Organizers
Do I have to sew, or can I make a no-sew version?
You can absolutely make a no-sew DIY pocket organizer. Just use a heavy-duty fabric glue
designed for thick materials like denim. Follow the drying times carefully and avoid overloading
the pockets, especially at the start.
How many pockets do I need?
For a small organizer, 6–9 pockets works well. For a full-size wall organizer in a kids’ or teens’ room,
12–20 pockets gives you a nice mix of storage without overwhelming the wall.
What if my jeans are really worn out?
As long as the pockets themselves are intact, you’re fine. Avoid pockets with big holes or blown-out corners
unless you’re willing to patch or reinforce them. Distressed denim can actually add character, especially
if you lean into the rugged, upcycled look.
Can I wash the organizer?
If your backing is fabric and everything is sewn, you might be able to hand-wash it gently and air-dry it.
But for most people, spot-cleaning and vacuuming are safer options. If you’ve glued pockets or used cardboard,
keep water to an absolute minimum.
Real-Life Experiences with a Wall Pocket Organizer from Old Jeans
It’s one thing to scroll past a gorgeous denim wall organizer on a site like Hometalk and think,
“I should make that someday,” and another thing to actually grab scissors and sacrifice
your favorite old jeans. Here’s what tends to happen after people finally go for it.
First, there’s the nostalgia factor. As you cut pockets from different pairs of jeans, you remember
when you wore thema concert, a vacation, those Saturday errands that turned into an all-day adventure.
Once the pockets are all stitched together on the wall, those memories end up baked right into the room’s decor.
One parent who made a denim organizer for her teenager joked that the project was “part storage system, part
scrapbook,” because her kid kept pointing out which pockets came from which jeans.
Second, most people underestimate just how much clutter disappears once everything has a designated pocket.
A teenager who used to drop headphones, controllers, and chargers on the floor started tossing them into
separate pockets insteadmostly because it was easier. The rule was simple: if it fits in a pocket, it lives
in a pocket. Within a week, the floor was more visible, and the “Where’s my charger?” chorus basically vanished.
People who sew also love that this project clears out their “I’ll use this eventually” scrap pile.
Instead of saving legs and waistbands for years, they get turned into something practical.
Crafters often report that once they make one denim wall organizer, they start
thinking of spin-offs: a smaller version for behind a bedroom door, a bedside organizer that tucks
under the mattress, or a narrow vertical strip for the side of a wardrobe or fridge wall.
There are a few lessons learned the hard way, though. One big one: plan your layout before you sew anything.
It’s tempting to start attaching pockets right away, but taking time to balance colors, sizes, and pocket heights
makes a big difference in how polished the final piece looks. Another common tip is to reinforce the top corners
of heavily used pockets, either with extra stitching or a small patch of denim on the back. That little bit of
extra work keeps corners from tearing after months of daily use.
Hanging height matters, too. Parents of younger kids usually hang organizers lower so kids can reach the pockets
themselves. In shared spaces, it often makes sense to create “zones”top pockets for adults, lower pockets for
kids. Some people even assign each family member a column of pockets so everyone knows where their keys,
sunglasses, and receipts should go. It sounds simple, but that kind of visual system can seriously cut down on
morning chaos.
Finally, a lot of DIYers say this project is surprisingly empowering. It doesn’t require advanced sewing skills,
and it turns an everyday, worn-out item into something you’ll use and see every day. Once the organizer is up on
the wall, there’s a nice little hit of pride every time you slip something into a pocket and think,
“I made this from old jeans.” The project fits perfectly with the Hometalk spiritcreative, budget-friendly,
and just the right amount of scrappy. And the next time a pair of jeans wears out, you won’t be annoyed.
You’ll just think, “New pockets!”