Table of Contents >> Show >> Hide
- What Is a Fruit Crisp?
- Why This Fruit Crisp Recipe Works
- Ingredients for the Best Fruit Crisp
- How to Make Fruit Crisp
- Fruit Crisp Variations
- Tips for a Perfect Fruit Crisp
- Serving Ideas
- How to Store and Reheat Fruit Crisp
- Common Mistakes to Avoid
- Personal Experience: What Making Fruit Crisp Teaches You
- Conclusion
There are desserts that demand precision, patience, and a sink full of dishes. Then there is fruit crisp: the cozy, golden, bubbling dessert that says, “Relax, I brought oats.” A good fruit crisp recipe is the kind of kitchen magic that works in nearly every season. Apples in fall, berries in summer, peaches when the farmers market is showing off, pears when you want something elegant, or frozen fruit when your refrigerator is giving “survival mode.”
The beauty of a homemade fruit crisp is that it feels special without behaving like a diva. No pie crust. No rolling pin. No complicated pastry skills. Just tender fruit, a little sugar and lemon, a buttery oat topping, and enough cinnamon to make your kitchen smell like someone lit a candle called “Grandma’s Weekend Visit.”
This guide gives you a flexible, dependable fruit crisp recipe you can use with apples, berries, peaches, cherries, pears, plums, or a mixed-fruit combination. You will also learn how to adjust sweetness, thicken the filling, get a crisp topping that actually stays crisp, and avoid the dreaded fruit soup situation. Delicious? Yes. Fussy? Absolutely not.
What Is a Fruit Crisp?
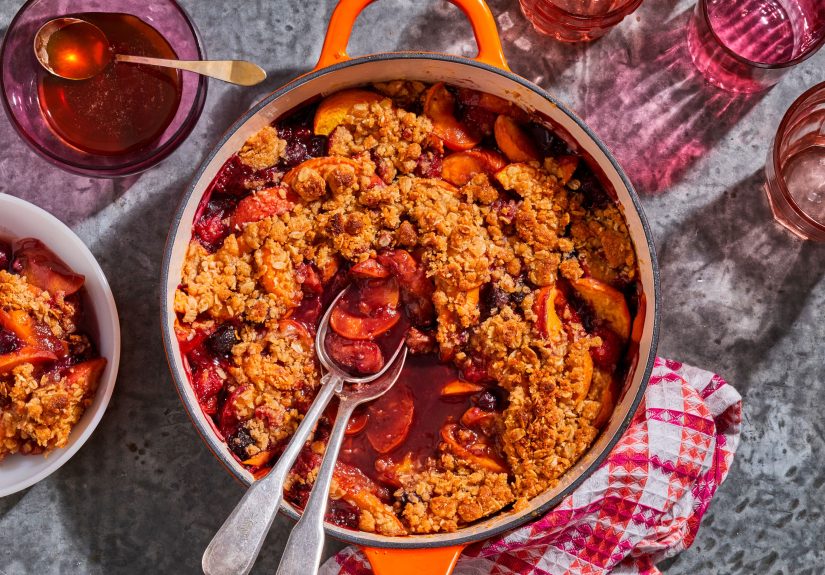
A fruit crisp is a baked dessert made with a sweetened fruit filling and a crumbly topping, usually containing oats, flour, sugar, butter, and spices. As it bakes, the fruit becomes soft and jammy while the topping turns golden, crunchy, and buttery.
Fruit crisp is often compared to crumble and cobbler. The names can overlap depending on region and family tradition, but generally, a crisp includes oats in the topping, a crumble may skip the oats, and a cobbler has a biscuit-like or batter-style topping. In other words, crisp is the crunchy friend, crumble is the buttery cousin, and cobbler is the one who brings biscuits to dessert and somehow gets away with it.
Why This Fruit Crisp Recipe Works
This recipe works because it balances three key elements: fruit, thickener, and topping. Too much sugar can make the filling watery. Too little thickener can leave you with a spoonable fruit puddle. Too much flour in the topping can make it dry. The goal is simple: juicy fruit underneath, crisp texture on top, and enough buttery crumbs to make everyone politely pretend they are not picking at the corners of the baking dish.
The recipe is also flexible. You can use fresh or frozen fruit, adjust the spices, add nuts, make it gluten-free with certified gluten-free oats and a suitable flour blend, or serve it warm with vanilla ice cream for the classic “I deserve this” moment.
Ingredients for the Best Fruit Crisp
For the Fruit Filling
- 6 cups sliced or chopped fruit, fresh or frozen
- 1/3 to 2/3 cup granulated sugar or light brown sugar, depending on fruit sweetness
- 2 tablespoons lemon juice
- 1 teaspoon lemon zest or orange zest, optional
- 2 tablespoons cornstarch, flour, or tapioca starch
- 1 teaspoon vanilla extract
- 1/2 teaspoon ground cinnamon
- 1/4 teaspoon salt
For the Crisp Topping
- 1 cup old-fashioned rolled oats
- 3/4 cup all-purpose flour
- 2/3 cup packed light brown sugar
- 1/2 teaspoon ground cinnamon
- 1/4 teaspoon salt
- 1/2 cup cold unsalted butter, cut into small cubes
- 1/2 cup chopped pecans, walnuts, or almonds, optional
Best Fruits to Use
The best fruit crisp recipe is the one that uses fruit you already love. Apples are classic because they soften beautifully while keeping some structure. Peaches make a juicy summer crisp with sunny sweetness. Blueberries, blackberries, and raspberries create a bold berry filling that looks dramatic with very little effort. Pears bring a soft, floral sweetness. Cherries add bright flavor and a deep ruby color.
For a balanced filling, combine firm fruit with juicy fruit. Try apple-blueberry, peach-raspberry, pear-cranberry, cherry-plum, or blackberry-peach. If the fruit is very tart, increase the sugar slightly. If the fruit is very sweet, reduce the sugar and add a little extra lemon juice.
How to Make Fruit Crisp
Step 1: Prepare the Baking Dish
Preheat the oven to 350°F. Lightly butter or spray a 9-inch square baking dish, a 2-quart baking dish, or a similar oven-safe pan. If you want a thicker crisp, use a slightly smaller dish. If you want more surface area for topping, use a wider dish. More topping surface means more crunch, which is a lifestyle choice I fully support.
Step 2: Make the Fruit Filling
Place the fruit in a large mixing bowl. Add sugar, lemon juice, zest if using, cornstarch, vanilla, cinnamon, and salt. Toss until the fruit is evenly coated. Let the mixture sit for 5 to 10 minutes while you prepare the topping. This short resting time helps the sugar draw out a little juice and gives the thickener a head start.
If you are using frozen fruit, do not worry if the mixture looks slightly frosty or juicy. You can bake most frozen fruit without thawing, but add an extra tablespoon of thickener if the fruit releases a lot of liquid. Berries, especially frozen berries, are enthusiastic juice producers. They mean well. They just need boundaries.
Step 3: Make the Oat Topping
In a separate bowl, combine oats, flour, brown sugar, cinnamon, and salt. Add the cold butter cubes. Use your fingertips, a pastry cutter, or a fork to work the butter into the dry ingredients until the mixture forms crumbs and small clumps. Stir in nuts if you are using them.
The topping should hold together when squeezed but still break apart easily. If it looks powdery, keep working in the butter. If it looks greasy, the butter may be too soft; chill the topping for 10 to 15 minutes before baking.
Step 4: Assemble the Crisp
Transfer the fruit filling to the prepared baking dish and spread it into an even layer. Sprinkle the topping over the fruit, covering it completely but not packing it down. Loose topping bakes into better texture. Pressed topping can become dense, and nobody came here for oat cement.
Step 5: Bake Until Golden and Bubbling
Bake for 40 to 50 minutes, or until the topping is golden brown and the fruit filling bubbles around the edges. Bubbling is important because it shows the thickener has activated. If the topping browns too quickly before the filling bubbles, loosely cover the dish with foil and continue baking.
Let the fruit crisp cool for at least 15 minutes before serving. This gives the filling time to thicken. It will still be warm, spoonable, and glorious, but less likely to run across the plate like it has somewhere urgent to be.
Fruit Crisp Variations
Apple Crisp
Use peeled or unpeeled sliced apples. Granny Smith, Honeycrisp, Braeburn, Pink Lady, and Golden Delicious all work well. Add 1 teaspoon cinnamon, a pinch of nutmeg, and 1 tablespoon extra lemon juice. Apple crisp is especially good with vanilla ice cream or a drizzle of caramel sauce.
Berry Crisp
Use blueberries, raspberries, blackberries, strawberries, or a mix. Because berries are juicy, use 3 tablespoons cornstarch instead of 2. Add lemon zest for brightness. Berry crisp is beautiful, quick, and dramatic enough to look like you worked harder than you did.
Peach Crisp
Use sliced fresh peaches, nectarines, or a peach-blueberry mix. You can peel the peaches if you prefer a smoother filling, but it is not required. Add a little vanilla and a pinch of ginger for warmth. Peaches love brown sugar, oats, and pecans.
Pear Cranberry Crisp
Use ripe but firm pears with fresh or frozen cranberries. The pears bring sweetness while the cranberries add tart sparkle. Increase the sugar slightly and add orange zest. This version tastes like a holiday dessert that put on a cardigan.
Tips for a Perfect Fruit Crisp
Use Old-Fashioned Oats
Old-fashioned rolled oats give the topping the best chewy-crisp texture. Quick oats can work in a pinch, but they create a softer topping. Steel-cut oats are too firm and will not bake properly in this style of dessert.
Keep the Butter Cold
Cold butter creates distinct crumbs that bake into a crisp, golden topping. Soft butter can make the topping spread too much, while melted butter can create a denser texture. If your kitchen is warm, chill the topping before baking.
Do Not Skip the Lemon
Lemon juice does not make the crisp taste sour. It sharpens the fruit flavor and balances the sweetness. Even apples and peaches benefit from a little acidity. Think of lemon as the tiny stage manager making everyone perform better.
Watch for Bubbles, Not Just Color
A golden topping is wonderful, but the filling also needs to bubble. That bubbling tells you the fruit juices have heated enough to thicken with the cornstarch or flour. If you remove the crisp too early, the filling may be thin.
Serving Ideas
Fruit crisp is best served warm, but it is also excellent at room temperature. The classic topping is vanilla ice cream, which melts into the fruit and creates a creamy sauce. Whipped cream is lighter and lovely with berry crisp. Greek yogurt can turn leftovers into a breakfast-adjacent treat, though whether dessert for breakfast counts as “balance” is between you and your spoon.
You can also serve fruit crisp with crème fraîche, mascarpone, cinnamon whipped cream, caramel sauce, toasted nuts, or a dusting of powdered sugar. For a dinner party, bake individual crisps in ramekins. For a family gathering, make it in a 9×13-inch dish and double the recipe. For emotional emergencies, eat it straight from the pan while standing at the counter. No judgment. The oats make it rustic.
How to Store and Reheat Fruit Crisp
Store leftover fruit crisp covered in the refrigerator for up to 4 days. The topping will soften as it sits, but the flavor will still be delicious. To bring back some crunch, reheat it uncovered in a 350°F oven for 15 to 20 minutes. You can also microwave individual servings, though the topping will be softer.
Fruit crisp can be assembled ahead of time, but for the best texture, keep the filling and topping separate until you are ready to bake. The topping can be made a day ahead and refrigerated. The fruit filling can be mixed several hours ahead, though very juicy fruits may release more liquid as they sit.
Common Mistakes to Avoid
Using Too Much Sugar
Fruit crisp should taste like fruit, not just syrup. Start with less sugar if your fruit is ripe and sweet. You can always serve with ice cream for extra sweetness.
Forgetting the Thickener
Without cornstarch, flour, or tapioca starch, juicy fruit can turn watery. Apples need less thickener than berries. Frozen fruit usually needs a bit more.
Overpacking the Topping
Sprinkle the topping loosely. Air pockets help it crisp. A tightly pressed topping can bake into a heavy layer instead of a crumbly crown.
Serving It Too Soon
Yes, the smell will test your character. Still, let the crisp rest for at least 15 minutes. The filling thickens as it cools slightly, and the topping becomes easier to scoop.
Personal Experience: What Making Fruit Crisp Teaches You
One of the best things about making fruit crisp is how forgiving it is. Many desserts behave like final exams. Fruit crisp behaves more like a friendly neighbor who says, “Use what you have.” Over time, making it teaches you to trust your senses: how ripe fruit smells, how much sugar it really needs, when the topping has enough butter, and what bubbling filling looks like when it is ready.
The first time you make a fruit crisp, you may measure everything carefully. That is a good idea. But by the third or fourth time, you start to understand the rhythm. Apples need slicing, berries need almost no effort, peaches may or may not need peeling, and pears become luxurious with just a little cinnamon and orange zest. You learn that a handful of oats can turn leftover fruit into dessert, and that “not enough fruit for a pie” is actually the perfect amount for a small crisp.
Fruit crisp is also a wonderful recipe for using imperfect produce. Slightly soft peaches, a few bruised apples, or berries that are one day away from giving up can still become something warm and beautiful. The oven is generous that way. It softens rough edges, concentrates flavor, and covers minor fruit flaws with a buttery oat blanket. Honestly, we could all use that kind of support.
Another lesson is that texture matters. A fruit crisp is not just about sweetness. The contrast between tender fruit and crunchy topping is what makes it satisfying. That is why old-fashioned oats, cold butter, and a proper bake time are so important. When the topping is golden and the fruit bubbles up at the sides, you get that perfect spoonful: soft, crisp, sweet, tart, buttery, and warm all at once.
There is also something deeply practical about this dessert. You can make it for a holiday meal, a backyard cookout, a weeknight treat, or a casual brunch. It does not require decorating. It does not need perfect slices. In fact, fruit crisp looks best when it is spooned into bowls with a little messy enthusiasm. Add ice cream, and suddenly the mess becomes “rustic charm.” Very convenient branding.
For families, fruit crisp is a great beginner baking recipe. Kids can help toss fruit, stir oats, sprinkle topping, and learn how ingredients transform in the oven. For experienced cooks, it is a blank canvas. You can add cardamom, ginger, maple syrup, toasted almonds, coconut, browned butter, or a splash of almond extract. You can make it classic or creative, simple or dinner-party fancy.
Most of all, fruit crisp reminds you that homemade dessert does not need to be complicated to be memorable. Sometimes the most loved recipes are the ones that arrive warm, smell incredible, and invite everyone to grab a spoon before the ice cream melts. That is the charm of a great fruit crisp recipe: it is humble, flexible, and always welcome at the table.
Conclusion
A great fruit crisp recipe is one of the most useful desserts you can keep in your kitchen routine. It works with fresh or frozen fruit, adapts to every season, and delivers that irresistible combination of bubbling fruit and buttery oat topping. Whether you make apple crisp in October, peach crisp in July, berry crisp in spring, or a mixed-fruit crisp whenever your freezer needs attention, the method stays simple and reliable.
Start with good fruit, balance sweetness with lemon, use enough thickener, and bake until the topping is golden and the filling bubbles. Serve it warm with vanilla ice cream, whipped cream, or yogurt, and do not be surprised when people ask for seconds before finishing firsts. Fruit crisp may be easy, but it never feels ordinary.


