Table of Contents >> Show >> Hide
- Why a classic storage chest is worth building
- Plan the design before you cut anything
- Tools and materials you will likely need
- A practical cut list for a 42-inch classic chest
- Step 1: Break down the panels carefully
- Step 2: Build the carcass and keep it square
- Step 3: Add the face frame and classic trim
- Step 4: Build a lid that looks good and behaves itself
- Step 5: Install hinges and do not skip the lid support
- Step 6: Fill, sand, and prepare for finish
- Common mistakes to avoid when building a wooden storage chest
- Ways to customize your DIY storage chest
- Real-world experience: what building a classic storage chest taught me
- Final thoughts
If your house has blankets, shoes, board games, holiday clutter, or that mysterious pile of “important stuff” nobody is emotionally prepared to throw away, a classic storage chest can earn its keep fast. It hides mess, adds character, and gives you a satisfying reason to buy wood without pretending it’s an “investment.” Better yet, it is one of those woodworking projects that can look heirloom-level fancy without requiring you to spend six months speaking fluent dovetail.
The smartest way to build a classic storage chest is to combine sturdy construction with simple design choices that never go out of style: clean proportions, a solid-looking base, a well-fitted lid, subtle trim, and a finish that makes the wood look like it has opinions. Whether you want a bedroom blanket chest, an entryway catch-all, or a living-room trunk that stores everything except your bad decisions, this guide walks you through the full process from planning and lumber selection to assembly, finishing, and real-life lessons from the shop.
Why a classic storage chest is worth building
A storage chest is one of the most practical furniture projects a DIYer can make. It works in a bedroom, mudroom, hallway, living room, or guest room. It can store blankets, seasonal clothes, keepsakes, toys, craft supplies, or tools for hobbies you definitely still do. And unlike some trendy furniture pieces that peak emotionally in six weeks, a wooden storage chest tends to age well. The style is flexible: paint it for cottage charm, stain it dark for a traditional look, or keep the lines simple for a cleaner transitional design.
It is also a great woodworking project because you can scale the difficulty. A beginner-friendly version uses a plywood carcass with hardwood trim and an edged lid. A more advanced version can use frame-and-panel sides, dovetails, breadboard ends, and molded details. Same destination, different amount of sawdust-induced character development.
Plan the design before you cut anything
Choose a size that fits your room
A classic chest should feel generous without turning into a wooden speed bump. For most homes, a chest around 36 to 48 inches wide, 16 to 20 inches deep, and 18 to 24 inches high works well. If you want a bedroom blanket chest, go longer. If you want an entryway chest that doubles as a visual anchor, keep the height comfortable and the depth modest so people do not trip over it while carrying groceries and existential dread.
A very workable example size is 42 inches wide by 18 inches deep by 20 inches high. That gives you useful storage without making the chest too heavy or awkward to move.
Decide on the construction style
There are two smart ways to approach this project:
- Simple classic build: plywood box, hardwood face frame, applied trim, and a hardwood-edged lid.
- Furniture-style build: solid-wood or frame-and-panel sides, more traditional joinery, and a more decorative top and base.
If your goal is a handsome chest that looks classic and lasts a long time, the first option is tough to beat. Plywood keeps the carcass stable, hardwood trim gives it warmth, and the finished piece can still look like something your grandparents would proudly point at.
Pick wood that matches the final look
For a paint-grade chest, poplar is friendly, affordable, easy to machine, and generally cooperative. For a stain-grade project, oak, maple, cherry, or walnut can all work beautifully depending on the vibe you want. If you want a chest with that traditional aromatic feel, a cedar lining is an optional upgrade. For a simplified build, use hardwood plywood for the main box and solid hardwood for face frames, edging, lid trim, and base details.
If you are new to furniture building, this is not the moment to declare war on twisted bargain-bin boards. Straight lumber makes life easier, glue-ups flatter, and your blood pressure more civilized.
Tools and materials you will likely need
You do not need a museum-grade shop to build a classic storage chest, but you do need accuracy, patience, and clamps. Always more clamps than you think. Woodworking obeys a mysterious law of nature that says every project needs one additional clamp you do not own.
Basic tools
- Table saw or circular saw with a straightedge guide
- Miter saw
- Drill/driver
- Random-orbit sander
- Jigsaw if you want a cutout base or handhold details
- Clamps
- Combination square or speed square
- Tape measure and marking tools
- Router, optional but helpful for trim details
Materials
- 3/4-inch hardwood plywood for the carcass
- 1×2 or 1×3 hardwood for face frames and trim
- 1x material for base molding or top edging
- Wood glue
- Wood screws or brad nails, depending on your method
- Hinges
- Lid stay or soft-close lid support
- Wood filler
- Sandpaper: 120, 180, and 220 grit
- Stain, paint, or clear finish
A practical cut list for a 42-inch classic chest
This is a sample cut list for a beginner-to-intermediate build with a plywood shell and hardwood trim. Adjust for your own design and material thickness.
- Front and back panels: 42 x 20 inches
- Side panels: 16 1/2 x 20 inches
- Bottom panel: 40 1/2 x 16 1/2 inches
- Lid panel: 43 x 19 inches
- Face frame pieces: sized to cover exposed plywood edges
- Base trim or plinth pieces: sized to wrap the lower perimeter
- Lid edging: 1×2 hardwood, mitered or butt-jointed
You can keep the bottom captured in dados if you have the tools, or support it on glued cleats inside the carcass. Dados look cleaner and add strength, but cleats are a perfectly respectable shortcut that most visitors will never interrogate.
Step 1: Break down the panels carefully
Accuracy at this stage saves the whole project. Cut the large panels cleanly and label every piece right away. Front is front. Back is back. “Mystery rectangle” is how projects become educational in all the wrong ways.
When cutting sheet goods, use a sharp blade and support the material well. If you are using a circular saw, clamp a straightedge and let the saw do the work. If the chest will be stained, take extra care to minimize tear-out on visible edges. Cut slightly proud if needed and trim to final dimension for a better fit.
Step 2: Build the carcass and keep it square
Dry-fit the chest first. This is your chance to catch sizing issues before glue enters the chat. Once the fit looks good, assemble the box with glue and either screws from the inside, countersunk fasteners hidden by trim, or brads used only as temporary clamps while the glue cures.
Check for square by measuring diagonally from corner to corner. If the measurements match, you are square. If not, adjust before the glue sets. This sounds boring, but it is the difference between “classic storage chest” and “why does the lid look like it is trying to escape?”
If you are using an interior bottom on cleats, install the cleats first, then set the bottom in place with glue and fasteners. If you are using dadoes or rabbets, slide the bottom in during assembly. In either case, the bottom should feel solid and rattle-free.
Step 3: Add the face frame and classic trim
This is where the plain box starts looking like furniture. Apply hardwood face-frame pieces to cover plywood edges on the front, top, and sides. Use glue and pins or clamps. Keep reveals consistent. Uneven trim lines are one of the fastest ways to make a piece look amateurish.
For a more traditional style, add a plinth base, base molding, or a slightly proud top rail. You can also apply panel molding to the front and sides to fake the look of raised panels without actually building a frame-and-panel chest. That is not cheating. That is called working smarter and still getting compliments.
If you want a truly old-school look, use wider stiles and rails on the front face. If you want something cleaner and more versatile, keep the trim restrained and let the finish do the talking.
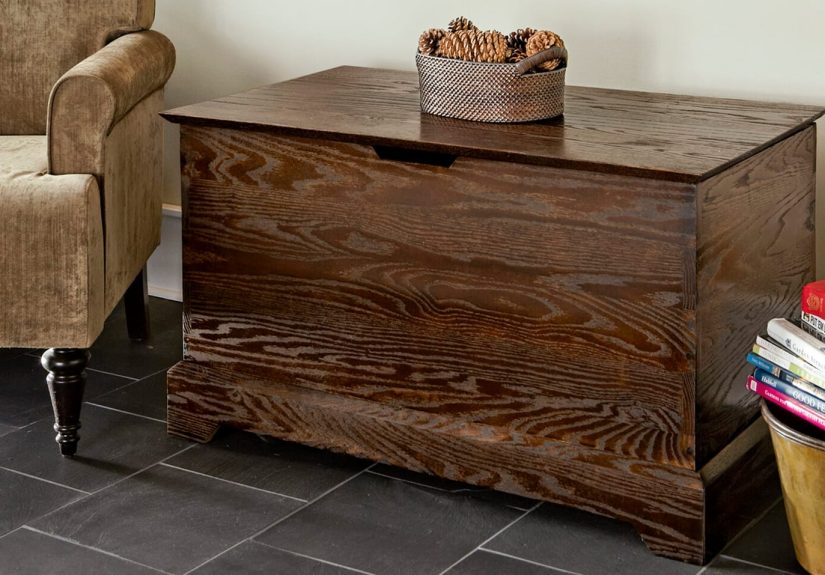
Step 4: Build a lid that looks good and behaves itself
The lid matters more than most builders expect. It is the part people touch, lift, judge, and occasionally drop. If the lid is warped, too heavy, or misaligned, the whole chest feels wrong.
The easiest reliable option is a plywood lid edged with solid hardwood. This gives you the visual warmth of real wood with the stability of sheet goods. Let the lid overhang slightly on the front and sides for a classic look. A small overhang also makes opening easier.
If you want a more advanced lid, you can glue up solid boards and add battens or breadboard-style ends designed to help the top stay flat. Just remember that solid wood moves with the seasons. If you lock it down carelessly, the wood may split, cup, or argue with you later.
Before installing the lid, ease the top edges with sandpaper or a router round-over bit. A chest should feel inviting to touch, not like a box of sharp opinions.
Step 5: Install hinges and do not skip the lid support
Hinges are not just hardware. They are the difference between graceful function and a lid that behaves like a medieval trap. Mark hinge locations carefully and pre-drill pilot holes so the screws go in straight and clean.
More important: install a lid stay, soft-close support, or torsion hinge system. This is especially important if children might use the chest. A good lid support keeps the lid from slamming shut and makes the chest safer and easier to use. It also reduces wear on the hinges and the back edge of the lid.
Test the lid several times before final tightening. Check for even reveals, smooth swing, and enough clearance so the lid does not scrape the back of the case or bind against the trim.
Step 6: Fill, sand, and prepare for finish
Good finishing starts long before the first coat. Fill visible nail holes, let the filler dry fully, then sand with intention instead of fury. Start around 120 grit if needed, move to 180, and finish at 220 for most stain or clear-finish projects. Always sand with the grain on final passes.
Vacuum dust thoroughly and wipe the surface clean before applying finish. Dust left behind turns your gorgeous chest into a textured lesson in regret.
Best finish options for a classic storage chest
- Paint: great for poplar and cottage, farmhouse, or kid-friendly styles.
- Stain and polyurethane: ideal if you want grain to show and the chest to feel traditional.
- Wipe-on varnish or oil-varnish blend: forgiving and beginner-friendly.
- Water-based clear coat: lower odor and quicker drying, with a cleaner look.
If you are staining blotch-prone woods, prep carefully and test the finish on scrap first. Scrap wood is where you make your mistakes cheaply and with dignity.
Common mistakes to avoid when building a wooden storage chest
- Ignoring wood movement: solid-wood panels and lids need room to expand and contract.
- Skipping the dry fit: misalignment gets more expensive after glue.
- Forgetting safety hardware: a slamming lid is not charming.
- Using weak bottom support: storage chests invite heavy loads.
- Rushing the sanding: finish highlights flaws instead of hiding them.
- Building too deep: items get lost in the bottom like socks in a dryer portal.
Ways to customize your DIY storage chest
Once the core build is done, you can personalize the chest without changing its structure much. Add cutout handles on the sides, a cedar lining, decorative moldings, a divided interior tray, a lockable clasp, or bun feet. You can also upholster the lid and turn it into a bench for a bedroom or entryway. That version earns bonus points for pretending to be elegant while secretly storing winter blankets and phone chargers from 2018.
For a more traditional blanket chest, use warm stain, simple brass hardware, and a molded base. For a more modern classic look, keep the profile square, use a matte clear coat, and let the wood species provide the visual interest.
Real-world experience: what building a classic storage chest taught me
The first classic storage chest I built looked straightforward on paper. Rectangles, lid, trim, done. I had that dangerous kind of confidence that only appears right before a workshop humbles you. I cut the carcass parts, laid everything on the bench, and thought, “This will be a relaxing weekend project.” Reader, it was relaxing for about twelve minutes.
The first surprise was how much the chest depended on squareness. A shelf can be a little rude and still function. A chest cannot. The moment the box was even slightly out of square, the lid fit looked weird, the trim lines looked nervous, and the whole piece started radiating “close enough” energy. That was the project that taught me to stop treating diagonal measurements like optional reading.
The second lesson was about lid weight. I had made a beautiful, chunky lid because I wanted the chest to feel substantial. What I actually created was a handsome shoulder workout. Once the hinges went on, I realized the lid needed support hardware, not optimism. After adding a proper lid stay, the chest suddenly felt safer, smoother, and more expensive. That one detail made the biggest difference in everyday use.
I also learned that trim is where a project becomes furniture. Before the face frame and base molding went on, the chest looked like a sensible plywood box. Afterward, it had personality. The edges looked intentional. The proportions made sense. Friends who had ignored the project all week suddenly started saying things like, “Wow, that looks really nice,” which is woodworking’s version of a standing ovation.
Then came finishing, where the wood kindly reveals every shortcut you hoped it had not noticed. I rushed the sanding on one side panel, convinced stain would somehow bring unity, harmony, and maybe world peace. Instead, the stain highlighted every scratch like a teacher with a red pen. I had to sand it back and do it properly. It was annoying, but useful. Since then, I treat surface prep as part of the build, not the boring ceremony before the fun part.
Another thing I did not expect was how personal a storage chest feels once it is in the house. A bookshelf shows off what you own. A chest quietly protects what matters. The one I built ended up storing quilts from family, winter throws, old photo albums, and a few random keepsakes that would look messy anywhere else. It became functional furniture, yes, but also a kind of domestic peace treaty between storage and style.
If I built the same chest again, I would still use a stable plywood carcass for efficiency, but I would spend even more time mocking up the trim profile and testing finishes on scrap. I would also decide earlier whether the piece was meant to blend in or stand out. That sounds minor, but design decisions get easier when the project has a job. Is it a quiet bedroom blanket chest? A rugged mudroom trunk? A painted toy chest? Once I answer that, the wood, finish, hardware, and proportions all stop arguing.
So yes, building a classic storage chest taught me about joinery, sanding, and hardware. But it also taught me that the best furniture projects are the ones people actually use. Not admire once. Use. Open. Fill. Move around. Depend on. That is when a DIY storage chest stops being a project and starts becoming part of the house.
Final thoughts
If you want a woodworking project that balances beauty, storage, and real-world usefulness, a classic storage chest is hard to beat. Keep the structure strong, the lines simple, the lid safe, and the finish clean. Build it like a piece that should outlast trends, and it probably will. You do not need extravagant joinery to make something timeless. You just need solid planning, careful cuts, and the humility to dry-fit before declaring victory.
In other words: measure twice, sand honestly, install the lid support, and let the chest become the classy adult in the room.