Table of Contents >> Show >> Hide
- Before You Start: Know the Parts
- Safety First: The Tiny Tool Spins Very Fast
- How to Change a Dremel Bit with a Standard Collet
- How to Change the Collet
- How to Change a Dremel Bit with an EZ Twist Nose Cap
- How to Change EZ Lock Accessories
- How to Change a Sanding Drum or Sanding Band
- Using a Dremel Keyless Chuck
- Troubleshooting Common Dremel Bit Problems
- Choosing the Right Bit Before You Change It
- Best Practices for Smooth Bit Changes
- Real-World Experience: What Actually Helps When Changing a Dremel Bit
- Conclusion
Changing a Dremel bit looks like one of those tiny workshop tasks that should take five secondsuntil the bit refuses to come out, the collet nut feels welded in place, and you start wondering whether the tool is smarter than you. Good news: it is not. A Dremel rotary tool is designed for quick accessory swaps, and once you understand the collet, collet nut, shaft lock, and mandrel, changing bits becomes simple, safe, and oddly satisfying.
This guide explains how to change a Dremel bit step by step, including standard collet changes, EZ Twist nose cap changes, EZ Lock accessory swaps, sanding drum changes, and keyless chuck use. You will also learn how to avoid wobble, stuck bits, wrong-size collets, and the classic beginner mistake: tightening everything like you are assembling a suspension bridge.
Before You Start: Know the Parts
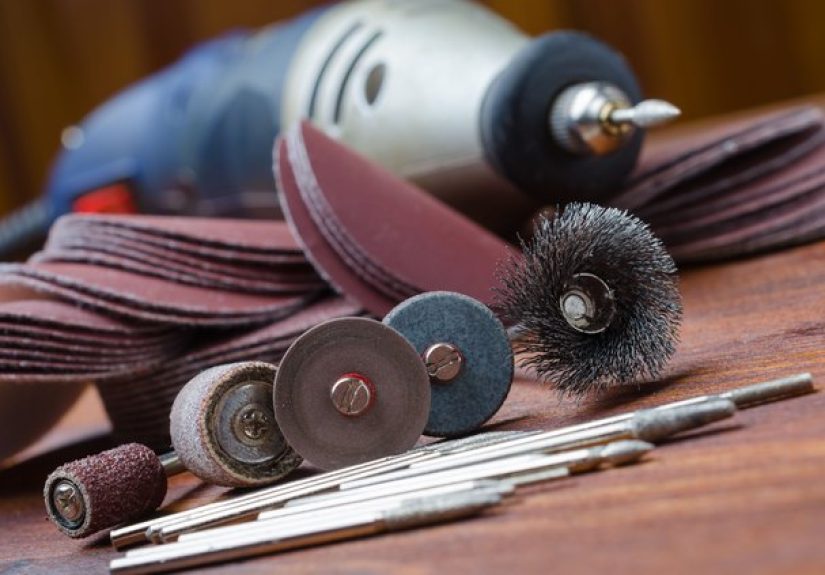
A Dremel bit is the small accessory that does the cutting, grinding, engraving, sanding, polishing, drilling, or carving. The tool holds that bit using a few small parts:
Collet
The collet is the tiny sleeve inside the nose of the tool. It grips the shank of the bit. Dremel collets come in common sizes such as 1/8 inch, 3/32 inch, 1/16 inch, and 1/32 inch. The right collet matters because a bit with a loose shank can wobble, slip, or launch your patience into another zip code.
Collet Nut
The collet nut threads onto the front of the tool and squeezes the collet around the bit. You loosen it to remove a bit and tighten it to secure a new one.
Shaft Lock Button
The shaft lock button keeps the spindle from spinning while you loosen or tighten the collet nut. Never press the shaft lock while the Dremel is running. Wait until the tool is completely stopped.
Mandrel
A mandrel is an adapter used for accessories that do not have their own shank, such as cut-off wheels, felt polishing wheels, sanding discs, and some buffing accessories. Instead of inserting the disc directly into the Dremel, you attach it to the mandrel, then insert the mandrel into the collet.
Safety First: The Tiny Tool Spins Very Fast
A Dremel may be small, but it is still a high-speed power tool. Before changing a bit, turn the tool off and unplug it. If you are using a cordless Dremel, remove the battery if the model allows it, or at least confirm the switch is firmly in the off position. Wait for the accessory to stop spinning completely before touching anything near the nose of the tool.
Wear safety glasses when using a rotary tool. Small cutting wheels, sanding drums, wire brushes, and grinding stones can throw dust, grit, or fragments. If you are sanding, grinding, or cutting material that creates dust, use proper ventilation and a dust mask or respirator suited to the material. Tie back long hair, avoid loose sleeves, and remove dangling jewelry. The spinning bit does not care how fashionable your hoodie string is.
How to Change a Dremel Bit with a Standard Collet
This is the classic method used on many Dremel rotary tools. It works for engraving cutters, drill bits, carving bits, grinding stones, burrs, sanding mandrels, and many standard accessories.
Step 1: Turn Off and Disconnect the Tool
Switch the Dremel off. Unplug corded models or make sure cordless models cannot start accidentally. This step is not optional. A rotary tool can go from quiet to chaos very quickly.
Step 2: Press the Shaft Lock Button
Find the shaft lock button near the front of the tool. Press it down gently. Rotate the collet nut by hand until the lock engages and the shaft no longer turns. You may feel it click into place.
Step 3: Loosen the Collet Nut
With the shaft lock held down, turn the collet nut counterclockwise. Some models include a small wrench. Other models have an EZ Twist nose cap that doubles as a wrench. You only need to loosen the nut enough for the bit to slide out. Do not remove the nut completely unless you are changing the collet.
Step 4: Remove the Old Bit
Pull the old bit straight out of the collet. If it resists, loosen the nut a little more. Avoid yanking at an angle because that can damage the collet or bend a thin accessory shank.
Step 5: Insert the New Bit
Choose a bit with a shank size that matches the collet. Slide the bit into the collet so the shank is well supported. Keep the exposed shank as short as practical while allowing the accessory to work properly. Less exposed shank usually means less vibration and better control.
Step 6: Tighten the Collet Nut
Hold the shaft lock button and tighten the collet nut clockwise. Start by finger-tightening, then use the wrench or EZ Twist nose cap for a snug final turn. Do not overtighten. The goal is secure, not “I hope this survives reentry from orbit.”
Step 7: Test for Wobble
Before touching the workpiece, turn the Dremel on at a low speed and watch the bit. If it spins smoothly, you are ready. If it wobbles, turn the tool off, unplug it, loosen the collet nut, rotate the bit slightly, reseat it, and tighten again.
How to Change the Collet
If your new Dremel bit has a different shank size, you may need to change the collet. For example, a 1/8-inch bit will not fit properly in a 1/16-inch collet, and a 1/16-inch bit will not be held securely in a 1/8-inch collet.
Step 1: Remove the Bit
Turn off and disconnect the tool. Press the shaft lock, loosen the collet nut, and remove the current bit.
Step 2: Unscrew the Collet Nut
Continue turning the collet nut counterclockwise until it comes off. Set it somewhere safe. Small Dremel parts have a special talent for rolling under workbenches.
Step 3: Pull Out the Old Collet
Remove the collet from the shaft. If it sticks, tap the tool gently with your hand or wiggle the collet carefully. Do not pry aggressively with a screwdriver.
Step 4: Insert the Correct Collet
Choose the collet that matches the new bit’s shank. Insert it into the tool shaft, then thread the collet nut back on loosely.
Step 5: Install the New Bit
Slide the bit into the collet, press the shaft lock, and tighten the collet nut until the bit is secure.
How to Change a Dremel Bit with an EZ Twist Nose Cap
Many newer Dremel rotary tools include an EZ Twist nose cap. This cap works as a built-in wrench, which means you do not have to dig through a drawer for the tiny flat wrench that somehow always hides behind the tape measure.
To use it, unscrew the nose cap from the front of the tool. Flip it around so the wrench opening fits over the collet nut. Press the shaft lock button, loosen the collet nut with the cap, remove the old bit, insert the new bit, and tighten the nut with the same cap. Then thread the nose cap back onto the tool.
The EZ Twist system does not change the basic process. It simply makes the tool change more convenient by storing the wrench right on the Dremel.
How to Change EZ Lock Accessories
Dremel EZ Lock accessories are designed for faster changes, especially for cutting wheels, sanding discs, and polishing accessories. Instead of using a tiny screw mandrel, EZ Lock accessories twist onto a spring-loaded mandrel.
Step 1: Install the EZ Lock Mandrel
Insert the EZ Lock mandrel into the collet just like a normal bit. Tighten the collet nut securely.
Step 2: Pull Down the Mandrel
Hold the EZ Lock mandrel and pull the spring-loaded head downward.
Step 3: Twist the Accessory Into Place
Place the EZ Lock wheel or disc onto the mandrel, twist it until it seats correctly, then release the mandrel. The accessory should lock into place.
Step 4: Check the Fit
Spin the accessory by hand before turning on the Dremel. If it looks crooked or loose, remove it and reinstall it. Cutting wheels should sit flat and centered.
How to Change a Sanding Drum or Sanding Band
Sanding drums are common Dremel accessories for shaping wood, smoothing plastic, trimming edges, and cleaning up small surfaces. A sanding drum usually has a rubber mandrel and a replaceable sanding band.
To change the entire sanding drum, loosen the collet nut and remove the mandrel like any other bit. To change only the sanding band, loosen the small screw on top of the drum. This relaxes the rubber cylinder so the old sanding band can slide off. Push the new sanding band onto the drum, center it, then tighten the screw until the rubber expands and grips the band.
If the sanding band creeps upward during use, it is usually not tight enough. If the band tears quickly, you may be pressing too hard or using too high a speed for the material.
Using a Dremel Keyless Chuck
A Dremel keyless chuck is an optional accessory that replaces the standard collet and collet nut. It lets you switch between several shank sizes without changing collets. If you often move from a drill bit to an engraving cutter to a polishing mandrel, a keyless chuck can save time.
To install it, remove the collet nut and collet from the Dremel, then thread the keyless chuck onto the tool. Open the chuck jaws by twisting the front section, insert the bit, and tighten by hand. Make sure the bit is centered between the jaws. If it is off-center, the tool may vibrate or produce rough results.
Troubleshooting Common Dremel Bit Problems
The Bit Is Stuck
Unplug the tool, press the shaft lock, and loosen the collet nut a little more. If the bit still will not move, gently tap the side of the collet nut with a wooden handle or plastic tool to break loose dust or debris. Avoid pliers on the bit unless the accessory is already damaged and you do not plan to reuse it.
The Bit Wobbles
Wobble usually comes from a mismatched collet, a bent bit, poor seating, or too much exposed shank. Remove the bit, inspect it, reinsert it straight, and tighten the collet. If the accessory is bent, replace it.
The Collet Nut Will Not Loosen
Make sure the shaft lock is fully engaged. Use the correct wrench or EZ Twist cap. Turn counterclockwise to loosen. If dust is packed into the threads, clean the area with a dry brush after removing the accessory.
The Bit Slips During Use
A slipping bit is often caused by the wrong collet size or under-tightening. Stop immediately, disconnect the tool, and reinstall the bit with the correct collet. Do not continue using a slipping accessory.
The Tool Vibrates Too Much
Vibration can mean the accessory is unbalanced, installed crooked, or not suited for the speed. Try reseating the bit, reducing speed, or using a fresh accessory. Cutting wheels and sanding drums wear down, and worn accessories rarely behave politely.
Choosing the Right Bit Before You Change It
Changing a Dremel bit is easy; choosing the correct bit is where the project succeeds or turns into decorative regret. Use carving bits for wood shaping and detail work. Use engraving cutters for glass, metal, and decorative lines. Use grinding stones for sharpening and metal smoothing. Use cut-off wheels for small metal cuts. Use sanding drums and discs for shaping and smoothing. Use felt wheels with polishing compound for shine.
Match the accessory to the material. A bit designed for soft wood may not perform well on hardened steel. A cutting wheel may cut metal beautifully but be a dramatic disaster on thick wood. When in doubt, test on scrap material first. Scrap pieces are cheaper than replacing the actual project after one overconfident pass.
Best Practices for Smooth Bit Changes
Keep the wrench, spare collets, mandrels, and common accessories in one small organizer. Label collets by size if you use them often. Clean dust from the nose of the tool after messy jobs. Do not tighten the collet nut without a bit inside unless necessary, because excessive tightening can compress the collet. Replace worn sanding bands, cracked wheels, and bent mandrels before they create problems.
When switching between tasks, slow down for a moment. A Dremel project often involves multiple accessories: a cutting wheel to remove material, a grinding stone to refine the edge, a sanding drum to smooth it, and a polishing wheel to finish it. The better your bit-changing routine, the faster and safer the whole workflow becomes.
Real-World Experience: What Actually Helps When Changing a Dremel Bit
The most useful lesson from real workshop experience is simple: do not rush the bit change. Most mistakes happen when people are in a hurry, especially during small projects where the Dremel feels harmless. Maybe you are trimming a screw, smoothing a plastic edge, engraving a nameplate, or sanding a tiny wooden corner. The tool is small, the job is small, and suddenly safety feels like an overreaction. That is usually when the bit is installed crooked, the collet is mismatched, or the cutting wheel is not fully seated.
One practical habit is to place the removed bit in a small tray immediately. Dremel accessories are tiny, sharp, and surprisingly good at disappearing. A magnetic tray works well for metal bits, while a divided craft box works better for sanding bands, felt wheels, and polishing accessories. Keeping accessories sorted by taskcutting, sanding, grinding, carving, drilling, polishingsaves time and prevents using the wrong bit just because it happened to be nearby.
Another helpful habit is the low-speed test. After installing a new bit, hold the Dremel away from the workpiece and run it briefly at low speed. Listen and feel. A properly seated bit sounds smooth. A poorly seated accessory may buzz, wobble, or shake. That short test can prevent scratches, broken wheels, and messy cuts. It also gives you a chance to confirm the bit is turning true before it touches the project.
For beginners, the biggest surprise is how little pressure a Dremel needs. The bit should do the work. If you press hard, the accessory may overheat, wear out quickly, grab the material, or chatter across the surface. When changing bits, choose the accessory that removes material efficiently instead of forcing the wrong one to behave. If a sanding drum is barely working, use a coarser grit. If a carving bit burns wood, reduce speed or use lighter passes. If a cut-off wheel struggles, let the wheel cut gradually rather than pushing it sideways.
It also helps to inspect the shank before inserting a bit. Dust, rust, dried compound, or a slightly bent shank can cause poor grip. Wipe the shank clean with a dry cloth. If a mandrel looks bent, retire it. A cheap replacement mandrel is better than fighting vibration through an entire project.
Finally, learn which accessory systems fit your work style. If you change bits occasionally, the standard collet system is reliable and precise. If you switch between many shank sizes, a keyless chuck is convenient. If you cut and sand frequently, EZ Lock accessories can make the job faster. The best setup is the one that lets you work cleanly, safely, and confidentlywithout turning every bit change into a tiny mechanical soap opera.
Conclusion
Learning how to change a Dremel bit is one of the first skills every rotary tool user should master. The process is straightforward: disconnect the tool, lock the shaft, loosen the collet nut, remove the old bit, insert the correct new bit, tighten it securely, and test for wobble. Once you understand collets, mandrels, EZ Lock accessories, sanding drums, and keyless chucks, your Dremel becomes much more useful.
The secret is not force. It is fit, alignment, and control. Match the collet to the bit, keep the shank properly seated, avoid overtightening, and let the tool’s speed do the work. Do that, and changing Dremel bits becomes quick, safe, and almost automatic.


