Table of Contents >> Show >> Hide
- Why Cleaning Your Guitar Matters (Beyond “It Looks Gross”)
- What You’ll Need (Beginner Kit: Cheap, Simple, Effective)
- Quick Daily Routine (2 Minutes That Save You Hours)
- Deep Clean Step-by-Step (Perfect for String Change Day)
- Step 0: Set up your cleaning “workspace”
- Step 1: Dust first (dry cleaning beats wet cleaning)
- Step 2: Clean the body (finish-safe approach)
- Step 3: Clean the neck (and beat sticky-neck syndrome)
- Step 4: Clean the fretboard (this is where beginners get nervous)
- Step 5: Condition unfinished fretboards (sparingly, not “deep-fried”)
- Step 6: Hardware and metal parts (shine without chaos)
- How to Clean Guitar Strings (So They Don’t Die Young)
- Know Your Finish: Gloss, Satin, Nitro, Poly (Yes, It Matters)
- What NOT to Do (A Short List of Regrets)
- Beginner Cleaning Schedule (So You Don’t Overthink It)
- Special Cases & Troubleshooting
- When to Stop and Call a Pro
- Conclusion: Keep It Simple, Keep It Safe, Keep Playing
- of Real-World Beginner Experiences (What You’ll Notice as You Start Cleaning)
Your guitar is basically a hand-held sponge for fingerprints, snack dust, and the mysterious substance that appears after one enthusiastic chorus. The good news: cleaning a guitar isn’t complicated. The bad news: “complicated” is exactly what happens when you grab the nearest household cleaner and accidentally give your finish a new personality.
This beginner-friendly guide walks you through simple, safe guitar cleaning and maintenancestrings, fretboard, body, hardware, and the stuff you should absolutely not do unless you enjoy regret. We’ll keep it practical, lightly funny, and obsessively careful about the parts of your instrument that cost real money to fix.
Why Cleaning Your Guitar Matters (Beyond “It Looks Gross”)
Dirt and oils don’t just live on the surface for decoration. Sweat and skin oils can speed up string corrosion, make your neck feel sticky, and leave grime in fret corners. Over time, buildup can dull tone, shorten string life, and make playing feel like you’re sliding across a cafeteria table.
Cleaning also helps you spot problems earlyloose hardware, sharp fret ends, cracks, lifting bridges, or a saddle that’s trying to become a boomerang. A 2-minute wipe-down is cheap insurance, and it’s far more satisfying than paying a repair bill because you “didn’t notice” your strap button was auditioning for freedom.
What You’ll Need (Beginner Kit: Cheap, Simple, Effective)
Before you start, gather a few basics. You do not need a chemistry lab. You need common sense and soft cloths.
- 2–3 clean microfiber cloths (one for dry wiping, one for cleaner/polish, one for final buff)
- A soft brush (clean makeup brush or small detailing brush) for dust around hardware
- Cotton swabs for tight spots (bridge corners, around knobs, tuner crevices)
- Guitar-specific cleaner/polish (optional, but usefulespecially for glossy finishes)
- Fretboard conditioner (only for unfinished wood boards like rosewood/ebony; not for glossy maple)
- Optional for stubborn grime: naphtha (lighter fluid) used carefully and sparingly, with good ventilation
Beginner rule: If you’re unsure what finish your guitar has, stick to dry microfiber, or a slightly damp cloth with plain water. “Unknown finish” is not the time to experiment with random sprays found under the sink.
Quick Daily Routine (2 Minutes That Save You Hours)
1) Wash your hands first (yes, really)
Clean hands reduce the amount of oil and grime you transfer to the strings and fretboard. It’s the easiest “maintenance hack” that doesn’t cost money.
2) Wipe down after every session
After playing, use a dry microfiber cloth to wipe:
- Strings (pinch each string gently through the cloth and run along its length)
- Back of the neck (where sweat and skin oils love to hang out)
- Body top (especially near the bridge and where your picking hand rests)
This habit does most of the work. Think of it like brushing your teeth. You could wait and do a “deep clean” every six months, but your guitar (and your bandmates) will silently judge you.
Deep Clean Step-by-Step (Perfect for String Change Day)
The best time for a deeper clean is when strings are off, or at least loosened. Plan this with a string change so you don’t do twice the work.
Step 0: Set up your cleaning “workspace”
- Place the guitar on a stable surface with a towel underneath.
- Support the neck (a rolled towel works).
- Keep liquids away from soundholes, electronics, and unfinished wood edges.
- Use small amounts of any productspritz the cloth, not the guitar.
Step 1: Dust first (dry cleaning beats wet cleaning)
Use a dry microfiber cloth to remove loose dust and grit. This prevents micro-scratches when you later buff or polish. Use a soft brush for dust around saddles, bridges, tuner posts, and pickup edges.
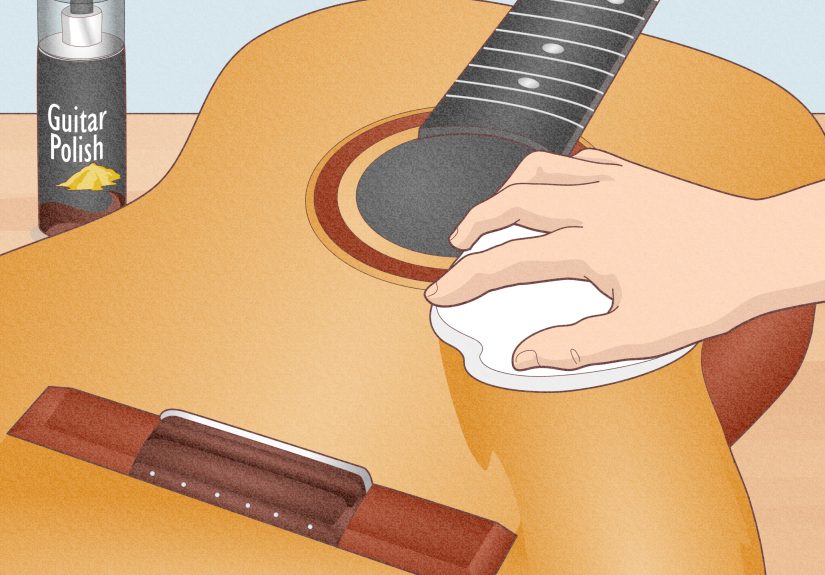
Step 2: Clean the body (finish-safe approach)
For most beginners, the safest method is simple: slightly damp microfiber cloth (water only), followed by a dry cloth to buff. For glossy finishes, a guitar-specific cleaner/polish can help remove fingerprints and hazeapply to the cloth, not directly on the guitar, then buff.
Avoid soaking. A guitar is not a dinner plate. If water gets into cracks, seams, or around bridges, it can cause swelling or finish issues. Your goal is “clean,” not “marinated.”
Step 3: Clean the neck (and beat sticky-neck syndrome)
The back of the neck is where comfort lives or dies. Wipe with a dry microfiber cloth first. If it still feels sticky, use a slightly damp cloth. If your neck has a satin finish, skip heavy polishes and waxy productsmany players prefer minimal product and gentle wiping so the neck stays fast.
Step 4: Clean the fretboard (this is where beginners get nervous)
Fretboard cleaning depends on the wood and whether it’s finished:
- Finished maple boards (glossy): treat like the bodywipe with dry cloth, then lightly damp if needed. No oil.
- Unfinished rosewood/ebony/paosanto: dry wipe first, then use a fretboard-safe cleaner if needed, and condition sparingly.
If there’s crusty buildup near frets, start with dry wiping. If it’s stubborn, use a tiny bit of guitar-safe cleaner on a cloth or cotton swab. Save solvents for rare situations (like adhesive residue), and use them carefully.
Step 5: Condition unfinished fretboards (sparingly, not “deep-fried”)
Conditioning is not the same as cleaning. Unfinished fretboards can benefit from occasional conditioning, but more is not better. Use a small amount of fretboard conditioner, wipe it in, let it sit briefly, then buff off the excess. The board should look healthy, not wet.
How often? For most beginners: a few times a year at most, usually during a string change when the board looks dry. If your fretboard always looks “oily,” you’re overdoing it.
Step 6: Hardware and metal parts (shine without chaos)
Use a dry cloth to wipe tuners, bridge, tailpiece, and screws. For tight spots, use cotton swabs or a soft brush. If you see corrosion, resist the urge to attack with abrasive household metal polishmany are too aggressive and can damage finishes or plating.
If you’re cleaning an electric guitar, keep liquids away from pickups, switches, and pots. If electronics are noisy, that’s typically a job for proper contact cleaner applied correctly (or a tech), not a random spray-and-pray moment.
How to Clean Guitar Strings (So They Don’t Die Young)
Strings collect sweat, oils, and grime. Wiping them down is the easiest way to keep them feeling fresher longer. Here’s the beginner-safe method:
- Use a dry microfiber cloth.
- Pinch one string gently through the cloth.
- Slide along the string length (both above and below the string if you can reach).
- Repeat for each string.
If you use a string cleaner product, follow its instructions and keep it off unfinished wood. Also note: coated strings often need less “product help” they mainly benefit from wiping.
Know Your Finish: Gloss, Satin, Nitro, Poly (Yes, It Matters)
Your guitar’s finish is like its skin. The wrong product can cloud it, soften it, or cause weird reactions. Here’s the beginner version:
- Gloss finishes: usually tolerate guitar-specific polishes well; microfiber + light polish = good shine.
- Satin/matte finishes: can get shiny “polished spots” if you buff aggressively; often best with gentle wiping and minimal product.
- Nitrocellulose lacquer: can be more sensitiveavoid harsh solvents and alcohol-based cleaners; use products labeled finish-safe.
- Polyurethane/polyester: generally durable, but still don’t use household cleaners or abrasives.
Beginner best practice: If you don’t know your finish, don’t guess. Use microfiber, slightly damp cloth, and guitar-specific cleaners only when you’re confident they’re appropriate.
What NOT to Do (A Short List of Regrets)
- Don’t use household glass cleaner. Many contain ammonia or other chemicals that can damage finishes.
- Don’t use alcohol indiscriminately. It can be risky on certain finishes and can dry out some materials.
- Don’t use furniture polish. It can leave residues and oils that don’t belong on instruments.
- Don’t flood the guitar with water. Lightly damp cloth = okay; soaking = no.
- Don’t oil a finished maple fretboard. Oil belongs on unfinished boards, and even then: sparingly.
- Don’t scrub with abrasive pads. You’ll create scratches that “add character” only if you like heartbreak.
Beginner Cleaning Schedule (So You Don’t Overthink It)
- After every play: wipe strings + neck + body contact areas (2 minutes).
- Every string change: deeper clean body/neck; fretboard attention while strings are off.
- A few times a year: condition unfinished fretboard if it looks dry (not on a strict calendar).
- Anytime you see gunk: spot-clean carefully before it becomes a science project.
Special Cases & Troubleshooting
“My fretboard has sticky black grime by the frets.”
That’s usually skin oils + dust compacted over time. Start with dry wiping. If it won’t budge, use a tiny bit of fretboard-safe cleaner on a cloth or cotton swab. Avoid scraping with metal objects. If it’s truly stubborn and you’re nervous, a tech visit is cheaper than a DIY disaster.
“My neck feels slow and sticky.”
Often it’s just skin oils. Wipe with a dry microfiber cloth after playing. For satin finishes, minimal product is usually best. If it’s still sticky, use a slightly damp cloth and dry immediately.
“My acoustic lives in a dry/humid placedoes cleaning help?”
Cleaning helps, but humidity control is the bigger win. If your guitar is wood (spoiler: it is), stable humidity can prevent cracks, warping, and other unpleasant surprises. A hygrometer and proper storage can matter as much as polish.
When to Stop and Call a Pro
Cleaning is DIY-friendly. Repairs are not always. Consider a professional setup or inspection if you notice:
- Cracks, lifting bridge, or buzzing that suddenly appears
- Rusty hardware that won’t clean up without abrasives
- Electronics crackling or cutting out (especially if you’re unsure how to use contact cleaner safely)
- Finish haze that worsens when you wipe (could be a finish reaction)
A good tech can do a proper clean, fret polish, and setupoften making a beginner guitar feel dramatically better. Think of it as a spa day that also improves intonation.
Conclusion: Keep It Simple, Keep It Safe, Keep Playing
The secret to guitar cleaning is not magic productit’s consistency and restraint. Wipe down after playing, deep clean when changing strings, condition unfinished fretboards only occasionally, and avoid household chemicals that were never meant for musical instruments.
Do those basics, and your guitar will stay comfortable, look better, and likely sound more alive. Plus, you’ll spend less time wondering why your strings feel like cooked spaghetti and more time actually making musicwhich is, last I checked, the point of owning a guitar.
of Real-World Beginner Experiences (What You’ll Notice as You Start Cleaning)
Beginners often expect guitar cleaning to be a once-in-a-while “big event,” like cleaning out a garage: emotionally difficult, physically confusing, and somehow involving a mystery smell. In reality, most of your results come from tiny habits.
Experience #1: The “Why do my strings feel awful?” moment. A lot of new players assume strings go dead because they bought the “wrong brand.” Sometimes, surebut often it’s just normal oil and sweat buildup. The first time you do a simple wipe-down after playing for a week, you’ll notice the strings stay slicker, your bends feel smoother, and you get a few more days of that crisp, lively sound. It’s not wizardry. It’s friction management.
Experience #2: The neck revelation. Many players discover the back of the neck is the real comfort zone. If your neck feels sticky, you play tenser, your hands sweat more, and you suddenly blame everything except the actual problem. A microfiber cloth becomes your “reset button.” Wipe, breathe, play again. It’s honestly weird how much better your guitar can feel after 30 seconds of attention.
Experience #3: The fretboard “gunk archaeology.” When you finally change strings and see dark buildup hugging the frets, it can be a little alarminglike you’ve discovered a tiny ancient civilization living between your A and D strings. The lesson is gentle cleaning beats aggressive cleaning. Dry wipe first, then light product if needed, and stop when it’s clean. Many beginners over-scrub because they want a brand-new look, but guitars are tools. “Clean and healthy” is the goalnot “sterile and terrified.”
Experience #4: The product temptation trap. Walking into a music store can make you believe you need seventeen bottles and a special cloth that was “woven by monks at midnight.” Most of the time, you don’t. A few microfiber cloths and a finish-appropriate cleaner are enough. The confidence boost is realizing you’re not neglecting your instrumentyou’re maintaining it intelligently.
Experience #5: The long-term payoff. After a month or two of wiping down after sessions, your guitar simply stays nicer. Fingerprints don’t cake up. Hardware looks better. Cleaning days become quick and easy instead of a full-on restoration project. And the best part? You start feeling like a real guitaristnot because you bought more gear, but because you’re taking care of the gear you already have.


