Table of Contents >> Show >> Hide
- Why Kitchen Tables Get Dirty Faster Than You Think
- Step 1: Identify Your Table Material Before You Clean
- The Daily 5-Minute Routine (Works for Most Tables)
- Deep-Clean by Table Type
- How to Disinfect a Kitchen Table Without Damaging It
- Stain Rescue Playbook
- What Not to Do (The “Please Don’t” List)
- A Realistic Cleaning Schedule
- Simple Cleaning Kit That Covers Almost Everything
- FAQ: Quick Answers
- Conclusion
- Experience Section (Additional ): Real-World Lessons from Cleaning Kitchen Tables
Your kitchen table is where life happens: breakfasts at top speed, homework under pressure, late-night snacks, and at least one mystery sticky spot that seems to reappear by magic. So if you’ve ever sprayed everything with one cleaner and hoped for the best, you’re not alone. The catch? Different table materials need different care. What makes glass sparkle can dull wood. What disinfects quickly can damage stone. And too much water can turn a beautiful tabletop into a warped science experiment.
This guide breaks down exactly how to clean a kitchen table by materialwood, glass, laminate, stone, and mixed surfacesusing methods that are effective, practical, and finish-safe. You’ll get daily routines, deep-clean checklists, disinfecting tips, stain rescue tricks, and a realistic schedule you can actually keep. No fancy lab coat required, just smart steps and the right cloth.
Why Kitchen Tables Get Dirty Faster Than You Think
A kitchen table collects more than crumbs. It holds oils from hands, food acids, steam, drink rings, school glue, and fine dust that can act like a micro-abrasive over time. If your home has kids, pets, or frequent guests, your table is basically a high-traffic surface in furniture form.
That matters because “clean” and “disinfected” are not the same thing. Cleaning removes visible dirt and residue; disinfecting targets germs. Most days, cleaning is enough. During illness in the household or after raw-food prep nearby, disinfecting can be usefulbut only when done correctly and safely for the table finish.
Step 1: Identify Your Table Material Before You Clean
If you do one thing right, do this. Material determines method.
Quick Material Check
- Sealed wood: Has a protective topcoat; usually smooth and slightly glossy or satin.
- Unsealed/oiled wood: More matte, absorbs moisture quickly, often seen in butcher-block styles.
- Glass: Obvious top, usually with metal or wood frame.
- Laminate/MDF/veneer: Uniform surface or thin wood layer over core material.
- Stone: Marble, granite, quartzheavy, cool to touch, sometimes veined.
Not sure what you have? Start with the gentlest method: damp microfiber cloth + a tiny bit of dish soap + immediate dry buff. Always spot-test underneath first.
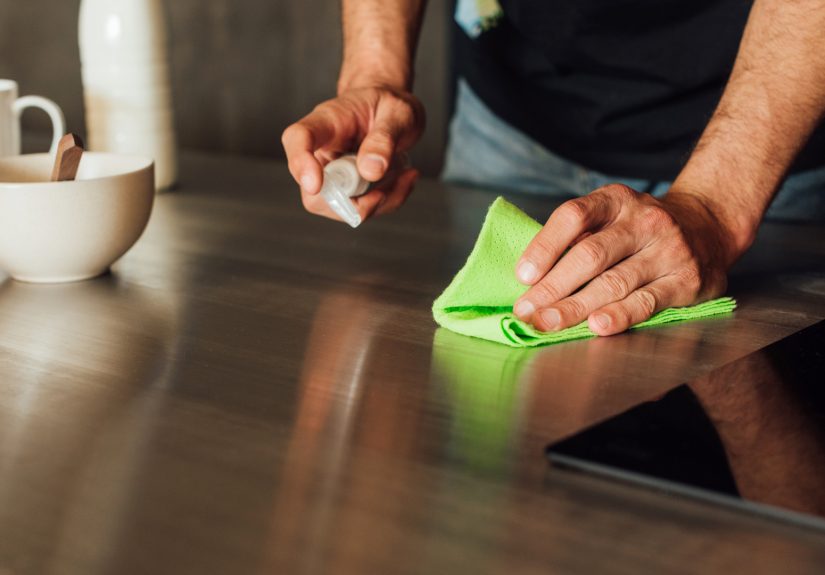
The Daily 5-Minute Routine (Works for Most Tables)
- Clear the table fully. Move placemats, centerpieces, and mail stacks pretending to be décor.
- Dry wipe first. Use a dry microfiber cloth to remove crumbs and dust so you don’t scrub grit into the finish.
- Damp clean. Wipe with a microfiber cloth dampened (not soaked) in warm water plus a drop or two of mild dish soap.
- Rinse wipe. Go over once with a cloth dampened in clean water.
- Dry immediately. Buff dry with a second clean cloth, especially for wood and laminate.
This simple routine prevents buildup, reduces streaks, and keeps you from needing aggressive cleaners later.
Deep-Clean by Table Type
1) How to Clean a Wood Kitchen Table (Sealed Wood)
Most wood kitchen tables are sealed and do best with low-moisture cleaning.
- Dust first with a soft microfiber cloth.
- Mix warm water with a small amount of mild dish soap.
- Dampen cloth, wring well, and wipe with the wood grain.
- For sticky spots: hold a damp cloth on the area for 20–30 seconds, then wipe gently.
- Wipe again with a clean damp cloth and dry fully.
Optional finish care: If your table looks dull, use a compatible furniture polish/wax occasionally (not daily), and buff well. Avoid heavy silicone buildup from frequent spray polish use.
Avoid: soaking the surface, abrasive pads, strong degreasers, ammonia-heavy sprays, and random “viral hacks” that skip testing.
2) Unsealed or Oiled Wood / Butcher-Block-Style Tops
These need extra moisture control.
- Clean with mild soap + warm water on a nearly dry cloth.
- Rinse lightly and dry immediatelyno standing water.
- For stubborn mess, use a paste of baking soda + warm water very gently, then rinse and dry.
- Recondition periodically with food-safe mineral oil or butcher-block conditioner.
If you disinfect this kind of surface, be selective and check labels. Some disinfectants require post-rinse on food-contact surfaces.
3) How to Clean a Glass Kitchen Table (Without Streaks)
Glass is easy to clean and easy to streak. Technique is everything.
- Start with a dry microfiber pass to remove dust.
- Use either a glass cleaner or a light mist of water + distilled white vinegar solution.
- Wipe in long strokes (top-to-bottom, then side-to-side).
- Buff immediately with a second dry microfiber cloth.
Pro move: Use less product than you think. Overspraying leaves residue trails and attracts new fingerprints faster.
4) Laminate, Veneer, and MDF Tables
These surfaces are durable but dislike aggressive scrubbing and excess water around seams.
- Use mild dish soap + warm water on a damp cloth.
- Wipe gently; don’t flood edges or joints.
- Rinse wipe and dry thoroughly, especially corners.
- For grease film, repeat with fresh cloth instead of scrubbing harder.
Think “gentle and low-moisture.” Hard scrubbing can wear coatings and expose edges.
5) Stone Tops (Marble, Granite, Quartz)
Stone looks tough, but certain products can etch or dull it.
- Use pH-neutral stone-safe cleaner or mild dish soap with water.
- Wipe with soft cloth, rinse with clean damp cloth, then dry.
- Blot spills quickly, especially citrus, vinegar, wine, and tomato sauce.
Do not use on marble: acidic cleaners (like lemon or vinegar), harsh abrasives, or rust removers with harsh acids. Those can damage finish and shine.
6) Mixed Material Tables (Wood Top + Metal Legs, etc.)
Clean each component separately using the right method. Don’t let one-size-fits-all sprays run down onto wood joints or metal hardware. Dry hinges, seams, and leg connections to prevent spotting and long-term wear.
How to Disinfect a Kitchen Table Without Damaging It
If someone in your home is sick or your table is acting as mission control for tissues, meds, and half-empty soup mugs, disinfecting makes sense. Use this order:
- Clean first. Dirt blocks disinfectant effectiveness.
- Use a product suitable for your table type.
- Keep surface wet for required contact time.
- Rinse if required. Especially for products marked for food-contact surfaces with post-rinse instructions.
- Dry and ventilate.
Important safety rules: never mix bleach with ammonia or acids, wear gloves when needed, and follow label directions exactly. For daily life in healthy households, routine cleaning is usually enough.
Stain Rescue Playbook
Sticky Syrup, Sauce, or Glue
Lay a warm damp cloth on the spot for 30–60 seconds, then wipe gently. Repeat instead of scraping aggressively.
Grease Film
Use warm water plus a tiny amount of dish soap. Wipe, rinse cloth, wipe again. Grease often needs two light passes, not one harsh one.
Water Rings on Wood
Try gentle methods first: mild soap clean and dry buff. If a faint ring remains, use a finish-safe wood method and test underneath first. Keep expectations realistic for deep, old stains.
Fingerprints on Glass
Use a light mist cleaner and immediate dry buff with a second microfiber cloth. This is the fastest way to remove smudges without haze.
Crayon/Marker on Sealed Surfaces
Start with soapy water and microfiber. If needed, step up to a finish-safe cleaner and spot-test. Avoid abrasive melamine on delicate finishes unless the manufacturer says it’s okay.
What Not to Do (The “Please Don’t” List)
- Don’t soak wood or laminate surfaces.
- Don’t use abrasive pads on glossy finishes, glass, or stone.
- Don’t assume “natural” means safe for all materials (acids can etch stone).
- Don’t skip the rinse step when product labels require it.
- Don’t disinfect dirty surfaces and expect magic.
- Don’t use one cloth for everything; change cloths as they get dirty.
- Don’t let spills “sit until after dinner.” Future-you will hate that choice.
A Realistic Cleaning Schedule
Daily (2–5 minutes)
- Wipe after meals with damp microfiber.
- Dry buff quickly to prevent streaks and water marks.
Weekly (10–15 minutes)
- Deep wipe top, edges, and underside lip.
- Clean legs, supports, and joints.
- Rotate placemats/runners and check for trapped crumbs.
Monthly
- Inspect finish wear, especially near favorite seats.
- Condition unsealed wood if needed.
- Polish glass/metal details and tighten loose hardware.
Simple Cleaning Kit That Covers Almost Everything
- 4–6 microfiber cloths (color-code by task)
- Mild dish soap
- Spray bottle for diluted cleaner
- pH-neutral cleaner for stone (if applicable)
- Food-safe mineral oil (for unsealed wood/butcher-block style)
- Disinfectant approved for your surface type
- Nitrile gloves
FAQ: Quick Answers
Can I use vinegar on every kitchen table?
No. Vinegar can be useful on glass and some grime situations, but it can damage or dull certain materials (especially some stone and delicate finishes). Match cleaner to material.
How often should I disinfect the table?
Only when neededduring illness, after contamination risk, or high-germ events. For everyday life, cleaning is usually sufficient.
Is paper towel fine for table cleaning?
Sometimes, but microfiber is usually better: less lint, fewer streaks, lower scratch risk on delicate finishes.
What if I don’t know the finish on my wood table?
Use the gentlest low-moisture method, spot-test in a hidden area, and avoid harsh chemicals until you confirm the finish.
Conclusion
Keeping a kitchen table clean isn’t about owning 19 specialty sprays. It’s about using the right method for the right material, cleaning before disinfecting, and keeping moisture under controlespecially on wood and laminate. If you remember just three things, remember these: identify the surface, use mild low-moisture cleaning first, and dry immediately. Do that consistently and your table stays cleaner, safer, and better-looking for years.
And yes, you can absolutely have a table that survives spaghetti night, science projects, and surprise guests. Your table can be both “lived-in” and “actually clean.” We’re aiming for that sweet spot.
Experience Section (Additional ): Real-World Lessons from Cleaning Kitchen Tables
Over time, one pattern shows up in almost every home: people don’t struggle because cleaning is hardthey struggle because advice is either too generic or too extreme. One family uses a strong degreaser daily on a sealed wood table and wonders why the finish gets cloudy after a year. Another tries to clean a glass top with paper towels and too much spray, then spends more time chasing streaks than actually cleaning. The fix in both cases is simple: less product, better cloths, and cleaner-material matching.
In busy households, the best-performing method is usually the smallest one you’ll actually repeat. A two-cloth system works beautifully in real life: one damp microfiber for cleaning, one dry microfiber for buffing. It sounds basic, but this one habit prevents the majority of visible issueshaze on glass, moisture spots on wood, and sticky edges on laminate. People who adopt this routine usually notice a difference in the first week, not because the cleaner is magical, but because consistency beats occasional deep scrubbing.
Another recurring lesson: most “stubborn stains” are really “stubborn timing.” If syrup, sauce, or coffee dries fully, removal takes more effort and people reach for aggressive tools. But if the same spill gets a warm damp compress for a minute, it lifts with almost no friction. The table suffers less, and cleanup is faster. In practical terms, one minute of patience saves ten minutes of fighting and a potential finish repair later.
Wood tables teach the clearest lesson about moisture. Many owners don’t realize that repeated over-wetting causes gradual wear long before dramatic warping appears. At first, the finish just looks tired. Then it starts grabbing smudges. Then cup rings become easier to form. The table didn’t fail suddenlyit was slowly over-watered. Homes that switched from “wet rag and walk away” to “damp wipe and immediate dry buff” saw the biggest long-term improvement in appearance.
Glass tables tell a different story: streaks are usually technique errors, not dirt problems. When people cut spray volume in half and use a second dry cloth, they stop battling haze. One especially useful trick is to clean in one direction first (vertical), then buff in the opposite direction (horizontal). Missed spots become obvious instantly, and you avoid that awkward moment where the table looks clean until sunlight hits it and reveals every swipe mark you’ve ever made.
Stone tables require the most discipline with product choice. The most common regret is using acidic “natural” cleaners on marble because they sounded gentle. Natural does not always mean finish-safe. In real homes, the safer play is boring but reliable: pH-neutral cleaner, soft cloth, quick dry. When owners commit to that boring routine, stone keeps its polish and personality. When they improvise with acids, the table often loses shine in specific zones where food prep or place settings happen most.
Finally, the biggest transformation isn’t a productit’s a rhythm. Families that attach table cleaning to existing anchors (right after dinner, before bedtime kitchen reset, or before loading the dishwasher) keep surfaces cleaner with less stress. The table stops feeling like one more chore and starts feeling like a quick reset signal: meal done, day moving forward. That rhythm is what keeps tables looking good across seasons, holidays, and everyday chaos.


