Table of Contents >> Show >> Hide
- Before You Commit: Is Black the Right “Right Now”?
- The Big Secret: Blonde Hair Needs “Filling” First
- What You’ll Need (and What You Can Skip)
- Step-by-Step: Blonde to Black at Home (The Pro-Method, Simplified)
- Step 1: Patch test + strand test (yes, both)
- Step 2: Start with the right canvas (clean, but not squeaky)
- Step 3: Prep your workspace like a responsible hair goblin
- Step 4: Choose your “filler” shade (the missing puzzle piece)
- Step 5: Apply the filler (quickly, evenly, thoroughly)
- Step 6: Apply your black shade (the main event)
- Step 7: Rinse properly (and don’t panic if the water looks like a crime scene)
- Step 8: Check your results in daylight
- Choosing the Right “Black” So It Looks Natural (Not Like a Marker)
- Troubleshooting: Fixes for the Most Common Blonde-to-Black Problems
- Problem 1: “It looks greenish or muddy.”
- Problem 2: “My ends are darker than my roots.”
- Problem 3: “Patchy spots, especially underneath.”
- Problem 4: “My scalp is itchy or burning.”
- Problem 5: “My black faded fast.”
- Problem 6: “My hair feels dry and crunchy.”
- Problem 7: “My bathroom now has ‘goth polka dots.’”
- Aftercare: Keep Your New Black Glossy (Not Faded by Tuesday)
- When to Call in a Pro (No Shame, Just Strategy)
- Extra : Experiences and Lessons People Learn the Hard Way
Dyeing blonde hair black at home sounds like a one-box, one-hour glow-up. In reality, it’s more like baking: if you skip a key step, you don’t get cakeyou get “why is my hair green?” frosting.
The good news: you can go from blonde to black without a salon visit if you understand what black dye needs to look rich (not hollow, muddy, or patchy), and you follow a plan that respects your hair’s current condition.
This guide walks you through the process with the least drama possibleplus what to buy, what to avoid, how to keep your scalp happy, and how to make the color look expensive even if your budget is giving “drugstore aisle at 9:47 p.m.”
Before You Commit: Is Black the Right “Right Now”?
Black hair can look glossy, dramatic, and ridiculously chic. It can also be stubborn, high-commitment, and hard to remove later. If you’re the kind of person who changes their phone wallpaper twice a day, consider a temporary or demi-permanent black first.
- Permanent black = longest-lasting, hardest to lift later.
- Demi-permanent = gentler deposit, fades more gracefully, still very dark.
- Temporary color = sits more on the surface, washes out quickly, great for a “test drive.”
If your blonde is heavily bleached, very porous, or breaking easily, you can still go darkerbut you’ll want to be extra careful with prep, saturation, and aftercare. Black dye will not magically turn damaged hair into healthy hair. (If only.)
The Big Secret: Blonde Hair Needs “Filling” First
Here’s the reason blondes sometimes turn “swampy” when they go dark: blonde hair is missing the warm underlying pigments (reds, oranges, golds) that make darker shades look natural.
Black dye looks black to your eyes, but it’s built on layers of pigments. If your hair is too light underneath, the dark result can look flat, greenish, or unevenespecially on porous, bleached areas.
“Filling” (also called repigmenting or pre-pigmentation) means putting warm pigment back into the hair before you go full dark. Think of it like priming a wall before painting it midnight navy.
Skip the primer and you get streaks. Use it and the color looks deep, smooth, and intentional.
What You’ll Need (and What You Can Skip)
Shopping list
- Gloves (two pairs if you canone for applying, one for rinsing)
- Old T-shirt or cape + old towel
- Petroleum jelly or a thick barrier cream (for hairline/ears)
- Claw clips for sectioning (4 is ideal)
- Wide-tooth comb
- Non-metal bowl + tint brush (optional, but helps control)
- A warm “filler” shade (more on picking it below)
- Your black shade (choose wisely“soft black” can look more natural)
- Gentle, color-safe shampoo + conditioner for after
Optional but helpful
- Pre-color porosity equalizer / pre-color treatment (great for bleached, uneven hair)
- Hair gloss or demi-permanent warm shade (makes filling easier)
- Clarifying shampoo (only if you have heavy buildupdon’t overdo it)
- Timer (your phone counts)
Please don’t freestyle these
- Do not dye eyebrows or eyelashes (seriously).
- Do not mix random developers/brands unless you know what you’re doing.
- Do not “stack” multiple permanent dyes in one night like it’s a TikTok challenge.
Step-by-Step: Blonde to Black at Home (The Pro-Method, Simplified)
Step 1: Patch test + strand test (yes, both)
A patch test checks for skin sensitivity to the dye ingredients. A strand test checks how your hair will actually grab the color.
This is especially important if you’ve never used that brand before, or if your blonde is bleached/porous.
- Patch test: Follow the box directions. Typically, you apply a small amount to skin behind the ear or inside the elbow and wait the recommended time.
- Strand test: Choose a small hidden piece (near the nape). Fill + dye that strand exactly like you plan to do your full head.
Step 2: Start with the right canvas (clean, but not squeaky)
If your hair has heavy product buildup (dry shampoo, waxy conditioners, oils), gently clarify 24–48 hours before coloring. If it’s already dry or fragile, skip clarifying and just shampoo normally the day before.
You want hair that’s clean enough to color evenly, but not so freshly scrubbed that your scalp is irritated.
Step 3: Prep your workspace like a responsible hair goblin
- Put on an old shirt.
- Cover surfaces (black dye splatters are forever memories).
- Apply petroleum jelly around your hairline and on ears.
- Detangle and section hair into 4 quadrants.
- Set out everything before you mix anything.
Step 4: Choose your “filler” shade (the missing puzzle piece)
The filler shade depends on how light you are and what kind of black you want. The goal is to add warm pigment back in so the black looks rich and neutral.
- Light blonde (level 8–10): Use a warm copper/gold or red-gold filler (think “strawberry blonde,” “copper,” “golden auburn”).
- Medium blonde (level 6–7): Use warm light brown/copper or auburn filler.
- Very ashy/platinum blonde: Warmth matters even moreaim copper or red-copper so you don’t get a murky outcome.
Best at-home filler options: a warm demi-permanent gloss, a semi-permanent warm shade, or a dedicated color filler product.
If you’re nervous, choose a demi/semi fillerit’s generally more forgiving on lightened hair.
Step 5: Apply the filler (quickly, evenly, thoroughly)
- Put on gloves.
- Apply filler to each section, saturating from mid-lengths to ends first (these areas are often more porous).
- Then apply closer to the roots (unless the filler instructions suggest otherwise).
- Comb through gently to ensure even distribution (don’t scrape your scalp like you’re raking leaves).
- Process for the recommended time.
- Rinse as instructed. Depending on product directions, you may rinse and towel-dryoften you’ll not shampoo at this stage.
What you’re looking for after filling: your blonde should look noticeably warmergolden, coppery, or auburn-ish. It might not be pretty yet. That’s okay. This is the “primer coat.”
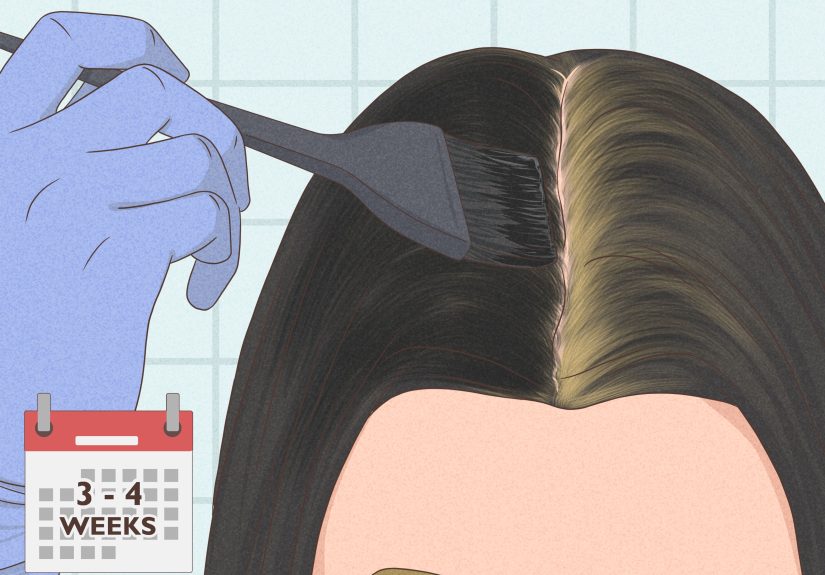
Step 6: Apply your black shade (the main event)
Now that your hair has the missing warm pigments, you’re ready for black.
- Mix your black dye exactly as directed.
- Section hair again if needed. Work one quadrant at a time.
- Apply black dye to mid-lengths and ends first if those areas tend to be resistant; apply roots according to the kit directions (many kits recommend roots first for virgin hair, but previously lightened hair can vary).
- Saturate thoroughly. Black dye needs full coverage“a little here and there” is how patchiness is born.
- Set a timer and process for the full time recommended.
Step 7: Rinse properly (and don’t panic if the water looks like a crime scene)
- Rinse with lukewarm-to-cool water until the water runs mostly clear.
- Use the included conditioner, then rinse again.
- Skip harsh shampooing right away unless the instructions specifically tell you to shampoo.
Step 8: Check your results in daylight
Bathroom lighting lies. Step near a window. If you see slightly lighter spots, don’t immediately re-dye your entire head that night.
Often, a gentle gloss, a targeted touch-up, or a second pass later is safer than rushing into round two.
Choosing the Right “Black” So It Looks Natural (Not Like a Marker)
Black comes in personalities:
- Soft black / natural black: slightly less intense, looks more realistic on many skin tones.
- Neutral black: classic, deep, balanced.
- Blue-black: dramatic, cooler, can emphasize cool undertones and look extra glossyalso less forgiving if your filler step was skipped.
If you’re going from very light blonde and want a believable “I was born like this” vibe, soft black or natural black often reads less harsh than blue-black.
Troubleshooting: Fixes for the Most Common Blonde-to-Black Problems
Problem 1: “It looks greenish or muddy.”
Usually caused by missing warmth. You likely needed a warmer filler (or a stronger fill step).
Fix: add a warm gloss (copper or red-copper) before doing any more dark dye. Don’t pile on ash tones.
Problem 2: “My ends are darker than my roots.”
Porous ends grab pigment faster. Fix: next time, apply to roots first (or protect ends with conditioner for the first few minutes),
and consider a porosity equalizer.
Problem 3: “Patchy spots, especially underneath.”
Most often from uneven saturation or rushed sectioning. Fix: targeted touch-up on dry hair (follow product guidance), using careful, small sections.
Two mirrors help.
Problem 4: “My scalp is itchy or burning.”
Rinse immediately if you feel significant burning. Scalp sensitivity can be irritation or an allergic reaction.
If you develop rash, swelling, or breathing issues, seek urgent medical care. Don’t “tough it out.”
Problem 5: “My black faded fast.”
Black can fade if you shampoo too soon, use hot water, or use harsh cleansers.
Fix: wait before washing, use cool water, go sulfate-free, and use a color-depositing conditioner or gloss between dyes.
Problem 6: “My hair feels dry and crunchy.”
Lightened hair is already vulnerable. Fix: prioritize moisture + gentle protein balance: deep conditioning, leave-ins, and fewer heat tools for a couple weeks.
Problem 7: “My bathroom now has ‘goth polka dots.’”
Clean splatters quickly. If stains happen, a gentle cleanser sooner is easier than scrubbing later like you’re trying to erase your past.
Aftercare: Keep Your New Black Glossy (Not Faded by Tuesday)
- Wait to shampoo: many colorists recommend giving fresh color time to settle before washing.
- Use cool or lukewarm water: hot water can speed fading.
- Choose color-safe products: gentle shampoos and rich conditioners.
- Limit heat styling: if you must, use a heat protectant.
- Deep condition weekly: especially if you were previously bleached.
- Refresh with a gloss: a black or dark brown gloss can keep shine and depth without repeated permanent dye.
When to Call in a Pro (No Shame, Just Strategy)
DIY is doable, but a salon correction is worth it if:
- Your hair is severely damaged, stretchy, or breaking.
- You have multiple bands of color (roots one shade, mids another, ends another).
- You want a very specific black tone (like smoky blue-black) and your hair is extremely porous.
- You had a strong reaction to dye before or you’re concerned about allergy.
Extra : Experiences and Lessons People Learn the Hard Way
People who go blonde-to-black at home tend to share a few surprisingly consistent “wish I knew this earlier” momentslike a hair color support group, but with better selfies.
If you want your transition to feel satisfying instead of stressful, learn from the most common lived-through-it patterns.
1) “I thought black was a single step.” A lot of first-timers assume black dye is the simplest shade because it’s dark.
The twist is that blonde hair is often missing the warm pigments that make dark shades look natural, so black can actually be less forgiving than going brunette.
Many people describe the same surprise: the black looked fine in dim indoor light, then looked unevenor oddly greenishwhen they stepped outside.
That’s usually the filler step waving a tiny flag that says, “Hi, remember me?”
2) “My ends turned into a black hole.” If your blonde is from bleach, your ends are often the most porous part of your hair.
A super common experience is that ends grab pigment instantly and go darker than everything elsesometimes to the point where the hair looks like it has a shadow gradient.
The fix people end up loving later is boring but effective: porosity equalizer, careful timing, and treating the ends like the delicate antiques they are.
Many also learn to apply with smaller sections than they think they need. If you can’t see through the section, you probably can’t saturate it evenly.
3) “I underestimated the mess.” Black dye is dramatic in every way, including how it stains.
People often report thinking they’ll be “careful,” then realizing they have mysterious dark smudges on their forehead, neck, and hands that make them look like they fought a printer and lost.
The winning combo tends to be: petroleum jelly at the hairline, gloves during rinsing (not just applying), and wiping drips immediately.
It’s also common to learn that the shower grout is not a fan of impulse decisions.
4) “I missed the back.” The back-of-head blind spot is real.
Many people do a great job on the front and sides, then discover lighter patches underneath or at the crown.
The people who feel happiest with their results usually do two things: use two mirrors (or a friend), and work in deliberate quadrants with a timer.
The mantra is: section, saturate, checkrepeat. Not glamorous, but it works.
5) “I didn’t expect the identity shift.” This one isn’t technicalit’s emotional.
Going from blonde to black can feel like changing your whole aesthetic overnight. Some people love the boldness instantly; others feel surprised for a few days because their features read differently.
The folks who report the smoothest adjustment often start with “soft black” or a very dark brown first, then go darker later if they want.
It’s like easing into a new style instead of jumping straight into a full gothic novel cover.
6) “The aftercare is what makes it look expensive.” People who keep their black looking glossy usually build a small routine:
cool water rinses, fewer washes, color-safe shampoo, and a weekly conditioning treatment.
Those who skip aftercare often report fading, dullness, and dryness within a couple weeksespecially on previously bleached hair.
The most repeated “aha” is that dyeing is one day, but maintaining is the lifestyle.
If you take anything from these shared experiences, let it be this: the difference between “DIY success” and “DIY chaos” is rarely talent.
It’s almost always prep + filling + saturation + patience. And maybe an old towel you don’t love anymore.