Table of Contents >> Show >> Hide
- Why Make a DIY Folding Screen?
- Tools and Materials
- Before You Start: Plan the Size and Style
- How to Make a DIY Folding Screen Step by Step
- Easy Design Ideas for a Custom Look
- Common Mistakes to Avoid
- Where to Use a DIY Folding Screen
- Real-World Experiences With a DIY Folding Screen
- Conclusion
- SEO Tags
A DIY folding screen is one of those rare home projects that checks every box. It is useful, stylish, movable, customizable, and just dramatic enough to make guests think you have your life together. Need to hide a cluttered corner? Create a dressing nook? Fake a home office in a one-bedroom apartment? A folding screen steps in like the understudy who somehow steals the whole show.
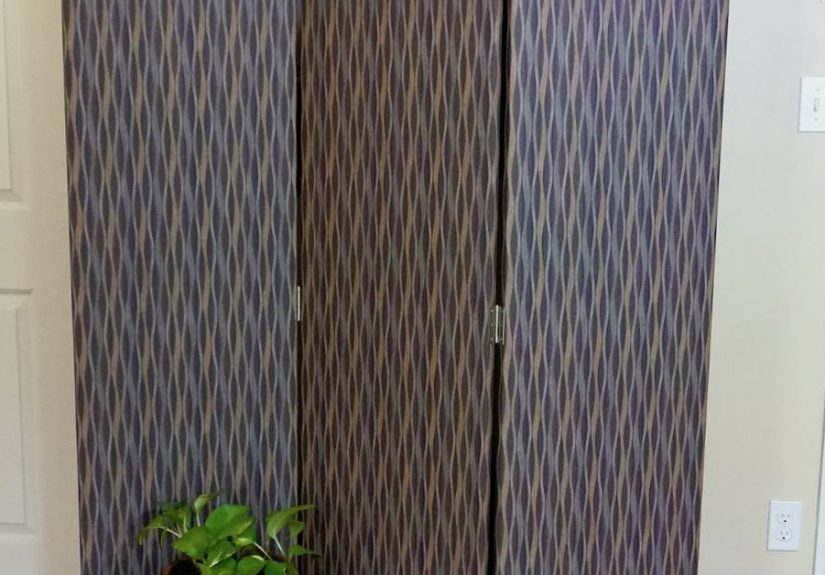
The beauty of this project is that it can be as simple or as fancy as you want. You can build a basic three-panel screen with wood frames and fabric in a weekend, or you can go full design goblin with cane webbing, wallpaper, painted murals, or vintage shutters. Either way, the structure is straightforward: build several lightweight panels, add your chosen insert, then connect them with hinges so the whole piece folds neatly when not in use.
In this guide, you will learn how to make a DIY folding screen from scratch, what materials work best, how to avoid the most common mistakes, and how to customize the final look so it feels less “garage project” and more “boutique hotel with excellent lighting.”
Why Make a DIY Folding Screen?
A folding screen does more than divide space. It changes how a room functions. In an open-plan home, it can carve out a reading corner, a workspace, or a guest sleeping zone without the expense or permanence of building a wall. In a bedroom, it can hide a clothing rack, laundry basket, or the exercise bike that seemed like a good idea in January.
It is also renter-friendly. Unlike built-in partitions, a folding screen can move with you. You can rotate it, tuck it behind a bed, place it near a window, or fold it flat and slide it into storage. That flexibility is the big selling point. This is not a commitment piece. It is more like a stylish boundary with trust issues.
And then there is the design side. A DIY folding screen gives you control over color, texture, height, transparency, and mood. Want airy and modern? Use linen or cotton canvas. Want warmth? Choose stained wood and woven cane. Want drama? Paint the panels in a bold color and pretend you have an interior designer on speed dial.
Tools and Materials
Basic Materials
- Wood boards for frames, such as 1×2 or 1×3 lumber
- Wood screws or pocket-hole screws
- Wood glue
- Sandpaper in medium and fine grits
- Primer and paint, or stain and clear sealer
- Fabric, cane webbing, plywood inserts, thin beadboard, or decorative panels
- Staples if using fabric or flexible panel material
- Two or three hinges between each panel
- Optional feet, furniture pads, trim, nailhead tape, or decorative molding
Tools
- Tape measure
- Pencil
- Miter saw or circular saw
- Drill and drill bits
- Clamps
- Staple gun
- Orbital sander or sanding block
- Paintbrush, foam roller, or spray paint setup
- Screwdriver
- Square or straightedge
If you are a beginner, do not let the tool list scare you. This project sounds like a lot, but the bones are simple. You are mostly making rectangles and persuading them to stand upright.
Before You Start: Plan the Size and Style
Choose the Number of Panels
Three panels are the easiest option for a first build. They are stable, easy to move, and wide enough for most bedrooms, offices, or studio apartments. Four panels give you more flexibility and a more traditional folding-screen look, but they also add weight.
A good starting size is around 16 to 20 inches wide per panel and about 60 to 72 inches tall overall. If your screen is too narrow, it may tip easily. If it is too wide or too heavy, it becomes harder to move and fold.
Pick a Panel Insert
Your insert determines both style and function. Fabric is the easiest because it is lightweight, forgiving, and simple to staple. Canvas, linen, duck cloth, and medium-weight cotton all work well. Cane webbing adds texture and a designer look. Thin plywood or beadboard gives you more privacy and a sturdier feel. Frosted acrylic, wallpaper over hardboard, or even painted drop cloth can also work if you want a more custom finish.
If you want the screen to divide a room without making it feel dark, choose a lighter or semi-sheer insert. If you want maximum privacy, use opaque fabric or solid panels.
Decide on the Finish
For a natural look, stain the wood and protect it with a clear topcoat. For a crisp decorative finish, prime and paint. Black looks modern, white feels clean and classic, and warm wood tones bring in a softer, more organic style. If you are aiming for “expensive but not trying too hard,” soft taupe, mushroom, olive, or deep charcoal are excellent choices.
How to Make a DIY Folding Screen Step by Step
Step 1: Measure and Sketch Your Design
Start by figuring out where the screen will live. Measure the width you want to cover and how tall the screen should be. Sketch each panel and write down the cut list. For example, a three-panel screen that is 72 inches tall and 18 inches wide might require six vertical pieces and six horizontal pieces, plus center supports if you want extra strength.
Planning matters here. A folding screen is not complicated, but it can become annoyingly crooked if you wing it with too much confidence and too little measuring.
Step 2: Cut the Wood for the Frames
Cut your boards to size for each panel. You can use simple butt joints for a beginner-friendly build or mitered corners if you want a cleaner, more polished look. Butt joints are easier and plenty strong for a lightweight divider.
Dry-fit the boards on the floor before assembling. Check that each panel is square. If the frame is off now, it will still be off later, only with added hinges and resentment.
Step 3: Assemble the Frames
Apply wood glue at the joints, clamp the frame, and secure it with screws. If you are using thin lumber, drill pilot holes first to reduce the chance of splitting the wood. Add a center rail if your screen is tall or if you want more support for the panel insert.
Repeat until all panels are built. Then compare them side by side. They do not need to be machine-perfect, but they should be consistent enough that the finished screen looks intentional rather than “rustic” in the panic-driven sense.
Step 4: Sand Everything Smooth
Now sand the wood. This is not the glamorous part of the project, but it is what makes the difference between “homemade” and “handmade.” Start with medium grit to smooth rough edges and saw marks, then move to a finer grit for a cleaner finish. Always sand with the grain.
Pay special attention to corners, edges, and any areas you will touch when moving the screen. Splinters are a terrible finishing detail.
Step 5: Paint or Stain the Frames
If you are staining, apply stain evenly, wipe away excess, and let it dry fully before sealing. If you are painting, prime first, then use two light coats of paint for better coverage than one thick gloopy coat. Let everything dry completely before moving on.
This is also the moment to get creative. You can color-block the panels, distress the wood lightly for a vintage look, or add trim for a more tailored finish. If you are using a bold fabric, keep the wood finish simple. If the insert is plain, the frame can do more of the decorating work.
Step 6: Attach the Panel Inserts
If you are using fabric, cut each panel piece a few inches larger than the frame opening. Lay the fabric face down, center the frame over it, and staple the fabric to the back side of the frame. Pull it taut as you go, working opposite sides to keep the tension even. The goal is smooth and snug, not stretched like a trampoline.
If you are using cane webbing, hardboard, beadboard, or thin plywood, cut the insert to fit and attach it from the back with staples, trim, or small brads. You can cover raw edges with lattice strips or decorative molding for a cleaner look.
For a reversible screen, use fabric on both sides or sandwich a solid insert between finished trim pieces.
Step 7: Add the Hinges
Lay two panels side by side and attach the hinges near the top and bottom, with a third hinge in the middle if the screen is especially tall. The important part is this: mount the hinges on alternating sides as you move from one seam to the next. That is what allows the screen to fold in an accordion pattern.
If you put all the hinges on the same side, the screen will technically exist, but it will refuse to behave. And a folding screen that does not fold correctly is just a decorative obstacle.
Step 8: Stand It Up and Test the Fold
Once all the panels are connected, stand the screen upright and test how it opens, closes, and balances. Add felt pads to the bottom if you will place it on hardwood or tile. If the screen feels wobbly, check whether the panels are evenly spaced and whether the hinges are aligned properly.
At this point, you are done with the build. Take a second to admire it. This is the part where a pile of lumber officially becomes furniture.
Easy Design Ideas for a Custom Look
- Modern minimalist: Black-painted frames with off-white linen.
- Coastal: White wood with pale blue fabric or woven cane.
- Boho: Natural wood, muslin, tassels, and a little fringe if you are feeling brave.
- Traditional: Dark stained wood with neutral upholstery fabric.
- Japandi-inspired: Slim wood frames with translucent paper-style inserts.
- Maximalist: Wallpapered panels, contrasting trim, and a finish that absolutely refuses to whisper.
You can also add function by clipping notes to it in an office, pinning jewelry to it in a bedroom, or using it as a photo backdrop for calls or content creation. A good folding screen is basically furniture with side quests.
Common Mistakes to Avoid
Making the Panels Too Heavy
Heavy panels can look substantial, but they also make the screen awkward to move and more likely to stress the hinges. Lightweight materials are usually the better choice.
Skipping the Pilot Holes
Small screws can still split wood, especially near edges. Pilot holes are a tiny step that can save you from a large amount of muttering.
Ignoring Hinge Direction
This is the classic folding-screen mistake. Alternate the hinge side between panel connections or the screen will not fold the way you want.
Using Fabric That Is Too Flimsy
Very thin fabric can sag, wrinkle, or show staples too easily. Medium-weight fabric tends to look cleaner and last longer.
Rushing the Finish
Let paint, stain, and sealers dry properly before assembly. Sticky wood and fresh fabric are not a dream team.
Where to Use a DIY Folding Screen
A DIY folding screen works in more places than you might expect. Put one in a studio apartment to separate the bed from the living area. Use one in a bedroom as a changing screen or to hide storage. Place one behind a desk to create a cleaner video-call background. Add one to a guest room to create a luggage nook. Use one near a window to filter light while maintaining a sense of division.
You can even use a folding screen as wall art when it is not actively dividing anything. Lean it behind a sofa, place it in an empty corner, or use it as a dramatic headboard alternative. Not every screen has to work full-time. Some can just stand there and look expensive.
Real-World Experiences With a DIY Folding Screen
One of the most interesting things about making a DIY folding screen is how quickly the project stops being theoretical and starts becoming personal. On paper, it sounds like you are just building a room divider. In practice, you are solving a problem that is usually tied to how you actually live. Maybe your apartment feels too open. Maybe your bedroom doubles as an office. Maybe you just want one blessed corner of your home where the laundry mountain cannot make eye contact with your guests.
That is why people who build folding screens often end up oddly attached to them. It is not just another DIY object. It changes the mood of a room immediately. A space that felt chaotic can suddenly feel organized. A visible storage area becomes hidden. A work zone becomes separate from a sleep zone. Even when the square footage stays exactly the same, the room feels more intentional, and that is a powerful shift.
There is also a very real learning experience in the making. The first lesson is measurement. Nearly everyone starts out thinking, “I will just eyeball this.” Then the panels do not line up, the hinges look confused, and the screen develops a slight lean that can only be described as theatrical. After that, most builders become strong believers in measuring twice, checking for square, and respecting the humble tape measure like it is the wise elder of the garage.
The second lesson is tension. If you are using fabric, you learn quickly that there is a sweet spot between too loose and too tight. Too loose, and the panel looks tired. Too tight, and the weave distorts or the staples pull strangely at the corners. There is a rhythm to stretching fabric across a frame, and once you find it, the project becomes almost relaxing. Almost. Corners still like to test your character.
Another common experience is discovering that the finish matters far more than expected. A basic frame can look surprisingly polished after proper sanding, primer, and paint. On the other hand, a clever design can still look unfinished if the wood is rough and the edges are messy. This is usually the point where many DIYers realize that sanding is not punishment. It is, unfortunately, part of the glow-up.
Then comes the hinge moment, which is the project’s mini final exam. If the hinges are placed correctly, the screen opens and folds with satisfying ease. If not, you get a moody sculpture that refuses to cooperate. It is funny how much joy can come from watching three simple panels fold the way they are supposed to. It feels like the DIY equivalent of getting a printer to work on the first try.
Once the screen is finished and in place, people tend to find extra uses for it. What began as a privacy screen becomes a backdrop for video meetings, a dressing area, a decorative corner piece, or a shield protecting the world from the sight of a treadmill being used as a coat rack. That versatility is part of the reason this project feels worth the effort. It adapts as your needs change.
Most of all, building a DIY folding screen is satisfying because the result feels practical and creative at the same time. You are not just making decor. You are making a tool for daily life, one that can soften, hide, separate, frame, and improve a room without demanding permanent construction. That is a pretty good return for a weekend project and a handful of hinges.
Conclusion
If you want a project that combines function, flexibility, and style, a DIY folding screen is hard to beat. It is beginner-friendly enough for an ambitious weekend build, but customizable enough to look truly high-end when finished well. Start with a simple frame, choose a panel material that suits your room, pay attention to sanding and hinge placement, and you will end up with a piece that feels both useful and genuinely decorative.
Best of all, this is a project that earns its floor space. Your folding screen can create privacy, hide clutter, define zones, and add texture to a room without a single hammer swing into your walls. That is a small miracle in modern decorating, and one worth building with your own hands.


