Table of Contents >> Show >> Hide
- Why This Three-Ingredient Star Wars Easter Egg Idea Actually Works
- The Three Ingredients
- How To Make Edible Star Wars Easter Eggs
- My Favorite Star Wars Easter Egg Designs
- Tips That Make These No-Bake Easter Treats Better
- Common Mistakes I Made So You Do Not Have To
- Serving, Storage, and Make-Ahead Advice
- Why These Star Wars Easter Eggs Are So Good For Parties
- My Real Experience Making These In My Kitchen
- Conclusion
- SEO Tags
If you have ever looked at an Easter dessert table and thought, “This is cute, but what if it had a little more galactic conflict?” then welcome aboard. This year, I skipped the usual pastel routine and made edible Star Wars Easter eggs out of just three core ingredients. Yes, three. Not twelve. Not “three, plus the entire baking aisle.” Just three main players: chocolate sandwich cookies, cream cheese, and candy melts.
The result was a tray of no-bake Easter treats that looked like they crash-landed somewhere between a spring brunch and a Star Destroyer. Some eggs resembled Darth Vader. A few had serious Stormtrooper energy. One looked a little like BB-8. Another looked less like Grogu and more like “mysterious swamp potato,” but that is part of the charm. Homemade holiday treats are not supposed to look factory-perfect. They are supposed to taste amazing, spark conversation, and make at least one person say, “Wait, you made these?”
That is exactly why this recipe works so well. It combines the popularity of three-ingredient desserts, the fun of Easter candy-making, and the built-in fandom appeal of Star Wars treats. It is simple enough for beginners, cute enough for a party table, and flexible enough that you can lean elegant, goofy, or full “May the frosting be with you.”
Why This Three-Ingredient Star Wars Easter Egg Idea Actually Works
The smartest holiday treats are the ones that look complicated while quietly doing almost none of the heavy lifting. That is the superpower of these edible Easter eggs. The cookie-and-cream-cheese filling creates a soft truffle center that is easy to shape into eggs. The melted candy coating firms up in the fridge, which gives the eggs a polished shell and a perfect surface for simple decoration.
In other words, this recipe is less “advanced pastry school” and more “I have a microwave, a spoon, and unreasonable confidence.” You do not need to bake. You do not need to temper chocolate. You do not need fondant sculpting skills. You mostly need to crush, mix, chill, dip, and decorate.
That ease matters because themed treats can go wrong fast when the design is too ambitious. The best Star Wars Easter desserts use instantly recognizable colors and shapes. A dark egg with a few clean lines reads as Darth Vader. A white shell with black dots gives Stormtrooper. A round white-and-orange pattern nods to BB-8. You do not need cinematic realism. You just need enough visual shorthand for people to grin before they take a bite.
The Three Ingredients
What you need
- 36 chocolate sandwich cookies
- 8 ounces full-fat cream cheese, softened
- 16 to 20 ounces candy melts, divided by color if you want multiple Star Wars designs
That is the entire core recipe. If you want to be strict about the count, candy melts are still one ingredient even when you use more than one color. Think of it as one costume department with a very healthy budget.
The cookies create structure and deep cocoa flavor. The cream cheese binds everything into a rich, truffle-like filling. The candy melts form the shell and provide the visual drama. This combination is popular for no-bake truffles for a reason: it is forgiving, fast, and reliably crowd-pleasing.
Optional but helpful tools
- Food processor or zip-top bag and rolling pin
- Mixing bowl and spatula
- Parchment-lined tray or plate
- Fork, dipping tool, or spoon
- Small piping bag or zip-top bag with the corner snipped
Notice that I said tools, not extra ingredients. I am respecting the mission here.
How To Make Edible Star Wars Easter Eggs
Step 1: Crush the cookies into fine crumbs
Pulse the chocolate sandwich cookies in a food processor until they turn into dark, almost fluffy crumbs. If you do not have a food processor, place them in a sealed bag and whack them with a rolling pin like you are settling an argument with the Empire. Fine crumbs work better than chunky ones because the filling becomes smoother and easier to shape.
Step 2: Mix with cream cheese
Transfer the crumbs to a bowl and mix in the softened cream cheese until the mixture becomes thick, uniform, and scoopable. It should hold together when pressed, almost like edible modeling clay. If the cream cheese is cold, the mixture will fight back. If it is softened, everything comes together beautifully.
Step 3: Shape into eggs
Scoop portions of the mixture and roll them into balls, then gently taper one end to create an egg shape. Place the formed eggs on a parchment-lined tray. Do not overthink the shape. Real eggs are not mathematically identical, and neither are these. Rustic is charming. Rustic is homemade. Rustic is also what I tell myself when one egg looks like it went through hyperspace sideways.
Step 4: Chill until firm
Refrigerate or freeze the shaped eggs until they are firm enough to dip cleanly. This step matters. Warm, soft eggs are far more likely to crumble, slide, or do something dramatic the second they meet melted coating. Chilled eggs behave. Chilled eggs understand the assignment.
Step 5: Melt the candy coating
Melt the candy melts according to package directions. Work in short intervals and stir often. You want smooth, fluid coating, not a scorched sugar tragedy. If you are using more than one color, melt them separately and keep them warm while you decorate.
Step 6: Dip and set
Drop each chilled egg into the coating, turn to cover, and lift it out with a fork or dipping tool. Tap off the excess and return it to parchment. Let the shell set before adding details. Once the coating firms, the eggs become little edible canvases ready for their Star Wars glow-up.
My Favorite Star Wars Easter Egg Designs
Darth Vader eggs
Use dark coating for the shell. Once set, drizzle on a few thin gray or white lines to suggest the chest panel and mask details. The key is restraint. Vader is more intimidating when you do less. Heavy-handed decoration turns him into “confused opera villain,” which is a different franchise entirely.
Stormtrooper eggs
Coat the eggs in white candy melts. Add two black eye shapes, a small dark mouth detail, and a few tiny lines to suggest the helmet. The contrast does most of the work for you. Stormtrooper eggs are great if you want a high-recognition design with minimal fuss.
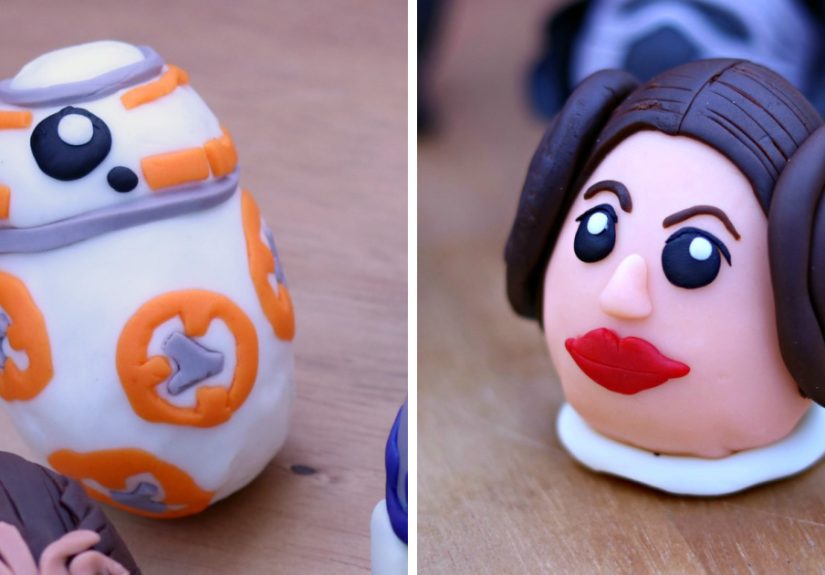
BB-8 eggs
Start with a white shell. Pipe orange circles, bands, or dots around the egg, then add tiny gray or black accents. The beauty of a BB-8-inspired design is that it does not need perfect symmetry. It just needs that bright orange-and-white droid energy.
Grogu-inspired eggs
If you have green coating, great. If not, lean into a neutral design and use a soft green drizzle or small ear-like marks if you are improvising with decorative candy coating. Grogu-inspired eggs are especially fun for kids because the design can be more cartoonish and still look intentional.
Death Star eggs
Gray or silver-toned coating works best here, but a pale shell with darker panel lines also gets the point across. Add one slightly larger circle for the superlaser dish and suddenly your Easter candy looks suspiciously powerful.
Tips That Make These No-Bake Easter Treats Better
Use softened cream cheese
This seems small, but it is the difference between a silky filling and an arm workout. Softened cream cheese blends quickly and evenly, which helps the eggs hold their shape without streaks or lumps.
Chill before dipping
If you skip the chilling step, the eggs can soften in the warm candy coating and become difficult to handle. A cold center gives you cleaner dips, smoother shells, and less dramatic language in the kitchen.
Keep the decorations simple
Themed desserts often go sideways when people try to paint a full movie poster onto a two-inch surface. Choose iconic visual cues instead. Helmet lines. Droid circles. A dark shell. A white shell. A few contrasting details. That is enough.
Work in batches
Leave some eggs in the fridge while you dip the others. That keeps the filling firm and gives you more control, especially if your kitchen runs warm or your candy coating is taking its sweet time.
Common Mistakes I Made So You Do Not Have To
My first mistake was shaping a few eggs too large. Oversized eggs are cute until you try to dip them and realize they weigh as much as a small moon. Keep them snack-sized. They look neater, chill faster, and are easier to decorate.
My second mistake was getting too artistic too early. On the first batch, I tried to freehand every detail while the coating was still soft. Bad idea. Lines bled. Colors wandered. One poor egg looked less like a Star Wars icon and more like modern art from a very stressed galaxy. Let the base set first, then add details.
My third mistake was assuming every design needed perfection. It does not. Once these eggs are plated together, the effect is what matters. A mixed tray of themed Easter candy looks festive and playful even if one Stormtrooper seems to be having a rough morning.
Serving, Storage, and Make-Ahead Advice
Because the filling contains cream cheese, these eggs are best stored in the refrigerator until serving time. They can absolutely handle a party table, but they are not the kind of treat you want to leave out for hours while everyone debates whether Han shot first. Keep them chilled, bring them out when you are ready, and return leftovers to the fridge.
They are also a smart make-ahead dessert. You can shape the eggs a day in advance, chill them overnight, and dip them the next day. You can even finish the full recipe ahead of Easter brunch and keep the tray covered in the refrigerator until showtime. That is especially helpful if your holiday prep list is already long enough to require its own opening crawl.
Why These Star Wars Easter Eggs Are So Good For Parties
These treats land in a sweet spot that a lot of holiday recipes miss. They are nostalgic without being old-fashioned, themed without being fussy, and kid-friendly without tasting like they were invented purely for children. Adults love them because they are essentially cookie truffles in costume. Kids love them because they are tiny edible characters. Hosts love them because they look impressive with very little actual stress.
They also photograph well, which matters more than anyone likes to admit. A plate of glossy little Star Wars Easter eggs on a spring table has built-in charm. Add a few pastel napkins, a simple cake stand, and maybe a little greenery, and suddenly your dessert spread looks like it had a creative director.
My Real Experience Making These In My Kitchen
I went into this project expecting a cute little holiday experiment and came out of it weirdly proud, slightly sticky, and fully convinced that edible fandom is one of the best forms of fandom. The first surprise was how easy the base recipe was. Once the cookies were crushed and mixed with the cream cheese, the filling practically begged to be shaped. It had that ideal texture where it felt structured but still soft enough to smooth with your hands. I made the first few eggs cautiously, like I was handling museum artifacts. By egg number six, I was shaping them at the speed of someone who had accepted their destiny.
The second surprise was how funny the decorating process became. I had a very noble vision in my head: a polished tray of immaculate mini masterpieces, each one instantly recognizable, each one worthy of a dramatic John Williams score. What I actually got at first was a batch of eggs that looked like the Rebel Alliance had suffered several budget cuts. My first Darth Vader had a lopsided face panel. My first BB-8 looked like a traffic cone with emotional depth. One white egg developed such chaotic black lines that I stopped calling it a Stormtrooper and started calling it “imperial-adjacent.”
But here is the thing: once I stopped chasing perfection, the whole process became much more fun. I realized that people do not respond to homemade treats because they are flawless. They respond because they are recognizable, playful, and clearly made with real enthusiasm. The minute I leaned into that energy, everything clicked. I kept the lines simpler. I let the colors do more of the storytelling. I grouped similar eggs together on the tray. Suddenly the collection looked intentional, even when each individual piece had a little personality of its own.
Taste-wise, these were the opposite of a novelty dessert that looks better than it eats. The centers were rich, creamy, and deeply chocolatey, almost like a cookies-and-cream truffle with a cheesecake vibe. The candy shell added that satisfying snap when you bit in. That contrast made the whole thing feel more polished than the ingredient list suggested. Three ingredients sounds like a kitchen shortcut, but the finished texture felt legit.
I also liked how adaptable the recipe was for different moods. If I wanted a cleaner look, I could stick to black-and-white designs and make a whole army of Vader and Stormtrooper eggs. If I wanted something more playful, I could bring in brighter colors and do droids, creatures, or vaguely alien eggs that still fit the theme. The recipe did not fight me. It just quietly supported whatever level of chaos I was bringing to the table.
By the time I finished, the tray looked festive, nerdy, and honestly kind of adorable. More important, everyone who saw them smiled immediately. That is the sweet spot for a holiday dessert. These edible Easter eggs were not just candy; they were a conversation starter, a photo prop, and a tiny edible crossover event between spring celebration and pop-culture joy. I would absolutely make them again, and next time I might even pretend I meant for that one crooked Stormtrooper to look that way.
Conclusion
If you want an Easter dessert that feels creative without becoming a full weekend project, these three-ingredient Star Wars Easter eggs are a great idea. They are simple, fun, no-bake, and surprisingly versatile. The cookie truffle base is rich and dependable, the candy coating makes decoration easy, and the Star Wars theme gives the whole thing personality. Whether you make a polished galaxy of droids and villains or a lovable tray of slightly chaotic homemade eggs, the effect is the same: people will be delighted, and the plate will empty fast.
That may be the real magic of this recipe. It turns a small, silly idea into something memorable. It is approachable enough for a casual kitchen session, festive enough for Easter entertaining, and geeky enough to make Star Wars fans feel seen. In a season full of sweets, that is a pretty strong use of the Force.