Table of Contents >> Show >> Hide
- Why a Rustic Pallet Jewelry Holder Is a Game Changer
- Step-by-Step: How to Build a Rustic Pallet Jewelry Holder
- 1. Source and Prep Your Pallet Wood
- 2. Design Your Layout (Before You Cut Anything)
- 3. Build the Back Panel
- 4. Cut and Attach the Hardware Cloth or Chicken Wire
- 5. Add Hooks, Nails, and a Dowel for Hanging Jewelry
- 6. Add a Shelf (Optional but Highly Recommended)
- 7. Finish and Seal the Wood
- 8. Install a Sturdy Hanger
- Styling Your Rustic Pallet Jewelry Holder
- Safety Tips for Working With Pallets
- Why This Project Fits the Remodelaholic Spirit
- Personal Experiences & Tips With Rustic Pallet Jewelry Holders
If you’ve ever spent 20 minutes untangling a knot of necklaces only to give up and grab the same old studs again, this project is for you. A rustic pallet jewelry holder turns those piles of earrings, bracelets, and chains into a wall-mounted display that’s equal parts storage and décor. Even better? You can build it from free pallet wood and a handful of basic hardware, just like the popular DIY versions shared by Remodelaholic and other crafty creators across the U.S.
In this guide, we’ll walk through how to make a rustic pallet jewelry organizer, why pallet wood is such a great material, and the little design detailslike chicken wire, cup hooks, and decorative knobsthat help your jewelry stay neat and easy to grab. Think farmhouse charm meets “I can actually find my favorite earrings.”
Why a Rustic Pallet Jewelry Holder Is a Game Changer
From Tangled Pile to Boutique Display
Traditional jewelry boxes are great in theory, but in real life, they tend to become black holes. Necklaces tangle, earrings lose their partners, and anything that’s not on top gets forgotten. Wall-mounted organizers flip that script: everything is visible, so you actually wear what you own. DIYers who switched from a box to a pallet jewelry holder say they rediscovered pieces they hadn’t worn in years simply because they could finally see them at a glance.
Why Pallet Wood Works So Well
Reclaimed pallet wood is a favorite in rustic décor for a reason. It’s usually free, full of character, and naturally imperfectknots, nail holes, and weathered grain all add charm that new lumber just can’t fake. Projects on sites like My Love 2 Create, Pallet List, and Instructables show how a few pallet slats can become shelves, racks, and wall organizers that look like you snagged them from a boutique, not the hardware store.
Using pallet wood for a jewelry holder also ticks all the sustainability boxes. You’re upcycling materials that might otherwise be discarded, reducing waste while adding storage. It’s eco-friendly, budget-friendly, and just plain pretty.
Key Features of a Rustic Pallet Jewelry Organizer
- Flat backboard: A simple rectangle made from pallet slats, attached to bracing in the back.
- Mesh center panel: Hardware cloth or chicken wire provides tons of space for earrings.
- Hooks and nails: Cup hooks, common nails, or screw-in hooks along the bottom and sides hold necklaces and bracelets.
- Optional shelf or dowel: A narrow shelf or dowel bar adds storage for rings, bangles, watches, or small trays.
- Rope or twine hanger: A braided jute or twine hanger adds extra rustic charm and makes mounting easy.
Step-by-Step: How to Build a Rustic Pallet Jewelry Holder
1. Source and Prep Your Pallet Wood
Look for free or low-cost pallets from local garden centers, hardware stores, or small businesses. Choose pallets stamped “HT” (heat-treated) rather than chemically treated when possiblethese are safer for indoor décor projects.
Disassemble the pallet using a pry bar, hammer, or reciprocating saw to cut through nails. Remove or grind down any remaining fasteners. Then:
- Trim boards to remove badly damaged ends.
- Lightly sand the surfaces to knock down splinters but keep the rustic texture.
- Wipe away dust with a dry cloth.
You’ll need enough boards to create a back panel roughly 24–30 inches wide and 10–14 inches tall, but you can scale the size up or down depending on your wall space and jewelry collection.
2. Design Your Layout (Before You Cut Anything)
Lay the pallet boards face down on a table to experiment with the arrangement. Mix boards with different tones and grain for more character, similar to the layered, weathered look seen in many pallet jewelry displays and wall organizers.
Decide on:
- Orientation: Horizontal boards create a long, narrow display; vertical boards feel more like framed art.
- Center panel size: Leave a rectangle in the middle where your hardware cloth or chicken wire will sit.
- Hook zones: Plan where necklaces, bracelets, and rings will hang so you don’t crowd everything in one row.
3. Build the Back Panel
Flip the boards so the front faces down. Cut two or three support strips from scrap pallet wood and attach them across the back with wood screws, brad nails, or a combination of glue and nails. This pulls the individual boards into a single solid panel.
If you want a more polished look, you can frame the panel with narrow trim pieces or rulers, like some pallet pegboard organizers do, but the raw edges are perfectly on-brand for rustic décor.
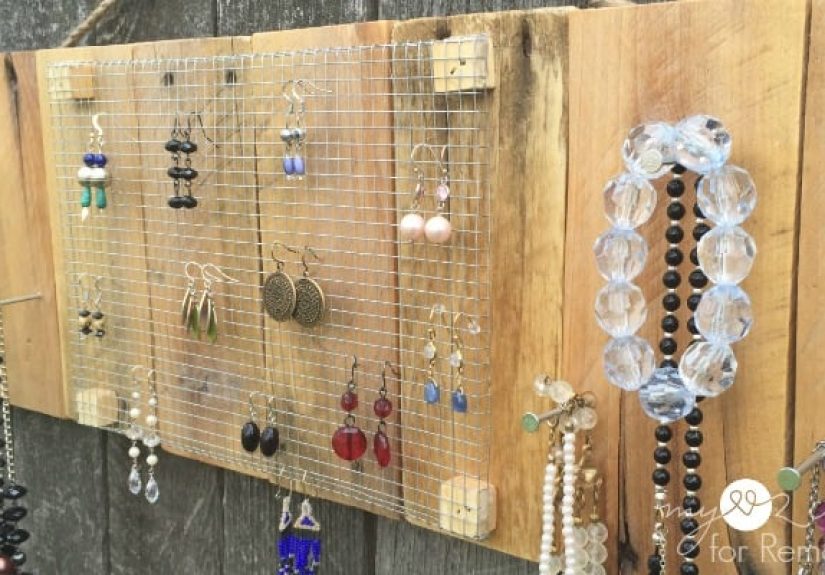
4. Cut and Attach the Hardware Cloth or Chicken Wire
Measure the central area you left open for earrings and cut a piece of hardware cloth or chicken wire slightly larger than that opening using wire cutters. DIY jewelry holders often use this material because earrings can hook through the grid while the wire stands off the wood enough to leave space for earring backs.
To protect fingers from sharp edges and to keep the wire from sagging, frame it with small wood squares or strips:
- Lay the mesh flat on the back of the panel.
- Place thin wood strips or small squares over the edges like a picture frame.
- Staple or nail through the strips into the pallet wood to clamp the mesh securely in place.
From the front, you should see a tidy metal grid framed by warm, weathered boards.
5. Add Hooks, Nails, and a Dowel for Hanging Jewelry
Now the fun part: turning your pretty wood into a serious organizer. Pallet jewelry racks featured on DIY sites often mix cup hooks, common nails, and decorative knobs to handle different types of jewelry.
Try this setup:
- Necklaces: Install 1–2 rows of small cup hooks or nails along the bottom edge and sides. Pre-drill pilot holes to avoid splitting the wood, just as many tutorials recommend.
- Bracelets and watches: Screw in a wooden dowel supported by small brackets or hook it through eye screws across the lower portion of the board. This keeps bangles together and easy to scan.
- Rings: Use a cluster of small hooks or short nails arranged in a line so rings can slide on and off.
- Statement pieces: Mix in large decorative knobs or salvaged hardware (hinges, vintage pulls) for chunky necklaces and cuffs, a common trick in rustic pallet displays.
6. Add a Shelf (Optional but Highly Recommended)
If you have space, attach a narrow shelf near the bottom of the holder using glue and screws from the back. Many pallet jewelry organizers incorporate a tiny ledge for perfume bottles, trinket dishes, or a phoneturning the piece into a mini command center for your dresser or closet wall.
Keep the shelf shallow (3–4 inches deep) so it doesn’t stick too far out from the wall. Rustic crates and pallet shelves often use this depth to balance storage with a slim profile.
7. Finish and Seal the Wood
You can leave the pallet wood completely raw, but a light finish helps protect it and highlight the grain. Popular options seen in pallet wood projects include:
- Whitewash: Thin white paint with water (about 1:1 or 1:2) and brush it on, then wipe off the excess to create a weathered, beachy look.
- Natural stain: One light coat of clear or light-toned stain brings out the warmth of the wood while keeping the rustic character.
- Matte sealer: Finish with a clear matte polyurethane or water-based sealer to protect the wood from humidity and everyday wear.
Whatever finish you choose, let it dry fully before loading your jewelry to avoid transferring color or residue onto metal and stones.
8. Install a Sturdy Hanger
Finish your rustic look with a rope or twine hanger. Braid three strands of jute twine together for thickness and staple or screw it securely to the back of the panel, knotting the ends so they can’t slip through. This method echoes the hanging style used on popular pallet jewelry holder tutorials.
If your piece is heavy or has a deeper shelf, consider adding a French cleat or keyhole hardware instead for extra supportespecially if you plan to fill it with heavier jewelry.
Styling Your Rustic Pallet Jewelry Holder
Choose a Location That Works Hard
Mount your jewelry holder where you actually get dressednext to a dresser mirror, above a vanity, or inside a walk-in closet. Many DIYers mount theirs on a wooden fence or shiplap accent wall for maximum rustic impact, but it looks just as good against a painted wall.
Hang it at eye level or slightly below so you can see all your pieces without stretching or squatting. If you share the space with someone else, consider a “his and hers” arrangement with two smaller organizers side by side.
Display by Color and Category
To keep things easy to find (and Instagram-worthy):
- Group necklaces by metal tone or color.
- Use one section of the wire grid just for stud earrings and another for dangly styles.
- Reserve the dowel for bracelets and watches only, so it doesn’t get overloaded.
Organized jewelry is more than just prettyit can save you time getting ready and prevent damage from tangling and scratching.
Match Your Existing Decor
One of the biggest perks of DIY is being able to customize. Want a more modern farmhouse look? Go for a light whitewash, simple black hooks, and clean lines. Leaning boho? Mix in colorful knobs, painted accents, and woven baskets below. Tutorials across Pinterest and remodeling blogs show how varied these organizers can be, even with the same basic pallet foundation.
Safety Tips for Working With Pallets
Before you dive in, keep a few safety basics in mind:
- Check pallet stamps: Look for “HT” markings and avoid pallets with unknown stains or strong chemical smells.
- Wear protection: Gloves, safety glasses, and a dust mask are your friends when cutting and sanding.
- Secure your piece: Make sure your wall anchors are rated for the weight of the organizer plus jewelry, especially if you’ve added a shelf.
With a bit of caution up front, your rustic jewelry holder will be safe, sturdy, and ready for long-term use.
Why This Project Fits the Remodelaholic Spirit
Remodelaholic is known for budget-friendly, creative DIY projects that make your home more beautiful and functional using everyday materialsexactly what a pallet jewelry holder does. The original rustic pallet jewelry holder shared for Remodelaholic combined leftover pallet boards, hardware cloth, and simple nails to create a piece that felt custom and high-end without a luxury price tag.
When you build your own version, you’re not just copying a project; you’re joining a larger DIY movement that values reuse, creativity, and hands-on craftsmanship. Every knot and nail hole tells a storyand now your jewelry gets to be part of it.
Personal Experiences & Tips With Rustic Pallet Jewelry Holders
Once you’ve built and lived with a rustic pallet jewelry holder for a while, you start to notice little details that make the biggest difference. Here are experience-based tips and observations drawn from how DIYers actually use these organizers over time.
1. Visibility Changes What You Wear
The first thing most people notice is that they suddenly rotate through way more of their jewelry. Pieces that lived at the bottom of a box finally see daylight because they’re right in front of you. Instead of defaulting to the same studs and chain, you’ll find yourself grabbing that pair of turquoise earrings or the chunky bracelet you forgot you owned. Over a few weeks, your everyday style feels more intentional and less “whatever I can untangle.”
2. Hooks Matter More Than You Think
At the planning stage, hooks feel like a tiny detail. In real life, they’re everything. Too few hooks and your necklaces pile up; hooks spaced too close together cause chains to overlap and tangle. A good rule of thumb from lived experience: leave about two inches between hooks for necklaces and at least three inches where you plan to hang chunkier statement pieces.
Mixing hook types is also a win. Slim cup hooks are perfect for chains, while chunky knobs hold heavier beads or layered bracelets. If you’re someone who collects cuffs or watches, giving them their own dedicated dowel bar keeps them from jockeying for space with necklaces.
3. Chicken Wire Is Surprisingly Versatile
Chicken wireor hardware clothmight look purely decorative at first, but it becomes the workhorse of the whole piece. Stud earrings slide onto the grid easily, dangling earrings hook over any intersection, and even small hoop earrings can be stored without stretching. Over time, you may naturally start to create “earring zones” across the mesh: everyday basics in one corner, special-occasion sparkles in another.
One practical tip: when you first load the wire, spread earrings out more than you think you need. It’s tempting to pack them tightly, but leaving small gaps makes it easier to remove pairs without knocking others off.
4. The Shelf Becomes a Mini Landing Zone
If you add a shelf, you’ll quickly discover it doesn’t just hold pretty perfume bottles. It becomes a landing zone for all the little things that never had a home: hair ties, bobby pins, lip balm, or the ring you take off every time you wash dishes. A small tray or dish on the shelf keeps those loose items from sliding around and adds another layer of styling.
Over time, many people end up styling this shelf almost like a tiny vignettemaybe a framed photo, a small plant, or a candle, with jewelry mixed in. It turns a strictly functional organizer into a focal point that feels designed, not just “stuck on the wall.”
5. Maintenance Is Easy (But Do Dust It)
Pallet wood is forgiving, but it does collect dust, especially around hardware and wire. A soft paintbrush or microfiber cloth run over the board every few weeks keeps things clean without scratching metals or gemstones. For sealed wood, a slightly damp cloth works fine; for raw, weathered boards, keep moisture to a minimum so they don’t swell or warp.
It’s also smart to give your jewelry a quick check while you’re dusting: tighten loose earring backs, wipe down metal with a jewelry cloth, and retire anything that’s broken or irritating your skin. The organizer becomes a built-in reminder to maintain your pieces, not just store them.
6. Adjusting Over Time Is Part of the Fun
One of the nicest parts about this style of organizer is how easy it is to tweak. Need more necklace space? Add a second row of hooks. Bought a few extra bracelets? Slide a slightly longer dowel into the existing eye screws. Want a different look? A new coat of stain or a subtle whitewash can completely change the vibe without rebuilding from scratch.
Because pallet wood is already rustic and forgiving, additional nail holes or new hooks don’t ruin the lookthey just add to the “well-loved” character. Where a sleek store-bought piece might show every modification, this one wears its upgrades proudly.
7. It Makes a Seriously Good Gift
Finally, if you’re thinking of making more than one, rustic pallet jewelry holders have huge gift potential. They’re personal without being too specific, useful for almost anyone who wears jewelry, and easy to customize with color, hardware, or size. Many makers sell similar organizers online, but giving a handmade version lets you match the recipient’s style exactly, from glam and sparkly to simple and minimal.
Add a few starter piecesmaybe a pair of earrings or a braceletand you’ve turned a DIY project into a complete, thoughtful gift set.
In short, living with a rustic pallet jewelry holder proves it’s more than a cute Pinterest idea. It’s a practical, flexible, and surprisingly stylish solution to everyday clutter, and it fits perfectly into the creative, resourceful spirit that Remodelaholic fans love.