Table of Contents >> Show >> Hide
- What Is an Electrochemical Metal Cutter?
- Why Use a 3D Printer as the Motion Platform?
- How the Simple Mods Work
- ECM vs. EDM vs. CNC Milling
- What Can a Modified 3D Printer Cut?
- Why This Idea Is So Exciting
- Important Safety Considerations
- Limitations of a 3D Printer-Based Metal Cutter
- Real-World Examples and Practical Possibilities
- SEO-Friendly Buyer and Maker Intent: Who Is This For?
- Experience Notes: What It Feels Like to Work With a Printer-Based ECM Setup
- Conclusion
Can a humble desktop 3D printer cut metal without a roaring spindle, flying chips, or a garage that sounds like a tiny construction site? Surprisingly, yesat least in experimental form. With a few clever modifications, a standard motion platform like an Ender-style 3D printer can be repurposed into an electrochemical metal cutter, using electricity, electrolyte flow, and controlled motion to dissolve metal along a programmed path.
This idea sits at the wonderfully strange intersection of 3D printing, CNC machining, electrochemistry, and maker ingenuity. Instead of forcing a spinning bit through stainless steel, electrochemical machiningoften shortened to ECMremoves conductive metal through anodic dissolution. In plain English: the workpiece slowly gives up material when current, electrolyte, and a shaped electrode are managed correctly. It is less “angry drill press” and more “science fair with a very serious haircut.”
What Is an Electrochemical Metal Cutter?
An electrochemical metal cutter is a machine that removes metal through a controlled electrochemical reaction rather than through mechanical force. The workpiece is connected as the positive side, or anode, while the tool electrode is connected as the negative side, or cathode. A conductive fluid called an electrolyte flows between them. When direct current passes through the small gap, metal dissolves from the workpiece and is carried away by the fluid.
Industrial electrochemical machining has been used for difficult materials such as stainless steel, nickel alloys, titanium alloys, and hardened metals. These are materials that can make conventional cutting tools cry tiny carbide tears. ECM is attractive because it creates little to no cutting force, produces minimal heat-affected damage, and can leave smooth, burr-free surfaces when properly controlled.
The desktop version is obviously not the same as a high-end industrial ECM system. A modified 3D printer is not about replacing a factory machine. It is about proving that the core idea can be explored using affordable motion hardware, open-source firmware, and a custom electrode toolhead.
Why Use a 3D Printer as the Motion Platform?
A 3D printer already has many of the ingredients needed for a small CNC-style machine. It has stepper motors, linear motion, belts or lead screws, a rigid-ish frame, firmware that understands G-code, and a build plate that can hold a workpiece. In other words, half the machine is sitting there waiting to be invited to a different party.
The biggest change is the toolhead. Instead of pushing filament through a heated nozzle, the modified printer carries an electrodeoften a small metal tube, needle, or wire-like tool. The printer’s X, Y, and Z axes guide the electrode along the desired path while the electrolyte and power supply do the actual metal removal.
This approach has become popular in maker discussions because desktop 3D printers are accessible, easy to modify, and supported by a large community. Many printers can already run precise linear moves with G0 and G1 commands. That makes them useful for experiments involving plotting, laser engraving, paste dispensing, PCB milling, and, in this case, electrochemical cutting.
How the Simple Mods Work
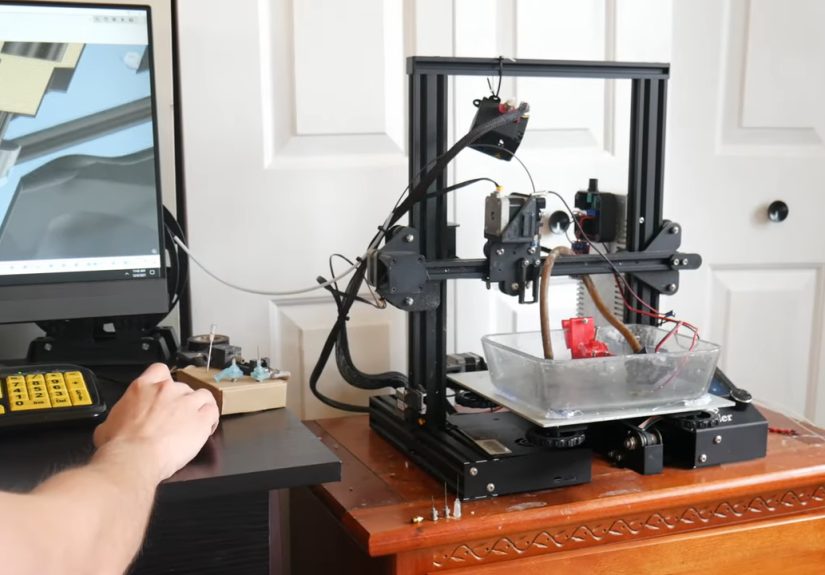
1. Replace the Extruder With an Electrode Toolhead
The most visible modification is removing or bypassing the normal hotend and mounting an electrode in its place. A hypodermic-style needle, small conductive tube, or shaped metal tool can act as the cathode. The point is not to scrape the workpiece. In fact, contact is usually the enemy. The electrode must stay close enough for the electrochemical reaction to happen, but not so close that it shorts against the metal.
This is where the 3D printer earns its keep. It can move the electrode slowly and repeatably across the workpiece. The path may resemble a CNC cutting route, except the “cutter” is a controlled chemical reaction rather than a spinning end mill.
2. Add Electrolyte Flow
Electrolyte is essential. It carries ions, completes the electrical path, cools the cutting zone, and flushes away dissolved metal byproducts. A small pump can move electrolyte from a container to the toolhead and back into a catch tray or reservoir. In some experimental setups, electrolyte flows through or around the electrode so the reaction happens exactly where the tool is aimed.
Flow matters more than beginners expect. Too little flow and waste builds up near the cut. Too much uncontrolled flow and the cut may widen or become inconsistent. The magic is in keeping the reaction localized, stable, and repeatable.
3. Connect a Controlled DC Power Supply
The process requires direct current between the electrode and the metal workpiece. The tool becomes the cathode, and the workpiece becomes the anode. A controlled power supply allows the operator to manage the reaction. The goal is not brute force. More power does not automatically mean a better cut; it may simply create heat, gas, rough edges, or an impressive new way to ruin a Saturday.
For a hobby article, the key takeaway is simple: ECM depends on stable electrical conditions, consistent spacing, and good electrolyte management. It is not a “clip on a car battery and hope” situation.
4. Protect the Printer From Corrosion and Splash
A 3D printer was not designed to live near conductive fluid. Electrolyte can corrode metal parts, damage electronics, and cause shorts. Any practical conversion needs splash control, sealed wiring, a nonconductive fixture, and careful separation between the wet cutting area and the printer’s control electronics.
The build plate area may need a tray or removable basin. Cable routing should avoid drips. Exposed bearings, fasteners, fans, and connectors should be protected. The printer is useful as a motion platform, but it will not appreciate being marinated.
ECM vs. EDM vs. CNC Milling
Electrochemical machining is often compared with electrical discharge machining, or EDM, but they are not the same. EDM uses electrical sparks to erode metal in a dielectric fluid. ECM uses electrolysis-like dissolution in a conductive electrolyte. EDM is thermal. ECM is chemical-electrical. Both can machine hard conductive materials, but they behave differently.
Compared with CNC milling, ECM has one enormous advantage: almost no cutting force. That means delicate parts are less likely to bend, chatter, or deform. There are no chips flying across the room and no cutting tool dulling against hardened stainless steel. The process can also produce burr-free edges because it dissolves material instead of tearing it away.
However, ECM is not automatically easier. It introduces new challenges: electrolyte chemistry, corrosion, fluid handling, gas generation, waste management, and process control. A mill may be loud and messy, but at least the mess is usually visible. ECM’s mess can be wet, conductive, and chemically annoying.
What Can a Modified 3D Printer Cut?
Electrochemical cutting works only on electrically conductive materials. Stainless steel, mild steel, copper, brass, nickel alloys, and some titanium alloys are possible candidates in principle. Plastics, wood, glass, and ceramics are not suitable for ECM because they do not conduct electricity in the needed way.
Maker experiments have shown that a desktop motion system can cut through thin metal and even thicker stainless stock when the electrode, current, feed rate, and electrolyte flow are tuned carefully. That does not mean every converted printer will slice steel like a lightsaber with a USB cable. The process is sensitive. Small changes in spacing, flow direction, electrode shape, and tool path can make the difference between a clean cut and a fuzzy metallic canyon.
For practical home-shop exploration, the most realistic uses include cutting simple profiles in sheet metal, experimenting with slots or grooves, engraving conductive metals, and learning the fundamentals of nontraditional machining. It is less ideal for high-speed production, tight-tolerance parts, or projects where safety controls are an afterthought.
Why This Idea Is So Exciting
The exciting part is not just that a 3D printer can cut metal. It is that an inexpensive machine can become a research platform for a process normally associated with industrial equipment. That opens the door for students, engineers, hobby machinists, and curious makers to explore metal removal in a hands-on way.
A desktop ECM setup also flips the usual maker workflow. Most hobbyists are comfortable adding material with 3D printing. Subtractive metalworking requires heavier equipment, stronger frames, and more expensive tooling. ECM offers another path: use the printer’s motion system and let electrochemistry handle the hard material.
There is also something elegant about the quietness of the process. No screaming router bit. No shower of sparks. No cutting oil perfume lingering in the air like a machine-shop ghost. The machine simply traces a path while the metal disappears molecule by molecule. It feels futuristic, even if the chemistry behind it is old enough to have a respectable gray beard.
Important Safety Considerations
Electrochemical cutting is not a casual kitchen-table experiment. The process can produce gas, mist, conductive spills, metal-contaminated liquid, and corrosion. Good ventilation is important, especially because electrochemical reactions can generate hydrogen. Hydrogen is flammable, and enclosed spaces are a bad place to collect flammable gas. That sentence should not need a drumroll.
Personal protective equipment is also essential. Eye protection, chemical-resistant gloves, and careful handling of electrolyte are basic requirements. Work should be done away from children, pets, food surfaces, and anything that would be expensive to replace after a conductive splash.
Waste disposal matters too. Used electrolyte may contain dissolved metals and should not be casually poured down a drain. Responsible disposal depends on the material being cut and local regulations. Anyone experimenting with ECM should treat the liquid waste as potentially hazardous until proven otherwise.
Electrical safety is equally important. Wet environments and power supplies demand respect. Connections should be insulated, strain relieved, and kept away from moving parts. The work area should include spill containment and a fast way to shut everything down. A modified 3D printer may look friendly, but once electricity and electrolyte enter the chat, the stakes go up.
Limitations of a 3D Printer-Based Metal Cutter
A desktop 3D printer was designed for light-duty extrusion, not wet electrochemical manufacturing. Its frame may flex, its motion parts may corrode, and its electronics may be vulnerable. Precision can also be affected by electrolyte spread, uneven current density, and tool gap variation.
Cut quality may vary through the thickness of the metal. Some experimental cuts show taper or flare because electrolyte conditions change as the cut gets deeper. Better flow control, improved electrode design, and slower tool paths can help, but there is no free lunchonly lunch with more wiring.
Another limitation is process feedback. Industrial ECM machines use sophisticated control systems to maintain the machining gap, manage current, and regulate fluid pressure. A hobby printer usually follows G-code blindly. Without closed-loop sensing, the machine may not know when the tool is too close, too far, or cutting unevenly.
Real-World Examples and Practical Possibilities
One well-known maker-style example used an Ender 3-style printer with a needle electrode and electrolyte pump to explore electrochemical cutting. The modified machine replaced the plastic extrusion job with a metal-removal toolhead. The experiment demonstrated that a common desktop printer can guide an electrode through a programmed path and remove stainless steel through electrochemical action.
Another related approach involves 3D printing custom tool shapes, making them conductive, and using them as ECM electrodes. This is especially interesting because ECM tool geometry influences the final cut. If makers can print, plate, and test custom tool shapes quickly, they can iterate faster than they could with traditional machined tooling.
Possible applications include custom brackets, thin metal panels, decorative metal art, prototype slots, small stainless parts, and educational demos. The technology is not yet a plug-and-play replacement for a CNC router or waterjet, but it is a compelling proof of concept.
SEO-Friendly Buyer and Maker Intent: Who Is This For?
This topic attracts several types of readers. The first group is 3D printer owners who have an older machine sitting idle and want a new project. The second group is hobby machinists looking for quieter ways to cut hard metal. The third group is engineering students and educators who want a low-cost demonstration of electrochemical machining. The fourth group is simply people who enjoy watching machines do things they were absolutely not born to do.
For these readers, the best content should explain the concept without pretending it is risk-free. A simple 3D printer ECM conversion is fascinating, but it requires patience, testing, safety awareness, and realistic expectations. It is a project for people who enjoy process development as much as finished parts.
Experience Notes: What It Feels Like to Work With a Printer-Based ECM Setup
Working with a modified 3D printer as an electrochemical metal cutter feels different from both 3D printing and conventional machining. With a normal print, you watch plastic appear layer by layer. With ECM, you watch metal disappear, often slowly, and sometimes in ways that teach you humility. The first lesson is that motion is only one part of the story. A printer can trace a perfect square, but the cut will only look perfect if the electrolyte, electrode, current, and distance behave themselves.
The second lesson is that preparation matters more than excitement. It is tempting to mount an electrode, clamp a piece of metal, and start sending G-code like a wizard with a USB wand. But the better experience comes from careful fixturing. The workpiece must stay flat. The electrical connection must stay solid. The electrolyte must flow where it should and not where it feels like taking a vacation. If the setup is sloppy, the cut quality will politely reveal every shortcut.
One of the most interesting experiences is the quietness. People expect metal cutting to sound dramatic. ECM is more subtle. There may be pump noise, fluid movement, and the soft whir of stepper motors, but not the violent soundtrack of milling or grinding. That quietness can be deceptive. The machine may seem calm while very real chemical and electrical processes are happening. It is a reminder that “quiet” does not always mean “harmless.”
Another practical observation is that cleaning becomes part of the workflow. A normal 3D printer leaves stray filament hairs and the occasional failed print that looks like spaghetti having an identity crisis. An ECM setup leaves wet surfaces, residue, metal-bearing fluid, and parts that need rinsing, drying, and inspection. Good housekeeping is not optional. It is part of accuracy, safety, and machine survival.
Expect iteration. The first cut may be too wide. The second may taper. The third may reveal that the electrode mount flexes or that the pump flow is uneven. This is not failure; it is process tuning. In fact, the best mindset is closer to laboratory experimentation than weekend fabrication. Keep notes. Change one variable at a time. Compare results. A small improvement in electrolyte delivery or tool spacing can make a visible difference.
The most satisfying moment is seeing a metal part separate cleanly after being cut by a machine that used to print plastic dragons and phone stands. It feels like unlocking a hidden skill tree. The printer did not become an industrial machine overnight, but it became more than a printer. It became a motion platform for exploring a serious manufacturing principle at a desktop scale.
The final experience-based takeaway is this: the project rewards respect. Respect the chemistry, respect the electricity, respect the waste, and respect the limitations of the printer. Do that, and a simple 3D printer ECM mod becomes more than a clever hack. It becomes a practical lesson in how manufacturing innovation often beginsnot with a giant machine, but with a curious person asking, “What else can this thing do?”
Conclusion
Simple mods can turn a 3D printer into an experimental electrochemical metal cutter by replacing the hotend with an electrode, adding controlled electrolyte flow, securing the conductive workpiece, and using the printer’s motion system to guide the cut. The result is a fascinating blend of desktop fabrication and industrial electrochemical machining principles.
This is not a beginner shortcut to effortless metalworking. It is a technical project with real safety concerns and real process challenges. But for makers, educators, and engineers, it offers a powerful lesson: sometimes the most interesting machines are not built from scratch. They are discovered inside machines we already own.
Note: This article is based on synthesized information from real electrochemical machining, 3D printer modification, CNC motion control, and workshop safety references. Source links are intentionally omitted for publication-ready formatting.


