Table of Contents >> Show >> Hide
- Before You Start: The “Custom Look” Checklist
- Whole-House “Builder Upgrade” Moves
- 1) Foam Crown Molding That Looks Shockingly Legit
- 2) Picture Frame Molding for Instant “Custom Millwork” Walls
- 3) Board-and-Batten (or Easy Wall Panels) for a Custom Wainscot Look
- 4) Caulk + Touch-Up Paint on Trim for Crisp, Expensive Lines
- 5) Swap Switch Plates and Outlet Covers (Tiny Change, Big Upgrade)
- 6) Paint the Ceiling (Yes, the Fifth Wall Is Having a Moment)
- 7) Paint Interior Doors a Statement Color
- 8) Add Simple Door or Window Casing for “Finished Architecture”
- Living Room & Dining Room Projects That Look High-End
- 9) Add a Ceiling Medallion to Make Your Light Fixture Look Custom
- 10) Hang Curtains High & Wide (The Fastest “Bigger Room” Trick)
- 11) Peel-and-Stick Wallpaper Accent Wall (Renter-Friendly, Designer Energy)
- 12) Floating Shelves for a Clean, Custom Storage Moment
- 13) Faux Built-Ins Using Bookcases (A Custom Look Without Custom Pricing)
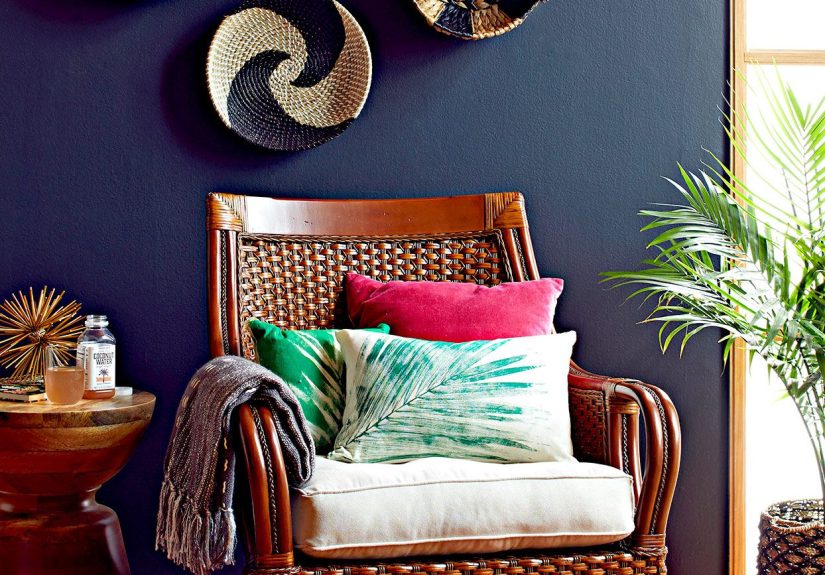
- 14) A Gallery Wall with Thrift Frames (Planned, Not Random)
- 15) Oversized DIY Art That Fills a Wall Like a Designer Piece
- Kitchen Projects That Feel Like a Mini Renovation
- Bedroom Projects That Feel Boutique-Hotel Nice
- Bathroom & Laundry Room Upgrades That Don’t Scream “Rental”
- Entryway & Hallway Projects That Make Your Home Feel Thoughtful
- Experience Notes: What DIYers Learn After the First “Weekend Project” Becomes a Week
- Wrap-Up
Custom homes have two things most of us don’t: (1) millwork everywhere, and (2) the audacity to charge extra for a wall that isn’t beige.
The good news? You can fake the “designer did this on purpose” look with budget-friendly DIY projects that rely on paint, trim,
peel-and-stick magic, and a little strategic measuring (yes, measuring counts as cardio).
Below are 27 upgrades that make rooms feel tailoredlike your home got a fitted blazer instead of a wrinkled hoodie. They’re practical, renter-aware
(where possible), and designed to deliver maximum “wait… did you renovate?” for minimum dollars.
Before You Start: The “Custom Look” Checklist
- Pick one “repeatable detail” (a trim style, a metal finish, a paint sheen) and use it across rooms.
- Prep beats perfection. Cleaning, sanding, and caulking are the unglamorous superheroes of DIY home upgrades.
- Use the same white paint for trim throughout the house when you can. It’s the easiest way to look intentional.
- Safety note: If a project involves wiring, gas, or major plumbing, call a pro. Your house doesn’t need “character” in the form of scorch marks.
Whole-House “Builder Upgrade” Moves
1) Foam Crown Molding That Looks Shockingly Legit
Crown molding is basically eyeliner for a room: it defines the edges and makes everything look finished. Foam crown molding is lighter,
easier to cut, and friendlier on your budget than traditional wood.
- Budget: $30–$150 per room (varies by size and profile)
- Skill: Beginner-to-intermediate
- Pro tip: Caulk the top and bottom edges, then paint for a seamless “built-in” illusion.
2) Picture Frame Molding for Instant “Custom Millwork” Walls
This is the classic trick for turning flat walls into “oh, this old townhouse?” territory. Create simple rectangles with trim, paint it all one color,
and suddenly your room has architecture.
- Budget: $40–$200 depending on wall size and trim choice
- Skill: Intermediate (mostly because corners love drama)
- Pro tip: Use painter’s tape to map frames first. Your eyes lie; tape doesn’t.
3) Board-and-Batten (or Easy Wall Panels) for a Custom Wainscot Look
Board-and-batten adds depth and “designer bones” in hallways, dining rooms, bedrooms, and entryways. You can build it with MDF strips and a level,
then caulk and paint until it looks like it came with the house.
- Budget: $60–$300
- Skill: Intermediate
- Pro tip: Slight gaps are normalcaulk is your best friend and your greatest lie.
4) Caulk + Touch-Up Paint on Trim for Crisp, Expensive Lines
Want the fastest way to make a room feel cared for? Fix the tiny gaps where trim meets wall. Fresh caulk and a quick paint touch-up can make baseboards,
window trim, and door casings look newly installed.
- Budget: $10–$40
- Skill: Beginner
- Pro tip: Cut the caulk nozzle small. You can always add more; removing blobs is a spiritual journey.
5) Swap Switch Plates and Outlet Covers (Tiny Change, Big Upgrade)
Builder-grade white plates are the “free pen from the bank” of home design. Switching to metal, matte, or decorative covers is quick and makes rooms feel curated.
Bonus: it’s one of the most renter-friendly DIY decor upgrades ever.
- Budget: $2–$15 each
- Skill: Beginner
- Pro tip: Match finishes across a floor (e.g., all brushed brass, all matte black) for a custom-home vibe.
6) Paint the Ceiling (Yes, the Fifth Wall Is Having a Moment)
Painted ceilings can make a room feel intentionalespecially in small spaces. Go subtle (a tinted white) for quiet sophistication, or go bold for instant personality.
Either way, it screams “designed,” not “default settings.”
- Budget: $30–$80
- Skill: Beginner
- Pro tip: Flat finishes hide imperfections; high gloss highlights every bump like it’s auditioning for a close-up.
7) Paint Interior Doors a Statement Color
Painted interior doors can replace the need for an accent walland they look wildly custom. A deep navy, soft sage, warm black, or dusty clay can make a hallway
feel like a boutique hotel instead of a corridor of chores.
- Budget: $25–$60 per door
- Skill: Beginner
- Pro tip: Lightly sand glossy doors and use a bonding primer so the finish doesn’t peel when someone slams the door during a Zoom call.
8) Add Simple Door or Window Casing for “Finished Architecture”
If your trim is skinny or uneven, upgrading casing (even with simple profiles) makes a space feel higher-end. Focus on one room firstlike the main living area
and repeat the style later as budget allows.
- Budget: $50–$250 per opening
- Skill: Intermediate
- Pro tip: Consistent “reveal” spacing (the tiny border between casing and jamb) is what makes it look pro.
Living Room & Dining Room Projects That Look High-End
9) Add a Ceiling Medallion to Make Your Light Fixture Look Custom
A ceiling medallion turns an “okay” light into an “oh wow.” Many are lightweight and can be installed with adhesive and a few finishing steps.
Some styles come in halves for easier installs around existing fixtures.
- Budget: $20–$120
- Skill: Beginner-to-intermediate
- Pro tip: Caulk seams and paint to match the ceiling for a seamless, original-to-the-house look.
10) Hang Curtains High & Wide (The Fastest “Bigger Room” Trick)
Mount curtain rods closer to the ceiling and extend them beyond the window frame. This makes windows look larger and ceilings feel tallertwo features
custom homes love showing off. Use clip rings to fake a tailored pleat on budget panels.
- Budget: $30–$200
- Skill: Beginner
- Pro tip: Iron (or steam) the panels. Wrinkles make even expensive curtains look like they slept on the floor.
11) Peel-and-Stick Wallpaper Accent Wall (Renter-Friendly, Designer Energy)
Removable wallpaper is the cheat code for pattern and texture. Use it behind a sofa, in a dining nook, or on the back of a bookcase for a built-in look.
Choose patterns that echo colors you already have so it feels cohesive, not chaotic.
- Budget: $50–$250
- Skill: Beginner
- Pro tip: Smooth, clean walls matter. Texture is the enemy of crisp seams (and your patience).
12) Floating Shelves for a Clean, Custom Storage Moment
Floating shelves add storage without the bulk of cabinets. They’re perfect for living rooms, kitchens, bathrooms, and home officesand they give that curated
“I style shelves for fun” look (even if you panic-arranged everything five minutes ago).
- Budget: $25–$200
- Skill: Beginner-to-intermediate
- Pro tip: Anchor into studs when possible. Floating shelves should not be a surprise physics lesson.
13) Faux Built-Ins Using Bookcases (A Custom Look Without Custom Pricing)
The built-in bookshelf look is iconicand expensive. The workaround: place bookcases side-by-side, add trim to bridge gaps, and paint everything one color.
Suddenly your room looks “architect-designed,” not “I assembled this at midnight.”
- Budget: $150–$800 (depending on bookcases and trim)
- Skill: Intermediate
- Pro tip: Paint the wall behind the bookcases the same color so any tiny gaps disappear.
14) A Gallery Wall with Thrift Frames (Planned, Not Random)
A gallery wall looks custom when it’s deliberate. Collect frames from thrift stores, paint them one unified color (or keep a tight palette), and plan the layout on the floor first.
Then trace paper templates onto the wall for stress-free hanging.
- Budget: $20–$150
- Skill: Beginner
- Pro tip: Mix frame sizes but keep spacing consistent for that professional, “curated collection” vibe.
15) Oversized DIY Art That Fills a Wall Like a Designer Piece
Oversized art reads “expensive” because it’s bold and confident. Stretch a drop cloth on a simple frame, paint a large abstract or color block, and hang it.
Minimalist art is forgivingand it looks intentional even if you made it during a playlist-fueled Saturday.
- Budget: $25–$120
- Skill: Beginner
- Pro tip: Repeat one color from your rug or pillows so it ties the whole room together.
Kitchen Projects That Feel Like a Mini Renovation
16) Swap Cabinet Hardware (The Kitchen’s Easiest Glow-Up)
New knobs and pulls can make old cabinets feel updated instantly. If you’re changing hole spacing, use a hardware jigor make a DIY version from cardboard
to keep everything aligned. Crooked hardware is the kind of detail your eyes will notice forever.
- Budget: $30–$250
- Skill: Beginner
- Pro tip: Stick with one finish throughout the kitchen for a cohesive, custom-cabinet look.
17) Peel-and-Stick Backsplash Tiles for Instant Personality
Peel-and-stick backsplash tiles can add texture and shine without the cost of traditional tile installation. They work best on smooth, clean, dry walls.
Choose a classic style (subway, marble-look, simple geometric) to avoid trend regret.
- Budget: $50–$300
- Skill: Beginner
- Pro tip: Plan your layout before peeling. The first row sets the whole vibelike bangs, but for your kitchen.
18) Under-Cabinet Lighting That Makes Everything Look Nicer
Lighting is the difference between “functional kitchen” and “custom kitchen.” Stick-on puck lights or plug-in LED strips add warmth, reduce shadows,
and make countertops feel more upscale. Look for options with dimming for maximum mood control.
- Budget: $20–$120
- Skill: Beginner
- Pro tip: Hide cords with adhesive cord covers painted the same color as the backsplash or wall.
19) A Pegboard Command Center (Cute Storage That’s Actually Useful)
Pegboard isn’t just for garages anymore. Mount one in a kitchen corner, pantry, or home office area for mugs, baskets, utensils, or mail.
Paint it the wall color for a built-in feel, or go bold for a statement moment.
- Budget: $25–$150
- Skill: Beginner-to-intermediate
- Pro tip: Install spacers/furring strips behind it so hooks sit properly. Otherwise, pegboard becomes “decorative disappointment.”
Bedroom Projects That Feel Boutique-Hotel Nice
20) Upholstered Headboard (The “Custom Bed” Shortcut)
A padded headboard instantly elevates a bedroom. A simple plywood base + foam + batting + fabric is all you need. Choose a durable fabric and a timeless color,
and suddenly your bed looks like it came with a design consultation.
- Budget: $60–$250
- Skill: Beginner-to-intermediate
- Pro tip: Make it wider than the bed by a few inches for a more expensive, “intentional” look.
21) Plug-In Wall Sconces (No Hardwiring, All the Vibes)
Wall sconces free up nightstand space and look custom immediately. Use plug-in sconces and hide cords with paintable cord covers.
This upgrade is especially great for rentals because it’s reversible.
- Budget: $40–$200
- Skill: Beginner
- Pro tip: Hang sconces at a consistent height (measure from the floor), not “where your arm guessed.”
22) Refresh a Nightstand or Dresser with Paint + Better Hardware
A thrifted or tired piece becomes a “custom” statement with the right paint sheen and upgraded pulls. Matte or satin finishes hide imperfections well,
while a careful topcoat helps surfaces handle daily life.
- Budget: $20–$120
- Skill: Beginner
- Pro tip: Sand lightly and clean thoroughly before painting. Dust is not an aesthetic.
23) Closet Upgrade: Add a Second Rod or DIY Shelves
Closet storage is where “custom” meets “why didn’t I do this sooner?” Add a second hanging rod for shirts/pants, build simple shelves,
or install a budget system and finish it with matching hangers and labeled bins.
- Budget: $30–$250
- Skill: Beginner-to-intermediate
- Pro tip: Paint the closet the same color as the room for a seamless, built-in effect when the door is open.
Bathroom & Laundry Room Upgrades That Don’t Scream “Rental”
24) Paint the Bathroom Vanity (Big Impact, Small Footprint)
Painting a vanity can make a bathroom feel updated without touching tile or plumbing. The key is prep: remove hardware, clean thoroughly,
sand lightly, and use a primer that grips. Finish with a durable cabinet paint or enamel.
- Budget: $30–$120
- Skill: Beginner-to-intermediate
- Pro tip: Let it cure before heavy use. “Dry to the touch” is not the same as “ready for a slammed drawer.”
25) Frame a Builder-Grade Mirror for a Custom Vanity Look
A plain, clipped-on mirror is functionalbut a framed mirror looks finished. You can build a simple frame with trim, paint or stain it,
and attach it securely (or use a frame kit). It’s one of the best affordable home upgrades for instant polish.
- Budget: $25–$150
- Skill: Beginner
- Pro tip: Match the frame finish to your faucet or hardware for that “designer planned this” consistency.
26) Peel-and-Stick Vinyl Floor Tiles (Best for Laundry Rooms, Powder Rooms, and Low-Traffic Areas)
Peel-and-stick flooring can refresh a tired floor fast, especially in laundry rooms or guest areas. Pick a style that mimics stone or wood,
and spend extra time on surface prep to avoid bubbles and lifting edges. In high-moisture bathrooms, choose products rated for that environment and keep expectations realistic.
- Budget: $1–$5 per sq. ft. (plus tools)
- Skill: Beginner
- Pro tip: Dry-fit your layout and snap chalk lines. “Eyeballing it” is how you get a diagonal floor you didn’t ask for.
Entryway & Hallway Projects That Make Your Home Feel Thoughtful
27) Build an Entryway Drop Zone (Shelf + Hooks + Tray = Instant Order)
Custom homes always have a spot for keys, bags, and mailbecause chaos is not a design style (no matter what your kitchen counter says).
Add a simple wall shelf, a row of hooks, and a small tray or basket. Paint the shelf the wall color for a built-in look, or stain it for warmth.
- Budget: $25–$150
- Skill: Beginner
- Pro tip: Mount into studs (or use heavy-duty anchors). Bags get heavy when life gets busy.
Experience Notes: What DIYers Learn After the First “Weekend Project” Becomes a Week
Here’s the honest truth about budget-friendly DIY projects: the projects are cheap, but your confidence is pricelessand occasionally fragile.
If you want every room to feel custom, the secret isn’t doing everything at once. It’s learning how to stack small wins so your home looks consistently finished.
The first lesson most DIYers learn is that prep is the whole project. Painting a vanity sounds like a one-day makeover until you meet the trio
of Cleaning, Sanding, and Primingthree characters who always show up uninvited and stay for dinner. But prep is also where the “custom” look is born.
A perfectly painted door with sharp edges and a smooth finish reads expensive, even if the paint cost less than a takeout order.
Next: measurements matter more than enthusiasm. Hanging curtains high and wide works because it’s optical science, not vibes.
The same goes for picture frame molding and board-and-battenspacing consistency is what makes it look like millwork instead of “I tried.”
A simple trick is to mark everything with painter’s tape first. Tape is forgiving. Nails are not.
Another big realization: your home needs repetition. Designers repeat finishes and shapes on purpose, and you can too. If you choose matte black
hardware in the kitchen, echo that finish in a couple of switch plates or a mirror frame. If you love warm brass, commit to it in two or three places.
Repetition makes your DIY home upgrades feel like a plan instead of a collection of unrelated errands.
DIYers also learn to respect the “boring” supplies. Caulk, spackle, sandpaper, and a decent brush aren’t glamorous, but they’re the difference between
“handmade” and “handy.” A good brush reduces streaks. A sanding block smooths edges. Caulk hides sins. You may not post a photo of your caulk gun,
but it deserves a tiny trophy.
Finally, the most useful mindset shift: custom is a feeling, not a price tag. A home feels custom when details look intentionalwhen doors are
crisp, trim lines are clean, lighting is warm, and storage makes sense. Even one project per room can change the way the whole house reads.
Start where you spend the most time. Finish that space fully. Then move on. Your future self (and your future weekends) will thank you.
Wrap-Up
If you do nothing else, steal this strategy: pick two “high-impact, low-cost” upgrades (like painted doors and upgraded switch plates),
plus one “architecture maker” (like molding or a ceiling detail). That trio alone can make a home feel customwithout the custom-home invoice.
Tackle these affordable DIY home upgrades one room at a time, repeat your finishes, and let caulk quietly do the heavy lifting.


