Table of Contents >> Show >> Hide
- What You’ll Build (Table of Contents)
- How to Keep These Projects Affordable (and Not a Week-Long Saga)
- 1) Pegboard or Tool Wall That Actually Holds Stuff
- 2) A “Drop Zone” for Keys, Shoes, and Small Chaos
- 3) Heavy-Duty Wall Hooks for Big Awkward Items
- 4) Clear, Labeled Bin System + Simple Shelf Row
- 5) Overhead Storage for Seasonal Gear
- 6) A Budget Workbench (No Fancy Joinery Required)
- 7) Magnetic Strip + Small-Parts Organizer Station
- 8) Sports & Bike Parking (Vertical Storage Wins)
- 9) Cord & Hose Management That Doesn’t Make You Cry
- 10) Plug-In or Battery LED Lighting Upgrade
- 11) Weatherstripping + Draft Control for Comfort
- 12) A “Cheap-but-Feels-New” Floor Refresh
- Real-World DIY Garage Upgrade Experiences (Extra )
- Final Checklist + Wrap-Up
- SEO Tags
Garages are supposed to be where you park a car, grab a tool, and feel like a capable adult human.
In reality, many garages are where holiday decorations go to retire, sporting gear goes to multiply,
and that one mystery box goes to… vibe.
The good news: you don’t need a full remodel (or a winning lottery ticket) to turn your garage into a
clean, functional space. A handful of affordable DIY garage upgradesmostly storage, lighting, and
simple comfort fixescan make the whole place feel bigger, safer, and easier to use.
Quick safety note: If you’re a teen or new to DIY, keep projects “low-risk.” Ask a parent/guardian for help with anything involving ladders, heavy lifting, or power tools. Skip anything involving electrical wiring or garage door springsthose are “call-a-pro” zones.
How to Keep These Projects Affordable (and Not a Week-Long Saga)
- Start with zones: “Car tools,” “yard,” “sports,” “seasonal,” “workbench,” “trash/recycling.” Organization becomes easy when everything has a “home.”
- Use vertical space: Walls and ceiling are your secret square footage.
- Buy fewer, better fasteners: The right anchors or screws cost a little morebut they prevent the sad moment when your new rack slowly… detaches.
- Measure twice, buy once: The cheapest mistake is the one you never make.
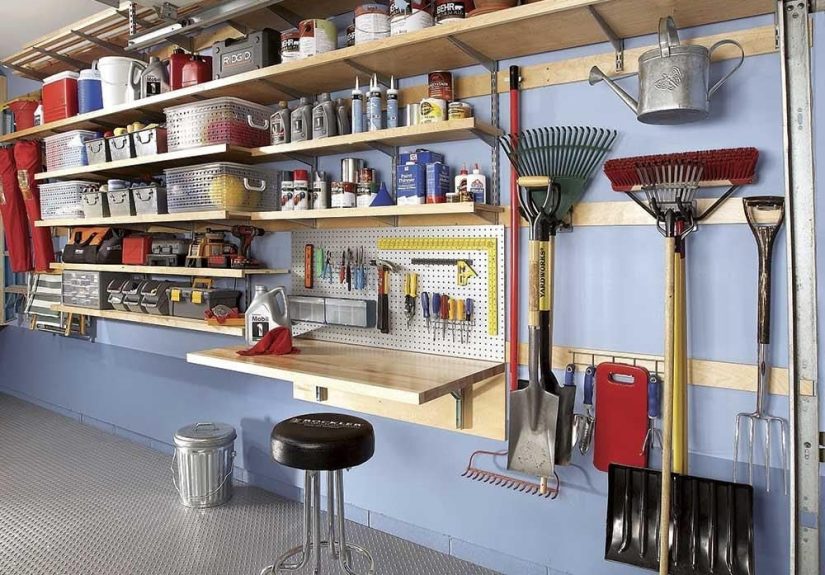
1) Pegboard or Tool Wall That Actually Holds Stuff
Why it’s worth it: A pegboard/tool wall gets tools off the work surface and puts them in “grab-and-go” range. It also makes your garage look like a place where projects happen, not a place where projects are avoided.
Budget range: $40–$150 (depending on board type, hooks, and size)
How to do it (simple version)
- Pick a wall section near where you’ll work (above a bench is ideal).
- Mount the board securelyideally into studsso it can handle real weight.
- Add hooks, small shelves, and bins for frequently used items.
- Arrange by “work flow”: measuring tools together, driving tools together, etc.
Pro tip
Trace tool outlines (or use labels) so everything gets returned to the right spot.
It’s like a parking space for your wrenchexcept your wrench won’t argue with you.
2) A “Drop Zone” for Keys, Shoes, and Small Chaos
Why it’s worth it: If your garage connects to the house, it’s basically a second front door. A tiny entry station stops clutter from migrating indoors.
Budget range: $20–$80
What to build
- A small wall shelf or narrow table
- Two or three hooks for keys, dog leash, hats
- A tray or bin for “pockets stuff” (sunglasses, tape measure, earbuds)
- Optional: a boot mat or shoe tray underneath
Pro tip
Label one container “RETURN TO HOUSE.” That’s your daily reset buttonanything that belongs inside goes there.
3) Heavy-Duty Wall Hooks for Big Awkward Items
Why it’s worth it: Shovels, rakes, ladders, folding chairs, and leaf blowers take up space mostly because they’re shaped like chaos. Hooks and hangers tame them.
Budget range: $25–$100
How to do it
- Group items by category (yard tools, ladders, sports, etc.).
- Install hooks or a rail system on a dedicated wall section.
- Hang bulky items vertically to free floor space.
Pro tip
Don’t trust flimsy adhesive hooks for garage heat/cold swings. Use proper mounting hardware rated for the weight.
4) Clear, Labeled Bin System + Simple Shelf Row
Why it’s worth it: Matching bins and labels are the cheapest way to make a garage feel “finished.” You’ll find things faster and re-buy fewer duplicates.
Budget range: $60–$180
How to set it up
- Choose 2–3 bin sizes (e.g., small for hardware, medium for sports, large for seasonal).
- Label bins by categorybig labels you can read from three feet away.
- Add one row of sturdy shelves to hold bins (freestanding shelves or wall-mounted shelf brackets).
Pro tip
Use a “one-bin rule” for small categories. If the bin is full, you either need a second bin or fewer duplicates.
(Yes, this is also how snack cabinets work.)
5) Overhead Storage for Seasonal Gear
Why it’s worth it: The ceiling is usually empty real estate. Overhead racks or ceiling-mounted hooks keep holiday decor and camping gear out of your way.
Budget range: $120–$250 (rack kits vary widely)
How to approach it safely
- Store light-to-medium items overhead (decorations, sleeping bags, empty bins).
- Follow the rack manufacturer’s instructions and load rating.
- Use a buddy system for installationthis is not a “solo ladder balancing act” project.
Pro tip
Put the “once-a-year” stuff up high and the “weekly” stuff at eye level. If you have to move five bins to get the basketball,
the system will fail by Tuesday.
6) A Budget Workbench (No Fancy Joinery Required)
Why it’s worth it: A basic workbench turns the garage into a usable workspace. It’s where you repair, assemble, and pretend you’re going to start that hobby “any day now.”
Budget range: $80–$200
Affordable options
- Simple lumber bench: A sturdy top + basic frame, assembled with screws.
- Pre-made top + legs: Buy a solid core door or butcher-block-style top and add brackets/legs.
- Fold-down bench: Great for small garagesfold it up when you need parking space.
Pro tip
If you don’t have cutting tools, many home centers will cut lumber for you (or you can choose designs that use pre-cut pieces).
The goal is a stable surface, not a woodworking tournament trophy.
7) Magnetic Strip + Small-Parts Organizer Station
Why it’s worth it: Screws, nails, hex keys, and little hand tools vanish because they’re small and sneaky. Give them a dedicated station.
Budget range: $25–$90
What to add
- A magnetic strip for metal tools (scissors, pliers, screwdrivers)
- A small parts organizer with compartments
- A labeled jar/can system for “extras” (spare bolts, picture hooks, etc.)
Pro tip
Keep the organizer near where you work. If it’s across the garage, you’ll “temporarily” set parts down.
“Temporary” is how clutter becomes a lifestyle.
8) Sports & Bike Parking (Vertical Storage Wins)
Why it’s worth it: Bikes and sports gear eat floor space. Storing them vertically clears the garage instantly.
Budget range: $30–$150
Ideas that stay affordable
- Wall hooks for bikes (check weight ratings)
- A ball bin or laundry-hamper-style ball corral
- Hooks for helmets and bags
Pro tip
Create a “grab zone” at kid-height for daily gear. When stuff is easy to put away, it actually gets put away.
Revolutionary concept, I know.
9) Cord & Hose Management That Doesn’t Make You Cry
Why it’s worth it: Extension cords and hoses turn into spaghetti the moment you stop looking at them. A simple storage method prevents tangles and trip hazards.
Budget range: $15–$70
Easy fixes
- Wall-mounted hose hanger or reel (manual is fine)
- Large hooks for coiled extension cords
- Velcro cord wraps so cords stay civilized
Pro tip
Store cords near outlets and hoses near the garage door. This reduces “drag it across everything” damage and makes setup faster.
10) Plug-In or Battery LED Lighting Upgrade
Why it’s worth it: Better lighting makes every garage upgrade feel more dramatic. It also helps you find the thing you dropped without doing the phone-flashlight shuffle.
Budget range: $20–$120
Affordable, no-wiring lighting ideas
- Plug-in LED shop lights (linkable strips are great)
- Battery-powered motion lights for dark corners
- Clamp lights for the workbench area
Pro tip
Place light where work happens: above the bench, near storage shelves, and by the door. Brightness in the right spots beats one sad bulb in the middle.
11) Weatherstripping + Draft Control for Comfort
Why it’s worth it: A drafty garage is uncomfortable and can leak air into adjacent spaces. Basic sealing improves comfort and helps keep dust and pests out.
Budget range: $25–$120
What to tackle (DIY-friendly)
- Replace worn weatherstripping around side entry doors
- Check garage door bottom seal and side/top seals
- Add a simple threshold seal if needed (follow product directions)
Pro tip
Avoid anything involving garage door spring adjustmentsthose systems store serious energy. Stick to seals and trim that are designed as homeowner replacements.
12) A “Cheap-but-Feels-New” Floor Refresh
Why it’s worth it: The floor is the biggest surface in the garage. A modest refresh makes everything look cleaner, even if you still own 47 half-used paint rollers.
Budget range: $40–$250
Budget-friendly options
- Deep clean + degrease: Cheapest upgrade, biggest visual payoff.
- Concrete sealer: Helps reduce dusting and stains (follow label safety directions).
- Interlocking floor tiles or mats: Great for a work zone; easy to install and remove.
Pro tip
If you use coatings or cleaners, ventilate well and follow the product label exactly. “Garage fumes” should not be a personality trait.
Real-World DIY Garage Upgrade Experiences (Extra )
When people start upgrading a garage, the first surprise is usually emotional: once you clear even a single wall,
the garage feels twice as big. That’s not because the garage magically expandedit’s because visual noise is powerful.
A pile of “stuff” creates the feeling that the space is small, even if the square footage hasn’t changed since the house was built.
The second surprise is how fast decision fatigue hits. Most garages contain “mixed-life” items: sports gear, yard tools,
car supplies, holiday decor, paint, random screws, and the mysterious leftovers from past projects. The win isn’t organizing
each object perfectly; the win is creating a few big, logical zones so your brain stops having to negotiate with every single item.
That’s why the most successful DIYers start with categories instead of containers. You don’t buy 20 bins and then ask what goes in them.
You decide what you actually store, then buy the smallest number of bins that makes it effortless to keep things tidy.
Another lesson that shows up again and again: the “most convenient” storage spot becomes the permanent storage spot.
If your broom holder is across the garage from where you sweep, the broom will end up leaning in a corner. If your bike hooks are
too high for the person who uses the bike daily, the bike will become a floor bike. That’s why a few inches of placement matters.
Many DIYers end up moving hooks and rails after a weeknot because they did it “wrong,” but because the garage starts teaching you
how you actually live.
People also learn that a garage upgrade is less about buying new stuff and more about letting go of old stuff. The classic example:
“I might need this someday” boards, broken tools, duplicate extension cords, empty containers, and items that belong to a hobby you
haven’t touched since the last time someone said, “Remember fidget spinners?” When you reclaim space, you often realize you’re paying
a storage tax in the form of stress, lost time, and repeated purchases. Simply labeling bins (“camping,” “car wash,” “holiday lights”)
stops you from buying a third version of something you already ownbecause now you can actually find it.
Finally, lighting is the unsung hero. DIYers who add even a couple of plug-in LED shop lights often say the garage instantly feels
“cleaner,” even before the organization is perfect. It’s not a trick; better lighting makes dust and clutter easier to spot, which
makes quick cleanups more likely. And once the garage becomes pleasant to be in, it becomes easier to maintain. That’s the real upgrade:
not a showroom garage, but a garage that stays functional on a normal Tuesday.
Final Checklist + Wrap-Up
If you do nothing else, do these three steps first: (1) pick zones, (2) get stuff off the floor, (3) improve lighting.
That combination delivers the biggest “wow” for the least money.
A simple order of operations
- Declutter (trash, donate, relocate)
- Create zones (tools, yard, sports, seasonal)
- Add wall storage (pegboard + hooks)
- Add shelves + labeled bins
- Upgrade lighting
- Seal drafts and refresh the floor last
Your garage doesn’t need to be perfect. It needs to be usable. The goal is a space where you can park, walk, find your tools,
and start projects without first moving seven mountains of stuff. And yesfuture you will be unbelievably grateful.


