Table of Contents >> Show >> Hide
- Before You Start: The 5-Minute Reality Check That Saves 5 Hours
- Materials and Finishes That Don’t Panic in Humidity
- 19 DIY Bathroom Vanity Ideas for Custom Storage and Style
- 1) The Dresser-to-Vanity Glow-Up
- 2) Wall-Mounted Floating Vanity (Small Bath Hero)
- 3) Open-Shelf Vanity with Baskets (Pretty + Practical)
- 4) Repurposed Console Table (Minimal Build, Maximum Style)
- 5) IKEA-Inspired Hack with Custom Fronts
- 6) Farmhouse Vanity from a Reclaimed Wood Base
- 7) Midcentury Modern Vanity from a Storage Cabinet
- 8) Industrial Pipe Frame Vanity (Bold, Budget-Friendly)
- 9) Corner Vanity for Awkward Layouts
- 10) Double Vanity from Two Matching Cabinets
- 11) Fluted or Reeded Door Fronts (Instant Custom Detail)
- 12) The Vanity “Skirt” (Hide Plumbing, Keep Openness)
- 13) Floating Vanity with a Towel Niche
- 14) Tiny Vanity from a Bar Cart or Rolling Cabinet
- 15) Built-In Vanity Wall (Great for “We Need More Storage” Families)
- 16) Concrete-Look Countertop Upgrade (Without the Drama)
- 17) Vessel Sink Vanity with Extra-Deep Drawers
- 18) Toe-Kick Drawer (The Secret Storage Flex)
- 19) Paint + Hardware + Lighting “Mini Reno” (High Impact, Low Chaos)
- Real-World DIY Vanity Experiences: What People Learn the Hard Way (So You Don’t Have To)
- Conclusion: Pick the DIY That Matches Your Life, Not Just Your Pinterest Board
A bathroom vanity is basically the Swiss Army knife of your bathroom: it holds your sink, hides your plumbing, swallows your clutter, and quietly judges you for owning twelve half-empty bottles of “hydrating” something. The good news? You don’t need a designer budget to get a vanity that looks custom, functions better, and makes your morning routine feel slightly more put-together than it actually is.
Below are 19 DIY bathroom vanity ideas that range from “I can totally do this in a weekend” to “I should probably text a friend who owns clamps.” Each idea includes storage upgrades and style movesbecause a vanity that’s pretty but can’t hold a hair dryer is just furniture cosplay.
Before You Start: The 5-Minute Reality Check That Saves 5 Hours
- Measure the “nope zone.” Map where the drain, supply lines, and shutoffs actually are (not where you wish they were).
- Decide your sink type early. Vessel sinks need less cabinet surgery; undermount sinks demand more precision and support.
- Plan around the wet wall. If you can keep plumbing near existing lines, your DIY stays “fun project” instead of “unexpected plumbing novel.”
- Pick a height that fits humans. Standard and comfort heights varychoose what feels right for your household’s elbows and backs.
- Moisture-proof like you mean it. Bathrooms are basically tiny saunas with opinions. Seal wood, edges, and end grain.
Materials and Finishes That Don’t Panic in Humidity
If your vanity material swells the first time someone takes a long shower, it’s not “character,” it’s a cry for help. For DIY builds, cabinet-grade plywood is a common go-to because it’s strong, stable, and takes paint well. Solid wood looks amazing but needs smart joinery and sealing. MDF can work for doors or trim details if fully sealed, but it hates leaks with the passion of a cat hates bath time.
For finishes, prioritize durability: quality primer + cabinet paint, or a hard-wearing topcoat (especially around sink cutouts). And if you’re converting furniture, don’t skip the boring stepscleaning, deglossing, sanding, and curing time. That’s the difference between “custom vanity” and “peeling regret.”
19 DIY Bathroom Vanity Ideas for Custom Storage and Style
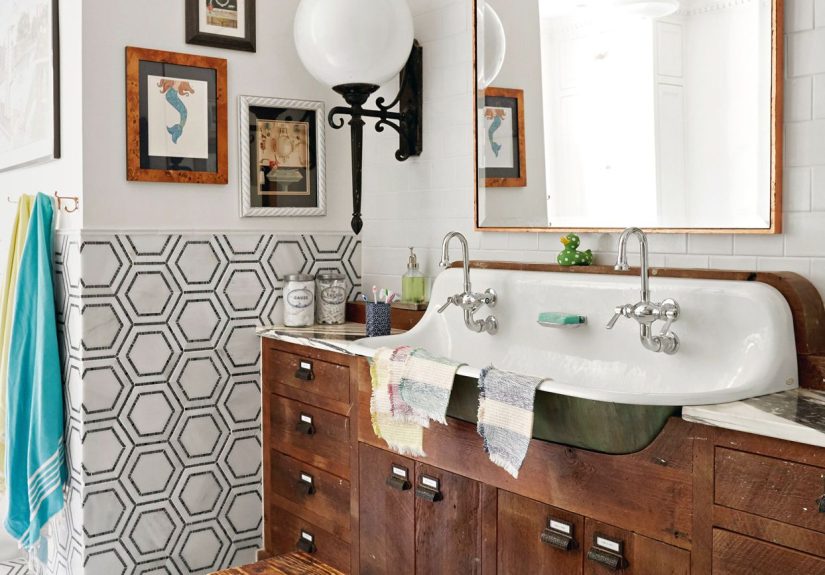
1) The Dresser-to-Vanity Glow-Up
Turn a vintage dresser into a vanity for instant character. The classic trick: sacrifice (some of) the top drawers to create space for plumbing, then reattach the drawer fronts as “false” faces so it still looks like real furniture. Bonus points if you keep at least one usable drawer for everyday items.
- Storage upgrade: Add drawer dividers for skincare, hair tools, and that one mystery key.
- Style move: Swap in new hardware and a contrasting countertop for a high-end look.
2) Wall-Mounted Floating Vanity (Small Bath Hero)
A floating vanity makes a bathroom feel larger because you can see more floor. Build a simple box cabinet, then mount it securely into studs (or blocking). It’s modern, easy to clean underneath, and it quietly screams “this bathroom was planned.”
- Storage upgrade: Use deep drawers instead of doors for easier daily access.
- Style move: Pair with a wall-mounted faucet for a clean, spa-like line.
3) Open-Shelf Vanity with Baskets (Pretty + Practical)
Build a sturdy base with one or two open shelves and slide baskets underneath. This is the perfect compromise when you want storage without the complexity of doors and drawers. It’s also forgiving in tight bathrooms because it feels visually lighter.
- Storage upgrade: Label baskets: “extra towels,” “toiletries,” “backup everything.”
- Style move: Match basket texture to your vibe: rattan for warm, wire for industrial, fabric for soft modern.
4) Repurposed Console Table (Minimal Build, Maximum Style)
If you find a sturdy console with the right depth, you’re halfway there. Add a sink, reinforce the top if needed, and create a neat plumbing cutout. This look leans boutique-hotelespecially with a statement mirror and sconces.
- Storage upgrade: Add an under-shelf rail for hand towels or a slim pull-out hamper.
- Style move: Keep the legs visible and the silhouette airy.
5) IKEA-Inspired Hack with Custom Fronts
The genius of an IKEA-style hack is predictable sizing and modular parts. Use a cabinet base you can modify, then add custom doors/drawer fronts for the “wait, where did you buy that?” effect.
- Storage upgrade: Go heavy on drawersdrawers beat cabinets for small-item control.
- Style move: Add wood slats, fluting, or clean slab fronts depending on your style.
6) Farmhouse Vanity from a Reclaimed Wood Base
Reclaimed wood brings warmth and texture. Use it for the face frame, doors, or open shelves (not necessarily the entire structure). Keep the build square and sturdy, then let the wood do the storytelling.
- Storage upgrade: Add a lower shelf sized for stacked towels and a lidded bin.
- Style move: Black hardware + a simple countertop keeps it from going full “barn gift shop.”
7) Midcentury Modern Vanity from a Storage Cabinet
Midcentury is all about clean lines and smart proportions. Start with a low cabinet, add tapered legs, and choose sleek pulls. It’s a great style if you want something timeless but not boring.
- Storage upgrade: Build a shallow top drawer with a U-cut for plumbing to keep small items organized.
- Style move: Use warm wood tones with a crisp white sink for contrast.
8) Industrial Pipe Frame Vanity (Bold, Budget-Friendly)
Build a frame with black pipe or metal tubing, then add a thick wood top and shelf. The open design works well in small bathrooms and gives you a rugged, practical looklike the vanity could survive a minor apocalypse.
- Storage upgrade: Add a bottom shelf for baskets and a side hook for hair tools.
- Style move: Pair with concrete-look accessories or matte black fixtures.
9) Corner Vanity for Awkward Layouts
If your bathroom has a weird corner begging to be useful, build a triangular or angled-front vanity. This is especially handy in powder rooms where every inch counts.
- Storage upgrade: Use a lazy Susan or angled pull-out inside for maximum corner efficiency.
- Style move: A small vessel sink keeps the footprint compact.
10) Double Vanity from Two Matching Cabinets
Instead of building one giant cabinet, combine two smaller bases and bridge them with a single countertop. It’s easier to transport, easier to level, and gives each person their own “zone.”
- Storage upgrade: Add a center bank of drawers for shared items like toothpaste, floss, and peacekeeping treaties.
- Style move: Symmetrymatching mirrors and lightsmakes it feel custom-built.
11) Fluted or Reeded Door Fronts (Instant Custom Detail)
Add fluted trim to plain doors (or build new doors) for a high-end look that reads “designer” without the designer invoice. The texture also hides fingerprints better than a glossy flat panel.
- Storage upgrade: Add soft-close hinges and a pull-out tray inside for daily items.
- Style move: Paint in a moody color for drama, or warm white for modern classic.
12) The Vanity “Skirt” (Hide Plumbing, Keep Openness)
Love the look of a pedestal sink but hate the lack of storage? Build a shallow cabinet shell around the sink area. It hides plumbing, gives you a shelf or drawers, and keeps an airy feel.
- Storage upgrade: Add tilt-out trays for toothbrushes and small items.
- Style move: Use beadboard or paneling for cottage charm.
13) Floating Vanity with a Towel Niche
Combine a wall-mounted cabinet with a built-in open niche on one side for towels. It’s functional, looks intentional, and keeps towels off the counter (where they slowly become damp sadness).
- Storage upgrade: Use the niche for rolled towels and a small tray for guest soap.
- Style move: Add integrated under-lighting for a subtle glow.
14) Tiny Vanity from a Bar Cart or Rolling Cabinet
For very small bathrooms, a narrow rolling cabinet can become a compact vanity base. Locking casters are key, and you’ll want a sink that fits the top without turning your faucet into a tightrope act.
- Storage upgrade: Use the lower shelf for extra toilet paper and cleaning supplies.
- Style move: Metal + wood combos feel modern and light.
15) Built-In Vanity Wall (Great for “We Need More Storage” Families)
Turn one wall into a vanity zone with a base cabinet plus a tall side cabinet for linens and toiletries. This idea is less about “cute” and more about “I can finally find the floss.”
- Storage upgrade: Add pull-out organizers and adjustable shelves.
- Style move: Match cabinet color to the wall for a seamless built-in look.
16) Concrete-Look Countertop Upgrade (Without the Drama)
Instead of rebuilding the whole vanity, upgrade the countertop for a fresh, modern look. Concrete-style finishes (or real concrete if you’re confident and patient) can make even a basic cabinet look custom.
- Storage upgrade: Add drawer organizers and you’ve basically got a new vanity experience.
- Style move: Pair with matte black or brushed nickel fixtures for modern balance.
17) Vessel Sink Vanity with Extra-Deep Drawers
Vessel sinks sit on top, which can simplify cabinet construction because the sink bowl doesn’t steal as much internal space. Use that advantage: install deep drawers for hair tools, backup products, and anything else that tends to sprawl.
- Storage upgrade: Include a dedicated “hot tool” drawer with a heat-resistant insert.
- Style move: Choose a sculptural bowl for a statement moment.
18) Toe-Kick Drawer (The Secret Storage Flex)
The space under your cabinet? It can do more than collect dust bunnies. Add a toe-kick drawer for flat items like extra razors, travel bottles, or cleaning cloths. It’s the kind of upgrade that feels like you hacked your own house.
- Storage upgrade: Use full-extension slides for easy access.
- Style move: Keep the toe-kick face flush so it disappears.
19) Paint + Hardware + Lighting “Mini Reno” (High Impact, Low Chaos)
Not ready to build? You can still get a custom look by repainting your vanity, upgrading hardware, and swapping your light fixture. This trio is powerful: paint sets the tone, hardware adds polish, lighting makes it feel expensive.
- Storage upgrade: Add stick-on drawer dividers and a pull-out under-sink organizer.
- Style move: Use a warm, flattering bulb color so nobody looks haunted at 7 a.m.
Real-World DIY Vanity Experiences: What People Learn the Hard Way (So You Don’t Have To)
DIY bathroom vanities are one of those projects that look straightforward until you meet plumbing in real life. Here are common experiences DIYers run intoand how to plan around them like the wise, prepared legend you are.
1) The “I measured… but not THAT” moment. People often measure the vanity width and forget the door swing, drawer clearance, and how far the faucet handles need to rotate. In tight bathrooms, a drawer that hits the toilet is not a “quirk,” it’s a daily argument. Pro move: mock up the vanity footprint with painter’s tape on the floor and open everything in the room like you’re stress-testing it.
2) Plumbing reality is undefeated. When converting a dresser or adding drawers, the P-trap and supply lines become the boss of your design. Many DIYers end up doing a U-shaped drawer cutout (or turning the top drawer into a shallow tilt-out) to keep storage while making space for pipes. The big lesson: build your storage around plumbing, not the other way aroundunless you want to learn new words from your plumber.
3) Leveling is an emotional journey. Floors and walls in real houses are rarely perfectly level, especially in older homes. DIYers often discover that a “simple install” becomes a game of shims, checking level, re-checking level, and then questioning reality. Take your time here. A slightly out-of-level vanity can cause countertop gaps, crooked doors, and drawers that roll open like they’re haunted.
4) The finish needs more patience than your schedule wants to give it. A freshly painted vanity may feel dry to the touch, but it often hasn’t fully cured. DIYers who rush to reinstall hardware quickly learn about fingerprints, dents, and sticky drawer fronts. The best experience upgrade is waiting the recommended cure time and using a durable cabinet-grade paint system with proper prep. In bathrooms, that prep is everything: cleaning, deglossing, sanding, priming, and sealing edges.
5) Storage is won (or lost) in the details. People start with “I just want it to look nicer,” and end with “I need a drawer for every category of item I own.” The biggest “aha” moment is how much calmer the bathroom feels when storage is planned: vertical dividers for hair tools, shallow top drawers for daily items, pull-outs under the sink, and a dedicated zone for backups. Even one smart upgradelike adding organizers or a toe-kick drawercan make a basic vanity feel custom.
6) Water will find the weak spot. DIYers often learn that unsealed cut edges (especially around sink openings) are the first place moisture sneaks in. Once water gets into raw wood or MDF, swelling follows. The best habit is sealing every cut edge and caulking where countertop meets wall, plus using silicone where recommended. It’s not glamorous, but it’s how your vanity stays beautiful after the “real bathroom” happens.
The upside? Most DIYers say the same thing when it’s done: the vanity feels more “theirs” than anything off the shelf. It fits the space better, stores what they actually use, and makes the bathroom feel like it finally grew up. And yesevery time a guest says, “Where did you buy this?” you get to casually respond, “Oh, this old thing?” (Even if you cried once during leveling.)
Conclusion: Pick the DIY That Matches Your Life, Not Just Your Pinterest Board
The best DIY bathroom vanity isn’t the fanciest oneit’s the one that fits your bathroom, your storage needs, and your time. Start small if you need to: paint and hardware can be transformational. If you want a true custom look, consider a floating vanity, a dresser conversion, or an open-shelf build with baskets. Whatever route you choose, prioritize moisture protection and smart storage, and your vanity will stay stylish long after the “new project smell” wears off.