Table of Contents >> Show >> Hide
- Why an Old Door Makes a Perfect Message Center
- Plan Your Command Center Before You Touch a Paintbrush
- Materials and Tools
- Step-by-Step: How to Turn an Old Door Into a Message Center
- Step 1: Inspect the door (and think safety first)
- Step 2: Clean, de-hardware, and repair
- Step 3: Light sanding and priming
- Step 4: Paint the door (and decide your style)
- Step 5: Map your zones (the “work triangle” of paper chaos)
- Step 6: Add the chalkboard section
- Step 7: Add a pinboard or corkboard zone
- Step 8: Install the mail sorter and hooks
- Step 9: Add a small shelf/ledge
- Step 10: Mount it safely (this is the non-negotiable part)
- Design Variations That Still Work in Real Life
- How to Keep Your Message Center From Becoming a Clutter Shrine
- Common Mistakes (and Quick Fixes)
- Budget and Time: What to Expect
- Conclusion
- Experiences: Living With an Old Door Message Center (What People Don’t Tell You)
An old door is basically a big, sturdy “blank canvas” that already knows how to handle daily abuse. It’s been slammed,
leaned on, painted over, and probably survived at least one questionable decorating era. So when you turn a salvaged
door into a message center (a.k.a. family command center), you’re giving it the retirement job it deserves: holding
mail, reminders, keys, and the million tiny paper slips that otherwise migrate to your kitchen counter like they pay rent.
The classic Hometalk-style “old door turned message center” project usually nails three things: it’s budget-friendly,
it’s charmingly imperfect, and it’s ridiculously practical. This guide breaks down how to plan it, build it, mount it
safely, and actually use it without turning it into yet another clutter magnet.
Why an Old Door Makes a Perfect Message Center
A door gives you vertical real estatelots of it. Compared with a small bulletin board, a full door can hold multiple
“zones” without looking crowded: a chalkboard section, a pinboard, hooks, a shelf, and a mail sorter can all coexist.
And because doors are built to stay rigid, they’re less likely to warp under the weight of organizers and hardware.
Bonus: old doors bring instant character. Even if you paint it, the panel lines, old knob holes, and worn edges add
texture that store-bought command centers just can’t fake (at least not without trying way too hard).
Plan Your Command Center Before You Touch a Paintbrush
The biggest difference between a “Pinterest-pretty” board and a message center that truly earns its wall space is
planning. Think in terms of household traffic: where do you naturally drop keys, open mail, or ask, “What time is practice?”
Choose the right location
- Entryway or near the garage door: best for keys, mail drop, and last-second reminders.
- Kitchen-adjacent wall: best for calendars, meal planning, and school paperwork triage.
- Not behind a swinging door: you don’t want your command center getting “door-blocked” daily.
Decide what your household actually needs
A good message center isn’t a museum exhibit. It’s a working station. Pick the pieces that solve real problems:
- Mail sorter: a slot or wall file pockets for incoming mail and “action items.”
- Key hooks: one per driver (plus a spare for “the key that vanishes”).
- Chalkboard or dry-erase area: quick notes, grocery adds, pickup reminders.
- Pinboard/corkboard: invitations, school flyers, permission slips, receipts.
- Small shelf/ledge: pens, chalk, scissors, stamps, or a charging spot for a phone.
Materials and Tools
You can go minimalist or fully loaded. Here’s a practical, flexible list:
Materials
- Old door (solid wood or hollow-core both work, but solid is heavier)
- Cleaner/degreaser and rags
- Sandpaper (medium and fine grit) or sanding sponge
- Primer (especially if the door is glossy or stained)
- Paint for the door (latex or enamel) and optional topcoat
- Chalkboard paint or a framed chalkboard insert
- Corkboard sheet, fabric pinboard, or a bulletin board panel
- Mail organizer (metal wall file pockets or wooden slots)
- Hooks (for keys, dog leashes, masksyes, some of us still keep those handy)
- Small shelf/ledge (a thin board or a pre-made ledge)
- Screws, anchors (as needed), and mounting hardware
Tools
- Drill/driver
- Stud finder, level, measuring tape
- Paint supplies (roller, brush, tray)
- Utility knife/scissors (for corkboard or fabric)
- Staple gun (if wrapping a pinboard with fabric)
Step-by-Step: How to Turn an Old Door Into a Message Center
Step 1: Inspect the door (and think safety first)
If your door is olderespecially if it came from a pre-1978 homeassume it may have lead-based paint. Avoid dry
sanding or creating dust unless you’ve tested and you’re using the right precautions. If kids will be around this
project, it’s worth taking the cautious route: clean gently, encapsulate with primer, and keep dust to a minimum.
Step 2: Clean, de-hardware, and repair
- Remove knobs, locks, hinges, and any nails or staples.
- Wash the surface to remove grime and oils (paint hates mystery grease).
- Fill major holes or cracks with wood filler and let it dry.
Step 3: Light sanding and priming
You don’t need to sand the door into a newborn tree. The goal is to dull gloss and smooth rough spots so primer and
paint adhere well. Prime especially if the door is stained, glossy, or has color you’re trying to block.
Step 4: Paint the door (and decide your style)
This is where you choose your vibe:
- Farmhouse: soft white, greige, or muted green with slightly distressed edges.
- Modern: crisp white or deep charcoal with clean-lined hardware.
- Vintage: keep some worn spots visible and let the door tell its story.
Apply thin coats and let them dry properly. Rushing paint is how you end up with fingerprints immortalized like a
DIY fossil record.
Step 5: Map your zones (the “work triangle” of paper chaos)
Before attaching anything, lay it out. Use painter’s tape to mark sections:
- Top third: calendar, weekly schedule, or corkboard for “important but not urgent.”
- Middle: chalkboard area for daily notes and reminders.
- Bottom: hooks, mail sorter, and a small ledge for grab-and-go items.
Aim for balance: keep heavy items lower, and give the writing area enough clearance so you’re not trying to jot a note
while your knuckles fight a row of hooks.
Step 6: Add the chalkboard section
You can paint a recessed panel with chalkboard paint or attach a framed chalkboard. If you paint it, follow the
product directions for dry time and curing. Many chalkboard surfaces also work best if you “season” them (rubbing the
side of chalk across the entire surface, then wiping it off) before first usethis helps reduce ghosting later.
Step 7: Add a pinboard or corkboard zone
Corkboard is a classic because it’s easy and cheap. For a softer look, wrap a board in fabric and staple it on the
back, then mount it to the door. This is especially nice if your door is heavily paneled and you want a flat, usable
pinning surface.
Step 8: Install the mail sorter and hooks
A metal wall file organizer is a simple upgrade that instantly makes the project feel “office-level functional.”
Mount it with screws (not just adhesive), then label pockets like:
To Pay, To Sign, To File, Kids, Returns.
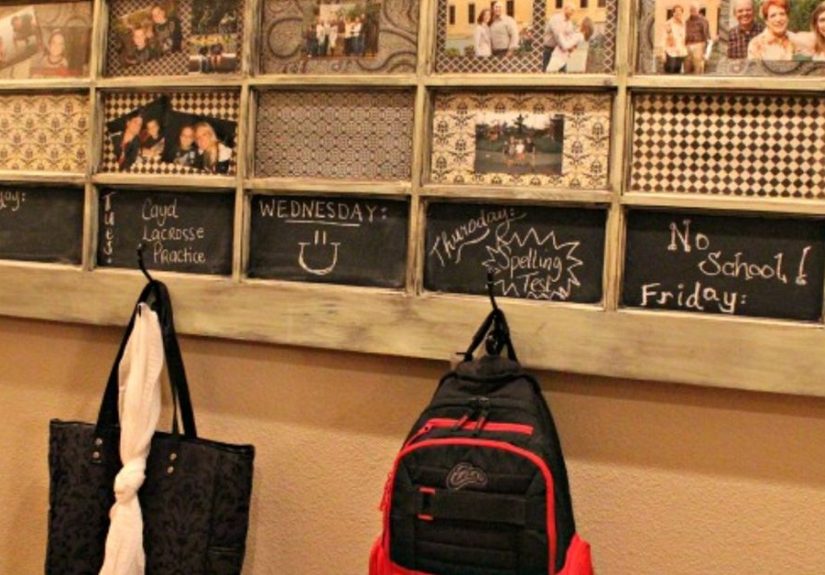
For hooks, choose sturdy ones and space them so key rings don’t become a jangly knot. If you have kids, add a lower row
for backpacks or lunch bagsnothing motivates good habits like “a hook at kid height.”
Step 9: Add a small shelf/ledge
A narrow shelf holds chalk, pens, and the tiny screwdriver you buy twice a year because it vanishes. If you’re adding
a charging station, keep cords tidy with cable clips on the back side of the door.
Step 10: Mount it safely (this is the non-negotiable part)
Doors can be heavy. If you’re mounting a full-size solid door, treat it like a heavy wall hanging. A French cleat is a
popular method because it distributes weight and makes leveling easier. Whatever you choose, anchor into studs when
possible, and don’t rely on flimsy drywall anchors for something that could turn into a surprise gravity experiment.
Design Variations That Still Work in Real Life
The “Tiny Wall” version
Use a narrow closet door or cut a door down to size. Keep just three essentials: hooks, a mail pocket, and a small
writing board.
The “School Year Survival” version
- One large calendar zone
- Clipboards for each child’s weekly papers
- A dedicated pocket for permission slips
- A drop spot for library books (aka “the items you remember at 10:47 PM”)
The “No Chalk Dust, Please” version
Swap chalkboard paint for a dry-erase board panel. You still get quick notes without the powdery fingerprints that
make your space look like a bakery exploded.
How to Keep Your Message Center From Becoming a Clutter Shrine
Here’s the truth: any command center can fail if it doesn’t have rules. Keep it simple:
- Weekly reset: toss junk mail, file papers, refresh the calendar.
- One “action” pocket: if it needs a decision, it goes thereno roaming paperwork.
- Limit décor: a wreath on your message center is cute until it blocks your reminders.
Common Mistakes (and Quick Fixes)
Mistake: The board is gorgeous… but nobody uses it
Fix: move it to where you naturally pause (entryway, kitchen path, near the garage door). Convenience beats aesthetics
every time.
Mistake: Chalkboard ghosting and hard-to-erase marks
Fix: let chalkboard paint cure fully, season the surface, and use a soft cloth for erasing. For deep cleans, dry fully
and re-season.
Mistake: Wobbly mounting
Fix: upgrade hardware, hit studs, and use a mounting system designed for heavy objects. If the door is solid wood,
don’t gamble with lightweight anchors.
Budget and Time: What to Expect
If you already have a salvaged door, this can be a low-cost build. Many DIYers source doors from architectural salvage,
reuse stores, or even freebies. The biggest costs are usually paint, hooks, and the organizer accessories you choose.
- Time: 3–6 hours of work (plus dry time)
- Cost: often modest if you reuse materials; higher if you buy premium organizers
Conclusion
Turning an old door into a message center is one of those rare DIY projects that looks charming and makes daily
life easier. It’s a family command center with personality: part organization, part décor, and part “please stop losing
the car keys.” Build it with the right zones, mount it safely, and keep a simple weekly reset routineand your counters
may finally get the break they deserve.
Experiences: Living With an Old Door Message Center (What People Don’t Tell You)
Once the paint dries and the hooks are up, the real test begins: does your old door message center actually survive
Monday mornings? In many homes, the first week is a honeymoon phaseeveryone is delighted to hang keys properly,
the mail sorter looks tidy, and the chalkboard has cute handwriting that belongs in a lifestyle magazine. Then real
life shows up wearing muddy shoes and holding three crumpled school flyers.
The most common “aha” moment is realizing the message center needs to match your habits, not your fantasies. For
example: if you never check a monthly calendar, a giant calendar section becomes wall art. But if you’re constantly
asking, “What time is that appointment again?” then a calendar zone is goldespecially when it’s positioned at eye
level where you naturally stop and look. Many DIYers end up shifting pieces around after a couple weeks: hooks get
spaced farther apart, a shelf moves lower so kids can reach supplies, or the mail pockets get relabeled because “To File”
mysteriously turns into “To Ignore.”
Another real-world lesson: the writing surface matters. Chalkboard paint can look incredible, but it’s picky. If the
surface wasn’t fully cured or seasoned, you may see ghosting (faint leftover marks) that makes your board look
permanently haunted by last Tuesday’s to-do list. When that happens, people often switch to a framed chalkboard insert,
or they pivot to dry-erase for easier cleanup. The good news is that the door format is forgivingpanels can be repainted,
swapped, or covered without rebuilding the entire project.
The “drop zone” effect is also real. If you don’t assign a specific landing spot for the most common itemskeys, dog
leash, sunglasses, school lanyardsyour door message center will still become a pile… just a more vertical pile. A
surprisingly effective strategy is to give every frequent item a dedicated hook and make the hooks obvious. Labels,
a small sign, or even using different hook styles can help. In family households, the kid-height hooks are the unsung
heroes: when children can reach their own backpack hook, you’re not the household bellhop.
People also notice that a message center changes how mail gets handled. Without a system, mail lands on counters and
becomes “counter décor.” With a sorter, mail becomes a process. The best setups include one pocket that is purely for
actionbills, forms, RSVPs, returnsbecause it creates a single decision point. Many households add a small pen cup,
stamp spot, and scissors on the shelf so they can actually complete tasks right there instead of walking away and
forgetting. That tiny “do it here, do it now” zone is often what makes the difference between organized and aspirational.
Finally, there’s the emotional benefit nobody puts in the supply list: calm. A working command center reduces the daily
friction of “Where is it?” and “Did we forget?” It’s not magicyour life won’t turn into a commercial where everyone
smiles while packing lunchesbut it does remove a handful of micro-stresses that add up. And if your message center is
built from a door with history, it adds warmth, not just function. The door doesn’t just hold reminders; it tells your
home’s story while keeping your day on track. That’s a pretty solid second career for something that used to just swing
open and shut.


