Table of Contents >> Show >> Hide
- Jump to:
- Before You Start (So You Don’t Set Your Craft Table on Fire)
- Quick Makeovers: Paint, Paper, Tape
- 1) The Classic Painted Shade (a.k.a. “I Can Totally Draw a Straight Line”)
- 2) Dip-Dye Ombre for Instant Boutique Energy
- 3) Watercolor Wash (Soft, Artsy, Zero Pressure)
- 4) Squiggle Edge Scallops (Playful and Surprisingly Chic)
- 5) Washi Tape Geometry (No Drying Time, No Regrets)
- 6) Wallpaper Wrap (A “Designer” Pattern for Scrap-Level Prices)
- 7) Wrapping Paper or Gift Wrap Glow-Up
- 8) Marbled Paper Shade (Art Class, but Make It Decor)
- 9) Metallic Inner Glow (Sneaky Glam)
- 10) Stencil + Simple Pattern (For People Who Love Order)
- Fabric & Texture: Cozy, Tailored, Fancy
- 11) No-Sew Fabric Wrap (Fastest Route to “Custom”)
- 12) Faux Pleated Shade (Hot Glue’s Main Character Moment)
- 13) Draped “Soft Gather” Fabric (Romantic, Not Fussy)
- 14) Ribbon-Wrapped Shade (Clean Lines, Minimal Mess)
- 15) Trim Upgrade: Pom-Poms, Fringe, or Rickrack
- 16) Beaded Fringe for a Little Sparkle Therapy
- 17) Fabric Collage Decoupage (Patchwork Without Sewing)
- 18) “Sweater for Your Light”: Knit or Crochet Cover
- Natural & Boho: Rope, Raffia, Rattan
- Upcycled & Unexpected: Maps, Florals, Shadow Play
- Styling Tips That Make It Look “Designer”
- Conclusion
- Bonus: of Lampshade Wisdom (From the Crafting Trenches)
Your room called. It wants a glow-up… but it also wants you to keep your weekend. Good news: swapping or
customizing a lampshade is one of the fastest, least-committal ways to change the vibe of a space. It’s like
bangs for your lampdramatic, reversible, and surprisingly empowering.
Below are 22 DIY lampshade ideas you can knock out with basic supplies, plus real-world tips
so your “quick update” doesn’t turn into a three-day saga starring hot glue burns and whispered regret.
These projects range from no-sew lampshade makeovers to upcycled statement shades, all designed to
look custom without costing custom.
Before You Start (So You Don’t Set Your Craft Table on Fire)
A quick lampshade update is supposed to be fun, not a cameo on the evening news. A few sanity-saving rules:
-
Go LED. LEDs run cooler than incandescent bulbs, which matters when you’re adding fabric,
glue, paper, or trim. -
Mind the fitter. Make sure your shade style matches your lamp hardware (spider, uno, clip-on).
If you’re unsure, take a photo of the top of the shade and the lamp harp before shopping or DIYing. -
Use the right adhesives. Fabric glue, high-temp hot glue, double-sided tape, and decoupage medium
all have their place. Avoid mystery glue that smells like a tire fire. -
Keep airflow in mind. Don’t fully seal the shade with thick plastic coatings or heavy layers that
trap heat. - Test first. Always try your technique on a small hidden spotespecially paint, dye, and spray.
Ready? Let’s give that lamp a personality upgrade.
Quick Makeovers: Paint, Paper, Tape
1) The Classic Painted Shade (a.k.a. “I Can Totally Draw a Straight Line”)
Use fabric paint or acrylic paint mixed with fabric medium to add stripes, color blocks, or a simple border.
Painter’s tape is your best friend here. Keep the design bold and the execution forgivingwide stripes hide
“oops” moments like a champ.
2) Dip-Dye Ombre for Instant Boutique Energy
Dip-dye turns a plain shade into a gradient dream. Use a dye bath (or fabric dye solution) and lower the shade
in stages to build an ombre effect. It’s oddly satisfyinglike making a fancy latte, but for lighting.
3) Watercolor Wash (Soft, Artsy, Zero Pressure)
Want a painterly look without painting a masterpiece? Use diluted fabric dye or watercolor-like fabric paint and
let it bloom naturally. The trick is embracing imperfection: a little unevenness reads “handmade,” not “help.”
4) Squiggle Edge Scallops (Playful and Surprisingly Chic)
Draw a wavy line around the bottom edge with a fabric marker or paint pen, then carefully trim along the line
for a scalloped silhouette. It’s the lampshade equivalent of a fun haircutsuddenly everything looks intentional.
5) Washi Tape Geometry (No Drying Time, No Regrets)
Washi tape is the easiest DIY lampshade makeover: chevrons, stripes, checkerboardwhatever your heart (and tape
stash) desires. If you hate it, peel it off and pretend it never happened. We love a low-commitment hobby.
6) Wallpaper Wrap (A “Designer” Pattern for Scrap-Level Prices)
Wrap the shade in wallpaper or peel-and-stick wallpaper for instant pattern. Smooth carefully to avoid bubbles,
overlap the seam neatly, and trim the top/bottom edges cleanly. This works especially well on drum shades.
7) Wrapping Paper or Gift Wrap Glow-Up
Got gorgeous wrapping paper you can’t bear to throw away? Give it a second life. Choose thicker paper, adhere it
smoothly, and consider adding trim at the edges to make it look finished instead of “I panicked at the craft store.”
8) Marbled Paper Shade (Art Class, but Make It Decor)
Use marbled paper (store-bought or handmade) for a high-impact look. Wrap panels around the shade and finish the
edges with ribbon or bias tape. It’s bold, graphic, and looks wildly more expensive than it is.
9) Metallic Inner Glow (Sneaky Glam)
Paint or spray-paint the inside of a shade in gold, copper, or silver for a warm reflective glow. Tape off
the edges so the finish looks crisp. This is perfect when you want drama… but subtle drama. Like a candlelit eyebrow raise.
10) Stencil + Simple Pattern (For People Who Love Order)
Use a stencil and a sponge brush to apply repeated motifsdots, leaves, arches, anything. Keep spacing consistent
and choose high-contrast colors for maximum payoff. Bonus: it’s a great way to coordinate with pillows or curtains
without matching like a furniture showroom.
Fabric & Texture: Cozy, Tailored, Fancy
11) No-Sew Fabric Wrap (Fastest Route to “Custom”)
Cut fabric to fit the shade (add a little overlap), then attach with fabric glue, spray adhesive, or double-sided
tape. Finish the top and bottom with ribbon or bias tape. Pick linen for modern, cotton prints for playful, or velvet
for moody glam.
12) Faux Pleated Shade (Hot Glue’s Main Character Moment)
Create faux pleats by folding fabric into crisp strips and gluing them around the shade. It looks tailored, expensive,
and like you own an iron… even if you absolutely do not. Great on small to medium shades where pleats don’t get unwieldy.
13) Draped “Soft Gather” Fabric (Romantic, Not Fussy)
Instead of precise pleats, do a gentle gathered drape: tack fabric at the top, softly pull, and secure at intervals.
This creates a relaxed, vintage-inspired lookperfect for cottage, French country, or “I collect teacups” energy.
14) Ribbon-Wrapped Shade (Clean Lines, Minimal Mess)
Wrap grosgrain ribbon around the shade vertically or horizontally, securing as you go. Alternate two colors for
subtle stripes or go full graphic with bold contrast. It’s like pinstripes for your lamp.
15) Trim Upgrade: Pom-Poms, Fringe, or Rickrack
Sometimes the fastest update is just adding trim. Glue pom-pom fringe along the bottom edge for playful charm,
or choose bullion fringe for instant “I thrifted this in Paris” vibes. Keep the trim scale proportional to the shade.
16) Beaded Fringe for a Little Sparkle Therapy
Beaded trim turns a basic lampshade into a statement piece. Add it to the bottom edge, or layer two rows for extra
movement. At night, the beads catch light and add that tiny bit of drama your Tuesday deserves.
17) Fabric Collage Decoupage (Patchwork Without Sewing)
Cut fabric motifs (florals, abstracts, geometric shapes) and decoupage them onto a plain shade using decoupage medium.
Overlap pieces for a layered look. This is ideal for using leftover fabric from curtains, pillows, or “I bought it on sale and now it’s destiny.”
18) “Sweater for Your Light”: Knit or Crochet Cover
If you knit or crochet, create a sleeve that slips over the shade, or stitch panels together. Keep the pattern open enough
for light to glow through. It’s cozy, tactile, and makes your lamp feel like it’s finally emotionally supported.
Natural & Boho: Rope, Raffia, Rattan
19) Jute or Rope Wrap (Instant Coastal/Organic Style)
Wrap jute twine or thin rope around the shade, gluing as you go. This creates a textured, natural look that works with
coastal, farmhouse, and modern organic interiors. Pro move: wrap tightly and keep rows aligned so it looks intentional.
20) Raffia Fringe Skirt (Beach Vacation, but Indoors)
Add raffia trim around the bottom for a soft, boho fringe. Keep it neat (trim the raffia ends) or lean into the wild
texture for a more relaxed vibe. This looks amazing with warm bulbs and natural wood lamp bases.
21) Cane Webbing or Rattan Panel Inserts (Airy and Architectural)
Replace sections of a shade (or cover the exterior) with cane webbing for a breathable, modern look. This idea shines
in neutral rooms where texture does the heavy lifting. It’s also a strong option for anyone chasing that “Japandi meets vintage” feel.
Upcycled & Unexpected: Maps, Florals, Shadow Play
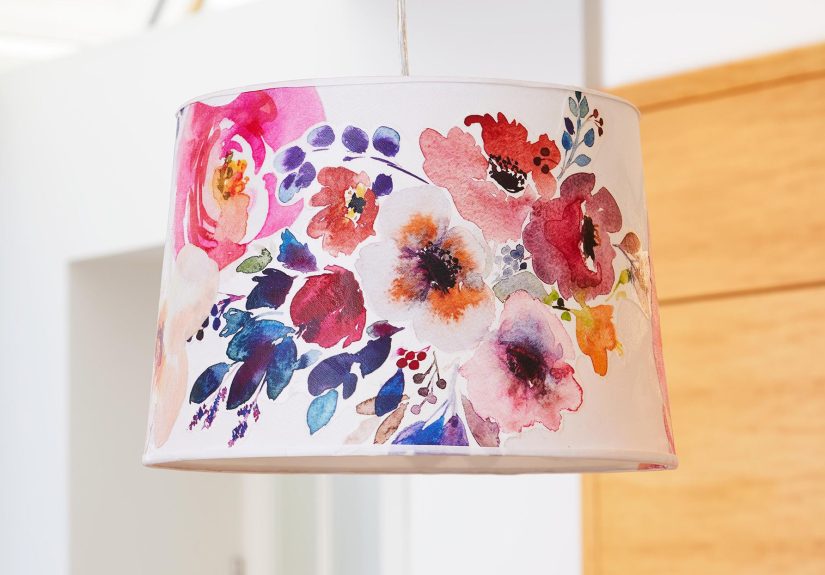
22) Map, Sheet Music, or Book Page Shade (Storytelling, Literally)
Wrap your shade in vintage maps, sheet music, or book pages (use copies, not grandma’s first edition). The text and
lines become pattern, and it looks especially good in offices, libraries, or reading corners. Finish edges with ribbon for polish.
Bonus Ideas (If You Want More Than 22 Without Starting a Second Lamp Collection)
- Pressed-flower decoupage: Seal dried botanicals under decoupage medium for a delicate, garden-inspired shade.
- Shadow-cutout liner: Add cut shapes to the inside of the shade so the light casts patterns on the wall.
- Stencil-on-linen “botanical chart” look: Use simple leaf silhouettes for a calm, modern aesthetic.
Yes, that’s technically more than 22 ideas if you count the bonuses. Consider it a free upgradelike extra fries,
but for DIY lighting.
Styling Tips That Make It Look “Designer”
- Match the mood, not the exact pattern. Pull one color from your rug or art instead of trying to “match” everything.
- Scale matters. A chunky fringe on a tiny shade looks like a lamp wearing a feather boa to the grocery store.
- Repeat texture. If you do jute on the shade, add one more natural texture nearby (basket, wood tray, linen pillow).
- Pair warm light with warm materials. Natural fibers and gold interiors look best with warm bulbs.
- Hide the seams. Bias tape, ribbon, or trim turns “DIY” into “custom.”
Conclusion
A lampshade is a small surface with a big job: it shapes light, softens glare, and quietly sets the tone of a room.
With these DIY lampshade ideas, you can update your lighting in an afternoonwhether you’re going for
crisp modern paint, cozy fabric pleats, or a natural rope-wrapped vibe.
Pick one technique that matches your patience level, use LED bulbs, and don’t overthink perfection. The best part of
a quick lampshade update is that it’s allowed to be playful. Your lamp can have a personality. So can you.
Bonus: of Lampshade Wisdom (From the Crafting Trenches)
The first time I tried a lampshade makeover, I approached it with the confidence of someone who had watched exactly
one tutorial and decided they were now “pretty much an expert.” Spoiler: my shade looked like it lost a fight with
a glue gun. But that’s the thing about DIY lamp shade projectsyour learning curve is short, and your redemption arc
is usually one trim upgrade away.
Here’s the biggest lesson: the edge finish is everything. You can wrap a shade in the most gorgeous fabric
on Earth, but if the top seam looks like a wrinkled sticker, your eye goes straight to it. The moment I started using
bias tape or ribbon on the edges, my projects jumped from “craft night” to “wait, where did you buy that?”
It’s not even hard. It’s just… annoyingly important. Like sunscreen.
Second lesson: texture reads more expensive than pattern. A simple linen wrap with a neat trim often looks
pricier than a loud print that’s slightly crooked. Natural materialsjute, raffia, canehave this magical ability to
make a lamp feel intentional, like it belongs in a curated room rather than a “we moved in last month and everything is temporary” situation.
When in doubt, add texture, not chaos.
Third lesson: choose the right base shade. Drum shades are basically the golden retrievers of DIYfriendly,
straightforward, and hard to mess up. Empire shades can be adorable, but they’re more like cats: they demand respect
and will punish sloppy measuring. If you’re new to no-sew lampshade makeovers, start with a drum shade and build confidence.
Fourth lesson: lightbulbs change the whole outcome. I once made a beautiful warm-toned shade, then used a cool,
daylight bulb and wondered why my living room suddenly felt like a dental office. Switching to a warm LED instantly fixed it.
Don’t underestimate how bulb temperature affects your “before and after.”
And finally: give yourself a “Plan B”. If paint bleeds under tape, cover it with trim. If pleats wobble, make them
look intentional with wider folds. If you hate the whole thing, remember that lampshades are removable. That’s the joy here:
you’re experimenting on a small object, not repainting an entire room. So go aheadtry the dip-dye, the washi tape geometry,
the rope wrap. Worst-case scenario, you’ll have a funny story and a lamp that’s one step closer to its glow-up.