Table of Contents >> Show >> Hide
- Why Landscape Edging Matters More Than People Think
- Landscape Edging Idea #1: A Hand-Cut Trench Edge
- Landscape Edging Idea #2: Metal or Heavy-Duty Plastic Edging
- Landscape Edging Idea #3: Brick, Paver, or Stone Edging
- Which Landscape Edging Idea Is Best for You?
- Mistakes to Avoid When Installing Garden Edging
- Real-World Experience: What I Learned From Trying These Edging Styles
- Final Thoughts
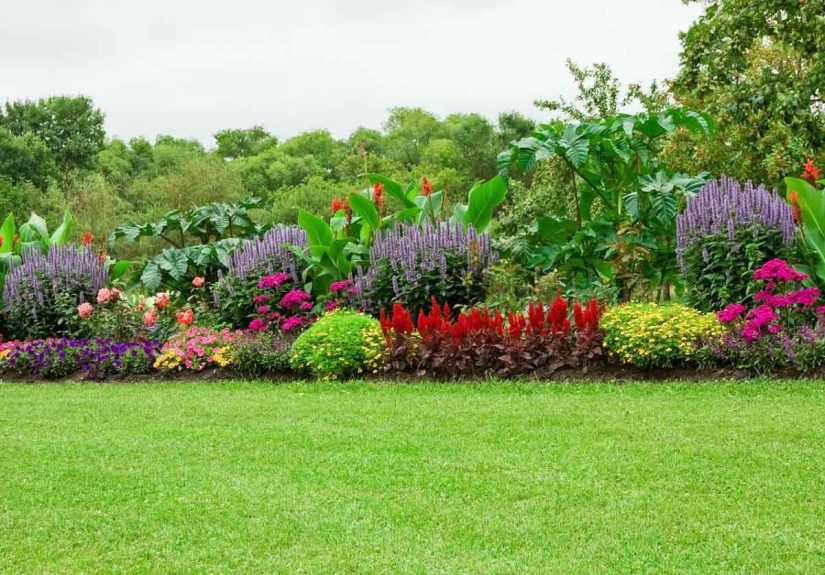
If your garden bed and your lawn are in a complicated relationship, you are not alone. Grass loves to creep. Weeds treat every open inch like a personal invitation. And before you know it, your neat flower bed starts looking like your yard shrugged and gave up. The good news is that a smart garden border can do more than make things look tidy. The right landscape edging can help block wandering turf, reduce weeding time, keep mulch where it belongs, and give your garden a cleaner, more finished shape.
In other words, edging is not just cosmetic. It is the polite but firm bouncer standing at the velvet rope, telling grass and weeds, “Sorry, not tonight.”
Below are three practical landscape edging ideas that work especially well when your goal is to keep grass out of garden beds and stop weeds from turning your planting area into a free-for-all. Each option has its own personality, budget, and maintenance level, so the best choice depends on whether you want something natural and inexpensive, sleek and durable, or classic and sturdy.
Why Landscape Edging Matters More Than People Think
A lot of gardeners focus on plants first and borders second. That makes sense emotionally. Flowers are exciting. Border materials are about as glamorous as a garage organizer. But edging does real work in a landscape.
A defined edge separates turf from planting soil. That matters because lawn grass does not stay put very well. Many common turf grasses spread by roots, stolons, or rhizomes, and they happily move toward moist, mulched beds. Once they slip into a flower border, they can wrap around perennials, compete for water, and make hand weeding feel like a part-time job nobody asked for.
Edging also helps hold mulch in place, creates a visual boundary for mowing, and makes maintenance more predictable. When the line between lawn and bed is crisp, your whole yard looks more intentional. Even a simple planting bed seems more polished when it has a clear shape.
That is why the best garden edging ideas do two things at once: they improve appearance and reduce work later. A pretty border that does not stop grass is just yard jewelry. Nice to look at, not especially helpful.
Landscape Edging Idea #1: A Hand-Cut Trench Edge
Best for: Natural-looking gardens, flexible bed shapes, and low-cost DIY projects
If you want the cheapest way to create a clean border and keep grass from casually strolling into your garden, a hand-cut trench edge is a strong place to start. This is sometimes called a spaded edge, a natural edge, or a trench edge. It is made by cutting a sharp line between the bed and the lawn, then removing a narrow strip of sod and soil to create an air gap.
This option is popular for a reason: it looks crisp, works with curved beds, and costs almost nothing beyond elbow grease and a decent edging tool. It is also one of the easiest ways to reshape or enlarge a garden bed without buying special materials.
How it works
A trench edge creates a small physical break between grass and planting space. That gap makes it harder for turf roots to creep directly into the bed, and it gives you a clean line to maintain. In simple terms, it tells your lawn where to stop.
For many homeowners, this is the most attractive edging style because it disappears into the landscape. There is no visible strip of plastic, no metal flashing, and no row of bricks announcing itself like a marching band. The focus stays on the plants.
Why gardeners like it
- Low cost and easy to start
- Works beautifully on curves and organic bed lines
- Looks natural and understated
- Easy to refresh if you like adjusting bed shapes over time
The downside
This is not a set-it-and-forget-it solution. A hand-cut edge usually needs touch-ups once or twice a year, especially in vigorous lawns. If you skip maintenance for too long, the grass will absolutely notice and begin its slow invasion.
Installation tips
Mark the bed line with a hose, rope, or spray paint before cutting. Use a flat spade or half-moon edger to slice down along the line. Then remove a narrow strip of sod from the lawn side so the edge has a distinct drop or trench. Keep the line consistent. Wobbly borders can make even expensive landscaping look accidental.
After cutting, apply mulch inside the bed to help suppress weed seeds and reduce open soil. The combination of a clean trench edge and a proper mulch layer is much more effective than either one alone.
This is a great choice for cottage gardens, pollinator beds, and informal front-yard borders where a soft, natural look matters. If your goal is budget-friendly lawn edging that still looks intentional, trench edging punches above its weight.
Landscape Edging Idea #2: Metal or Heavy-Duty Plastic Edging
Best for: Long-term weed control, modern landscapes, and gardeners who want a stronger barrier
If you want a border with more backbone, metal or heavy-duty plastic edging is one of the most practical options. This type of landscape edging sits along the bed line and creates a more permanent physical barrier between lawn and planting space.
Think of it as the trench edge’s more committed cousin. Same purpose, less annual fuss.
Metal edging
Metal edging is often the favorite for homeowners who want a clean, nearly invisible line with real durability. It has a sleek appearance, holds straight lines beautifully, and does an excellent job separating turf from beds. Steel options are especially sturdy, while aluminum can resist rust and still give you that crisp contemporary look.
Metal edging is a smart fit for modern landscape design, foundation beds, and formal gardens where sharp geometry matters. It also works well if you are tired of recutting bed lines every season and want something more permanent.
Plastic edging
Plastic edging is more budget-friendly and often easier for beginners to install. It is lightweight, flexible, and useful for curved beds. The best versions are thick enough to resist warping and can be staked securely into place. Cheap flimsy rolls, however, tend to buckle, pop up, or announce their regret sometime around midsummer.
If you choose plastic, go for a heavier product designed for landscape use rather than the thinnest option on the shelf. Saving a little money up front can turn into buying the same product twice, which is not the kind of repeat performance anyone enjoys.
Why this edging idea works well against grass and weeds
Metal and plastic edging create a defined wall between turf and bed soil. When installed properly, they reduce root creep, help keep mulch from spilling into the lawn, and maintain a clean mowing line. For gardeners dealing with aggressive grass or repeated border breakdown, this type of barrier often feels like a sanity upgrade.
Installation tips
- Cut a shallow trench first so the edging sits securely and evenly.
- Use stakes where recommended and keep sections tight together.
- Set the height carefully. Too high and it looks awkward. Too low and it may not stop much.
- Check the line from multiple angles before securing everything. Once installed, crooked edging will haunt you every time you pull into the driveway.
When to choose this option
Choose metal or plastic edging if you want a practical border that gives you a stronger defense against grass invasion with less routine reshaping. It is especially useful around perennial beds, shrub borders, and front-yard landscaping where you want consistency year after year.
Landscape Edging Idea #3: Brick, Paver, or Stone Edging
Best for: Classic curb appeal, mowing convenience, and durable garden borders
If you want a border that looks substantial and adds real structure to the yard, brick or stone edging is hard to beat. This is one of the most attractive landscape edging ideas for homeowners who want the border itself to become part of the design.
Bricks, pavers, and edging stones create a strong separation between lawn and bed, and when installed flush or nearly flush with the soil, they can double as a mowing edge. That means mower wheels can ride along the border, which reduces trimming and gives your yard a cleaner finish. This is one of those small joys in life that sounds boring until you try it and suddenly feel oddly powerful.
Why it is effective
Unlike a simple trench, brick and stone edging creates a solid border with lasting presence. It resists wear, stands up to weather, and helps hold the shape of beds over time. This makes it especially useful in front foundation plantings, walkway borders, and formal flower beds where the edge is meant to stay put for years.
Design options
You have plenty of flexibility here. Bricks can be laid flat in a trench for a low-profile look or stood upright for a more distinct border. Natural stone creates a looser, more rustic feel. Concrete pavers give you a cleaner, more uniform appearance. Straight runs tend to be easiest, but some stone systems can also handle curves.
If you want the border to match your house or patio, this is the edging category with the most style potential. Red brick can echo traditional architecture, while gray pavers or granite edging pair well with contemporary homes.
Things to keep in mind
This is usually more expensive and labor-intensive than trench or plastic edging. To get the best result, the base needs to be leveled properly so the border does not wobble, shift, or heave out of line. On the plus side, once the job is done well, maintenance is relatively simple.
Installation tips
- Dig a trench wide and deep enough for the material and base.
- Use sand or compacted base material if needed for leveling.
- Check height frequently so the finished line remains even.
- Keep surrounding mulch and soil slightly lower than the top of the edging for a crisp look.
This is an excellent choice if you want durable garden edging that improves curb appeal while also helping keep lawn grass out of flower beds.
Which Landscape Edging Idea Is Best for You?
The best landscape edging depends on your yard, your budget, and your tolerance for maintenance.
Choose a hand-cut trench edge if:
- You want the lowest-cost option
- You like a natural, invisible border
- You do not mind seasonal touch-ups
Choose metal or heavy-duty plastic edging if:
- You want a stronger grass barrier
- You prefer low maintenance
- You like clean lines and defined bed shapes
Choose brick, paver, or stone edging if:
- You want the border to add visual character
- You value durability
- You want a mowing edge that simplifies lawn care
For many homeowners, the smartest move is not just choosing edging, but combining edging with mulch and early weed control. If weeds and grass are already established, remove them before installing the border. Then add a sensible mulch layer to reduce new weed germination and make the finished bed easier to maintain.
Mistakes to Avoid When Installing Garden Edging
Even the best landscape border can underperform if the setup is sloppy. Here are a few common mistakes that make edging less effective:
1. Installing edging after the bed is already full of weeds
If weeds or turf roots are already established in the bed, edging alone will not magically fix the problem. Clean the area first. Remove existing grass, dig out root systems, and start with a clean line.
2. Skipping mulch
Edging stops side invasion, but mulch helps with surface weed suppression. Think of edging as the wall and mulch as the lid. You generally want both.
3. Making the bed too narrow
Very narrow strips between lawn and foundation often become maintenance headaches. A slightly wider bed usually looks better, gives plants room to grow, and reduces awkward trimming.
4. Choosing appearance over function
A beautiful border that is too flimsy for your grass type is going to disappoint you. Start with performance, then choose the prettiest version that fits your budget.
Real-World Experience: What I Learned From Trying These Edging Styles
Here is the honest part nobody tells you when you are standing in the garden center comparing edging materials while pretending you absolutely know what you are doing.
The first time I cut a trench edge, I felt ridiculously accomplished. The bed looked sharp, the mulch stayed put, and the whole yard suddenly seemed more expensive than it actually was. For a few weeks, I walked past it like a homeowner in a commercial for outdoor confidence. Then summer arrived, the grass started creeping, and I learned the first major truth of trench edging: it looks amazing, but it expects a follow-up call.
That does not make it a bad choice. In fact, for curved beds and informal gardens, I still think it gives the prettiest result. But it works best when you accept the relationship for what it is. This is not a one-time project. It is a seasonal ritual. If you do not mind grabbing a spade once or twice a year, the payoff is worth it.
Metal edging taught me the opposite lesson. It was less romantic, more practical, and frankly a little annoying to install the first time because precision matters. But once it was in place, it stayed put. No drama. No visible sagging. No grass sneaking through every five minutes like it had forged travel documents. For straight or gently curved beds near the front of the house, metal edging felt like the grown-up solution. It gave the landscape a clean outline and saved time later, which is one of the few yard miracles that actually exists.
Plastic edging was more of a mixed bag. The heavier version performed well enough, especially in curved beds where flexibility helped. The thinner version, however, felt like buying optimism in a roll. It looked fine on day one, then slowly developed opinions of its own. A few warm days, a couple of loose stakes, and suddenly parts of it wanted to become modern sculpture. Lesson learned: with plastic, quality matters a lot.
Brick and stone edging delivered the most satisfying finished look. It made the beds feel intentional and permanent, like the garden had a plan instead of a collection of good intentions. The biggest surprise was how much easier mowing became when the border was set at the right height. That small improvement adds up quickly over a full season. It turns routine lawn care from fiddly trimming into something closer to a straight pass with fewer headaches.
But brick and stone also taught me patience. If the base is not level, the result will bother you forever. Not occasionally. Forever. Every time you glance at the bed, your eye will go straight to the one paver that sits a little too high, like a crooked picture frame in a quiet room.
After trying all three, my practical advice is simple. If you love a natural garden look and do not mind maintenance, choose a trench edge. If you want the strongest low-maintenance barrier, choose metal or heavy-duty plastic. If you want the border itself to be part of the design and you care about curb appeal, choose brick or stone.
And whatever you choose, do not expect edging to do all the work alone. Pull weeds early. Keep mulch fresh. Watch for grass runners before they settle in. Garden maintenance is rarely about one magic product. It is usually about a few smart choices that make the next season easier than the last.
Final Thoughts
The best landscape edging ideas are the ones that make your garden look better and your weekends feel less like weed combat training. A trench edge gives you a classic natural border. Metal or heavy-duty plastic edging offers a stronger physical barrier with less upkeep. Brick, paver, or stone edging adds structure, beauty, and mowing convenience.
No matter which option you choose, the winning formula is the same: start with a clean bed, create a clear edge, and maintain it before the grass starts getting ambitious. Do that, and your flower beds will stay neater, your mulch will stay put, and your garden will finally stop looking like it is negotiating with the lawn.


