Table of Contents >> Show >> Hide
- Why Watercress and Ponds Get Along (Most of the Time)
- Before You Start: A 10-Minute Pond Check (So You Don’t Regret Everything)
- Method 1: The “Pot-on-a-Brick” Method (Fastest, Cleanest, Most Beginner-Friendly)
- Method 2: The Gravel-Bog Shelf (A “Mini Wetland” That Doubles as a Pond Polisher)
- Method 3: The Floating Watercress Island (For Fish Ponds and “Look, I’m Basically an Aquaponics Wizard” Vibes)
- Harvesting: The “Cut, Come Again, Repeat” Routine
- Common Pond Watercress Problems (and Fixes That Don’t Involve Yelling at Plants)
- Food Safety: How to Enjoy Pond-Grown Watercress Without Inviting Trouble to Dinner
- FAQ
- Conclusion: Pick Your Method, Then Let Watercress Do What It Does Best
- of Real-World Pond Watercress Experience (a.k.a. “What I Wish I Knew on Day One”)
- SEO Tags
Watercress is the overachiever of leafy greens: peppery, fast-growing, and always acting like it owns the place. Give it water and a little light, and it’ll reward you with endless “cut-and-come-again” harvestsplus a pond edge that looks intentionally landscaped instead of “I swear I’ll fix that someday.”
The catch? Watercress is also the friend who shows up, rearranges your furniture, and then invites three cousins to move in. So the real secret to growing watercress in a pond isn’t just getting it to growit’s growing it on purpose, in a way that’s tidy, harvestable, and doesn’t turn your pond into a mustard-family jungle.
Why Watercress and Ponds Get Along (Most of the Time)
Common watercress (Nasturtium officinale) is a semi-aquatic member of the mustard family (the same big, spicy clan that includes arugula, kale, and mustard greens). In the wild, it loves clean, cool water and tends to hang out along the edges of springs, streams, and shallow moving water. In pond terms: it wants its roots wet, its leaves mostly in the air, and its water refreshed or circulating enough that everything doesn’t go swampy.
In a home pond, watercress can do double duty:
- Edible harvests: tender stems and leaves for salads, soups, sandwiches, and “I grew this” bragging rights.
- Natural nutrient sponge: vigorous growth can help soak up extra nutrients that would otherwise feed algae.
- Softens pond edges: it’s a marginal plant that makes shelves and borders look lush and intentional.
Before You Start: A 10-Minute Pond Check (So You Don’t Regret Everything)
1) Make sure you’re growing the right “watercress”
The pond-friendly, edible classic is Nasturtium officinale. Don’t confuse it with “garden cress” (often grown in soil), and don’t assume every plant sold as “cress” wants to live in water. If you want something similar but less aquatic, look for “upland cress” (it’s more soil-based and behaves differently).
2) Plan for containment (watercress is enthusiastic)
Watercress can spread quickly, root at nodes, and form dense mats. In many parts of the U.S., it’s considered noxious or invasive, which is why the smartest home-pond approach is: grow it in containers or confined zones, harvest often, and never let fragments escape into natural waterways.
3) Keep the water clean enough for “pond-to-plate”
If you plan to eat it, don’t grow watercress in water that could be contaminated by livestock runoff or questionable sources. Rinse thoroughly, and if you’re ever unsure about water quality, cook it. Water plants can carry pathogens or parasites if grown in contaminated waterso treat “edible pond plant” with the same respect you’d give “mystery buffet shrimp.”
4) Light and temperature: aim for “bright and cool-ish”
Watercress does well in full sun to partial shade. In hot summers, it’s happier with morning sun and afternoon shade (or dappled light), especially if your pond warms up. Warm water can slow growth and encourage bolting (flowering), which usually means tougher stems and more bitterness.
Method 1: The “Pot-on-a-Brick” Method (Fastest, Cleanest, Most Beginner-Friendly)
This is the simplest way to grow watercress in a pond without turning your entire pond into a watercress situation. You plant it in a pot (or aquatic basket), then set the pot on a brick or shelf so the roots stay wet while the foliage stays mostly above the surface.
What you need
- A small pot or aquatic planting basket (the kind with holes is great)
- Heavy planting media: loamy soil + compost, or aquatic planting media
- Pea gravel or small river stones (to top-dress and keep soil from floating away)
- A brick, upside-down pot, or pond shelf for height control
- Watercress starts: cuttings, divisions, or rooted grocery-store bunches
Step-by-step
- Fill the pot. Use rich media that stays wet. Watercress isn’t fussy, but it appreciates organic matter. Leave about 1 inch of space at the top.
- Plant the starts. Tuck stems in so nodes touch the moist media. Watercress roots readily, especially from healthy cuttings or divisions.
- Top-dress with gravel. Add a thin layer of pea gravel or stones. This keeps soil in place and discourages fish from redecorating.
- Set it in the pond… shallow. Place the pot so water covers the root zone but the leaves sit above water. Think “wet feet, dry haircut.”
- Add gentle movement if your pond is still. If you have a pump, aim a little flow near the pot. If you don’t, place the pot where water naturally circulates (near a waterfall return, fountain, or filter outlet).
Why it works
Watercress naturally thrives with roots submerged or in saturated media. This method keeps it consistently wet while preventing constant submersion of foliage (which can lead to rot). Bonus: it’s easy to remove the pot for trimming, cleaning, or “oh wow, it grew HOW much this week?”
Quick troubleshooting
- Yellow leaves: often heat stress, low nutrients, or stale water around the roots. Add shade, improve circulation, and harvest.
- Algae on the pot/media: reduce fertilizer near the pond, add shade, and rinse the container periodically.
- Snails nibbling: hand-pick, use traps, and keep growth tender with regular harvests.
Method 2: The Gravel-Bog Shelf (A “Mini Wetland” That Doubles as a Pond Polisher)
If you want watercress to look like it’s growing “naturally” along the pond edgewithout letting it roam freebuild a small gravel bog zone on a shelf, in a shallow tray, or in a separate marginal planter that sits in the pond.
A bog shelf is basically a contained, gravel-filled zone where water can move gently through the root area. It’s tidy, it looks great, and it gives roots oxygen while keeping them wet.
What you need
- A shallow tray, wide aquatic planter, or a lined shelf area (something that keeps gravel contained)
- Pea gravel (or washed small river gravel)
- A small piece of mesh/fabric (optional) to separate finer media from gravel
- Watercress starts (cuttings/divisions work beautifully here)
- Optional: a small pump line aimed to gently move water across/through the shelf
Build it
- Create the contained bed. Use a tray/planter or a pond shelf with edging that prevents gravel from spilling into open water.
- Add gravel. Fill with washed gravel. If you want extra richness, add a thin layer of compost/soil beneath a mesh layer, then cap heavily with gravel so nothing floats away.
- Plant watercress. Push cuttings down so nodes contact wet gravel and the crowns sit above water.
- Encourage gentle flow. Aim a return line or pump output toward the shelf, or position the bog near existing circulation.
Care tips that keep it “cute” instead of “chaotic”
- Harvest weekly: regular cutting prevents the bed from matting over and improves tenderness.
- Trim before flowering: you’ll get better flavor and less rampant spread.
- Contain fragments: when you trim, scoop strays so they don’t drift and root elsewhere.
Method 3: The Floating Watercress Island (For Fish Ponds and “Look, I’m Basically an Aquaponics Wizard” Vibes)
If your pond has fish (or you’re battling nutrient load), a floating watercress setup can be a low-effort way to keep roots constantly hydrated while the plant feeds on what the pond already provides. Think of it as a salad bar that also helps the pond behave.
Option A: Floating planter (no added fertilizer)
- Get a floating planter or DIY raft. You can use a floating ring planter, or make a simple raft from closed-cell foam. Cut holes for net pots.
- Use net pots + inert media. Clay pebbles or gravel work well. You want roots in water, foliage above.
- Let the pond feed it. In fish ponds, nutrient-rich water often provides enough for decent growth.
- Move it as seasons change. Float it into partial shade during heat waves, and into brighter spots during cool seasons.
Option B: Separate “mini hydro” tub that returns water to the pond (controlled feeding)
If your pond is low-nutrient (clear, few fish) but you still want fast watercress growth, keep fertilizing out of the main pond: set up a small side tub (like a tote) with watercress in net pots, then let that water return to the pond through a controlled overflow. This gives you growth without turning your entire pond into a fertilizer experiment.
- Set a small tub next to the pond and circulate pond water through it with a small pump.
- Float a foam cover with net pots so roots hang in the tub.
- Add nutrients sparingly in the side tub only (not directly into the pond), and monitor algae.
- Shade the tub if water heats up; watercress prefers cooler conditions.
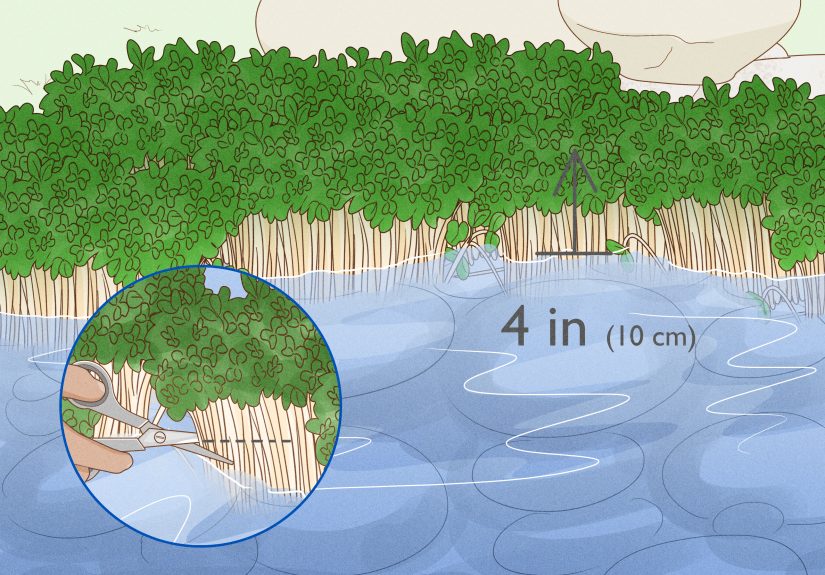
Harvesting: The “Cut, Come Again, Repeat” Routine
Harvesting is where watercress really pays rent. For best flavor, cut before heavy flowering and keep the plant producing tender tips.
- How to cut: snip stems and leave a few inches of growth so it rebounds quickly.
- How often: weekly or biweekly in peak growth seasons.
- What to eat: leaves and stems are edible; thicker stems can be tougher, so aim for young growth.
Common Pond Watercress Problems (and Fixes That Don’t Involve Yelling at Plants)
Problem: It’s growing… but slowly
- Likely cause: warm water, low light, or too-still water around roots.
- Fix: add afternoon shade, increase circulation, and harvest to encourage new shoots.
Problem: It’s growing… too well
- Likely cause: nutrient-rich pond water + happy plant.
- Fix: keep it contained, trim weekly, remove fragments immediately, and don’t let it flower and set seed.
Problem: Leaves are getting bitter or the plant is flowering fast
- Likely cause: heat stress and long hot days.
- Fix: move containers to partial shade, increase water movement, and harvest more frequently.
Problem: Snails and pests are treating it like a buffet
- Fix: hand-pick snails, use simple traps, and keep the plant trimmed for tender regrowth.
Food Safety: How to Enjoy Pond-Grown Watercress Without Inviting Trouble to Dinner
Watercress is delicious raw, but safety depends on water quality. If the pond water could be contaminated (livestock runoff, questionable sources, poor sanitation), don’t eat it raw. Rinse thoroughly under running water. When in doubt, cook itwatercress is fantastic in soups, sautéed with garlic, or stirred into warm dishes right at the end.
If you want the “salad-ready” experience, use the cleanest setup you can: container-grown plants in a well-maintained ornamental pond, no runoff concerns, and regular fresh water circulation. Your future self will thank you.
FAQ
Can I start watercress from the grocery store?
Yesif you buy bunches with intact roots or fresh stems that can root. Start them in clean water until roots form, then plant into your pot or gravel shelf.
Will it survive winter?
In milder climates, watercress can act like a perennial. In colder areas, it may die back and return in spring if conditions stay suitable. If your pond freezes solid, treat it as seasonal or overwinter a pot in a protected, cool location.
Do I need fertilizer?
Sometimes noespecially in fish ponds or naturally nutrient-rich water. If growth is pale or weak, feed lightly and preferably in a separate container system so you don’t supercharge pond algae.
Conclusion: Pick Your Method, Then Let Watercress Do What It Does Best
If you want simple, start with Method 1 (Pot-on-a-Brick). If you want a natural-looking edge that stays contained, go with Method 2 (Gravel-Bog Shelf). And if you want the floating “edible pond plant” aestheticespecially with fishtry Method 3 (Floating Island).
The big win is consistency: steady moisture, some light, cooler water when possible, and frequent harvesting. Do that, and you’ll have a pond that looks better and a kitchen that suddenly has a permanent supply of peppery greenslike you planned it that way all along.
of Real-World Pond Watercress Experience (a.k.a. “What I Wish I Knew on Day One”)
The first time I tried growing watercress in a pond, I did what many confident beginners do: I underestimated the plant and overestimated my ability to “keep an eye on it.” I figured I’d tuck a little clump near the edge, let it do its cute, leafy thing, and harvest politely when I felt like it. Reader, watercress does not do “politely.”
Week one: adorable. Week two: thriving. Week three: I swear it learned my schedule. It went from “small herb” to “green hairpiece for the pond” almost overnight. I learned my first big lesson: if you want watercress to stay harvestable, you can’t treat harvesting like an optional hobby. You treat it like brushing your teeth. You don’t skip it for two weeks and then act shocked when things feel weird.
The second lesson was about depth. I started too deep, because I assumed “water plant” meant “underwater plant.” Nope. My happiest setup ended up being the pot-on-a-brick method: roots consistently wet, foliage mostly in the air. Once I raised the pot so the crown wasn’t submerged, the plant stopped sulking and started producing crisp new tips. The pond also stayed cleaner, because I wasn’t constantly disturbing the bottom with floating soil and drifting bits of plant.
Lesson three: shade is not defeat; shade is strategy. During hot stretches, my pond warmed up and the watercress got crankygrowth slowed, flavor got sharper in a not-fun way, and it tried to flower like it had somewhere better to be. Moving the container so it got morning sun and afternoon shade was the turnaround. I didn’t change the plant. I changed the appointment calendar of the sun.
The sneaky lesson I didn’t expect was cleanup discipline. Watercress breaks easily and roots at nodes, so every trimming session creates tiny “future plants” that drift around looking for new real estate. Once I started trimming with a small bowl in hand (catch cuttings immediately), the pond stopped getting surprise watercress colonies in random corners. I also started composting trimmings away from the pond edgebecause the last thing you want is a damp pile of cuttings quietly rerooting like a zombie movie subplot.
Finally, the food-safety mindset mattered. I’m much pickier now about where the water comes from and how I rinse what I harvest. Even if your pond looks clean, “looks clean” is not a laboratory test. When I’m unsure, I cook the watercresssoups, sautés, and quick wilts are forgiving, delicious, and still feel like a flex because you grew it yourself.
After a few cycles, it clicked: watercress is easy to grow when you give it boundaries. It’s not a difficult plantit’s an energetic one. Contain it, harvest it often, keep the water moving and reasonably cool, and it becomes the most rewarding “pond vegetable” you’ll ever grow. Ignore it, and it becomes your pond’s new personality.


