Table of Contents >> Show >> Hide
- Quick Coordinate Crash Course (XYZ Without the Headache)
- Way #1: Use the Debug Screen (Java Edition)
- Way #2: Turn On “Show Coordinates” (Bedrock Edition)
- Way #3: Ask Minecraft in Chat (Command Method)
- How to Use Coordinates Like a Pro (Practical Examples)
- Troubleshooting: When Coordinates Won’t Show
- Player Experiences: How Coordinates Save the Day ( of Realistic Scenarios)
- Conclusion
If you’ve ever built a gorgeous base and then immediately walked 47 blocks into a forest and forgot where you live (relatable), you need Minecraft coordinates. They’re basically the game’s GPSexcept instead of saying “turn left in 500 feet,” it says “you are at 128, 72, -340,” and expects you to be emotionally mature about it.
In this guide, you’ll learn three reliable ways to find your coordinates in Minecraftcovering both Java Edition and Bedrock Editionplus practical tips for using XYZ like a pro. No keyword-stuffing. No robotic fluff. Just the good stuff (and a tiny amount of friendly roasting if you keep losing your house).
Quick Coordinate Crash Course (XYZ Without the Headache)
Minecraft uses a 3D coordinate grid with three numbers: X, Y, and Z. Each number represents your position along one direction of the world.
- X = east / west position (side-to-side)
- Y = height (up / down)
- Z = north / south position (forward / back)
When you move, your coordinates change in real time. Each block you walk is basically one coordinate step. That’s why coordinates are perfect for navigation, meeting up with friends, and returning to that cave you swore you’d “remember forever.”
What do the numbers actually look like?
A coordinate set might look like this: (128, 72, -340). That means you’re 128 blocks along X, 72 blocks high, and -340 blocks along Z relative to the world’s origin (0, 0, 0).
The Y number is your vertical levelso it’s especially useful for mining, building, and not accidentally digging into lava. In modern Minecraft worlds, the vertical range can extend down to negative Y levels and up to the sky-high build limitso don’t panic if you see a minus sign.
Way #1: Use the Debug Screen (Java Edition)
If you play Minecraft Java Edition (PC/Mac/Linux), the fastest way to see your coordinates is the famous (and slightly terrifying) debug screen. It shows a ton of infoFPS, biome, memory usageand yes, the coordinates you actually came for.
Step-by-step: how to open coordinates on Java
- Load into your world.
- Press F3 on your keyboard.
- Look on the left side for a line labeled XYZ (and often another labeled Block).
Pro tip: On many laptops, function keys are tied to brightness/volume. If pressing F3 changes your volume instead of opening debug info, try Fn + F3. (Yes, your laptop is allowed to be dramatic.)
What you should look for on the debug screen
- XYZ: Your exact position (often with decimals).
- Block: Your block position (rounded to whole blocksgreat for sharing coordinates).
- Facing: Your direction (handy when someone says “go north” and you realize you are a compass-free creature).
- Biome: Useful when you’re hunting a specific biome and reality is refusing to cooperate.
When Java coordinates don’t show up
Sometimes the debug screen appears, but the XYZ line is missing. The most common reason is a setting called Reduced Debug Info, which can hide coordinates. If you’re on a server, an admin can also restrict debug info.
If this happens:
- Check settings for a reduced debug option (it may be toggled on).
- If you have permission, a gamerule can control reduced debug info in a world.
- If you’re on a server/Realm, you may need to ask an adminpolitely, like someone who wants access to coordinates and also continued friendship.
Way #2: Turn On “Show Coordinates” (Bedrock Edition)
If you’re on Minecraft Bedrock Edition (Windows, Xbox, PlayStation, Switch, mobile), you usually won’t get the Java-style debug screen. Instead, Bedrock gives you a clean, always-visible toggle: Show Coordinates.
Step-by-step: enable coordinates on Bedrock (single-player or your own world)
- Pause the game.
- Open Settings.
- Find the world settings (often under Game).
- Toggle Show Coordinates to On.
Once enabled, your coordinates typically appear on-screen (commonly in the corner) as three numberseasy to read, easy to share, and far less intimidating than Java’s wall of text.
Alternate Bedrock method: use a gamerule (useful for servers)
On some Bedrock worlds/servers, coordinates can also be controlled using a gamerule command. If you have permission to use commands, you can try:
If you ever want to hide them again (say, for a cinematic build video where numbers ruin the vibe), flip it back off:
Important note about Bedrock permissions
On Realms or servers, you might not be allowed to change world settings or run commands unless you’re the owner/operator. If the toggle is missing or won’t “stick,” it may be a permissions issuenot you being cursed by the Coordinate Gremlins.
Way #3: Ask Minecraft in Chat (Command Method)
Want coordinates without leaving chat? Or maybe your keyboard is missing function keys, you’re recording content, or you just enjoy telling the game what to do. In that case, you can use commands to reveal or confirm coordinates.
Heads up: Commands typically require cheats enabled (or the right permissions on a server).
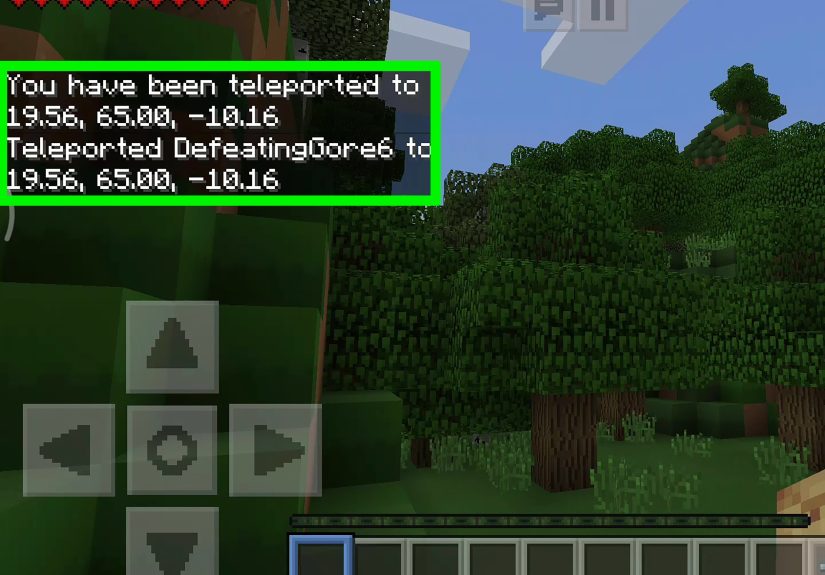
Command trick (Java): “Teleport” to your current location
In Java Edition, you can run a teleport command that targets yourself and uses relative coordinates. You won’t actually movebut the game can output a message that includes coordinates.
- Open chat (usually T).
- Enter:
This can confirm your position in a way that’s easy to screenshot or copy. It’s also a nice workaround when you’re trying to share coordinates quickly with friends.
Command trick (Bedrock): enable on-screen coordinates via gamerule
If your goal is simply “show me my XYZ all the time,” Bedrock’s command approach is usually the gamerule toggle:
Why this method is surprisingly useful
- Creators: You can keep the screen clean and only show coords when needed.
- Multiplayer: It’s easier to standardize settings across a server world.
- Keyboard problems: If your F-keys are a mess, chat commands don’t care about your laptop’s “special features.”
How to Use Coordinates Like a Pro (Practical Examples)
Knowing coordinates is great. Using them well is even better. Here are a few practical ways coordinates make your Minecraft life easier:
1) Save important locations (so you stop losing them)
Write down (or screenshot) coordinates for:
- Your base
- Nether portal locations
- Villages
- Strongholds and End portals
- Rare biomes you’ll never find again “by accident”
A simple sign near spawn like “HOME: 128 72 -340” can save hours of wandering and quiet regret.
2) Meet friends without a 30-minute “where are you?” conversation
The most underrated coordinate skill is communication. If you’re playing multiplayer, share block coordinates (whole numbers), like: “Meet at 128, 72, -340.” Don’t send decimals unless you’re trying to roleplay as a NASA mission controller.
3) Build with symmetry and precision
Coordinates aren’t only for navigationthey’re for building like an architect. Want a castle centered perfectly on X=0? Want your road to run straight on Z=200 for 1,000 blocks? Coordinates let you align mega-builds cleanly instead of eyeballing it and hoping for the best.
Troubleshooting: When Coordinates Won’t Show
“F3 doesn’t work.”
- Try Fn + F3 (common on laptops).
- Check if your keyboard has an Fn Lock (some laptops can toggle whether F-keys act like media keys).
- On Mac, you may need to use function-key settings so the F-keys behave like standard keys.
“My debug screen shows up, but no XYZ line.”
- Look for a Reduced Debug Info setting in options.
- If you’re on a server, an admin can enforce reduced debug info even if your client setting is off.
“I can’t toggle Show Coordinates on Bedrock.”
- If you’re not the world owner/operator, you might not have permission.
- On servers, coordinates may need to be enabled through world settings or commands by an admin.
Player Experiences: How Coordinates Save the Day ( of Realistic Scenarios)
Coordinates aren’t just “numbers on a screen.” They’re the difference between a confident explorer and a player who keeps circling the same mountain like it owes them money. Here are a few common, very real player-style experiences where knowing how to find your coordinates in Minecraft changes everything.
Experience #1: The “I’ll Just Grab Some Wood” Trap
A lot of players have a similar origin story: you spawn, punch a tree, build a starter hut, and feel unstoppable. Then you walk “just a little” to find more wood. You see a cool hill. Then a pond. Then another hill. Suddenly, it’s nighttime, your hunger is low, and every zombie within a 5-mile radius has RSVP’d to your location. Players who get in the habit of checking coordinates early can avoid this spiral. The simplest habit is saving your base coords the moment you place a bed or crafting table. When panic hits, coordinates turn your escape plan from “run in vibes” into “run to 128, 72, -340.” Vibes are greatuntil they’re not.
Experience #2: Mining Runs That Don’t End in “Where Was That Cave?”
Mining is basically a memory test you didn’t sign up for. You find a perfect cave entrance, spot iron, then hear lava and follow it like a moth to a flame. Thirty minutes later, you’re deep underground and completely unsure how to return to the surfaceespecially if you didn’t mark the route with torches properly. Experienced players often do one of two things: they note the cave entrance coordinates before going in, or they periodically record coordinates at major junctions (“branch here,” “lava pool here,” “diamonds here”). Even if you don’t keep a full journal, saving two or three key XYZ points can prevent a mining session from becoming an accidental underground residency.
Experience #3: Nether Portals and the Great “Wrong Return” Problem
Nether travel is amazing… right up until you walk through a portal and return somewhere you do not recognize, like Minecraft is pranking you personally. Players who use coordinates tend to treat portals like airports: each one gets labeled. They write down Overworld portal coords and (if possible) Nether-side coords too. When a portal network starts expanding, those coordinates become the blueprint for keeping travel reliable instead of chaotic. And when a friend says, “I’m in the Nether, I don’t know where I am,” you can help immediatelybecause coordinates turn confusion into a solvable problem.
Experience #4: Multiplayer Meetups That Actually Happen
In multiplayer worlds, players often underestimate how far apart they are. Someone says, “I’m near a river,” and the other person says, “Same!” One hour later, they realize Minecraft contains more than one river. Coordinates fix that instantly. Veteran groups often establish a shared meeting point (spawn, a community town, or a nether hub) and use coordinates like a shared language. Even casual players find that once everyone agrees to share XYZ, meetups happen in minutes instead of turning into a long-distance relationship fueled by confusion and boat travel.
Experience #5: Big Builds That Don’t Drift Off-Center
Mega-builders learn quickly that “close enough” becomes “why is this wall crooked?” when your build is 200 blocks wide. Many builders pick a coordinate anchorlike the center of a castle at X=0, Z=0and measure outward. Others align roads and districts along clean coordinate lines (for example, “the main road is Z=200”). These habits seem small until you expand a base into a city. At that point, coordinates aren’t just navigation; they’re the difference between a planned world and a beautiful mess that you have to explain to visitors.
Conclusion
If Minecraft had a life motto, it would be: “Explore boldly… but bring coordinates.” Whether you use Java’s debug screen, Bedrock’s Show Coordinates toggle, or a quick command trick, knowing your XYZ makes the game less frustrating and way more fun. Save your base coords. Share meeting points. Build straighter roads. And the next time you wander into the wilderness with a stack of diamonds, you’ll actually make it homelike the responsible adventurer you were always meant to be.


