Table of Contents >> Show >> Hide
- What Is a Circuit, Really?
- Way 1: Make a Simple Battery-and-Bulb Circuit
- Way 2: Make a Paper Circuit
- Way 3: Make a Simple Switch Circuit or Conductivity Tester
- How to Troubleshoot Any Beginner Circuit
- Safety Tips for Making a Circuit
- Why Learning to Make a Circuit Is Worth It
- Hands-On Experiences Related to Making a Circuit
- Conclusion
- SEO Tags
If you have ever looked at a flashlight, a greeting card that lights up, or a toy that sings the same three notes forever, congratulations: you have already met a circuit. A circuit is simply a complete path that lets electricity move from a power source, through something useful, and back again. That sounds very technical, but the basic idea is wonderfully simple. No loop, no action. Complete the loop, and suddenly a bulb glows, a buzzer buzzes, or an LED starts showing off like it just won a talent show.
In this guide, you will learn three practical ways to make a circuit: a classic wire-and-bulb setup, a creative paper circuit, and a simple switched circuit you can use as a mini invention or a conductivity tester. Along the way, we will break down what makes a circuit work, how to troubleshoot it when it refuses to cooperate, and how to build safely without turning your science experiment into a dramatic cautionary tale. Whether you are a student, a parent, a teacher, or just someone who enjoys making things light up for no respectable reason, these methods are a great place to start.
What Is a Circuit, Really?
Before jumping into the three builds, it helps to understand the basics. A circuit usually needs four things:
- A power source, such as a battery
- A path, usually made from wire, copper tape, or another conductive material
- A load, which is the thing that uses the electrical energy, like a bulb, buzzer, or LED
- A complete loop, so current can travel all the way around
That last part matters most. A closed circuit works because electricity has a full path to follow. An open circuit has a gap somewhere, so the current stops. Think of it like a train track. If the rails do not connect all the way around, the train is not going anywhere. It is the same with electricity, except it is less noisy and usually does not require a conductor with a hat.
You will also hear a few common terms when learning how to make a circuit. Voltage is the push supplied by the battery. Current is the flow of charge through the circuit. Resistance is the opposition to that flow. For a beginner project, you do not need to do a full engineering spreadsheet dance, but knowing these ideas helps explain why one bulb is bright, another is dim, and an LED sometimes sits there doing nothing because it is facing the wrong way.
Way 1: Make a Simple Battery-and-Bulb Circuit
This is the most classic beginner build and still one of the best. It teaches the core rule of electronics: electricity needs a continuous path from one terminal of the battery to the other. If you can make a bulb light with a battery and a wire, you are already doing real circuit building.
What You Need
- 1 AA, D-cell, or other low-voltage battery
- 1 small flashlight bulb in a holder, or a battery-powered mini bulb kit
- 2 insulated wires with stripped ends
- Electrical tape if needed
How to Build It
Start by connecting one wire from the positive end of the battery to one contact on the bulb holder. Then connect the second wire from the negative end of the battery to the other bulb contact. If the connections are solid and the bulb is good, the bulb should light immediately. That is your first working circuit.
If you do not have a bulb holder, you can still make this work, but you will need to touch the correct metal parts of the bulb. One wire must contact the metal tip at the bottom of the bulb, and the other must touch the threaded metal side. The glass part, charming as it may be, does not help.
Why This Circuit Works
The battery provides the energy. The wires provide the path. The bulb filament resists the current enough to heat up and glow. Once the loop is complete, current flows through the bulb and back to the battery. Break the loop anywhere, and the light goes out.
Common Beginner Mistakes
- The wire is touching plastic insulation instead of exposed metal
- The bulb is burned out
- The battery is dead
- Only one side of the battery is connected, creating an open circuit
- The connection is loose, which is the circuit version of saying, “I meant well”
This setup is perfect for classrooms and home learning because it makes the concept of a closed circuit obvious. You can even test it by disconnecting one wire and reconnecting it. The difference between open and closed suddenly becomes very real when the bulb stops cooperating.
Way 2: Make a Paper Circuit
If the first method is classic science fair territory, the second is where electronics meets arts and crafts. A paper circuit uses a coin cell battery, copper tape, and a tiny LED to create a flat circuit on paper or cardstock. It is one of the easiest ways to make electricity feel creative instead of intimidating.
What You Need
- Cardstock or thick paper
- Copper tape with conductive adhesive
- 1 coin cell battery
- 1 LED
- Tape or a binder clip
- Optional: markers, stickers, or craft supplies
How to Build It
Draw your design first. Maybe it is a birthday card, a tiny house with a glowing window, or a paper robot with suspiciously dramatic eyes. Then lay down two separate paths of copper tape on the paper. These two paths should come close to each other where the LED will sit, but they should not overlap.
Place the LED legs so that each leg touches a different copper tape path. LEDs are directional, so polarity matters. The longer leg usually connects to the positive side of the battery path. Add the battery so each side connects to the correct tape line, then press or clip the battery into place. If everything is lined up correctly, the LED lights up and your paper project instantly looks about 300% more impressive.
Why Paper Circuits Are Great for Beginners
Paper circuits make the path of electricity easy to see. Instead of wires hiding the route, the copper tape shows exactly where the current travels. That visual layout helps beginners understand that a circuit is not magic. It is a route. A very small, shiny, surprisingly satisfying route.
They are also excellent for learning about polarity. If the LED does not light, one of the first things to check is whether it is facing the right direction. That tiny moment of troubleshooting teaches an important lesson: components are not always interchangeable, and electricity can be picky about orientation.
Tips for Better Results
- Keep the copper tape smooth and firmly pressed down
- Avoid gaps, wrinkles, or accidental overlaps
- Use cardstock instead of thin paper so the battery has better support
- Test the LED directly with the battery before building the full design
- Add a flap or folded switch if you want the light to turn on only when pressed
Paper circuits are ideal for classrooms, STEM projects, greeting cards, posters, and beginner makerspaces. They prove that making a circuit does not always require a workbench full of tools. Sometimes it just requires tape, paper, and a willingness to let your craft supplies become slightly more ambitious.
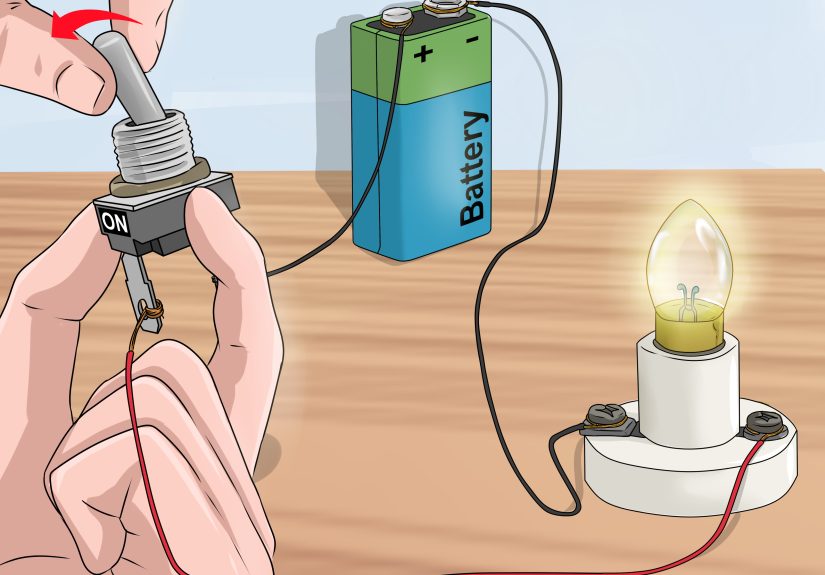
Way 3: Make a Simple Switch Circuit or Conductivity Tester
Once you have lit a bulb and powered an LED, the next fun step is adding control. A switch circuit teaches you how electricity can be turned on and off intentionally. Better yet, the same idea can be turned into a simple conductivity tester that shows whether materials like aluminum foil, paper clips, plastic, or rubber let current pass.
What You Need
- 1 battery pack or low-voltage battery
- 1 small bulb, buzzer, or LED with proper support
- 3 wires with clips or stripped ends
- Aluminum foil, paper fasteners, or metal paper clips
- Cardboard, foam, or a clothespin for structure
How to Build a Basic Switch Circuit
Build the same simple circuit you made in Method 1, but leave a small gap in one section of the path. That gap is where your switch goes. Now create a movable bridge, such as two foil tabs that touch when pressed, or a clothespin with foil contacts inside. When the metal contacts meet, the circuit closes and the bulb or buzzer turns on. When they separate, the circuit opens and everything stops.
It is a tiny invention, but it teaches a big idea: a switch does not “make” electricity. It simply opens or closes the path that current needs.
How to Turn It into a Conductivity Tester
Instead of permanently bridging the gap with a homemade switch, leave two wire ends ready to touch a test material. Place a metal spoon, coin, or paper clip between the ends and the circuit should close. Try plastic, rubber, or dry wood and the circuit usually stays open. That is because metals are good conductors, while many non-metal materials are insulators.
This version is especially useful for students because it turns an abstract vocabulary lesson into visible evidence. A bulb that lights is hard to argue with. It becomes instantly clear why wires are metal on the inside and insulated on the outside.
Why This Method Matters
This third approach moves beyond “Can I make it work?” and into “Can I control what happens?” That is the gateway to real electronics. Once you understand how to interrupt and restore a circuit, you can begin thinking about buttons, alarms, sensors, and more complex designs.
How to Troubleshoot Any Beginner Circuit
If your project does not work the first time, welcome to electronics. That is not failure. That is Tuesday.
Here is the smart way to troubleshoot:
- Check the power source. A weak or dead battery is the most common villain.
- Look for a complete loop. One tiny gap can stop the whole system.
- Inspect metal-to-metal contact. Electricity does not travel well through wishful thinking.
- Check polarity for LEDs. Turn it around and test again.
- Test one part at a time. Confirm the battery works, then the bulb, then the wires, then the full setup.
- Watch for accidental short circuits. If the path bypasses the bulb or LED, the load will not work as intended.
It also helps to speak your circuit out loud. Start at the positive battery terminal and trace the path to the load and back to the negative terminal. If you cannot describe the loop clearly, the electricity probably cannot find it either.
Safety Tips for Making a Circuit
Beginner circuit projects should stay simple and low-voltage. Use small batteries, beginner kits, and components designed for educational projects. Do not work with wall outlets, household mains electricity, damaged chargers, or plugged-in electronics. That is not beginner territory. That is “absolutely not” territory.
If you are using wires that need stripping, have an adult handle sharp tools when appropriate. Keep batteries in good condition, do not mix old and new batteries, and do not leave metal objects across both battery terminals because that can create a short circuit and generate heat. If you use coin cell batteries, store them securely and keep them away from small children. Tiny battery, huge problem.
Safe circuit building is not about making the activity less fun. It is what lets you keep having fun after the lesson is over.
Why Learning to Make a Circuit Is Worth It
Circuits are not just school content. They are the logic behind flashlights, doorbells, game controllers, appliances, laptops, robots, and entire buildings full of devices. Learning the basics gives you a practical foundation for STEM, maker projects, troubleshooting, and creative design. It also teaches a powerful habit: break a complex system into parts, test each part, and find the missing connection.
That is a useful lesson in electronics and, honestly, in life.
Hands-On Experiences Related to Making a Circuit
One of the most interesting things about learning three ways to make a circuit is how different each experience feels, even though the same scientific rule is always at work. In a basic battery-and-bulb build, the experience is immediate and dramatic. You connect the final wire, the bulb lights, and suddenly electricity stops being an invisible mystery. It becomes something you can control with your own hands. For many beginners, that first tiny flash feels surprisingly big. It is the moment when science shifts from reading to doing.
Paper circuits create a different kind of experience. They feel less like a lab and more like invention. A simple greeting card can become a light-up moon, a glowing city skyline, or a holiday tree with one bright star at the top. People who are nervous around wires often relax when the materials look familiar. Paper, tape, and markers feel approachable. Then the LED turns on, and the project suddenly bridges art and engineering in a way that feels playful instead of intimidating. That blend is powerful because it invites more kinds of learners into the subject.
The switch circuit experience is usually where curiosity really takes off. Once people realize they can control when a circuit is open or closed, they begin experimenting with all kinds of ideas. They try foil flaps, clothespins, cardboard levers, and sliding contacts. Some versions work perfectly. Others fail in hilarious ways. A switch might look brilliant but fail because two pieces of foil never quite touch. Another might work once and then fold itself into retirement. That trial-and-error process teaches patience, observation, and design thinking better than a tidy diagram ever could.
Another common experience is discovering that troubleshooting is part of the fun. Beginners often expect a project to work instantly, and when it does not, they assume they did something terribly wrong. In reality, most circuit building involves checking polarity, tightening a connection, replacing a weak battery, or finding one small gap that has been quietly ruining the whole party. That moment of fixing the problem is educational gold. It teaches that science is not just about getting the right answer. It is about testing, adjusting, and understanding why something behaves the way it does.
There is also a confidence boost that comes from moving between the three methods. The simple circuit teaches the core loop. The paper circuit teaches layout and polarity. The switched circuit teaches control and experimentation. Together, they help beginners stop seeing electronics as a sealed-off expert world. Instead, circuits become understandable systems made from parts with clear jobs. That is a huge mindset shift. It turns “I am not good at this” into “Let me test one more idea.” And honestly, that mindset is worth at least as much as the glowing bulb.
Conclusion
There is more than one way to make a circuit, but every successful version follows the same rule: electricity needs a complete path. A simple battery-and-bulb circuit teaches the foundation. A paper circuit makes electronics creative and visual. A switch circuit adds control and opens the door to experiments with conductors, insulators, and interactive designs. Once you understand those three approaches, you are no longer just copying a project. You are starting to think like a builder.
And that is the real spark.