Table of Contents >> Show >> Hide
- What Is a Hair Puff?
- Before You Start: Tools and Products You May Need
- Way 1: Make a Classic High Puff for Curly, Coily, or Natural Hair
- Way 2: Make a Front Crown Puff for Volume
- Way 3: Make a Low or Side Puff for a Soft Everyday Look
- How to Make Your Hair Puff Last Longer
- Common Hair Puff Mistakes to Avoid
- Best Hair Puff Ideas for Different Hair Types
- of Real-Life Experience: What Making a Hair Puff Actually Teaches You
- Conclusion
A hair puff is one of those hairstyles that looks like it took strategy, confidence, and maybe a tiny meeting with a glam squad. In reality, it can be wonderfully simple. Whether you have natural curls, coils, waves, straight hair, short layers, or second-day hair that has officially joined the rebellion, a puff can add height, shape, and personality in minutes.
The beauty of the hair puff is its flexibility. It can be sleek and polished for school, work, brunch, or a wedding guest look. It can be fluffy and carefree for a casual day. It can also save a “my hair has chosen chaos” morning without making you reach for heat tools. The trick is choosing the right puff method for your hair type and the look you want.
In this guide, you will learn three practical ways to make a hair puff: the classic high puff for curly and natural hair, the front crown puff for instant volume, and the low or side puff for a softer everyday style. You will also find prep tips, product suggestions, common mistakes, and real-life experience notes to help your puff stay cute without pulling your scalp into next Tuesday.
What Is a Hair Puff?
A hair puff is a gathered hairstyle that creates rounded volume. It may sit high on the crown, near the forehead, at the back of the head, or slightly to one side. On curly, coily, and kinky hair, a puff often looks like a soft, cloud-like ponytail. On straight or wavy hair, a puff usually means lifted volume at the crown or a teased front section pinned into shape.
The key ingredients are simple: volume, shape, gentle hold, and comfort. A good puff should look full, but it should not feel painfully tight. If your eyebrows are suddenly two inches higher after styling, the puff is not fashionableit is negotiating with your hairline.
Before You Start: Tools and Products You May Need
You do not need a salon station to make a hair puff, but a few basic tools help. Choose what matches your hair texture and the style you want.
Basic tools
- Wide-tooth comb or detangling brush
- Soft boar-bristle brush or smoothing brush
- Hair tie, puff cuff, satin scrunchie, or elastic headband
- Bobby pins or small hair pins
- Spray bottle with water
- Fine-tooth comb or teasing comb for crown volume
- Satin scarf for setting edges or smoothing the base
Helpful products
- Leave-in conditioner for moisture
- Curl cream or styling cream for definition
- Light gel for hold around the hairline
- Mousse or root-lifting spray for fine or flat hair
- Dry shampoo or texture spray for second-day volume
- Light hairspray for flexible hold
- Edge control, used gently and sparingly
The most important rule is to avoid overloading your hair. Too much cream, gel, or oil can flatten the puff and make it look heavy. Start small. You can always add more product, but removing excess gel five minutes before leaving the house is an Olympic event nobody asked to enter.
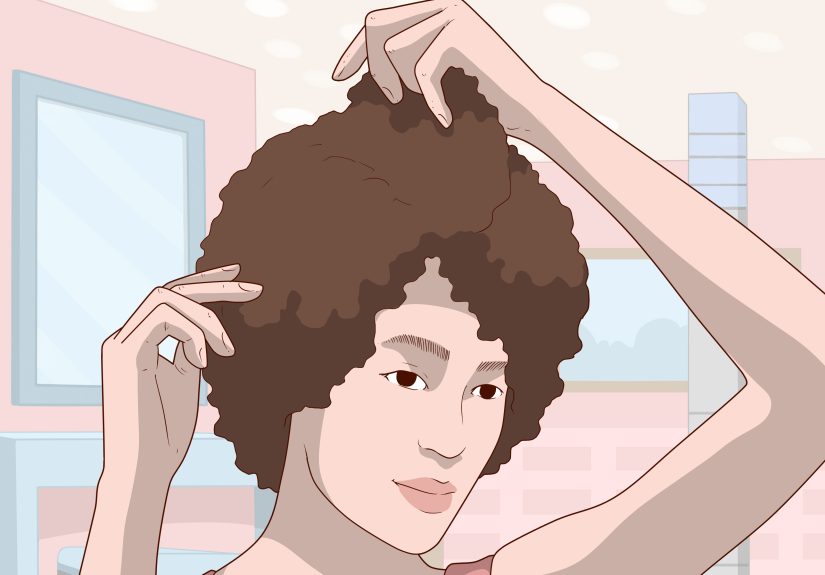
Way 1: Make a Classic High Puff for Curly, Coily, or Natural Hair
The classic high puff is bold, beautiful, and practical. It works especially well on type 3 and type 4 hair, braid-outs, twist-outs, wash-and-go curls, stretched natural hair, and older curly styles that need a refresh. This puff gathers the hair upward while letting the curls bloom at the top.
Step 1: Start with moisturized, detangled hair
Lightly mist your hair with water, focusing on dry areas. Add a small amount of leave-in conditioner or curl cream, then gently detangle with your fingers or a wide-tooth comb. For tightly curled or textured hair, detangling while damp and conditioned can reduce breakage.
You do not need soaking wet hair. Damp hair gives flexibility, but wet hair can shrink more and make the puff harder to shape. Think “refreshed,” not “caught in a rainstorm.”
Step 2: Smooth the perimeter
Apply a light gel or styling cream around the edges, nape, and sides. Use a soft brush to smooth the hair upward. Avoid brushing aggressively through the curls in the center because you want that volume to stay fluffy.
If you like a softer look, skip the super-sleek base and use your hands instead of a brush. A little texture around the hairline can make the puff look modern and relaxed.
Step 3: Use a gentle band or puff cuff
Place a large elastic headband around your neck, then slide it upward over your hairline and toward the crown. Stop when the puff reaches your desired height. Another option is to use a puff cuff, satin scrunchie, or a long shoestring-style band designed for hair.
The band should feel secure, not tight. If your scalp feels sore, loosen it immediately. Tight ponytails and high-tension styles can stress the hairline over time, so comfort matters as much as style.
Step 4: Shape the puff
Use your fingers or a hair pick to gently lift the roots and round out the puff. Pull out a few curls for fullness. If parts look flat, mist lightly with water and scrunch in a little curl cream.
For extra drama, tilt the puff slightly forward. For a more balanced look, center it directly on the crown. Either way, avoid yanking the hair into place. A puff should be sculpted, not wrestled.
Step 5: Set the style
Tie a satin scarf around the base for 5 to 10 minutes to smooth the sides. Remove the scarf, fluff the puff, and finish with a light mist of hairspray if needed. If you style your baby hairs, use a small amount of edge control and a soft brush. Keep it gentle, especially around fragile edges.
Way 2: Make a Front Crown Puff for Volume
The front crown puff is ideal for straight, wavy, relaxed, blow-dried, or fine hair. Instead of gathering all the hair into a puff, this method creates lift at the front or crown. It is perfect for half-up hairstyles, ponytails, buns, and loose hair that needs a little “main character” energy.
Step 1: Prep the roots
Begin with dry hair. If your roots are oily, apply a little dry shampoo and wait a minute before brushing it through. If your hair is clean and slippery, add a light texture spray or mousse before blow-drying. Hair with a bit of grip holds a puff better than freshly conditioned, ultra-silky hair.
Step 2: Section the front area
Use a comb to separate a section from temple to temple or from the front hairline to the crown. Clip the rest of your hair out of the way. The wider the section, the softer and more blended the puff will look. A smaller section creates a more noticeable bump.
Step 3: Tease gently at the roots
Lift the section upward. Place a fine-tooth comb two to three inches from the roots and gently comb downward toward the scalp. Repeat two or three times. Do not saw at the hair like you are trying to start a tiny campfire. Gentle backcombing gives lift while reducing tangles and breakage.
If your hair is fine, spray the roots lightly before teasing. If your hair is thick, tease smaller sections so the volume is evenly distributed.
Step 4: Smooth the top layer
Flip the section back. Use the surface of your comb or brush to smooth only the top layer. Do not brush through the teased base, or the volume will disappear faster than snacks at a sleepover.
Step 5: Pin the puff
Push the section slightly forward to create height, then secure it with two crossed bobby pins. For a polished look, hide the pins under the lifted section. For a casual look, let the pins show and choose decorative ones.
You can leave the rest of your hair down, pull it into a ponytail, twist it into a bun, or create a half-up puff. Finish with flexible hairspray so the puff stays lifted without turning crunchy.
Way 3: Make a Low or Side Puff for a Soft Everyday Look
A low or side puff is a great option when you want volume without height at the very top of your head. It works well for curly hair, stretched natural hair, wavy hair, braids with loose ends, twist-outs, and even short-to-medium lengths. This style feels romantic, casual, and easy to wear.
Step 1: Choose your placement
Decide whether you want the puff at the nape, slightly above the nape, or behind one ear. A low center puff looks elegant. A side puff feels playful. A puff placed slightly higher in the back creates more shape while still staying comfortable.
Step 2: Refresh the hair
Mist curls or waves lightly with water. Add a small amount of leave-in conditioner or styling cream to revive definition. If your hair is straight or fine, use texture spray at the roots and mid-lengths to prevent the puff from collapsing.
Step 3: Gather loosely
Use your hands to gather the hair into position. For curly and coily textures, hands are often better than brushes because they preserve volume. Secure with a satin scrunchie, covered elastic, or soft hair tie. Keep the first loop loose. If you wrap the tie too many times, the puff may shrink and pull.
Step 4: Pin and shape
Use bobby pins to tuck any short pieces into the puff. Pull gently at the crown or sides to create softness. If you want a fuller puff, separate curls with your fingers or use a pick at the roots.
Step 5: Add a finishing detail
A low puff looks great with a side part, face-framing curls, a scarf, a claw clip, or decorative pins. For a special occasion, wrap a small piece of hair around the base to hide the elastic and pin it underneath.
How to Make Your Hair Puff Last Longer
A puff can last all day with the right prep. The secret is balance: enough hold to keep the shape, enough moisture to prevent frizz, and enough looseness to protect your scalp.
Use lightweight products
Heavy creams and oils can make the puff sag. For fine hair, use mousse, dry shampoo, or texture spray. For curly and coily hair, use a light leave-in and gel only where you need control.
Protect the puff at night
If you want to preserve a high puff overnight, loosely pineapple your hair with a satin scrunchie and sleep with a satin bonnet or scarf. You can also sleep on a satin pillowcase to reduce friction.
Refresh instead of restyling from scratch
The next day, mist the puff lightly with water, fluff with your fingers, and smooth only the base if needed. Constant brushing and tightening can stress your hair, so refresh gently.
Common Hair Puff Mistakes to Avoid
Making the puff too tight
A tight puff may look sleek for an hour, but it can cause scalp tenderness and strain the hairline. If the style hurts, it is too tight. Choose soft bands, avoid rubber bands, and rotate your hairstyles.
Using too much gel
Gel can create a smooth base, but too much can flake, harden, or make the hair look stiff. Apply a small amount around the perimeter only, then build if necessary.
Skipping moisture
Dry curls can look dull and frizzy in a puff. A little water and leave-in conditioner can bring the shape back to life.
Teasing too aggressively
Backcombing creates volume, but rough teasing can cause tangles and breakage. Use small sections, gentle strokes, and a light finishing spray.
Forgetting your hair type
Not every puff needs the same technique. Coily hair may need moisture and a wide band. Fine hair may need root lift and pins. Thick hair may need sectioning. The best puff is the one that works with your texture, not against it.
Best Hair Puff Ideas for Different Hair Types
For curly hair
Try a high puff with defined curls in the center. Refresh curls with water and curl cream, then fluff with your fingers. Leave a few tendrils out around the face for a soft finish.
For coily or kinky hair
A classic afro puff is a beautiful choice. Use a puff cuff or adjustable band to avoid too much tension. Stretching the hair first with twists, braids, or banding can create a larger puff.
For straight hair
Create a front puff by teasing the crown and pinning it back. Add loose waves first if you want more body. Texture spray helps straight hair hold the shape.
For fine hair
Use dry shampoo or volumizing mousse at the roots before styling. Tease in small sections and smooth only the surface. Avoid heavy oils near the scalp.
For short hair
Try a mini puff, half-up puff, or pinned crown puff. Bobby pins are your best friends here. Use them to guide shorter layers into the shape you want.
of Real-Life Experience: What Making a Hair Puff Actually Teaches You
The first thing you learn when making a hair puff is that your hair has opinions. Strong opinions. One day it cooperates like a paid professional. The next day, the left side has volume, the right side has secrets, and the back looks like it attended a different styling tutorial. That is normal. A puff is not about forcing every strand into perfection. It is about creating a shape that looks intentional, even when your hair is clearly improvising jazz.
One helpful experience is learning to style based on the day your hair is having. Freshly washed curly hair may be soft, defined, and springy, but it can also shrink more. A high puff on wash day may look smaller and tighter. Two-day or three-day hair often makes the best puff because the curls have more stretch, the roots have more volume, and the hair has enough natural texture to stay in place. For straight or wavy hair, second-day hair can also be easier because it is less slippery. Dry shampoo becomes less of a backup plan and more of a styling assistant with excellent timing.
Another lesson is that the band matters more than people think. A harsh elastic can make a puff uncomfortable and leave dents. A satin scrunchie, puff cuff, or adjustable band gives more control. The best puff often comes from slowly sliding the band into place rather than tying it tightly from the start. This small change can make the style feel better and look fuller.
You also discover that “sleek” does not have to mean “stiff.” Many beginners apply gel to the entire head, then wonder why the puff looks flat. In real life, gel works best around the hairline, sides, and nape. The puff itself usually needs freedom. Let the curls, waves, or teased sections breathe. A little frizz can even make the puff look softer and more natural.
For crown puffs, the biggest experience-based tip is to tease less than you think you need. A few gentle strokes at the roots can create lift. Too much teasing creates a nest that future-you must patiently detangle. The top layer should always stay smooth, because that is what people see. The hidden structure underneath does the heavy lifting, like shapewear for your hairstyle.
Finally, making a hair puff teaches you that comfort is part of beauty. If the style pulls, loosen it. If your edges feel sore, change the placement. If your scalp feels tight, take the puff down. A hairstyle should make you feel confident, not trapped. The best hair puff is full, flattering, and wearable. It should survive your day, match your vibe, and let you forget about your hair for a whilewhich, honestly, is the dream.
Conclusion
Learning how to make a hair puff gives you a fast, stylish option for almost any hair day. The classic high puff celebrates natural volume and curl texture. The front crown puff adds instant lift to straight, wavy, or fine hair. The low or side puff creates a softer look that works for casual days, special events, and everything in between.
The best results come from gentle styling, lightweight products, and choosing a method that fits your hair type. Keep the puff secure but not tight, protect your edges, and refresh the style instead of constantly pulling it into place. With a little practice, your puff can become one of the easiest hairstyles in your routineand possibly the most reliable friend in your beauty lineup.


