Table of Contents >> Show >> Hide
- Before You Start: Safety, Tools, and One Smart Reality Check
- How a Cigarette Lighter Socket Is Usually Held in Place
- Way 1: Remove the Socket from the Front with a Removal Tool
- Way 2: Remove Trim and Undo the Retaining Ring from the Back
- Way 3: Drop the Panel or Console and Release a Push-In or Bracket-Mounted Socket
- What to Do If the Socket Still Will Not Come Out
- Common Mistakes to Avoid
- How to Choose the Right Method for Your Vehicle
- Real-World Experiences with Removing a Cigarette Lighter Socket
- Final Thoughts
If your car’s cigarette lighter socket has stopped working, gone loose, overheated, or become a coin-eating gremlin that blows fuses for sport, you may need to remove it. The good news: this job is often more annoying than difficult. The slightly less cheerful news: automakers love hiding these little sockets behind trim panels like they’re guarding state secrets.
Whether you call it a cigarette lighter socket, a 12V outlet, an accessory power outlet, or “that round thing my phone charger lives in,” the removal process usually comes down to one of three methods. Some sockets release from the front with a special removal tool. Others come out only after you remove trim and undo a retaining ring from the back. And some are mounted in a bracket or push-in housing that has to be released from behind.
This guide walks you through all three approaches, plus the tools you’ll want, the mistakes you’ll want to avoid, and the real-world headaches people run into when this supposedly “quick little fix” suddenly turns into a dashboard archaeology project.
Quick note: On many newer vehicles, the old cigarette lighter has become a 12V accessory outlet, but the removal logic is usually very similar. The name changed. The round hole stayed dramatic.
Before You Start: Safety, Tools, and One Smart Reality Check
Tools You May Need
- Plastic trim removal tools
- Flat and Phillips screwdrivers
- Socket set with extensions
- Needle-nose pliers
- Flashlight or work light
- Pick tool or hook tool
- Vehicle-specific or factory-style lighter socket removal tool
- Small container for screws and clips, unless you enjoy crawling under seats later
Disconnect the Battery First
Before touching the socket or surrounding wiring, turn the vehicle off and disconnect the negative battery cable. This is not overkill. It is the “I prefer not to create sparks inside my dashboard” step. After the negative cable is safely moved away from the terminal, give the electrical system a few minutes to settle down.
Check the Fuse Before Removing Anything
Here’s the plot twist many DIYers discover late: the socket itself may not be bad at all. The 12V outlet fuse is one of the most commonly blown fuses in a vehicle. A tired charger, a shorted accessory, or a stray coin dropped into the socket can knock it out. So before you start disassembling trim like you’re auditioning for an auto-repair show, inspect the fuse and replace it only with the exact same amperage rating. If the new fuse blows immediately, you likely have a short or a damaged socket.
How a Cigarette Lighter Socket Is Usually Held in Place
Most cigarette lighter sockets are secured in one of three ways:
- Internal locking tabs that release with a dedicated removal tool inserted into the socket from the front.
- A rear retaining ring or locknut that threads onto the socket body from behind the panel.
- A push-in or bracket-mounted housing that clips into the console, dash, or trim bezel.
That’s why there isn’t one universal answer to “How do I remove a cigarette lighter socket?” The right method depends on how your vehicle’s power outlet was designed and how much rear access you can get without breaking half the center console and your patience.
Way 1: Remove the Socket from the Front with a Removal Tool
This is the cleanest method when your vehicle uses a socket designed to release through the opening itself. Several replacement outlets for GM, Chrysler, Dodge, Jeep, and Ram applications are sold with a matching removal tool, and that tells you something important: the socket is meant to release from the front rather than by brute force and colorful language.
How This Method Works
Look inside the cigarette lighter socket with a flashlight. On compatible designs, you may see square holes or release openings inside the socket wall. A factory-style removal tool slides into those openings, compresses the retaining tabs, and allows the socket to pull straight out.
Steps
- Disconnect the negative battery cable.
- Remove the lighter element or any charger plugged into the outlet.
- Shine a light inside the socket and identify the release openings.
- Insert the correct removal tool evenly so it engages both sides.
- Pull the tool and socket assembly straight outward.
- Once the socket is free, disconnect the wiring connector from the rear.
Why This Method Is Great
You may not need to remove the center-console trim at all. That saves time and reduces the chance of snapping clips, scratching the bezel, or discovering that your dashboard trim was apparently installed by a team of extremely motivated raccoons.
Where DIYers Get in Trouble
The classic mistake is trying to pry the socket out with a screwdriver from the front. That usually damages the trim ring, deforms the outlet sleeve, or makes the socket even harder to remove. If your outlet style is meant to be released internally, use the proper tool. This is one of those jobs where the right little tool can save a surprising amount of swearing.
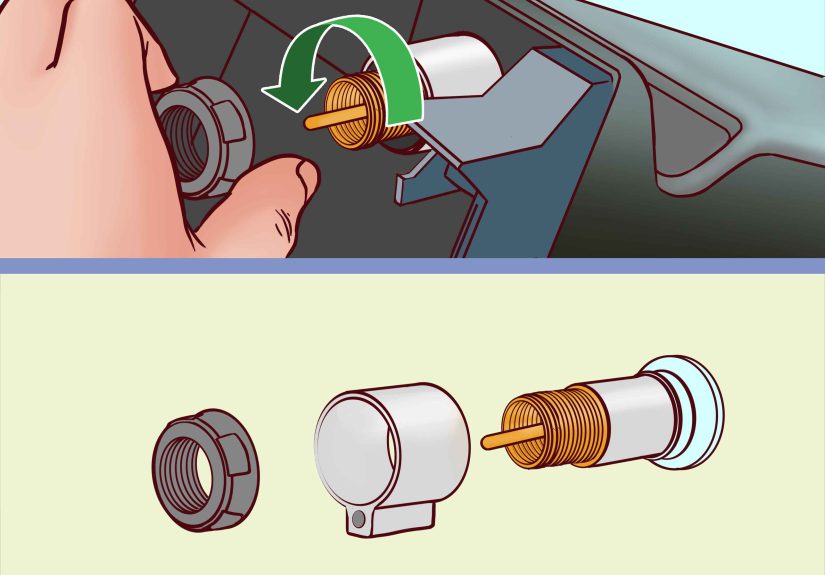
Way 2: Remove Trim and Undo the Retaining Ring from the Back
This is probably the most common method on traditional 12V sockets and many aftermarket replacement outlets. In this design, the visible socket sits in a hole in the dash or console, and a retaining ring or locknut holds it tight from behind.
How This Method Works
Once you remove the surrounding trim panel or access cover, you can reach the back of the socket, unplug the connector, and unscrew or unclip the retaining ring. After that, the socket pushes out through the front of the panel.
Steps
- Disconnect the negative battery cable.
- Use plastic trim tools to remove the bezel or console panel around the outlet.
- Work slowly and look for hidden screws before prying. Some panels pop free with clips; others are secured by screws under rubber mats, cup-holder inserts, or small covers.
- Once you can access the back of the outlet, unplug the wiring harness.
- Locate the retaining ring, threaded collar, or locknut holding the socket body in place.
- Turn the retaining ring counterclockwise and remove it.
- Push the socket out through the front of the opening.
Best Tips for This Method
- Use non-marring plastic trim tools, not a metal screwdriver, unless you want decorative gouges in your interior.
- Take photos as you go so reinstalling the trim is not a guessing game later.
- Keep clips and screws organized by area.
- If the retaining ring feels stuck, avoid forcing it with giant pliers right away. A little penetrating patience and better access usually works better than violence.
When This Method Makes the Most Sense
Use this method when the front of the socket does not show any internal release holes, when the outlet is obviously threaded through the panel, or when your replacement part includes a lock ring or rear mounting hardware. Many aftermarket 12V receptacles are specifically built for rear installation with a locking ring, which makes this approach straightforward once you can reach the back.
Way 3: Drop the Panel or Console and Release a Push-In or Bracket-Mounted Socket
Some sockets are not held by a big threaded ring. Instead, they are clipped into a bezel, bracket, or push-in housing. In these cases, the outlet won’t really come out from the front, and there may not be a neat retaining nut in the back either. Instead, you need to remove enough trim to free the housing and release its tabs from behind.
How This Method Works
The socket or outlet housing is retained by side clips, spring tabs, or a bracket. Once you drop the trim panel or center-console section, you can compress the tabs and slide the socket out of the mounting bracket.
Steps
- Disconnect the negative battery cable.
- Remove the trim bezel, lower dash panel, or center-console section that contains the socket.
- Support the panel so you do not strain the wiring.
- Disconnect the outlet wiring connector.
- Inspect the socket body for side tabs, locking ears, or a clip-on bracket.
- Depress the retaining tabs while sliding the socket rearward or forward, depending on the design.
- If the socket is part of a larger outlet module, remove the whole module first, then separate the socket on the bench.
Why This Method Can Be the Safest
It sounds like more work, but sometimes it is actually the least risky option. If a socket is clipped into a brittle bezel, trying to yank it from the front can crack the panel. By removing the panel first, you can see exactly what you’re dealing with, release the tabs correctly, and avoid turning a minor electrical repair into a surprise interior restoration project.
What to Do If the Socket Still Will Not Come Out
Check for Hidden Fasteners
If the trim panel refuses to budge, stop and check again for hidden screws. Automakers love hiding them under mats, tiny covers, storage-bin liners, and trim strips. If you keep prying and the panel feels “kind of attached but angry,” you likely missed a fastener.
Inspect for Melted Plastic
A bad cigarette lighter socket can overheat. If the socket has been running hot, the plastic housing or surrounding bezel may have partially melted. In that case, the outlet may not slide out smoothly even after the retainer is removed. You may need to carefully work the socket loose or replace the surrounding trim piece if it has deformed.
Look for Corrosion or Damaged Wiring
If the connector is corroded, loose, or discolored, removal is only half the job. You should inspect the harness, terminal tension, and ground condition before installing a new outlet. Otherwise, you may swap in a shiny new socket and still end up with the same dead charger and the same disappointed face.
Common Mistakes to Avoid
- Skipping the fuse check: Sometimes the socket is innocent.
- Using the wrong fuse rating: Bigger is not better here. Bigger can become smokier.
- Prying with metal tools on visible trim: One slip and your dashboard gets a permanent autograph.
- Forcing a front-release socket without the right tool: That can bend the outlet and ruin the opening.
- Not disconnecting the battery: A small spark in the wrong spot can create a much larger problem.
- Ignoring the connector condition: A worn socket and a heat-damaged plug often travel as a team.
How to Choose the Right Method for Your Vehicle
If you are standing in the garage wondering which removal method applies to your car, use this quick logic:
- See internal slots or square holes inside the socket? Try the front-release removal-tool method.
- Can you access the back of the panel and spot a threaded collar or ring? Use the rear retaining-ring method.
- Socket appears molded into a bezel, clipped into a bracket, or buried in a console module? Remove the panel and release the tabs from behind.
When in doubt, do not guess aggressively. Pull the trim panel enough to inspect the back side first. A two-minute inspection can save you from a forty-minute detour into accidental dashboard sculpture.
Real-World Experiences with Removing a Cigarette Lighter Socket
One of the most common experiences people have with this repair is realizing the socket was not actually the problem. A charger stops working, the lighter will not heat up, or the dash outlet goes dead, and the first assumption is that the socket has failed. Then they check the fuse and discover the real villain was a cheap adapter, a forgotten metal fragment, or a penny that slipped into the outlet months ago and waited patiently to cause trouble at the worst possible time. It is a humbling moment, but also a cheap one, which is the kind of humility most of us can live with.
Another common experience is learning that trim work feels easy right up until the first clip refuses to cooperate. Many DIYers go into the job thinking the socket will simply pop out from the front. Then the bezel refuses to move, the hidden screw reveals itself only after ten minutes of suspicion, and suddenly the “quick fix” has become a lesson in patience. The people who come out of that situation happiest are usually the ones who slow down, use plastic trim tools, and stop the moment something feels wrong instead of doubling their effort and tripling the damage.
There is also the very familiar discovery that not all cigarette lighter sockets are created equal. On one car, a removal tool slips into the outlet, the tabs release, and the socket comes out like it has been waiting all day for freedom. On another vehicle, the socket is trapped behind half the center console, the wiring connector is positioned at an angle designed specifically to challenge human wrists, and the retaining ring seems to have been tightened by a bodybuilder with a grudge. That contrast is why broad repair guides help, but vehicle-specific awareness matters. The job category may be the same, but the mood can vary wildly.
Heat damage is another real-world surprise. People often pull a socket and find browned plastic, a loose center contact, or a connector that looks like it had a rough childhood. That usually explains why chargers fit loosely or why the socket worked only when the plug was wiggled into exactly the right position like a radio from 1997. In those cases, simply removing the socket becomes part diagnosis and part detective work. The lesson is simple: if the old outlet shows signs of overheating, inspect the wiring carefully before installing the new one.
Then there is the victory experience, and yes, it is wonderfully satisfying. You disconnect the battery, remove the trim without snapping a clip, free the old socket, install the replacement, reconnect everything, and your charger finally powers up like it should. No smoke. No mystery. No dashboard pieces left over. Just a clean repair and the tiny thrill of knowing you fixed something yourself. It is not glamorous, but it is real DIY satisfaction. In a world full of subscriptions and sealed electronics, replacing a humble 12V outlet can feel refreshingly hands-on.
The biggest takeaway from people who have done this successfully is that the best approach is not always the fastest-looking one. The best approach is the one that matches the socket design. Use the tool when it is a tool-release style. Remove the retaining ring when it is a ring-mounted style. Drop the panel when the socket is clipped in from behind. Once you stop trying to make every vehicle obey the same method, the job becomes far less frustrating and a lot more predictable.
Final Thoughts
Removing a cigarette lighter socket is one of those repairs that looks tiny on paper but can branch into trim work, fuse testing, wiring inspection, and a brief emotional support session with your center console. Still, once you understand the three basic mounting styles, the job becomes much easier.
To recap, the three main ways to remove a cigarette lighter socket are:
- Use a front-release removal tool for sockets with internal locking tabs.
- Remove trim and undo the retaining ring from the back.
- Drop the panel or console and release a push-in or bracket-mounted socket from behind.
Start with safety, check the fuse before tearing things apart, and let the socket design tell you which method to use. That way, you fix the problem instead of creating three exciting new ones.


