Table of Contents >> Show >> Hide
- What Are 3D Printed Stamp Rollers?
- Why Makers Love 3D Printed Roller Stamps
- Common Types of 3D Printed Stamp Rollers
- Best Materials for 3D Printed Stamp Rollers
- Design Principles That Make a Roller Work
- How to Make a 3D Printed Stamp Roller
- Print Settings and Practical Tips
- How to Use a 3D Printed Stamp Roller
- Project Ideas for 3D Printed Stamp Rollers
- Common Mistakes to Avoid
- Are 3D Printed Stamp Rollers Worth It?
- Hands-On Experiences With 3D Printed Stamp Rollers
- Conclusion
Note: This article is written in clean body-only HTML for web publishing and intentionally avoids source-link clutter inside the content.
Some creative tools look complicated until you realize they are basically a wheel with personality. That is the charm of 3D printed stamp rollers. They take a simple ideaa rolling cylinder with a raised designand turn it into a surprisingly powerful tool for paper crafts, clay work, packaging, journaling, cosplay textures, classroom projects, textile experiments, and handmade gift wrap. Instead of pressing one stamp again and again like a tiny office clerk with a deadline, a stamp roller glides across the surface and leaves a continuous pattern behind.
The concept is not new. Cylinder seals were used thousands of years ago to roll designs into soft clay. The modern twist is that makers can now design a pattern on a computer, export it as an STL file, and print it at home. A custom roller that once required carving, molding, or ordering from a specialty shop can now be made over the weekend. Sometimes it works beautifully on the first try. Sometimes the roller waddles like a shopping cart with one bad wheel. Either way, the process is wonderfully hands-on.
Today, DIY stamp rollers are popular because they sit at the intersection of digital design and old-school craft. A 3D printer gives you accuracy, repeatability, and customization. Ink, paint, clay, or foam gives the final result a handmade look. That combination is why artists, teachers, hobbyists, small business owners, and cosplay builders keep experimenting with 3D printed roller stamps.
What Are 3D Printed Stamp Rollers?
A 3D printed stamp roller is a cylindrical stamp made with additive manufacturing. The design is raised on the outside of the cylinder, so when the roller moves across a surface, it transfers ink, paint, pressure, or texture in a continuous strip. Depending on the model, the roller may be a simple cylinder used by hand, a wheel mounted on an axle, a sleeve that fits over a marker or paint roller, or part of a more advanced auto-inking mechanism.
The simplest version looks like a small rolling pin with a pattern wrapped around it. The design might be dots, stars, vines, bricks, scales, wood grain, paw prints, waves, geometric shapes, brand logos, or custom text. The roller can be used on flat paper, wrapping paper, kraft bags, polymer clay, ceramic clay, EVA foam, cardboard, fabric tests, leather scraps, and mixed-media art surfaces. In other words, it is the craft-room equivalent of a Swiss Army knife, except less pointy and more likely to get covered in acrylic paint.
Why Makers Love 3D Printed Roller Stamps
The biggest benefit is customization. Store-bought rollers are convenient, but they lock you into someone else’s pattern. A 3D printed stamp roller lets you create a design that fits a specific project. Want a tiny honeycomb pattern for a bee-themed invitation? Print it. Need dragon scales for a cosplay armor panel? Print it. Want a repeating coffee cup pattern for bakery packaging? Print that too, preferably before drinking your third espresso and naming every cup “Greg.”
Cost is another advantage. Once you own or can access a 3D printer, the material cost for a small roller can be modest. A single spool of filament can produce many prototypes, especially if the rollers are small. This makes experimentation less scary. If the first design is too shallow, too sharp, or too busy, you can adjust the file and print another version. Traditional custom rubber stamps often require ordering, waiting, and paying for each revision. With a 3D printer, revision is part of the fun.
Speed also matters. A maker can design a roller in the morning, print it in the afternoon, and test it the same day. For teachers, that means classroom activities can be customized around seasons, lessons, or school mascots. For small businesses, it means branded packaging can feel handmade without requiring a large production run. For artists, it means a pattern idea can move from sketch to object while the creative spark is still hot.
Common Types of 3D Printed Stamp Rollers
Ink and Paint Stamp Rollers
Ink and paint rollers are designed to transfer pigment onto paper or similar surfaces. Some makers build rollers around acrylic paint markers, where the marker supplies paint and the printed wheel distributes the pattern. Others use stamp pads, brayers, foam pads, or paint trays. These rollers work best when the surface is slightly flexible or when the raised design is even enough to make clean contact.
Clay and Pottery Texture Rollers
Clay rollers are among the most forgiving and satisfying versions. Because clay records pressure rather than pigment, the roller does not need to absorb ink. PLA, PETG, resin, or other rigid materials can work well. These texture rollers are used for pottery slabs, polymer clay earrings, ornaments, tiles, miniature terrain, and decorative borders. The key is to avoid undercuts that trap clay and to clean the grooves before the clay dries into a tiny archaeological site.
Cosplay and EVA Foam Rollers
Cosplay makers use stamp rollers to add texture to EVA foam, foam clay, thermoplastics, and surface coatings. Patterns like leather grain, metal rivets, reptile scales, stone blocks, and fantasy armor motifs can turn plain foam into something that looks expensive from three feet awaywhich is the official measurement of convention-floor magic.
Wrapping Paper and Packaging Rollers
A custom roller can transform plain kraft paper into custom gift wrap or branded packaging. Small businesses can use repeating logos, seasonal icons, or simple decorative borders. The look is more personal than a printed label and more scalable than stamping one image at a time. For best results, use a simple pattern, consistent pressure, and paper that does not bleed excessively.
Best Materials for 3D Printed Stamp Rollers
Material choice depends on how the roller will be used. For clay, foam, and embossing, rigid materials such as PLA and PETG are often practical. PLA is easy to print and captures detail well, making it a good starting point for beginners. PETG is tougher and a bit more heat-resistant, though it can string during printing. Resin prints can capture fine details, which is useful for intricate designs, but they require careful curing and cleanup.
For ink stamping, flexibility becomes more important. TPU and other flexible filaments can provide a little give, helping the raised design touch the paper more evenly. However, not all TPU behaves like commercial rubber. Some flexible filaments are still fairly firm, especially when printed thick. The roller’s wall thickness, infill, shore hardness, and surface finish all affect how well it stamps. A flat stamp may need more softness than a texture roller because ink transfer punishes every tiny uneven spot.
Flexible resin can also be useful for stamp faces because it can create smoother, more compressible parts than many filament prints. The trade-off is that resin printing requires more equipment, ventilation awareness, post-processing, and safety care. If you are printing for casual crafting, PLA or TPU is usually the friendlier starting point. If you need fine detail and cleaner ink transfer, flexible resin may be worth exploring.
Design Principles That Make a Roller Work
A successful custom stamp roller starts with a design that understands motion. A flat stamp only has to look good in one press. A roller has to keep working as it rotates. That means the pattern should repeat smoothly, align at the seam, and avoid long smooth stretches that cause slipping. Small traction elements can help the wheel keep moving, especially on slick paper or painted surfaces.
Raised elements should be high enough to print, but not so tall that they wobble, drag, or collect too much ink. A relief height of about 1 to 2 millimeters is often enough for craft use, though clay texture rollers may use deeper relief. Fine lines can look elegant in CAD and then vanish in real life, especially if the nozzle is too large or the stamp material is too rigid. If a detail is thinner than your printer can reliably produce, it is not a design detail; it is a future troubleshooting session.
Patterns also need breathing room. If every millimeter is packed with detail, ink can blur and clay can clog. Clean negative space makes the design easier to read. For text, bold sans-serif lettering usually performs better than delicate scripts. Also, remember to mirror text when needed. Nothing says “learning experience” like rolling your brand name backward across thirty paper bags.
How to Make a 3D Printed Stamp Roller
Step 1: Choose the Use Case
Before opening CAD software, decide whether the roller is for ink, paint, clay, foam, or packaging. The use case determines the material, relief depth, handle design, and surface finish. A roller for polymer clay can be rigid and deeply textured. A roller for ink on envelopes should be smoother, more flexible, and easier to coat evenly.
Step 2: Create or Import the Pattern
You can design patterns in Tinkercad, Fusion, Blender, Illustrator, Inkscape, or similar tools. Many makers start with a 2D SVG and extrude it into a raised design. For seamless repeats, test the pattern as a strip first. A small gap or mismatch may not seem obvious on screen, but once it rolls across paper, the seam can shout, “Hello, I live here!”
Step 3: Wrap the Design Around a Cylinder
The pattern must be placed around the roller circumference. Some programs handle this more easily than others. Simple designs can be built directly with repeated shapes around a cylinder. More advanced designs can be wrapped mathematically or modeled as a repeating surface. Beginners may find it easier to create a short roller with fewer repeats, then scale up after testing.
Step 4: Add an Axle, Handle, or Marker Fit
A roller needs controlled movement. Some designs include a central hole for a dowel, screw, or printed axle. Others use a handle frame so the roller spins freely. Marker-based designs may include a printed cap or holder that fits a paint marker. For larger wall or fabric experiments, makers sometimes adapt rollers to fit paint roller frames.
Step 5: Print and Test
Print a small prototype before committing to a full-size roller. Test it on the actual surface you plan to use. Paper, clay, foam, and fabric all behave differently. Adjust relief height, spacing, material, speed, and pressure based on the result. This is where the project becomes less “perfect digital object” and more “tiny rolling science experiment.”
Print Settings and Practical Tips
For FDM printing, use a layer height that balances detail and strength. A 0.2 mm layer height is a practical starting point, while 0.12 mm can improve fine surface detail. Slower speeds help with flexible filament. TPU often benefits from low retraction, dry filament, and careful extrusion settings. If the filament is wet, the print may become stringy, bubbly, or rough, which is not ideal for a stamp face.
Print orientation matters. A roller printed standing upright may show vertical seam artifacts and can take longer, but it may keep the circular profile clean. A roller printed horizontally may need supports and can create contact marks on the pattern. Split designs can solve some problems: print the core separately, then print or attach a patterned sleeve. This modular approach makes it easier to swap designs without printing a full handle every time.
For resin printing, prioritize proper support placement and post-curing. Supports should not damage the stamp face. Flexible resin can be trickier than standard resin, so small test pieces are your friend. Always follow resin safety procedures, including gloves, ventilation, and proper washing and curing.
How to Use a 3D Printed Stamp Roller
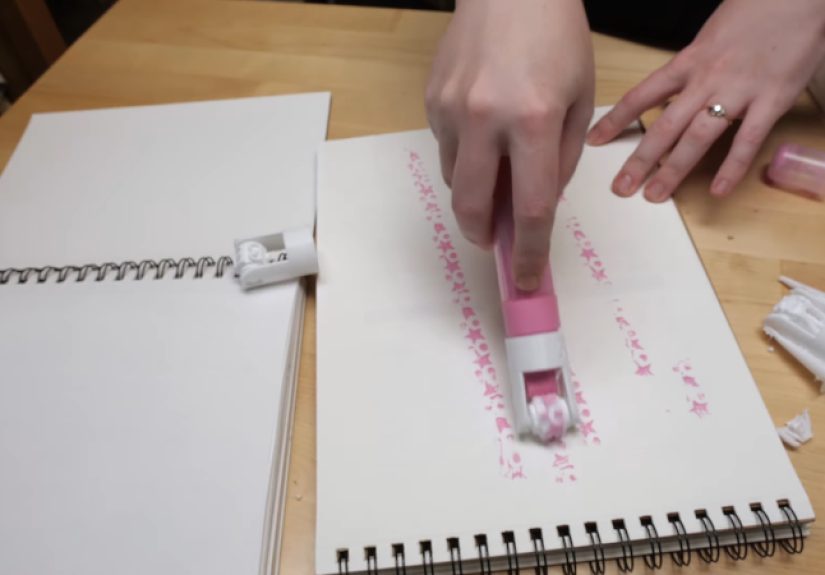
For ink, apply a thin, even layer. Too much ink turns detail into mush; too little creates a ghost print. A brayer can help distribute ink across the raised surface. Stamp pads can work for small rollers, but larger rollers may need a separate ink plate. Roll with steady pressure and avoid stopping mid-pass. Stopping creates dark spots, much like pausing a lawn mower creates that one weird stripe your neighbor will absolutely notice.
For clay, dust the roller lightly with cornstarch or use a release method appropriate for your clay type. Roll slowly and clean the grooves often. For EVA foam, test on scrap first. Heat, pressure, and coatings can change how foam receives texture. If using paint, acrylic markers, or fabric paint, allow enough drying time before touching or layering the pattern.
Project Ideas for 3D Printed Stamp Rollers
Start with custom gift wrap. Print a simple star, leaf, snowflake, or line-art roller and use it on kraft paper. It looks handmade without requiring hours of individual stamping. Another easy project is a clay jewelry texture roller. Small floral, woven, or geometric patterns can add professional-looking detail to earrings and pendants.
For small businesses, create a packaging roller with a logo, slogan, or brand icon. Use it on tissue paper, mailer boxes, thank-you cards, or shopping bags. For classrooms, make rollers that teach patterns, math shapes, animal tracks, or historical motifs. For cosplay, print stone, scale, leather, or rivet textures and test them on foam scraps before using them on the final costume piece.
Common Mistakes to Avoid
The first mistake is making the design too detailed. Fine detail may look impressive on screen but fail during printing or stamping. The second mistake is choosing the wrong material. A rigid roller can texture clay beautifully but perform poorly with ink on uneven paper. The third mistake is forgetting the seam. A rolling stamp repeats, so the start and end of the pattern must meet gracefully.
Another common issue is uneven pressure. If the handle is wobbly or the roller is not round, the print will fade in and out. A clean axle and balanced cylinder make a huge difference. Finally, do not ignore cleanup. Ink and clay love to hide in small grooves. Clean the roller before material dries, or you may accidentally create a permanent “abstract crust” edition.
Are 3D Printed Stamp Rollers Worth It?
Yes, especially if you enjoy making custom tools. They are not always a perfect replacement for commercial rubber rollers, but they offer creative freedom that mass-produced tools cannot match. A 3D printed stamp roller is ideal for artists, crafters, teachers, ceramicists, cosplayers, journalers, packaging designers, and anyone who hears the phrase “custom rolling stamp” and immediately starts thinking of twelve patterns to print.
The best approach is to treat the first roller as a prototype, not a masterpiece. Start simple, test often, and adjust. Once you understand how your printer, material, pattern, and surface behave together, the results improve quickly.
Hands-On Experiences With 3D Printed Stamp Rollers
The first time you use a 3D printed stamp roller, the experience feels half craft project and half detective story. You roll it once, squint at the result, and suddenly become a forensic analyst of ink density, line spacing, wheel traction, and whether your table is secretly tilted. The good news is that every test teaches you something useful.
For paper projects, the biggest lesson is restraint. A thin layer of ink almost always beats a heavy one. When the roller is overloaded, the design loses its crisp edges and becomes a smudgy parade. A light pass with a brayer or paint marker can produce cleaner results. Smooth paper gives sharper impressions, while rough kraft paper creates a charming handmade texture. If the goal is rustic packaging, that slight imperfection can be a feature, not a flaw.
Clay is usually more forgiving and more dramatic. A rigid PLA texture roller can create beautiful impressions in soft clay with very little effort. The trick is to roll with steady pressure and keep the clay at the right moisture level. Too wet, and the pattern may drag. Too dry, and the impression becomes shallow. Polymer clay behaves differently from ceramic clay, so test scraps are essential. A small roller with a leaf pattern, for example, can turn a plain slab into a tray, ornament, or pendant that looks far more complicated than it was.
With TPU rollers, patience pays off. Flexible filament can be fussy, especially if it has absorbed moisture. Dry filament, slow speeds, and simple geometry reduce frustration. A TPU stamp roller may not feel as soft as store-bought rubber, but even a little flexibility can improve ink contact. For better performance, avoid making the roller too thick and solid. Lower infill and thoughtful wall settings can add useful give.
One of the most satisfying experiments is making custom wrapping paper. A small roller with repeating stars or botanical shapes can cover a long sheet of kraft paper quickly. The result feels personal, festive, and slightly smug in the best possible way. It says, “Yes, I made the paper too,” without requiring you to actually explain the three failed prototypes hiding in the drawer.
For cosplay and foam work, the experience is more about texture than clean printing. A roller pressed into foam clay or surface coatings can create leather grain, scales, or stone lines. The effect may not be perfect up close, but once painted, weathered, and viewed as part of a costume, it can look fantastic. The main lesson is to test scale. A pattern that looks good on a small model may appear oversized on a glove or too subtle on a chest plate.
Overall, using 3D printed stamp rollers feels rewarding because the tool itself becomes part of the creative process. You are not just buying a pattern; you are designing how the pattern behaves. That makes every print, every smear, every surprisingly good test strip, and every “oops, that text is backward” moment part of the craft.
Conclusion
3D printed stamp rollers are simple tools with a big creative range. They can decorate paper, texture clay, customize packaging, add detail to cosplay foam, and help artists build repeatable patterns without giving up the handmade feel. The best rollers are not always the most complicated. Clean shapes, thoughtful spacing, correct material choice, and steady rolling technique matter more than cramming every possible detail onto a tiny cylinder.
If you are new to the idea, begin with a small PLA texture roller for clay or a simple TPU roller for ink testing. Keep the design bold, test on scraps, and revise without guilt. The beauty of 3D printing is that your first version does not have to be your final version. It only has to teach you what the next version should do better.


