Table of Contents >> Show >> Hide
- Before You Start: The 60-Second Multiplayer Checklist
- Way #1: Join a Friend’s World Online (Invites + Friends List)
- Way #2: LAN Party on the Same Wi-Fi (Yes, Even Without Internet)
- Way #3: Play on Servers (Featured Servers + “Add Server”)
- Way #4: Use Minecraft Realms (Your Always-On Private World)
- Which Method Should You Pick?
- Multiplayer Troubleshooting Cheat Sheet
- Conclusion
- Real-World Experiences: What Multiplayer Actually Feels Like (500+ Words)
Minecraft Pocket Edition (a.k.a. Minecraft on your phone/tablet) is basically Minecraft: Bedrock Edition in a tiny, tap-friendly tuxedo. And yesmultiplayer still rules. Whether you want a quick “same couch, same Wi-Fi” session or a persistent world your friends can hop into at 2 a.m. to build a suspiciously tall chicken statue, you’ve got options.
This guide breaks down four reliable ways to play Minecraft PE multiplayerwith step-by-step instructions, honest pros/cons, and the troubleshooting tips people usually learn only after yelling “WHY CAN’T I SEE YOUR WORLD?!” into the void.
Before You Start: The 60-Second Multiplayer Checklist
Do this once and you’ll save yourself approximately three decades of frustration:
- Update Minecraft on every device to the same version (mismatched versions are multiplayer’s #1 party pooper).
- Sign in to a Microsoft account (it powers friends, invites, and most online features).
- Check world settings (hosts): make sure “Multiplayer Game” is enabled.
- Confirm permissions (especially for child/teen accounts): multiplayer can be blocked by family/safety settings.
- Know your goal: quick session (friend world), offline-ish (LAN), public chaos (servers), or always-on hangout (Realms).
Way #1: Join a Friend’s World Online (Invites + Friends List)
This is the classic “my friend is hosting, I’m joining” setupsimple, fast, and great for spontaneous survival runs. It works across Bedrock platforms (mobile, console, Windows) as long as everyone is on Bedrock.
Best for
- Quick multiplayer sessions where the host is playing at the same time
- Small groups who already have each other added
- Cross-platform play with friends on console/PC (Bedrock)
How to host (on Minecraft PE)
- Open Minecraft → tap Play.
- Select an existing world or tap Create New.
- In world settings, open Multiplayer and turn on Multiplayer Game.
- If you want friends to find it easily, also allow Friends of Friends (optional, but handy).
- Start the world.
- Open the pause menu → tap Invite to Game (wording can vary slightly) → select friends.
How to join
- Open Minecraft → tap Play.
- Go to the Friends area (or a friends panel, depending on your UI version).
- Look for your friend’s world under “Joinable Friends” (or accept the invite prompt).
- Tap the world → Join.
Common hiccups (and the fixes that actually work)
- You don’t see the world: confirm you’re friends on Microsoft/Xbox, and the host enabled Multiplayer for that world.
- “Multiplayer is disabled”: check account safety settings (family settings can block joining multiplayer).
- Infinite “Connecting…”: try switching networks (Wi-Fi vs cellular), restarting the app, and verifying both devices are fully updated.
- One person is on Java Edition: Java and Bedrock don’t natively cross-playeveryone needs Bedrock for this method.
Way #2: LAN Party on the Same Wi-Fi (Yes, Even Without Internet)
LAN multiplayer is the “old-school pizza-and-soda” way to play: everyone on the same local network, one world, instant teamwork. The beautiful part? Your router can be online or offlineLAN play can still work as long as devices are on the same network.
Best for
- Playing in the same house/classroom
- Low-lag sessions where everyone is nearby
- Situations where internet is weak (or you just don’t want it involved)
How to set up LAN multiplayer (host steps)
- Connect every device to the same Wi-Fi network (same router, same SSID).
- Open Minecraft → Play → select or create a world.
- In world settings, go to Multiplayer.
- Turn on Multiplayer Game.
- Turn on Visible to LAN Players.
- Start the world and stay in it.
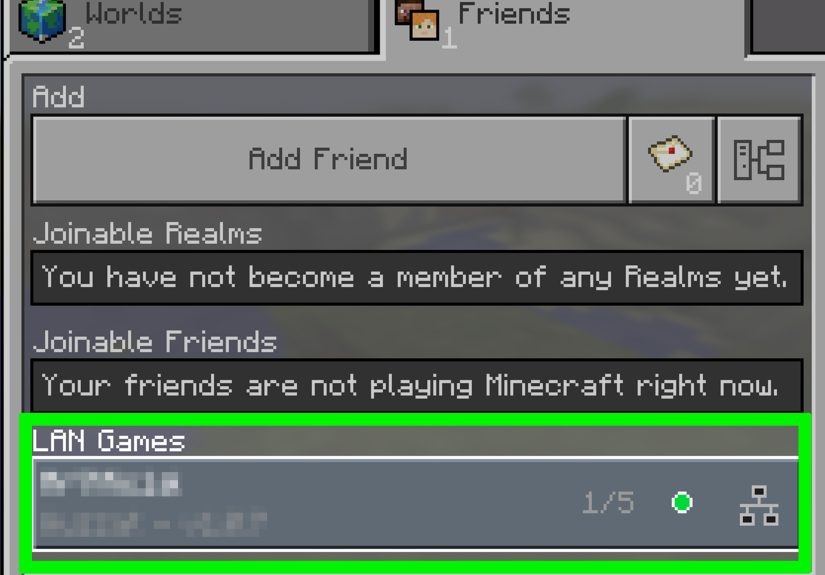
How to join a LAN world (joiner steps)
- Make sure you’re on the same Wi-Fi as the host.
- Open Minecraft → tap Play.
- Look for the host’s world in your join list (it often appears as a LAN game).
- Tap it → Join.
LAN troubleshooting (because Wi-Fi loves drama)
- Mobile hotspot weirdness: hotspots don’t always behave like a “true LAN,” so discovery can fail. A regular router is more reliable.
- Different Wi-Fi bands: if one device is on “MyWiFi-5G” and another is on “MyWiFi,” they may not see each other. Match them.
- VPNs: disable VPNs; they can block local discovery.
- Still invisible: restart Minecraft on both devices, then toggle “Visible to LAN Players” off/on before reloading the world.
Way #3: Play on Servers (Featured Servers + “Add Server”)
Servers are where multiplayer goes from “cozy cabin” to “theme park with fireworks.” You can join featured servers right inside the game (minigames, hubs, events), or manually add a server address if you’re joining a private/community server.
Best for
- Mini-games (SkyWars, BedWars-style modes, parkour, PvP arenas)
- Meeting up with a larger group
- Joining a community that runs events or roleplay worlds
Option A: Join a Featured Server
- Open Minecraft → tap Play.
- Go to the Servers tab.
- Pick a featured server (you may recognize names like The Hive or CubeCraft depending on your region).
- Tap Join Server.
Option B: Add a Server (IP/Address + Port)
If a friend says, “Join my server, the address is something.something,” this is the path. (Bonus: it makes you sound extremely official when you say “What’s the port?”)
- Open Minecraft → Play → Servers.
- Tap Add Server.
- Enter:
- Server Name: anything you want (“Totally Not A Trap” is popular)
- Server Address: the IP or URL your friend gave you
- Port: if required (many Bedrock servers use 19132, but always use what your server host provides)
- Tap Save, then select it and tap Join.
Server safety and sanity tips
- Use reputable servers with clear rules and active moderation.
- Don’t share personal info in chat (keep it in-game, not real-life).
- Expect different vibes: servers can have custom rules, economy systems, and mini-game mechanics.
Way #4: Use Minecraft Realms (Your Always-On Private World)
Realms are the “set it and forget it” option: a private, cloud-hosted world that stays online even when the owner is asleep. If your friend group struggles to coordinate schedules, Realms are basically a peace treaty.
Best for
- Friend groups who want one shared, persistent world
- Parents/guardians who want a more controlled multiplayer environment
- People who don’t want to run a server but want “server-like” convenience
How to create a Realm on Bedrock (mobile-friendly steps)
- Open Minecraft → tap Play.
- Choose Create New (or convert an existing world via Realm settings, depending on your menu).
- Select the option to Create on Realms / start a Realm trial (wording varies by device).
- Pick a plan (commonly shown as a smaller “2-player” style option or a larger “10-player” Realm option).
- Name your Realm, choose settings, and create it.
How to invite friends (two easy ways)
- Invite by username/friend list: open the Realm → go to Members → Add / Invite.
- Share link/code: open Realm settings → Members → Share Link (then send it to friends you trust).
Why Realms feel different (in a good way)
- Always online: friends can build even if the owner is offline.
- Invite-only: it’s not a public free-for-all unless you share the link broadly.
- Low setup: no port forwarding, no server hardware, no “why is my laptop screaming?” moments.
Which Method Should You Pick?
| Goal | Best Option | Why |
|---|---|---|
| Quick session with one friend | Join a Friend’s World Online | Fast, simple, no subscriptions |
| Play in the same place (same Wi-Fi) | LAN Multiplayer | Low lag, can work without internet |
| Mini-games and big communities | Servers | Instant access to public modes and events |
| Persistent private world for a group | Realms | Always online, invite-only, minimal setup |
Multiplayer Troubleshooting Cheat Sheet
“I can’t see my friend’s world.”
- Confirm both players are on Bedrock and the same Minecraft version.
- Host: verify Multiplayer Game is enabled in that world’s settings.
- Make sure you’re actually friends on Microsoft/Xbox.
- Try a quick reboot: fully close Minecraft and reopen on both devices.
“Multiplayer is disabled because of account settings.”
- This usually means privacy/family settings are blocking multiplayer or adding friends.
- Fix it by updating the account’s multiplayer permissions (often handled through Xbox/Microsoft family settings).
“LAN isn’t showing up.”
- Confirm both devices are on the same Wi-Fi network (not just “both have Wi-Fi”).
- Host: turn on Visible to LAN Players.
- Disable VPNs and try switching both devices to the same Wi-Fi band/SSID.
“Server won’t connect.”
- Double-check the server address and port (extra spaces can break it).
- Try a different network if possible (some networks block game ports).
- Make sure the server supports Bedrock (not Java-only).
Conclusion
Minecraft PE multiplayer isn’t one single featureit’s a whole menu. If you want fast and simple, join a friend’s world online. If you’re together in the same place, LAN is a low-lag classic. If you want mini-games and crowds, servers are your playground. And if your group wants a world that never sleeps, Realms are the easiest way to keep everyone building on the same timeline.
Pick the method that matches your friend group’s style, run through the quick checklist, and you’ll spend more time mining diamonds and less time mining through menus. (Although, to be fair, both involve a lot of digging.)
Real-World Experiences: What Multiplayer Actually Feels Like (500+ Words)
Guides make multiplayer sound like a neat checklist: tap here, toggle that, invite friend, done. In real life, it’s a little messier and honestly, that’s part of the fun. Here are a few “this is what actually happens” scenarios players commonly run into when using these four multiplayer methods on Minecraft PE.
1) The “We Just Want to Start Tonight” Survival Sprint (Friend World Online). This is the most common first multiplayer experience: one person creates a survival world, everyone joins, and the group immediately splits into two teamsbuilders and “people who promise they’re collecting food but return with 37 flowers and one piece of raw chicken.” It’s great for quick sessions because it doesn’t require planning beyond “are you on right now?” The only downside is the world’s availability depends on the host. If the host logs off, the server goes dark, and the rest of the group starts negotiating like: “Okay, so… can you come back on for five minutes so I can put my stuff in a chest?”
2) The LAN Party That Turns Into a Mini Tournament (Same Wi-Fi). LAN sessions feel different. Everything’s faster, players can shout across the room, and coordination is immediate. You’ll see people do challenges that are harder onlinelike a timed mining race (“first to find diamonds wins”) or a speed-build contest (“you have 10 minutes to make a house that doesn’t look like a toaster”). LAN is also where creativity pops off because you can hand a device to someone else and say, “Okay, you design the entrance, I’ll do the roof,” without waiting for lag or reconnects. It’s the closest Minecraft gets to a board game nightexcept the board is infinite, and the dice sometimes explode (thanks, creepers).
3) The “Let’s Play Something Loud” Phase (Servers). Public servers are where players go when they want structure, mini-games, or just a break from “we need more iron” conversations. A typical first server experience is joining a hub, getting dazzled by cosmetic effects, then immediately asking: “Where do I actually go?” After that, it becomes addictive in a different way than survival worldsround-based games give you fast wins, fast losses, and a reason to keep playing “one more match.” Servers can also be the easiest way for a friend group to play when nobody wants to host, because the server does the hosting. The main trick is picking environments that match your comfort level and choosing communities with solid moderation and clear rules.
4) The Realm That Becomes Your Group’s “Second Home” (Realms). Realms shine once your group starts caring about continuity: shared storage, long builds, farms, villages, and that one pet that everyone treats like a celebrity. The big “aha” moment is realizing the world keeps going even when the owner isn’t onlinesomeone can hop in, finish the bridge, organize the chests (a hero’s work), and log off. Over time, Realms tend to create traditions: a community town square, a rule that nobody builds within 100 blocks of spawn without asking, or a weekly goal like “this week we all gear up for the Nether.” The secret sauce is setting expectations early: basic rules, respectful pranks only, and maybe a “no stealing” policy unless you want your Realm to turn into a courtroom drama with diamond receipts.
If you take one thing from these experiences, make it this: multiplayer works best when the method matches the moment. Use friend worlds for quick hangouts, LAN for in-person chaos, servers for mini-games, and Realms when your group is ready to invest in a shared world that feels like it belongs to everyone.