Table of Contents >> Show >> Hide
- 1) Take a Full-Page Screenshot (and Save It as a PDF)
- 2) Choose Where Screenshots Go: Photos, Files, or a Quick Note
- 3) Use “Copy and Delete” to Share Fast Without Cluttering Your Camera Roll
- 4) Tame the Screenshot Preview: Full Screen vs. Thumbnail (and Other Screen Capture Settings)
- 5) Crop Immediately (Before You Accidentally Share Your Entire Life)
- 6) Turn Messy Scribbles Into Perfect Shapes in Markup
- 7) Add Arrows, Text, Magnifier, and Signatures (Yes, Signatures) Right on the Screenshot
- 8) Use Live Text to Copy, Paste, Translate, or Call Directly From a Screenshot
- 9) Use Visual Intelligence on Screenshots: Search, Ask, and Add Events to Your Calendar
- Real-World Screenshot Experiences: of “Yep, That’s Me”
- Conclusion
If your iPhone’s Camera Roll looks like a detective’s evidence boardreceipts, memes, flight confirmations, “look at this weird bug,” and a screenshot of
a screenshot (we’ve all been there)good news: Apple quietly turned screenshots into a mini productivity app. The modern iPhone screenshot tool isn’t
just “press two buttons and pray you remember why you did it.” It can crop on the fly, turn web pages into PDFs, pull text out of images, and even
help you search or ask questions about what’s on screen.
Below are nine genuinely useful iPhone screenshot features you can start using immediately. They’re especially handy if you save screenshots for later
(spoiler: later becomes never) or if you share screenshots often (spoiler: you’ll accidentally share one with your battery at 7% someday). Let’s fix
your workflowand maybe your dignity.
1) Take a Full-Page Screenshot (and Save It as a PDF)
Sometimes a normal screenshot is like taking a photo of a novel’s first sentence and calling it “reading.” If you’re capturing a long article, recipe,
invoice, or confirmation page in Safari, use a full-page screenshot instead. Your iPhone can capture content beyond the visible screen and save it as a
PDFperfect for sharing, printing, or filing away in the “I’m organized now” folder you’ll make and then ignore.
How to use it
- Take a screenshot as usual.
- Tap the screenshot preview.
- Select Full Page at the top of the editor.
- Crop if needed, then choose Save PDF to Files.
Example: You’re booking a hotel and want the cancellation policy. Full-page screenshot → PDF → save to Files → share with your travel buddy
who thinks “terms and conditions” is a personality type.
2) Choose Where Screenshots Go: Photos, Files, or a Quick Note
The default “dump everything into Photos” strategy is why you can’t find your actual vacation pictures without wading through 47 screenshots of
directions to a place you never went. When you finish editing a screenshot, iOS gives you multiple save optionsso you can treat screenshots like
documents, not photo-bombs.
How to use it
- Take a screenshot and tap the preview.
- Tap Done.
- Pick an option like Save to Photos, Save to Files, or (when offered) Save to Quick Note.
Pro tip: If the screenshot is “reference material” (tickets, schedules, instructions), Files is often the better home. If it’s “shareable chaos”
(memes, group chat gold), Photos is fine.
3) Use “Copy and Delete” to Share Fast Without Cluttering Your Camera Roll
If your main screenshot habit is “grab it, paste it into Messages, move on,” you don’t need to keep that screenshot forever. Newer iOS versions include
a “Copy and Delete” option so you can copy the screenshot to your clipboard and immediately delete itlike a responsible adult… who still screenshots
things.
How to use it
- Take a screenshot and tap the preview.
- Tap Done.
- Choose Copy and Delete, then paste wherever you need.
Example: You’re sending a screenshot of an address to a friend. Copy and Delete means you won’t rediscover that screenshot in 2028 and wonder
why Past You was so obsessed with “123 Maple St.”
4) Tame the Screenshot Preview: Full Screen vs. Thumbnail (and Other Screen Capture Settings)
Screenshot previews are helpfuluntil you’re taking a bunch in a row and the preview keeps jumping in front of your taps like an overexcited toddler.
Recent iOS releases add a dedicated Screen Capture settings section where you can control how previews behave (and more).
What you can tweak
- Preview style: choose the classic corner thumbnail workflow or a full-screen preview experience.
- Extra screenshot intelligence: options that enable features like automatic recognition of objects/places in screenshots (device dependent).
- Format options: on supported devices, you may see settings related to capture quality (like SDR vs. HDR screenshots).
Why it matters: If you take screenshots for work (bug reports, step-by-step guides, receipts), these settings can make screenshots feel like a tool,
not a speed bump.
5) Crop Immediately (Before You Accidentally Share Your Entire Life)
The fastest screenshot cleanup is the one you do before the screenshot even “becomes a screenshot.” As soon as you tap the preview, you can drag the crop
handles and trim out everything you don’t want. This is the simplest way to hide private infobecause if it’s not in the image, it can’t be revealed later.
How to use it
- Take a screenshot and tap the preview.
- Drag the crop handles to keep only what you need.
- Save or share directly from the editor.
Example: You’re sharing a price comparison screenshot. Crop out your name, account number, location, and the 14 unread texts that silently judge you.
6) Turn Messy Scribbles Into Perfect Shapes in Markup
Markup is the built-in editing toolbox for screenshots, and it has a surprisingly “I went to design school” trick: it can snap your rough doodles into clean,
geometric shapes. Draw a wonky circle, pause for a beat, and iOS politely replaces it with a perfect one. It’s like autocorrect, but for your shaky hands.
How to use it
- Open a screenshot preview.
- Tap Markup (the pen icon).
- Choose a pen/highlighter tool.
- Draw a shape in one stroke, then pause briefly to let it “snap” into a clean version.
Best uses: circling a button in a tutorial, drawing boxes around items in a receipt, or creating clean diagrams when you’re explaining something to
a coworker and you want to look like you have your life together.
7) Add Arrows, Text, Magnifier, and Signatures (Yes, Signatures) Right on the Screenshot
Sometimes a screenshot needs context. “Look at this” is not context. Markup’s + menu lets you add arrows, speech bubbles, text boxes,
and even a magnifier tool for zooming in on tiny details. You can also create and reuse signatureshandy when you need to sign something quickly and send
it back without firing up a laptop like it’s 2014.
How to use it
- Open the screenshot editor and enter Markup.
- Tap + to add text, shapes, magnifier, or a signature.
- Drag handles/dots to resize and reposition.
Privacy note: If you’re hiding sensitive info, a solid shape (like a filled rectangle) is usually safer than lightly “highlighting” over it.
Cropping is even better when possible.
8) Use Live Text to Copy, Paste, Translate, or Call Directly From a Screenshot
Live Text turns text inside images into selectable text. That means a screenshot of an email, a tracking number, a Wi-Fi password, a recipe ingredient list,
or a phone number doesn’t have to be retyped like you’re auditioning for a 1990s office job. You can copy it, paste it, translate it, look it up, or tap
recognized phone numbers and addresses for quick actions.
How to use it
- Open the screenshot (in the editor or later in Photos).
- Tap or press-and-hold on the text to select it (if your device supports Live Text).
- Copy, translate, look up, or use the suggested actions.
Example: Screenshot a shipping confirmation. Copy the tracking number. Paste it into your carrier’s site. Feel smug. Repeat.
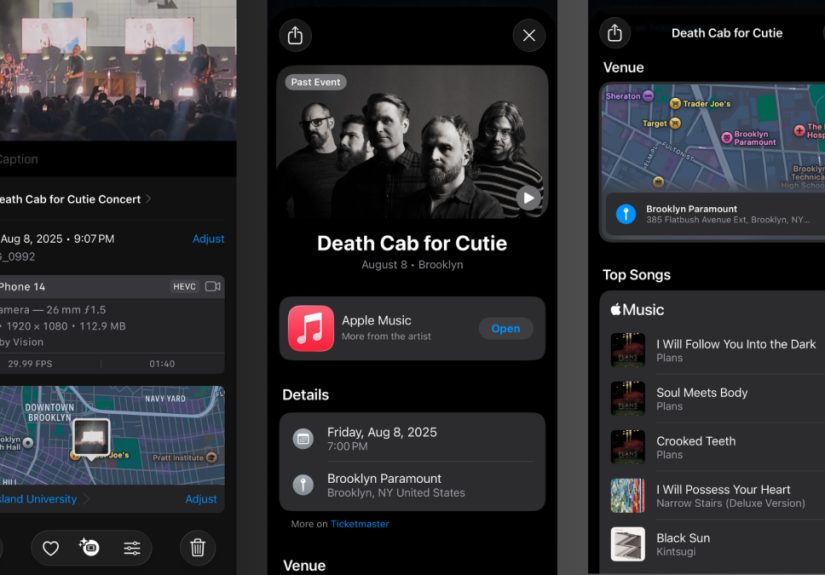
9) Use Visual Intelligence on Screenshots: Search, Ask, and Add Events to Your Calendar
This is the “screenshots aren’t just pictures anymore” feature. On supported iPhones, Visual Intelligence can analyze what’s on screen and offer actions:
searching for similar items, highlighting specific parts of the screenshot, asking a question about what’s shown (including via ChatGPT integration on
supported setups), and even detecting event details so you can add them to your calendar.
How to use it (when available)
- Take a screenshot and open the preview.
- Make sure you’re not actively drawing in Markup (some tools require “view” mode).
- Use options like Search, Ask, or Add to Calendar if they appear.
- Highlight a specific area to focus the search or question on what matters.
Example: Someone texts you a flyer screenshot with a date/time/location. Your iPhone can pull that info out and start a calendar eventso you don’t
end up texting, “Wait, what day was that again?” six times.
Real-World Screenshot Experiences: of “Yep, That’s Me”
I used to take screenshots the way most of us do: impulsively, emotionally, and with absolutely no plan. A funny tweet? Screenshot. A return policy I’d
“totally need later”? Screenshot. A restaurant menu someone sent me in a group chat? Screenshot. Two days later, I’d open Photos to show a friend a real
picture of my dog and get forced to scroll past a timeline that looked like: a CAPTCHA fail, a bank app, a bank app again, a map, and then… oh right, my dog.
The biggest upgrade was treating screenshots like documents instead of accidental photographs. Saving full-page web captures as PDFs is a game-changer
when you’re planning anything vaguely adult, like travel or home repairs. I started keeping a “Trips” folder in Files where every reservation screenshot becomes
a PDF. Suddenly, “Where’s the confirmation?” turned into “Hold on, I have it.” (And yes, I said it like I was a wizard.)
“Copy and Delete” also deserves a trophy for quietly saving my sanity. I’m in a lot of “send me what you mean” conversationssomeone asks which button to tap,
what setting to turn on, what the error message says. I can screenshot, copy, paste into Messages, and delete it immediately. My camera roll stays clean, and I
don’t end up with 300 screenshots of my own text messages like I’m building a case against myself.
Markup tools changed how I explain things. Instead of writing paragraphs like, “Tap the third option under the second header,” I circle the button, add an arrow,
and drop a tiny text label that says “THIS ONE.” Bonus: when you draw shapes and let them snap into perfect geometry, your screenshots look strangely professional,
like you actually meant to help instead of panic-screenshotting while your phone battery drops from 12% to 9%.
Live Text has saved me from retyping mistakes more times than I can count. I’ve copied tracking numbers, confirmation codes, and long Wi-Fi passwords out of
screenshots like it’s nothing. It feels like cheating, but the good kindthe “I finally used the thing I paid for” kind. And Visual Intelligence takes it further:
when someone sends a screenshot of an event flyer, I can often pull the details into my calendar without playing detective. That alone reduces the risk of me
showing up on the wrong day, at the wrong time, confidently holding iced coffee like I’m early when I’m actually a week late.
The punchline is that screenshots aren’t the problemunmanaged screenshots are. Once you use these tools, your iPhone stops being a screenshot hoarder’s
storage locker and becomes what it was always meant to be: a tiny, powerful computer that occasionally helps you remember where you parked.
Conclusion
The next time you take a screenshot, don’t just capture and forget. Crop immediately, save it in the right place (Photos vs. Files), use Markup for clean
callouts, and let Live Text or Visual Intelligence do the tedious work for you. With these nine iPhone screenshot features, your screenshots become searchable,
shareable, and genuinely usefulrather than a chaotic scrapbook of modern life.


