Table of Contents >> Show >> Hide
- Why a $30 Mid-Century Armoire Is Worth Saving
- The “Armoire Autopsy” Before You Start
- Pick Your Makeover Style: Three Winning Routes
- Tools and Materials That Make Life Easier
- The Step-by-Step Mid-Century Armoire Makeover Plan
- Step 1: Clean like you mean it
- Step 2: Repair before you beautify
- Step 3: Prep the surface (a.k.a. the unglamorous magic)
- Step 4: Prime with intention
- Step 5: Paint (thin coats, big patience)
- Step 6: Upgrade the details: hardware, legs, and interior
- Step 7: Topcoat (optional, but sometimes worth it)
- Step 8: Let it cureyes, really
- Design Moves That Keep the Mid-Century Soul
- Common Mistakes (and How to Avoid the Sad DIY Montage)
- Cost Breakdown: From $30 to “Wait, Where’d You Buy That?”
- Where a Mid-Century Armoire Shines in a Modern Home
- Safety Notes for Vintage Furniture (Especially If You’re New to DIY)
- Conclusion: The $30 Armoire That Now Looks Like a $300 Find
- Extra: Real-Life Experiences From a $30 Mid-Century Armoire Makeover
You know that moment at the thrift store when you spot a piece of furniture and your brain goes,
“I can fix her,” even though you are holding a wobbly shopping cart and a coffee that tastes like regret?
That’s exactly how a $30 mid-century armoire makeover begins: with optimism, a little delusion, and the
sudden confidence of someone who has watched exactly three furniture-flip videos.
But here’s the twist: mid-century modern furniture is often built better than what you’ll find in many
big-box aisles today. So when you drag home an armoire with good bones (and maybe one suspicious smell),
you’re not just “doing DIY.” You’re rescuing a piece that can look boutique-level with the right plan,
the right prep, and the patience to let paint cure instead of poking it every 12 minutes like it’s a sourdough starter.
Why a $30 Mid-Century Armoire Is Worth Saving
A true mid-century armoire typically has clean lines, smart proportions, and practical storageoften with
a hanging area, shelves, or drawers that make it a closet upgrade in furniture form. Even when the finish is tired,
you’ll often find features worth preserving: sturdy joinery, a real wood frame, and veneers (like walnut) that
look expensive because… well… they are expensive.
And let’s be honest: $30 doesn’t buy much anymore. Not a lamp. Not a trendy throw pillow. Not even a fancy sandwich
if you add chips and a drink. But it can buy a storage heroif you’re willing to give it a second act.
- Budget win: You control the final look without paying boutique prices.
- Design win: Mid-century silhouettes work with everything from modern to cozy vintage.
- Practical win: An armoire hides clutter like it’s training for the Olympics.
- Sustainability win: Keeping furniture out of the landfill is always in style.
The “Armoire Autopsy” Before You Start
A successful furniture makeover starts with a quick assessmentbecause no one wants to spend a weekend refinishing
a piece that’s secretly held together by hope and a single rusty staple.
Check the structure
Gently test for wobble. Open and close doors. Pull drawers (if it has them). Look at the back panel and the base.
A little looseness is fixable; a collapsing frame is a different hobby.
Identify the surface: solid wood or veneer?
Many mid-century pieces use veneer over stable wood products. Veneer is not “fake”it’s a thin layer of real wood.
The key is treating it like the delicate superstar it is. You can clean, repair, and refinish veneer beautifully,
but you don’t want to sand like you’re preparing a skateboard ramp.
Sniff test and stain scan
Musty smells, smoke, or mystery odors are common with thrifted furniture. Also look for water rings, ink marks,
or dark stains that might require stain-blocking primer or a design pivot (hello, painted exterior).
Hardware and hinges
Missing pulls are a gift, honestly. It means you’re not emotionally obligated to keep the old ones.
Hinges that squeak or sag can often be adjusted or replacedjust match sizes and style so doors hang straight.
Pick Your Makeover Style: Three Winning Routes
Before you touch a single tool, decide your finish direction. This prevents the classic DIY spiral where you start
with “just a quick refresh” and end up reorganizing your entire living room because the armoire “needs a new vibe.”
1) The “Respect the Walnut” approach
Keep or restore the wood look on the most visible areasoften doors or drawer frontsthen paint the frame for contrast.
This keeps the mid-century modern feel while giving it a modern edge.
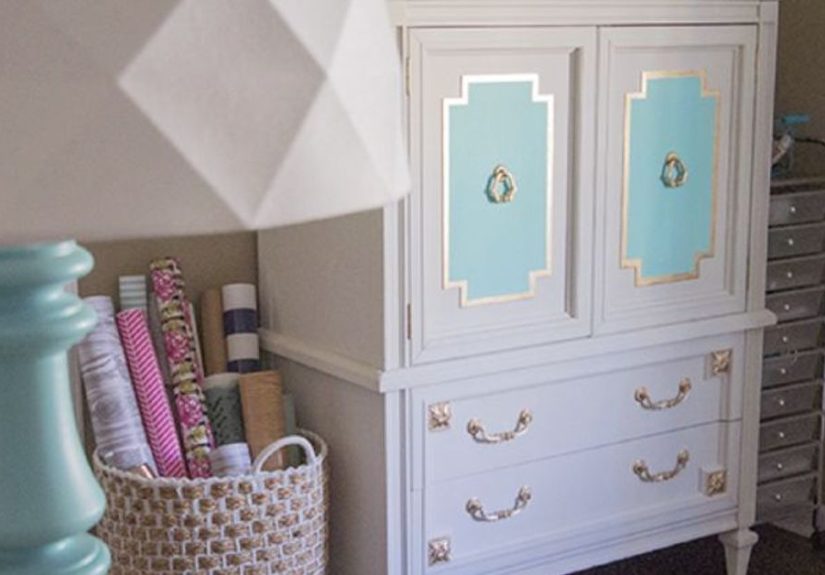
2) The full paint makeover
Perfect when the veneer is too damaged to save or the finish is uneven. A high-quality paint finish can look sleek and
intentionalespecially in warm whites, deep greens, inky blues, or soft mushroomy neutrals.
3) The “two-tone + texture” glow-up
Think painted body, wood legs, and updated hardware. Add a little spice with cane webbing inserts, fluted trim, or a
subtle pattern inside the doors. It’s mid-century, but with a wink.
Tools and Materials That Make Life Easier
You don’t need a garage full of gear. You do need a plan, good lighting, and the ability to resist “budget shortcuts”
that cost you twice as much later. Here’s a practical list:
- Cleaning: gentle degreaser, microfiber cloths, a bucket, and patience
- Surface prep: sanding sponge or fine sandpaper, tack cloth or damp wipe-down cloth
- Repairs: wood glue, wood filler, clamps (optional but helpful)
- Priming: a bonding primer for slick surfaces; stain-blocking primer if needed
- Paint: durable cabinet/furniture paint (waterborne alkyd or enamel-style)
- Finishing touches: new hardware, optional legs/feet, liners for shelves
If you’re a teen or new to DIY, treat power tools and strong chemical products as “adult-supervised activities.”
You can do a ton of this project safely, but anything involving heavy sanding, spraying, or harsh solvents is best handled
with help and proper protective gear.
The Step-by-Step Mid-Century Armoire Makeover Plan
Step 1: Clean like you mean it
Furniture paint hates grease. It also hates dust, wax, and that invisible film that thrift stores apparently spray on
everything. Clean thoroughly, then rinse/wipe so you’re not leaving residue behind. Let it dry completely.
Pro tip: if the armoire lived through three decades of furniture polish, you may need extra cleaning passes. Your paint
job should stick to the furniturenot to leftover wax.
Step 2: Repair before you beautify
Fix loose joints, tighten wobbly corners, and address veneer chips. Small dents can be filled; lifted veneer can sometimes be
re-adhered with careful gluing. Don’t obsess over perfectionjust aim for smooth and stable.
- Loose doors: check hinge screws and alignment.
- Gaps or cracks: fill with a paintable wood filler if you’re painting.
- Veneer edges: stabilize anything that could catch and peel later.
Step 3: Prep the surface (a.k.a. the unglamorous magic)
Most mid-century pieces have a smooth finish. Paint doesn’t love smooth finishes. Your goal is a lightly “scuffed”
surfacedull, not destroyedso primer can grip. If the armoire is laminate or very glossy, a bonding primer is especially important.
Keep this part gentle. If you’re working on veneer, think “polishing the surface for grip,” not “sanding a deck.”
Step 4: Prime with intention
Primer is the difference between a makeover that lasts and one that chips the first time you breathe near it.
Use a primer that matches your situation:
- Bonding primer: best for slick or glossy surfaces so paint adheres properly.
- Stain-blocking primer: helpful if you see tannin bleed, water stains, or mystery discoloration.
Apply primer evenly and let it dry per the label. Dry time is not a suggestion. It’s a contract.
Step 5: Paint (thin coats, big patience)
For a smooth furniture finish, multiple thin coats usually beat one thick coat. Thick coats can sag, stay soft longer, and
show brush marks. Thin coats build a harder, more even surface.
Want the mid-century look to feel authentic? Choose a finish with a subtle sheenoften satin or semi-gloss reads “period-correct”
without looking plasticky.
Step 6: Upgrade the details: hardware, legs, and interior
This is where the armoire stops looking “thrifted” and starts looking “designer.”
- Hardware: Warm brass, matte black, or classic chrome can all workjust match the vibe.
- Legs/feet: If the base is clunky, adding tapered legs can instantly scream “mid-century.”
- Interior: Line shelves, add a tension rod for hanging, or use baskets to create zones.
If you’re drilling new holes, measure twice and drill once. If you’re drilling while hungry, eat first.
Step 7: Topcoat (optional, but sometimes worth it)
Some furniture/cabinet paints don’t require a topcoat, while other finishes benefit from extra protection.
If you choose to topcoat, follow compatibility guidance (water-based over water-based is often simpler).
The main point: protection is great, but only if it’s the right kind of protection for your paint.
Step 8: Let it cureyes, really
Paint can feel dry and still be soft underneath. Give your armoire time before loading it with heavy items, installing tight
doors, or stacking things inside. If you rush this step, your beautiful new finish can dent, stick, or scuff.
Design Moves That Keep the Mid-Century Soul
The goal isn’t to erase the armoire’s past. The goal is to make it look like it belongs in your home now.
These design choices help you keep that mid-century modern charm:
Choose era-friendly colors
Mid-century palettes love warm whites, olive green, muted teal, rust, and deep navy. If you want a safer pick, a creamy off-white
with brass hardware is basically the “little black dress” of furniture makeovers.
Keep lines clean
Avoid overly ornate trim that fights the armoire’s silhouette. Mid-century style thrives on simple geometry and proportions.
Use contrast on purpose
Two-tone finishes work especially well on armoires. For example:
- Painted body + wood doors: keeps the “walnut moment” while modernizing.
- Painted doors + natural frame: graphic and bold, especially with sleek pulls.
- Surprise interior: a calm exterior with a fun wallpaper inside the doors.
Common Mistakes (and How to Avoid the Sad DIY Montage)
Oversanding veneer
Veneer is thin. The goal is surface prep, not excavation. If you sand through veneer, you’ll see a different substrate beneath it,
and it’s hard to “unsee” after that.
Skipping primer on slick finishes
Slick surfaces need a bonding strategy. Otherwise, paint may peel where doors rub or where hands touch most.
Rushing recoat and cure times
Recoat too soon and you can trap moisture, drag semi-wet paint, or end up with a finish that never fully hardens.
Patience isn’t just a virtueit’s a durability plan.
Underestimating hardware impact
Hardware is jewelry. Cheap jewelry can still be cute, but the right hardware makes the whole piece look intentional.
If your budget is limited, spend it here.
Cost Breakdown: From $30 to “Wait, Where’d You Buy That?”
Here’s a realistic budget snapshot for a $30 armoire makeover. Your total will vary based on what you already have on hand.
| Item | Typical Cost Range | Notes |
|---|---|---|
| Thrifted armoire | $30 | The main character |
| Cleaner/degreaser | $5–$15 | Non-negotiable for adhesion |
| Primer | $15–$35 | Bonding or stain-blocking, depending on needs |
| Paint | $25–$60 | Durable furniture/cabinet paint costs more but pays off |
| Hardware | $10–$50 | Biggest “designer” upgrade per dollar |
| Optional legs/feet | $15–$60 | Transforms the silhouette fast |
| Misc. supplies | $10–$25 | Sandpaper, wipes, tape, etc. |
Total: anywhere from “I used what I had” to “I accidentally built a luxury armoire.” Both are valid life choices.
Where a Mid-Century Armoire Shines in a Modern Home
Armoires are the underrated superheroes of storage. They can be:
- An entryway drop zone: shoes, bags, seasonal gear, all hidden behind doors.
- A bar cabinet: add a tray, glass storage, and maybe a little lighting.
- A linen closet: towels and bedding, organized and out of sight.
- A craft cabinet: shelves for supplies, a hidden mess, and fewer “where did my scissors go?” moments.
- A tiny-home closet: if you’re short on built-in storage, this is your solution.
Styling tip: let the armoire breathe. Mid-century pieces look best when they’re not crammed into a corner like they’re in time-out.
Safety Notes for Vintage Furniture (Especially If You’re New to DIY)
Many older painted surfaces (especially those made before 1978) can involve lead-based paint hazards. If you’re not sure what
you’re dealing with, avoid aggressive sanding and scraping, and consider professional help. This is one area where “winging it”
is not a personality traitit’s a risk.
Also: ventilation matters. Always follow product labels, work in a well-ventilated area, and use appropriate protection.
If you’re a teen, ask a parent/guardian to help with any steps involving power tools, sprays, or strong chemical products.
Conclusion: The $30 Armoire That Now Looks Like a $300 Find
A $30 mid-century armoire makeover isn’t just about paint. It’s about turning a forgotten piece into something functional,
beautiful, and distinctly yours. When you clean thoroughly, prep thoughtfully, prime correctly, and let the finish cure,
you get results that don’t scream “DIY disaster.” They whisper, “custom vintage treasure,” which is basically the dream.
So whether you go full paint, two-tone, or “save the walnut,” you’ll end up with a piece that makes your space feel more intentional
and makes your wallet feel less personally attacked.
Extra: Real-Life Experiences From a $30 Mid-Century Armoire Makeover
The funniest part of any furniture makeover is how quickly it becomes a personality test. You start out calm and confident:
“I’m just going to freshen it up.” Then you remove one hinge, discover three different screw types, and suddenly you’re negotiating
with the universe like, “If this door hangs straight, I promise I’ll stop buying random furniture.”
One of the most useful lessons is that the first hour of a makeover often decides the quality of the final result.
Not because you’re painting yetbecause you’re cleaning, inspecting, and planning. It’s surprisingly empowering to slow down and do a
quick “map” of the armoire: where hands touch most, where doors rub, where the veneer is fragile, and what parts deserve the spotlight.
On mid-century pieces, that usually means the front faces and the legs. If those look great, everything looks great.
Another lesson: the thrift store price tag is not the real costtime is. Waiting for primer to dry, letting coats set up,
and giving paint time to cure can feel like watching a microwave count down from 59 seconds. But the difference is dramatic.
When you rush, you get tacky surfaces, fingerprints, and a finish that scuffs if you look at it too hard. When you wait,
the armoire feels solid and smooth, like it always belonged in your home.
There’s also a very specific emotional arc to hardware. At first, you think, “I’ll keep the original pulls for character.”
Then you clean them and realize the “character” is mostly rust and sadness. The moment you install new hardware is often the
moment the piece transforms. It’s like putting on shoes that actually match your outfit. Suddenly the armoire looks curated,
not rescued.
And yes, mistakes happen. The most common one is thinking you can “just do one thick coat” to finish faster. Thick coats look
fine until they don’tuntil they sag, or stay soft, or make the corners look goopy. Thin coats feel slow, but they give you control.
If you’ve ever tried to fix a drippy finish after it dries, you learn quickly that slow-and-steady is the real time-saver.
Finally, the best experience-related tip: make the armoire useful for your actual life. It’s easy to focus on the
outside and forget that armoires are storage machines. Add shelf liners so items don’t slide. Use baskets for small stuff.
Create zones: top shelf for linens, middle shelf for daily items, bottom for bulky things. If it’s for clothes, consider a hanging
rod and a small tray for accessories. When the inside works well, you’ll use the armoire moreand the makeover becomes more than decor.
That’s the quiet payoff of a $30 mid-century armoire makeover: you don’t just end up with a pretty piece. You end up with a functional
one that fits your space, hides your clutter, and makes you feel like you upgraded your home without upgrading your monthly budget.
Which, honestly, deserves a little victory dance (preferably not while the paint is still curing).


