Table of Contents >> Show >> Hide
- Why Paint an Oak Bathroom Vanity Instead of Replacing It?
- Can You Use Latex Paint on an Oak Bathroom Vanity?
- Tools and Materials You Will Need
- Step 1: Remove Doors, Drawers, and Hardware
- Step 2: Clean the Oak Vanity Thoroughly
- Step 3: Fill Holes, Dents, and Oak Imperfections
- Step 4: Sand the Gloss Off the Vanity
- Step 5: Choose the Right Primer
- Step 6: Sand the Primer Lightly
- Step 7: Apply the First Coat of Latex Paint
- Step 8: Sand Lightly and Apply the Second Coat
- Step 9: Let the Paint Cure Before Reassembly
- Best Latex Paint Colors for an Oak Bathroom Vanity
- Common Mistakes to Avoid
- How to Make a Painted Oak Vanity Look More Expensive
- Cleaning and Maintaining a Latex-Painted Bathroom Vanity
- Real-World Experience: What I Learned From Painting an Oak Bathroom Vanity
- Conclusion
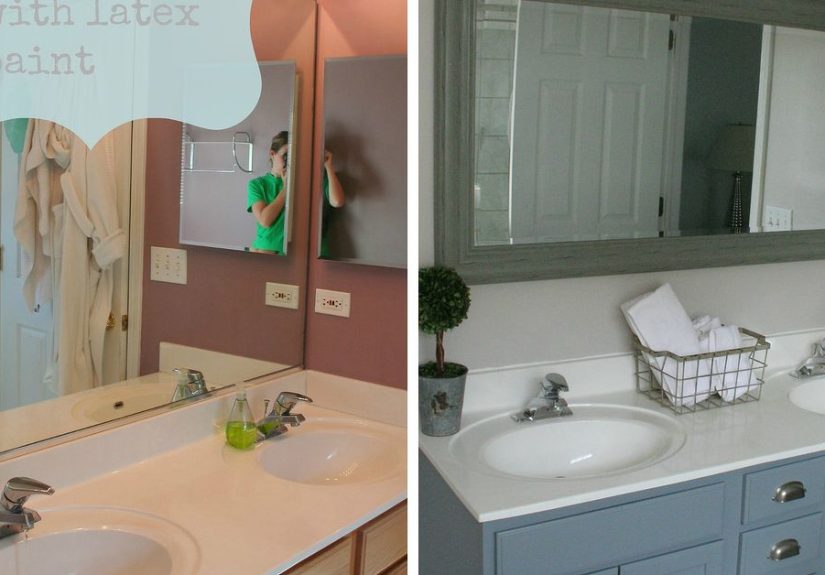
An old oak bathroom vanity has a special talent: it can make an otherwise clean bathroom look like it is still waiting for the 1994 wallpaper border to come back in style. The good news? You do not have to rip it out, order a custom cabinet, or develop a mysterious new relationship with your credit card. A bathroom oak vanity makeover with latex paint can transform a tired, orange-toned cabinet into a fresh, durable, modern focal point.
Latex paint is popular for bathroom vanity projects because it is easier to work with than traditional oil-based paint, cleans up with soap and water, dries faster, and comes in a wide range of finishes. But painting oak is not the same as painting a bedroom wall. Oak has open grain, old varnish can be slick, bathroom humidity is relentless, and vanity doors live a hard life of toothpaste splatter, towel bumps, and “I’ll just set this curling iron here for one second” moments.
This guide walks through the full process: planning, cleaning, sanding, priming, painting, curing, hardware upgrades, common mistakes, and real-world lessons from tackling a vanity that has seen things. By the end, you will know how to paint an oak bathroom vanity with latex paint and get a finish that looks intentionalnot like a weekend panic project fueled by iced coffee and optimism.
Why Paint an Oak Bathroom Vanity Instead of Replacing It?
Replacing a bathroom vanity sounds simple until the project starts multiplying like wet gremlins. A new vanity may require plumbing adjustments, countertop changes, flooring repairs, backsplash touch-ups, and a very long stare at the receipt. Painting keeps the existing cabinet in place while giving the room an entirely new personality.
Oak vanities are often structurally solid. Many older cabinets were built with sturdy frames, real wood doors, and dependable drawer boxes. The issue is usually the finish: honey oak, heavy gloss, worn edges, outdated hardware, or a stain color that clashes with newer tile and fixtures. Paint solves the visual problem without tossing a perfectly usable cabinet into the landfill.
A latex-painted vanity can look crisp, soft, dramatic, coastal, farmhouse, traditional, or modern depending on the color and hardware. White brightens a small bathroom. Navy adds drama. Sage green makes the room feel fresh without shouting. Charcoal hides minor daily wear. Warm greige plays nicely with beige tile, which is helpful if your bathroom floor is determined to remain beige forever.
Can You Use Latex Paint on an Oak Bathroom Vanity?
Yes, you can use latex paint on an oak bathroom vanity, but the success of the project depends heavily on prep work and primer. Latex paint alone does not love sticking to glossy varnish, old polyurethane, or cabinet surfaces that have absorbed years of soap film and hand oils. The paint needs a clean, dull, well-primed surface.
For a bathroom, choose a high-quality acrylic latex paint, cabinet enamel, or water-based alkyd enamel designed for trim, doors, or cabinets. These products dry harder than basic wall paint and are better suited for a vanity that gets touched every day. A satin, semi-gloss, or gloss finish is usually more practical than flat paint because it resists moisture better and is easier to wipe clean.
The magic word is not just “latex.” It is “durable.” A cheap wall paint may technically cover the wood, but it will not necessarily handle humidity, cleaning, and daily use. Think of it this way: bathroom vanity paint needs to wear a tiny suit of armor, not a cotton T-shirt.
Tools and Materials You Will Need
- Degreasing cleaner or mild dish soap and warm water
- Screwdriver or drill for removing doors and hardware
- Painter’s tape
- Drop cloth or rosin paper
- Wood filler for dents or old hardware holes
- 150-grit and 220-grit sandpaper or sanding sponges
- Tack cloth or microfiber cloth
- Bonding primer or stain-blocking primer
- High-quality acrylic latex cabinet paint or latex enamel
- Angled synthetic-bristle brush
- Small foam or microfiber roller
- Paint tray
- Optional: grain filler for a smoother oak finish
- Optional: new knobs, pulls, hinges, or soft-close hardware
Step 1: Remove Doors, Drawers, and Hardware
Start by taking off the cabinet doors, drawer fronts if possible, knobs, pulls, and hinges. Label each door and hinge location with painter’s tape. This may feel unnecessary when there are only two doors, but future you will appreciate not playing “which hinge is slightly crooked?” at 10 p.m.
Lay the doors flat on a protected work surface. Painting them horizontally helps prevent drips and makes it easier to get smooth coverage. Keep screws and hardware in a small bag or container. If you are replacing hardware, measure the distance between screw holes before buying new pulls. Guessing is exciting, but not in a good way.
Step 2: Clean the Oak Vanity Thoroughly
Cleaning is not glamorous, but it is one of the most important steps in a bathroom oak vanity makeover with latex paint. Bathroom cabinets collect hairspray mist, hand lotion, toothpaste dust, soap residue, and mystery fingerprints. Paint will not bond properly to grime.
Wash every paintable surface with a degreasing cleaner or warm water with a small amount of dish soap. Pay special attention to the area around drawer pulls and door edges. Rinse with clean water and let the cabinet dry completely. Do not skip the rinse. Cleaner residue can cause adhesion problems, and nobody wants to watch fresh paint peel like a bad sunburn.
Step 3: Fill Holes, Dents, and Oak Imperfections
If you are changing from knobs to pulls, or from one pull size to another, fill old holes with wood filler. Press filler firmly into the holes, slightly overfill, and let it dry according to the label. Sand smooth after it hardens.
Oak has a pronounced grain pattern. Some homeowners like seeing a little grain through the paint because it keeps the wood character. Others want a smoother, factory-style finish. If you want the smoothest possible painted oak vanity, apply a grain filler before priming. This adds time, but it reduces the visible texture that oak loves to show off like it is auditioning for a topographic map.
Step 4: Sand the Gloss Off the Vanity
Sanding does not mean grinding the cabinet into sawdust. The goal is to dull the old finish so primer can grab. Start with 150-grit sandpaper if the existing finish is glossy or uneven, then follow with 220-grit for a smoother surface. Sand with the grain whenever possible.
For detailed door profiles, use a sanding sponge. It bends into curves better than a flat sanding block. After sanding, vacuum the dust and wipe everything with a tack cloth or slightly damp microfiber cloth. Dust left behind will become bumps in the paint, and once you notice them, you will see them forever. That is simply how DIY eyesight works.
Step 5: Choose the Right Primer
Primer is the difference between a vanity makeover that lasts and one that starts chipping before the hand towel gets rehung. For oak, especially stained oak, use a bonding primer or stain-blocking primer. Oak can release tannins that bleed through light paint colors, creating yellowish or brownish discoloration. A stain-blocking primer helps prevent that.
If the vanity has a shiny factory finish, a bonding primer is essential. If the oak is dark, reddish, or previously stained, a stain-blocking primer is a smart choice. Many DIYers prefer shellac-based or oil-based stain-blocking primers for stubborn bleed-through, then apply latex paint over the properly dried primer. Water-based bonding primers are also useful when adhesion is the bigger concern.
Apply primer with an angled brush on edges, corners, and door details, then use a small roller on flat areas. Keep coats thin and even. Thick primer does not make the project stronger; it just makes it lumpy and dramatic.
Step 6: Sand the Primer Lightly
Once the primer is dry, lightly sand with 220-grit sandpaper. This removes tiny raised grain, brush marks, and dust specks. Wipe clean before painting. This step feels fussy, but it is one of the secrets to a smooth painted vanity.
If you see tannin bleed after the first primer coat, do not ignore it. Add another coat of stain-blocking primer and let it dry fully. Painting over visible bleed-through with more latex paint usually does not solve the problem. It just buries the problem temporarily, like hiding laundry in the bathtub before guests arrive.
Step 7: Apply the First Coat of Latex Paint
Use a high-quality synthetic brush for grooves, inside corners, and trim details. Then roll the flat areas with a small foam or microfiber roller. Work in thin coats. Thin coats dry harder and smoother than thick coats.
Paint in the direction of the wood grain or the longest line of the cabinet. Avoid over-brushing once the paint starts to set. Modern latex and water-based enamel paints often level nicely if you let them do their job. If you keep brushing, you may leave marks that look like you tried to frost a cake with a broom.
Let the first coat dry according to the paint label. Bathroom vanity doors and drawers should not be rushed. Dry to the touch is not the same as ready for another coat. Patience is cheaper than sanding off gummy paint.
Step 8: Sand Lightly and Apply the Second Coat
After the first coat dries, inspect the surface. If it feels rough, lightly sand with 220-grit or finer sandpaper. Wipe away dust and apply the second coat. Most oak bathroom vanities need two coats of paint over primer. Dark colors over a tinted primer may cover beautifully in two coats. White or pale colors over dark oak may need a third thin coat for full coverage.
Let each coat dry fully. If your bathroom is humid, use a fan to move air through the room, but do not aim a dusty fan directly at wet paint. That is how you create a custom “lint confetti” finish, which is rarely requested by designers.
Step 9: Let the Paint Cure Before Reassembly
Latex paint may dry quickly, but curing takes longer. Curing is the process of the paint hardening to its final durable finish. Depending on the product, humidity, temperature, and coat thickness, this can take days or even weeks. You can usually reassemble the vanity once the paint is dry enough to handle gently, but treat it with care.
Avoid scrubbing the surface, slamming drawers, or setting heavy objects on freshly painted areas during the cure period. If doors touch the frame, consider adding small clear bumpers after the paint has cured enough. They soften the closing action and help prevent sticking.
Best Latex Paint Colors for an Oak Bathroom Vanity
Soft White
White is classic for bathrooms because it makes small spaces feel brighter and cleaner. Use a stain-blocking primer under white paint, especially on oak, because tannin bleed is most noticeable under light colors.
Sage Green
Sage green works beautifully with brass, black, or brushed nickel hardware. It feels calm and current without being trendy in a way that will make you cringe next year.
Navy Blue
Navy gives a bathroom vanity a custom furniture look. It pairs well with white counters, marble-look tile, and warm wood accents.
Charcoal or Soft Black
A dark vanity can ground a bathroom and hide minor scuffs better than white. Choose a satin or semi-gloss finish so the surface still wipes clean.
Warm Greige
Greige is a practical bridge color if your bathroom has beige tile, cream counters, or warm flooring. It updates oak without fighting the existing room.
Common Mistakes to Avoid
Skipping the Cleaning Step
Paint failure often begins with a dirty surface. Even if the vanity looks clean, wash it. Bathroom residue can be invisible but still cause adhesion trouble.
Using Regular Wall Paint
Wall paint is not the best choice for a vanity. Use cabinet paint, trim enamel, or a durable acrylic latex product made for high-touch surfaces.
Painting Over Gloss Without Sanding or Bonding Primer
Glossy varnish is slick. Paint needs grip. Sanding plus the right primer creates that grip.
Applying Thick Coats
Thick paint coats dry slowly, show brush marks, and chip more easily. Two or three thin coats are better than one heroic blob.
Reinstalling Hardware Too Soon
Fresh paint can dent, stick, or peel if handled roughly before curing. Give the finish time to harden before daily use.
How to Make a Painted Oak Vanity Look More Expensive
Paint does the heavy lifting, but the finishing details make the makeover feel polished. Replace dated brass knobs with matte black, champagne bronze, brushed nickel, or polished chrome hardware. If your faucet is staying, coordinate the hardware finish with it or choose a mixed-metal look intentionally.
Add new drawer liners, update the mirror, swap the light fixture, and use fresh caulk around the backsplash or countertop if needed. A painted vanity beside old yellow caulk is like wearing a tuxedo with muddy sneakers. The tuxedo is trying, but the sneakers are loud.
If the vanity has exposed hinges, consider painting them separately only if they are designed to be painted and still function smoothly. Otherwise, replacing them may look cleaner. Add felt or silicone bumpers to doors after the paint cures to reduce impact and protect the finish.
Cleaning and Maintaining a Latex-Painted Bathroom Vanity
Once cured, clean the vanity with a soft cloth and mild soap. Avoid abrasive scrub pads, harsh solvents, and aggressive bathroom cleaners that can dull or soften the finish. Wipe up standing water around the sink. Even durable paint appreciates not being treated like a swimming pool deck.
Keep a small amount of leftover paint in a labeled jar for touch-ups. Include the paint brand, color name, sheen, and date. Future you will not remember whether the color was “Cloud White,” “Snowbound,” or “White That Looked Less Weird Under Store Lights.”
Real-World Experience: What I Learned From Painting an Oak Bathroom Vanity
The first thing experience teaches you about a bathroom oak vanity makeover with latex paint is that the cabinet is probably dirtier than it looks. Oak grain is a champion collector of dust, old polish, and the kind of bathroom film no one wants to discuss at brunch. A quick wipe is not enough. The vanity needs a real cleaning before sanding, especially around handles and drawer edges. On one project, the area behind the old knobs was so grimy that the original oak color looked two shades different after cleaning. That was the moment the vanity and I stopped pretending.
The second lesson is that oak grain has opinions. If you paint directly over oak after a light sanding, the grain will likely remain visible. That is not automatically bad. In fact, a little texture can look charming, especially in a cottage, farmhouse, or traditional bathroom. But if you expect a perfectly smooth, factory-sprayed finish, you need grain filler, extra sanding, or both. The paint will not magically erase deep oak pores. Paint is talented, but it is not a magician with a tiny wand.
Primer is where many DIY vanity projects either become durable or start quietly planning their own failure. On stained oak, especially when painting white, primer matters more than the topcoat. A stain-blocking primer helps stop tannins from sneaking through and turning your crisp white vanity into something that looks faintly tea-stained. If the first coat of primer shows discoloration, pause and add another primer coat. Do not convince yourself the paint will cover it. That is optimism talking, and optimism does not block tannins.
Another practical discovery: doors are much easier to paint flat than upright. When doors are left attached, paint gathers near hinges, drips along edges, and makes you perform weird yoga poses beside the toilet. Removing the doors adds setup time, but it saves frustration. Use small labels so each door goes back where it belongs. Bathroom cabinets can be slightly out of square, and swapping doors may create gaps that were not there before.
Thin coats are the secret handshake. The first coat of latex paint may look unimpressive, especially over primer. That is normal. Do not panic and slather on more paint. A thin first coat, light sanding if needed, and a second thin coat will look smoother and cure harder. If you rush the second coat, the finish can stay soft longer than expected. In a bathroom, where humidity slows drying, patience is part of the material list.
Hardware can make the makeover look twice as expensive. A painted oak vanity with old, worn hardware may still read as “painted old vanity.” The same cabinet with fresh pulls, clean hinges, and a modern faucet suddenly looks intentional. The best upgrades are not always dramatic. Sometimes a simple satin nickel knob or matte black pull is enough to make the whole bathroom stand taller.
Finally, curing time is real. The vanity may be dry the next day, but it is not ready for rough treatment. For the first couple of weeks, use it gently. Open doors by the hardware, wipe water quickly, and avoid letting bottles sit on freshly painted surfaces. Once cured, a well-prepped latex-painted vanity can handle normal bathroom life beautifully. The makeover is not just cosmetic; it can make the room feel cleaner, brighter, and more personal. And every time you walk in and see that once-orange oak cabinet looking fresh and confident, you get the quiet satisfaction of knowing you rescued it with paint, patience, and only a moderate amount of muttering.
Conclusion
A bathroom oak vanity makeover with latex paint is one of the most rewarding budget-friendly bathroom upgrades. The process is simple, but the details matter: clean thoroughly, sand the glossy finish, choose the right primer, apply thin coats of durable latex cabinet paint, and allow enough curing time before heavy use.
Oak may be stubborn, but it is also forgiving when prepared correctly. Whether you choose soft white, deep navy, sage green, charcoal, or warm greige, paint can turn an outdated vanity into a stylish centerpiece. Add new hardware, fresh caulk, and careful maintenance, and your old oak cabinet can look less like a leftover and more like a design decision. Not bad for a project that does not require demolition, plumbing drama, or explaining to your family why the bathroom has no sink for three weeks.


