Table of Contents >> Show >> Hide
- Why This Recipe Works (and Why Your Donuts Won’t Taste Like Oil)
- Ingredients You’ll Need
- Equipment Checklist
- Step-by-Step: Make the Yeast Donut Dough
- Make the Chocolate Pastry Cream Filling
- Fry the Donuts (Golden, Not Greasy)
- Fill the Donuts
- Finish Options: Powdered Sugar, Vanilla Glaze, or Chocolate Top
- Troubleshooting (Because Donuts Like to Humble Us)
- Make-Ahead and Storage
- Variations (Same Vibe, Different Outfit)
- FAQ
- Chocolate-Filled Donuts: The Experience (500-ish Words of Real-Life Joy)
- Conclusion
If you’ve ever bitten into a chocolate-filled donut and thought, “Wow, I’d like to eat six of these and then
immediately take a nap,” you’re in the right place. This chocolate-filled donuts recipe gives you
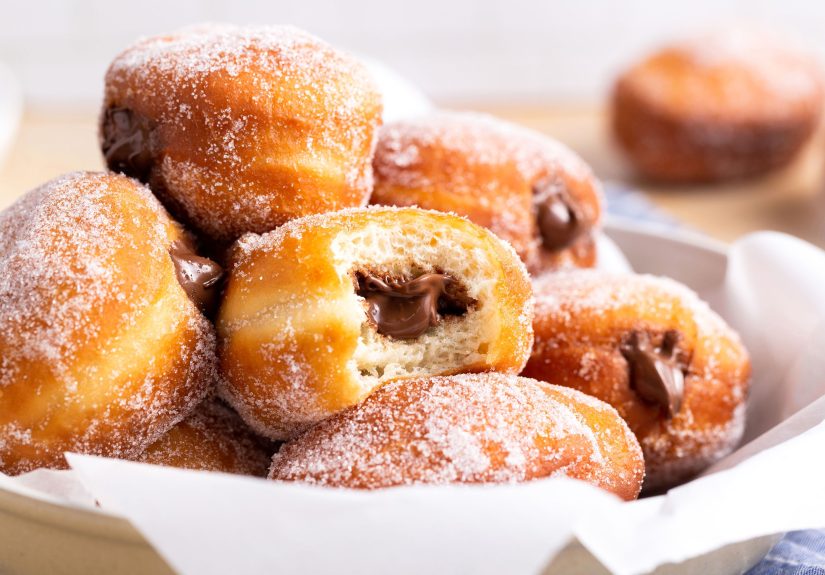
fluffy, yeasted donuts with a rich, silky chocolate pastry cream insideaka the kind of breakfast-dessert that makes
weekends feel like a tiny vacation.
We’re going classic and practical: a soft yeast dough (light, airy), a chocolate filling that actually tastes like
chocolate (not “sweet brown mystery”), and a frying method that aims for golden, not greasy. Don’t worryno culinary
gymnastics required. Just a little patience, a thermometer, and the willingness to accept that powdered sugar will
end up on your shirt. It’s basically a rule.
Why This Recipe Works (and Why Your Donuts Won’t Taste Like Oil)
Great homemade chocolate filled doughnuts come down to three things:
- Proper fermentation: yeast dough needs time to rise so the donuts puff instead of turning dense.
- Steady oil temperature: too cool = oily; too hot = browned outside, raw inside.
- Chilled, thick filling: warm filling runs, thin filling leaks, and nobody wants a chocolate crime scene.
Time check: plan about 3.5–4.5 hours start to finish (most of it is rising/chilling time), or split it
into two days with an overnight dough option.
Ingredients You’ll Need
For the Yeast Donuts (Makes about 10–12 filled donuts)
- 3/4 cup (180 ml) whole milk, warm (about 100–110°F)
- 2 1/4 tsp (1 packet) active dry yeast
- 1/4 cup (50 g) granulated sugar
- 1 large egg + 1 large egg yolk (room temp helps)
- 4 tbsp (57 g) unsalted butter, melted and cooled slightly
- 1 tsp vanilla extract
- 3 1/4 cups (390 g) all-purpose flour (plus more for rolling)
- 1 tsp fine salt
- Neutral oil for frying (canola/vegetable/peanut), enough for 2–3 inches in your pot
For the Chocolate Pastry Cream Filling (Plenty for generous filling)
- 2 cups (480 ml) whole milk
- 4 large egg yolks
- 1/2 cup (100 g) granulated sugar
- 1/4 cup (30 g) cornstarch
- 1/4 cup (25 g) unsweetened cocoa powder
- Pinch of salt
- 4 oz (113 g) semisweet chocolate, chopped
- 2 tbsp (28 g) unsalted butter
- 1 tsp vanilla extract
Optional Finishes (Pick Your Donut Personality)
- Powdered sugar (simple, classic, messy in the best way)
- Vanilla glaze: 1 1/2 cups powdered sugar + 2–3 tbsp milk + 1/2 tsp vanilla + pinch of salt
- Chocolate glaze: 4 oz (113 g) semisweet chocolate + 1/2 cup (120 ml) heavy cream
Equipment Checklist
- Large mixing bowl or stand mixer (hand mixing worksyour arms just file a complaint)
- Rolling pin
- 3-inch round cutter (or a drinking glass with a sharp edge)
- Sheet pans + parchment paper
- Heavy-bottomed pot or Dutch oven (high sides = less splatter drama)
- Fry thermometer or instant-read thermometer
- Spider strainer or slotted spoon
- Wire rack + paper towels
- Piping bag (or zip-top bag) + long filling tip (helpful but not mandatory)
Step-by-Step: Make the Yeast Donut Dough
1) Bloom the yeast
In a large bowl, whisk warm milk and a teaspoon of the sugar. Sprinkle yeast over the top. Let sit 5–10 minutes until
foamy. If nothing happens, your yeast may be expired or the milk was too hot/coldbetter to find out now than after
you’ve emotionally committed.
2) Mix the wet ingredients
Whisk in the remaining sugar, egg, egg yolk, melted butter, and vanilla. The mixture should look creamy and smell like
“weekend plans.”
3) Add flour and salt, then knead
Add flour and salt. Mix until a shaggy dough forms, then knead 6–8 minutes by mixer (or 8–10 minutes by hand) until
smooth and elastic. The dough should be soft and slightly tacky but not a glue trap. If it’s very sticky, add flour
1 tablespoon at a time.
4) First rise (bulk fermentation)
Place dough in a lightly greased bowl, cover, and let rise 1 1/2 to 2 hours, until doubled. Ideal spot: warm, draft-free.
Not ideal spot: directly on your radiator like it’s sunbathing.
5) Roll, cut, and proof
Turn dough onto a floured surface. Roll to about 1/2-inch thick. Cut rounds with a 3-inch cutter. Place on parchment-lined
baking sheets with space between them.
Cover loosely and let proof 45–75 minutes until puffy and airy. A good test: gently poke oneif the indentation slowly
springs back, they’re ready to fry.
Make the Chocolate Pastry Cream Filling
1) Whisk the base
In a bowl, whisk egg yolks, sugar, cornstarch, cocoa powder, and salt until smooth. It’ll look like brownie batter’s
responsible older sibling.
2) Heat the milk and temper
In a saucepan, heat milk just until steaming (not boiling). Slowly whisk about half the hot milk into the yolk mixture
to temper (this prevents scrambled-egg filling, which is… not the vibe). Pour everything back into the saucepan.
3) Thicken, finish, and chill
Cook over medium heat, whisking constantly, until thick bubbles appear and it holds a pudding-like consistency
(usually 2–5 minutes once it starts thickening). Remove from heat; whisk in chopped chocolate, butter, and vanilla
until smooth.
Strain if you want it extra silky. Press plastic wrap directly onto the surface and refrigerate at least 2 hours
(or until fully cold and pipeable).
Fry the Donuts (Golden, Not Greasy)
1) Heat oil to the right range
Pour 2–3 inches of neutral oil into a heavy pot. Heat to 350–365°F. If you’re new to frying, aim for
350°F and keep it steady. Use a thermometer and don’t overcrowd the potadding too many donuts drops the temperature and
invites oil absorption.
2) Fry in batches
Carefully lower 2–3 donuts into the oil. Fry about 1.5–2 minutes per side, flipping once, until deep
golden brown. They should feel light when lifted.
3) Drain and cool
Remove to a paper towel-lined rack. Cool at least 10 minutes before filling. Filling hot donuts sounds efficient,
but it melts the filling and turns your kitchen into a chocolate slip-n-slide.
Fill the Donuts
Spoon chilled pastry cream into a piping bag fitted with a long filling tip. If you don’t have one:
- Use a zip-top bag with a small corner snipped off, and
- Make a small side opening with a paring knife or sturdy straw.
Insert the tip into the donut and pipe until you feel resistance and the donut gets slightly heavier. Stop before it
puffs like a balloon. Repeat with all donuts.
Finish Options: Powdered Sugar, Vanilla Glaze, or Chocolate Top
Option A: Powdered sugar
Dust generously. Then dust a little more. Then accept that you will inhale some powdered sugar at some point.
Option B: Quick vanilla glaze
Whisk powdered sugar, milk, vanilla, and salt until smooth. Dip the tops of cooled donuts, let excess drip off, and set
on a rack until glossy and set.
Option C: Chocolate glaze (ganache-style)
Heat heavy cream until steaming. Pour over chopped chocolate, wait 2 minutes, then whisk until smooth. Dip donut tops
and let set. This is the “wear black clothing” option.
Troubleshooting (Because Donuts Like to Humble Us)
My donuts are greasy
- Oil temp was too low or dropped from overcrowding.
- Fix: fry fewer at a time and keep oil at 350–365°F.
My donuts are dark outside but raw inside
- Oil was too hot.
- Fix: lower heat and test-fry one donut. If it browns in under a minute, you’re running hot.
My donuts are tough
- Too much flour, over-kneading, or over-proofing.
- Fix: add flour slowly during kneading; proof only until puffy (not deflated).
My filling leaks out
- Filling was warm/thin or donuts were overfilled.
- Fix: chill filling until thick; pipe slowly and stop when you feel resistance.
Make-Ahead and Storage
- Overnight dough option: After the first rise, cover the dough and refrigerate overnight. The next day,
let it sit at room temperature 30–60 minutes, then roll/cut/proof and fry. - Best eating window: Fried donuts are happiest the day they’re made.
- Cream-filled donuts: Refrigerate and enjoy within 1–2 days for best texture and safety.
- Food-safety note: Don’t leave custard-filled donuts at room temp for more than about 2 hours.
Variations (Same Vibe, Different Outfit)
- Boston-cream style: Use vanilla pastry cream and top with chocolate glaze.
- Chocolate-hazelnut shortcut: Fill with a thick chocolate-hazelnut spread (warm slightly to pipe).
- Mocha filling: Add 1–2 tsp instant espresso powder to the milk for the pastry cream.
- Spiced chocolate: Add a pinch of cinnamon or chili powder to the filling for a subtle kick.
FAQ
Can I bake these instead of frying?
You can, but the texture will be more like a soft baked donut/bun than a classic fried donut. If you want baked,
look for a baked donut method and use the same chocolate filling after cooling.
What oil is best for frying donuts?
Use a neutral oil with a high smoke point (canola, vegetable, peanut). Save olive oil for salad dressing and emotional
support.
How do I know the donuts are proofed enough?
They’ll look noticeably puffy and airy. A gentle poke should spring back slowly. Under-proofed donuts can split and
stay dense; over-proofed donuts can collapse or absorb oil.
Chocolate-Filled Donuts: The Experience (500-ish Words of Real-Life Joy)
Making chocolate-filled donuts at home is less like “following a recipe” and more like “hosting a tiny, delicious
science fair in your kitchen.” First comes the dough, which starts out shy and sticky, then gradually transforms into
something smooth and bouncylike it just remembered it has potential. The rising stages feel slow until you realize
they’re basically your permission slip to do something else for a while: tidy up, prep the filling, or stand near the
bowl whispering encouragement like you’re coaching a very small athlete.
Then there’s the moment you roll the dough and cut those perfect little rounds. It’s strangely satisfying, like making
edible poker chips. The second proof is where the magic becomes visible. The donuts go from “flat circles” to “pillowy
clouds,” and you’ll catch yourself thinking, “Okay… I could open a shop,” which is a classic donut-making side effect.
(Another side effect: powdered sugar on your elbows.)
Frying is the part that feels dramatic, but it’s actually the most predictable once you commit to the thermometer.
The oil makes a gentle, confident sizzle when the temperature is right. Too quiet and the donuts drink oil like it’s
a refreshing beverage. Too angry and they brown fast and panic you into flipping early. The sweet spot sounds like a
steady applausesmall bubbles, not a jacuzzi. A lot of home bakers learn quickly that batching matters: fewer donuts
at a time means better temperature control, and better control means donuts that taste like donuts, not like “whatever
oil is on sale this week.”
Filling is pure payoff. A chilled chocolate pastry cream is thick enough to stay put, but still silky when you bite
in. The first filled donut always teaches you somethingusually that you don’t need to pipe until the donut is
suspiciously swollen. The second donut is your redemption arc. By the third, you’re an artist. By the sixth, you’re
an artist who “accidentally” needs to taste-test again for quality assurance.
The best part is sharing them. Chocolate-filled donuts have an instant-grin effect. People lean in, take a bite, and
immediately stop talkingbecause their brain is busy filing the donut under “important memories.” They’re also a
surprisingly fun tradition: weekend mornings, birthdays, snowy days, or any time you want a dessert that feels
celebratory without requiring a layer cake and a minor engineering degree.
And yes, the kitchen will smell like a donut shop for hours. That’s not a problem. That’s the reward.
Conclusion
This chocolate-filled donuts recipe is the sweet spot between bakery-level results and home-kitchen
sanity: fluffy yeasted donuts, a rich chocolate filling, and simple, reliable frying technique. Keep your oil temperature
steady, chill your filling, and rememberdonuts are supposed to be joyful, not stressful. If one turns out slightly lopsided,
call it “rustic,” dust it with sugar, and move on like a confident pastry professional.


