Table of Contents >> Show >> Hide
- Why Table Legs and Wooden Spools Make Great DIY Candle Holders
- What You’ll Need
- How to Choose the Best Salvaged Pieces
- Step-by-Step: How to Make Rustic Candle Holders
- Styling Ideas for Rustic Candle Holders
- Common Mistakes to Avoid
- Are Wooden Candle Holders Safe?
- Why This DIY Project Works So Well for Rustic Decor
- Experience Notes: What It’s Actually Like to Make These Candle Holders
- Conclusion
There are two kinds of people in the world: those who see an old table leg and think, “junk,” and those who see it and whisper, “You, my friend, are about to become the star of my dining table.” If you’re here, I’m guessing you’re in the second group. Excellent choice. Rustic candle holders made from salvaged table legs and wooden spools have that collected-over-time charm that makes a room feel warm, layered, and just a little bit smug in the best possible way.
This project is affordable, beginner-friendly, and wildly satisfying. It also happens to be a clever way to reuse thrifted, vintage, or leftover wood pieces that might otherwise end up collecting dust in the garage next to a mysterious can of stain from 2017. The result is a set of candle holders that look custom, cozy, and wonderfully imperfect.
In this guide, you’ll learn how to make rustic candle holders from table legs and spools, how to choose the right materials, how to finish them for that aged farmhouse look, and how to keep the whole setup safe once the candles are lit. Because yes, we love ambience, but we also love not setting the table runner on fire.
Why Table Legs and Wooden Spools Make Great DIY Candle Holders
Rustic decor works best when it has texture, variation, and a little history. That’s exactly why repurposed table legs and wooden spools are such a smart choice. Turned table legs already have shape, height, and decorative detail, so half the design work is done before you even open the toolbox. Wooden spools, meanwhile, bring roundness, visual weight, and vintage character. Pair them together, and you get candle holders with personality instead of cookie-cutter sameness.
They’re also incredibly versatile. A chunky leg can become a dramatic pillar-style holder. A smaller spindle can be transformed into a classic taper candle stand. A squat spool can act as a sturdy base. Mix heights and silhouettes together, and your centerpiece suddenly looks like it came from a boutique home store with mood lighting and prices that would make your wallet cry.
What You’ll Need
Materials
- Old table legs, furniture feet, or wood spindles
- Wooden spools or other round wooden bases
- Wood glue or construction adhesive suitable for wood
- Wood screws or dowels for extra reinforcement, if needed
- Taper candles, tealight cups, or pillar candle inserts
- Wood stain, paint, wax, or clear matte sealer
- Felt pads for the bottom
Tools
- Miter saw, handsaw, or coping saw
- Drill or drill press
- Forstner bit or spade bit sized to your candle type
- Sandpaper in coarse, medium, and fine grits
- Clamps
- Measuring tape
- Pencil
- Safety goggles and dust mask
If you’re making holders for taper candles, drill only a shallow recess at the top. If you’re making holders for tealights, it’s smart to use a metal cup insert rather than dropping a naked flame directly into wood. Rustic is charming. Scorched is less charming.
How to Choose the Best Salvaged Pieces
The prettiest DIY candle holders usually start with a good thrift-store eye. Look for table legs with curves, ridges, knobs, or worn paint. Tiny cracks and dings are usually fine, but avoid pieces that wobble badly, split deeply, or feel soft from water damage.
When picking wooden spools, pay attention to diameter and stability. A wider spool creates a sturdier base, which is especially helpful if you’re using taller table legs. The goal is simple: your finished candle holder should sit flat and solid on a table without doing an interpretive dance every time someone walks by.
For a collected rustic look, choose pieces that don’t match perfectly. Vary the heights, but keep the visual family similar. Think “siblings with different haircuts,” not “random relatives from three separate reunions.”
Step-by-Step: How to Make Rustic Candle Holders
1. Clean and Inspect the Wood
Remove dirt, old cobwebs, sticker residue, and loose finish. A damp cloth usually works for surface grime. If the wood has flaky paint or rough patches, scrape away the loose bits and let it dry fully before sanding. Check for nails, staples, or hidden hardware before cutting or drilling.
2. Decide on Height and Shape
Arrange your table legs and spools on a table before cutting anything. A good trio often includes one short, one medium, and one tall holder. That staggered look creates the cozy layered effect people love in farmhouse decor, rustic centerpieces, and mantel styling.
If a leg is too long, trim it from the least decorative end. Try not to chop off the pretty part unless you enjoy regret with your sawdust.
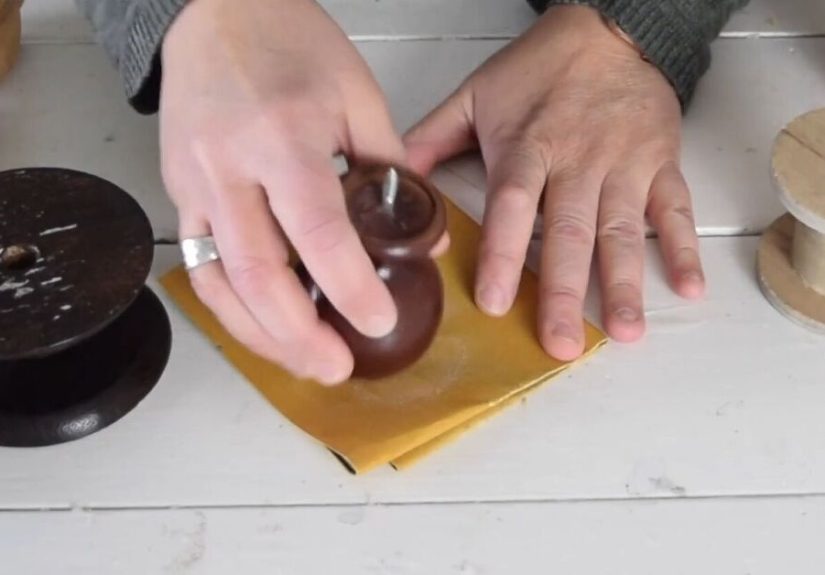
3. Sand for a Smooth-but-Not-Boring Finish
Sand enough to remove splinters, roughness, and flaky finish, but don’t erase all the age and texture. Rustic wood decor looks best when it still has a little life in it. Start with a coarser grit if needed, then move to finer grit for a touchable finish. Always sand with the grain and remove dust thoroughly before staining or sealing.
4. Attach the Base
If you’re using a spool as the base and a table leg as the body, dry-fit the two pieces first. Once you like the proportions, attach them with strong wood glue. For heavier or taller candle holders, reinforce the bond with a centered screw or dowel. Clamp the pieces and let the adhesive cure fully.
This is the moment where patience matters. A half-cured glue joint may hold for five triumphant minutes and then betray you at dinner. Let it dry.
5. Drill the Candle Recess
Mark the center at the top. For taper candles, drill a shallow hole just large enough to hold the candle snugly. For tealights, drill a flat-bottomed recess or add a metal insert cup. If the fit is slightly loose, you can wrap the candle base with a small amount of foil for a temporary adjustment, but the better solution is drilling the right size from the start.
Use a drill press if you want a perfectly centered, perfectly straight result. A handheld drill works too; just go slowly and keep the bit vertical. Measure twice, drill once, and say fewer words you’ll regret later.
6. Distress, Stain, or Paint
This is where the style comes alive. For a natural rustic finish, apply a medium or dark wood stain and wipe away the excess. For a weathered farmhouse look, try whitewashing, dry brushing, or lightly distressing edges after paint dries. If you want the holders to look genuinely timeworn, a layered finish often works better than one heavy coat.
You can also combine treatments. A stained base with a lightly rubbed cream top has a collected antique look that works beautifully in modern rustic interiors. Just keep the finish matte or satin instead of high gloss unless your goal is “fancy bowling alley.”
7. Seal and Add Felt Pads
Once the stain or paint is dry, apply a clear sealer if you want added durability. A matte finish tends to preserve the rustic character best. Add felt pads underneath so the holders don’t scratch your table, buffet, or mantel.
Styling Ideas for Rustic Candle Holders
One of the best things about DIY candle holders is that they earn their keep all year. On a dining table, cluster them with greenery, old books, or a wood tray. On a mantel, mix them with framed art, small vases, or antique finds. On a coffee table, use a pair with flameless candles for a warm look without the worry.
For fall decor, style them with mini pumpkins, acorns, and dried eucalyptus. For Christmas, add cedar clippings and brass accents. In spring, pair them with bud vases and soft linen runners. Rustic candle holders are basically the denim jacket of home decor: dependable, flattering, and somehow always useful.
Common Mistakes to Avoid
Making the Top Too Narrow
A tiny top can look elegant, but if it doesn’t securely support the candle, the piece becomes decorative chaos. Make sure the candle sits firmly and straight.
Ignoring Stability
If the base is too small for the height, your holder may wobble. Always test it on a flat surface before calling the project done.
Over-sanding the Character Away
Not every nick needs to disappear. Rustic style depends on visible grain, texture, and a bit of wear.
Skipping Safety Details
Wood and flame need boundaries. Use stable holders, keep lit candles away from drafts and flammable items, and extinguish them before leaving the room or heading to bed.
Are Wooden Candle Holders Safe?
They can be, as long as you design and use them thoughtfully. The key is making sure the candle sits securely, the holder stands flat and stable, and the flame is kept away from direct contact with wood, dried greenery, fabric, or other combustibles. For tealights, metal inserts are a smart move. For pillar candles, a separate heat-resistant plate or metal cup is even better.
Also, place finished candle holders on a heat-safe surface and keep them away from curtains, shelves, paper decor, and anything else that could catch fire. If you have children, pets, or a household member who can somehow trip over air, flameless candles are an excellent option. You’ll still get the glow, minus the dramatic subplot.
Why This DIY Project Works So Well for Rustic Decor
Rustic decorating is not about perfection. It’s about warmth, texture, craftsmanship, and stories. A repurposed table leg has history. An old spool has patina. A handmade candle holder brings those qualities into a room in a way mass-produced decor rarely can. It feels personal because it is personal.
This project also gives you room to experiment. You can go more farmhouse, more primitive, more cottage, or more modern rustic depending on the finish and the candle style you choose. That flexibility is why DIY rustic candle holders from table legs and spools have such lasting appeal. They’re simple enough for a weekend craft but stylish enough to keep around for years.
Experience Notes: What It’s Actually Like to Make These Candle Holders
The first thing most people notice when making rustic candle holders is that the project feels easy right up until the moment you try to center everything perfectly. Old table legs are rarely as symmetrical as they look from a distance, and vintage spools love to pretend they are level until you place them on a dining table and discover they rock like a chair in a country song. That’s normal. In fact, it’s part of the experience.
One of the most helpful lessons is learning to work with the wood instead of fighting it. A salvaged leg may have worn paint in one groove, a deeper stain in another, and a small dent where life clearly happened. At first, it’s tempting to sand every inch until it looks factory fresh. But once you’ve made a few pieces, you realize the charm lives in those imperfections. The trick is smoothing the surface enough to make it pleasant to touch while leaving just enough wear to tell a story.
Another common experience is underestimating how much the finish changes the whole mood of the project. A plain unfinished holder can look a little like “garage scrap with ambition.” Add a warm walnut stain, soft white dry brushing, or a lightly weathered wax topcoat, and suddenly it looks intentional and expensive. It’s one of those rare DIY moments where ten extra minutes of finishing work can make the piece look ten times better.
Drilling the candle recess is usually the point where beginners get nervous. And honestly, fair enough. One crooked hole can make the candle lean like it had a long week. The best experience usually comes from taking your time, marking the center carefully, and practicing on a scrap piece first if you have one. After that first successful hole, confidence rises fast. By the third holder, you start acting like you’ve been running a candleholder empire for years.
There’s also something surprisingly satisfying about arranging finished pieces in a set. Even when they are mismatched, they look connected by material, color, and shape. A short spool-based holder next to a tall turned leg creates the kind of layered tabletop styling that feels cozy without trying too hard. It’s one of the reasons people often make one holder and then immediately decide they need three more.
Perhaps the best part of the experience is that these projects feel personal. You remember where the leg came from, why you picked that stain, and which holder gave you a tiny bit of trouble before becoming your favorite. The finished pieces don’t just decorate a room; they carry the memory of making them. And that, more than any trendy finish or perfect photo, is what gives DIY rustic candle holders their real magic.
Conclusion
If you want a DIY decor project that is affordable, creative, practical, and full of rustic charm, candle holders made from table legs and spools are hard to beat. They’re simple enough for beginners, customizable enough for experienced makers, and stylish enough to earn a permanent place on your table, mantel, or shelf. Start with sturdy salvaged pieces, focus on a secure candle fit, choose a finish that enhances the wood’s character, and style them in groups for maximum impact.
In other words, don’t underestimate the decorative future of that lonely old table leg. With a little sanding, drilling, and imagination, it can glow up in every sense of the phrase.


