Table of Contents >> Show >> Hide
- Quick Jump
- What Kind of Chocolate-Filled Donut Are We Making?
- Ingredients
- Equipment You’ll Want (So This Stays Fun, Not Chaotic)
- Step-by-Step: Chocolate-Filled Donuts Recipe
- Chocolate Filling Options (Choose Your Adventure)
- Why This Works (A Little Food Science, No Lab Coat Required)
- Troubleshooting: Fixes for the Most Common Donut Problems
- Food Safety + Best Practices (Quick but Important)
- Storage & Make-Ahead Tips
- What It’s Really Like to Make Chocolate-Filled Donuts at Home ( of Realistic “Experience”)
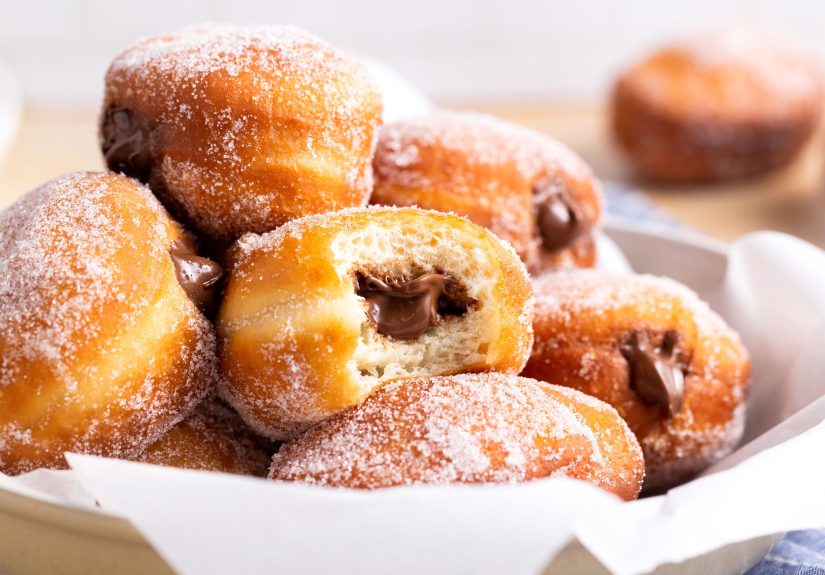
If you’ve ever bitten into a chocolate-filled donut and briefly forgot your own name (relatable), you already know the mission: fluffy, golden dough on the outside… and a rich, silky chocolate center that makes you consider eating a second one “for quality control.” This guide gives you a bakery-style chocolate-filled donuts recipe you can actually pull off at homeno industrial donut robot required.
We’ll go in-depth on the dough, frying, and filling, plus the little details that separate “pretty good!” from “waitYOU made these?!” You’ll also get smart troubleshooting, flavor variations (hello, mocha and Nutella), storage tips, and realistic expectationsbecause donuts are fun, but hot oil and yeast have big main-character energy.
What Kind of Chocolate-Filled Donut Are We Making?
There are two big “families” of chocolate-filled donuts:
- Yeast-raised filled donuts (light, airy, classic bakery vibe)
- Cake donuts (denser, quicker, more like a donut-shaped muffinstill delicious)
This recipe focuses on the yeast-raised version because it’s the most iconic for filled donuts and gives you that soft, pillowy bite that pairs perfectly with a creamy chocolate center. We’ll fill them with a chocolate pastry cream (like a chocolatey custard) or a faster ganache-style fillingyour choice.
Flavor Goal: Balanced Sweetness
The best chocolate-filled donuts don’t just taste “sweet.” They taste rich, like cocoa and vanilla showed up to the party wearing fancy shoes. We’ll keep the filling smooth and deeply chocolatey without turning the donut into a sugar grenade.
Ingredients
For the Yeast-Raised Donut Dough (Makes 10–12 filled donuts)
- 3 1/4 cups (390g) all-purpose flour, plus more for rolling
- 1/4 cup (50g) granulated sugar
- 2 1/4 tsp (1 packet) active dry yeast
- 1 tsp fine salt
- 3/4 cup (180ml) warm whole milk (about 105–115°F)
- 2 large eggs, room temperature
- 6 tbsp (85g) unsalted butter, softened
- 1 tsp vanilla extract (optional, but highly recommended for “bakery smell”)
- Pinch of nutmeg (optional, subtle donut-shop magic)
For Frying
- Neutral oil with a high smoke point (canola, vegetable, peanut)
For Coating (Pick One)
- Granulated sugar
- Powdered sugar
- Chocolate glaze (optional; see variation ideas below)
Chocolate Filling Option A: Chocolate Pastry Cream (Best “Bakery” Result)
- 2 cups (480ml) whole milk
- 1/2 cup (100g) sugar
- 1/4 cup (30g) cornstarch
- 4 large egg yolks
- 1/4 cup (25g) unsweetened cocoa powder
- 4 oz (113g) semisweet chocolate, chopped (or chips)
- 2 tbsp (28g) unsalted butter
- 1 tsp vanilla extract
- Pinch of salt
Chocolate Filling Option B: Fast Chocolate Ganache Filling (Quick + Silky)
- 6 oz (170g) semisweet chocolate, chopped
- 1/2 cup (120ml) heavy cream
- 1 tbsp butter (optional, extra gloss)
- Pinch of salt
Ultra-Fast Shortcut Filling (Still Tastes Great)
- Chocolate-hazelnut spread (pipeable at room temp; warm slightly if needed)
Equipment You’ll Want (So This Stays Fun, Not Chaotic)
- Large mixing bowl (or stand mixer)
- Rolling pin
- 2 1/2–3-inch round cutter (or a glass + a steady hand)
- Sheet pans + parchment paper
- Heavy pot or Dutch oven (wide and stable)
- Deep-fry thermometer (strongly recommended)
- Spider strainer or slotted spoon
- Wire rack + paper towels
- Piping bag + long filling tip (or a small knife + regular tip)
Safety Note (Because Hot Oil Has No Chill)
Use a stable pot, don’t overcrowd, and keep kids/pets out of the splash zone. A thermometer isn’t just for perfectionit’s also for safety and consistency.
Step-by-Step: Chocolate-Filled Donuts Recipe
1) Make the Dough
- Activate the yeast: In a large bowl, stir warm milk + 1 tbsp of the sugar + yeast. Let sit 5–10 minutes until foamy. (If it doesn’t foam, your yeast may be expired or the milk was too hot/cold.)
- Mix: Add remaining sugar, eggs, vanilla, salt, nutmeg (if using), and about half the flour. Stir until a thick batter forms.
- Add butter + remaining flour: Mix in softened butter, then add the rest of the flour gradually until you have a soft, slightly tacky dough.
- Knead: Knead by hand 8–10 minutes (or 5–7 minutes in a stand mixer) until smooth and elastic. The dough should feel soft, not dry. If it’s super sticky, add flour 1 tbsp at a time.
2) First Rise (The Dough Nap)
- Place dough in a lightly oiled bowl, cover, and let rise until doubledabout 60–90 minutes in a warm spot.
- How to know it’s ready: It should look puffy and airy. If you poke it gently, the indentation should slowly spring back.
3) Shape the Donuts
- Turn dough onto a lightly floured surface. Roll to about 1/2 inch thick.
- Cut rounds with a 2 1/2–3-inch cutter. Re-roll scraps once (more than that can make tougher donuts).
- Place rounds on parchment-lined baking sheets, leaving space between them.
4) Second Rise (Where Fluff Happens)
- Cover donuts loosely (plastic wrap or a clean towel) and let rise until noticeably puffy, 30–60 minutes.
- Pro cue: They should feel lighter and more delicate. If they’re under-proofed, they can split or turn dense; if over-proofed, they can deflate when moved.
5) Fry the Donuts
- Heat 2 inches of oil in a heavy pot to 350°F.
- Fry 2–4 donuts at a time (don’t crowd). Cook about 1–2 minutes per side until golden brown.
- Transfer to a rack lined with paper towels to drain. Let cool 10–15 minutes before filling.
6) Fill + Coat
- Coat warm donuts in granulated sugar, or dust with powdered sugar after cooling.
- Use a small knife or skewer to make a hole in the side of each donut.
- Pipe in chocolate filling until the donut feels heavier and you see a little filling push back.
7) Serve (Ideally While Still a Little Warm)
Chocolate-filled donuts are peak delicious the day they’re madeespecially within the first few hours when the contrast between fluffy dough and creamy center is at its absolute best.
Chocolate Filling Options (Choose Your Adventure)
Option A: Chocolate Pastry Cream (Silky, Stable, Bakery-Style)
This is the classic “professional donut filling” texture: creamy, smooth, pipeable, and not runny.
- In a saucepan, whisk sugar, cornstarch, cocoa powder, and salt.
- Whisk in milk until smooth. Add egg yolks and whisk again.
- Cook over medium heat, whisking constantly, until thickened and bubbling (1–3 minutes once it starts warming up).
- Remove from heat; stir in chopped chocolate, butter, and vanilla until smooth.
- Press plastic wrap directly onto the surface (prevents a skin). Chill 1–2 hours until thick and cold.
- Before piping, whisk briefly to loosen to a silky texture.
Option B: Fast Ganache Filling (5 Minutes, Big Chocolate Energy)
- Heat heavy cream until just steaming (microwave or stovetop).
- Pour over chopped chocolate. Let sit 2 minutes.
- Stir until smooth; add butter + salt if using.
- Cool until thick enough to pipe (30–60 minutes at room temp, faster in the fridgestir every 10 minutes).
Option C: Chocolate-Hazelnut Spread (Shortcut That Still Slaps)
Want a filling that’s basically guaranteed to be delicious? Use chocolate-hazelnut spread. If it’s too thick, warm it slightly until pipeable (don’t make it hotjust soft).
Flavor Variations (Specific, Delicious Examples)
- Mocha filling: Add 1–2 tsp instant espresso powder to pastry cream or ganache.
- Mexican hot chocolate: Add 1/2 tsp cinnamon + a tiny pinch of cayenne to the filling.
- Orange-chocolate: Add 1 tsp orange zest to pastry cream; it tastes like fancy candy.
- Boston-cream-ish: Fill with vanilla pastry cream and drizzle a chocolate glaze on top.
Why This Works (A Little Food Science, No Lab Coat Required)
Yeast + Enriched Dough = Soft, Fluffy Donuts
Yeast creates gas bubbles that expand during proofing and frying, giving donuts lift. Eggs and butter enrich the dough, making it tender and flavorful instead of bread-like.
Oil Temperature Is the Whole Game
At the right temperature, donuts brown quickly outside while cooking through inside. If the oil is too cool, donuts soak up oil and get heavy. Too hot, and you get “tan on the outside, raw on the inside,” which is not the donut life we’re aiming for.
Pastry Cream Is Thickened by Starch + Eggs
Cornstarch thickens as it heats, and egg yolks add richness. Cooking while whisking prevents lumps and keeps the texture smooth enough to pipe.
Troubleshooting: Fixes for the Most Common Donut Problems
Problem: My donuts are greasy
- Likely cause: Oil temperature was too low.
- Fix: Keep oil around 350°F and fry in small batches so the temp doesn’t crash.
Problem: Brown outside, raw inside
- Likely cause: Oil was too hot or donuts were too thick.
- Fix: Lower heat slightly. Roll dough to about 1/2 inch. You can also check the first batch by probing for doneness (see safety tips below).
Problem: Donuts deflate when I move them
- Likely cause: Over-proofed or handled too roughly.
- Fix: Proof until puffy but not fragile. Move gently; use parchment squares to lift if needed.
Problem: Filling leaks out
- Likely cause: Donuts were too warm, or filling is too thin.
- Fix: Let donuts cool 10–15 minutes. Chill pastry cream until thick; cool ganache until pipeable.
Problem: My pastry cream is lumpy
- Likely cause: Not whisked constantly, or it cooked too fast in spots.
- Fix: Strain through a fine mesh sieve, then whisk until smooth. Next time, keep the heat medium and whisk like you mean it.
Food Safety + Best Practices (Quick but Important)
- Use a thermometer: Maintaining oil temp is the difference between “golden and fluffy” and “why is this donut wearing an oil jacket?”
- Don’t crowd the pot: Too many donuts at once drops the temperature and increases splatter risk.
- Optional internal check: If you want extra reassurance on the first batch, check doneness with an instant-read thermometerespecially if your donuts are thick.
- Dairy-based fillings need refrigeration: If you fill with pastry cream, store appropriately (details below).
Storage & Make-Ahead Tips
Best Day to Eat Them: Today
Fresh donuts are at their peak within hours. After that, they’re still tasty, but the texture gradually shifts from “cloud” to “pleasantly chewy pillow.”
Room Temperature (Unfilled or Non-Dairy Fillings)
- Store in an airtight container for 1–2 days.
- Line with parchment to reduce sticking.
Refrigerator (Dairy-Based Chocolate Pastry Cream Filling)
- Refrigerate in an airtight container.
- Plan to eat within 3–4 days for best quality.
- Note: Refrigeration can dry donuts slightlylet them sit at room temp a bit before eating.
Freezer (Best for Unfilled Donuts)
- Freeze unfilled donuts, wrapped well, up to about 2–3 months.
- Thaw at room temperature, then fill fresh for the best texture.
Make-Ahead Strategy (If You Like Winning)
- Make the pastry cream filling a day ahead and chill.
- Fry donuts the day you plan to serve and fill once cooled.
What It’s Really Like to Make Chocolate-Filled Donuts at Home ( of Realistic “Experience”)
Here’s the honest, home-kitchen reality of making chocolate-filled donuts: it feels like a tiny baking adventure with multiple chapters, and every chapter ends with you getting to eat something warm and ridiculous. The first moment where you think, “Oh, this is happening,” is when the yeast blooms. You stir warm milk and yeast, and a few minutes later the surface turns foamylike your bowl just quietly whispered, “Trust me.” That’s your green light.
Mixing the dough is both soothing and slightly dramatic. At first it’s sticky and messy, the kind of dough that makes you question your life choices. Then you knead, and you’ll notice the transformation: it goes from shaggy to smooth, from “wet laundry” to “soft pillow.” If you’ve never made enriched dough before, the butter can feel like it’s taking forever to incorporate. It’s normal. Keep kneading and it will eventually behave. Dough does not respond well to panic, but it responds wonderfully to patience.
The rising steps are where donut-making teaches the main lesson: good things take a little time. While the dough doubles, you start noticing tiny signalsthe dough gets puffier, the surface looks smoother, and the whole bowl seems lighter. And yes, waiting can feel like torture because donuts are not the kind of food that inspires calm. They inspire appetite.
Cutting the donuts is the most instantly satisfying part. You roll out the dough and press the cutter down, and suddenly you’re producing perfect little rounds that look like they came from a bakery tray. This is also when you’ll start thinking about how many you can “reasonably” eat. (The answer is: more than you planned. Always.) The second rise is quieter: the donuts inflate slightly, become tender, and you learn to touch them like they’re tiny balloons filled with hopes and dreams.
Frying is the “chef moment.” The oil shimmers, the thermometer hits the target temperature, and the first donut goes in. It floats. It browns. Your kitchen starts smelling like a donut shop, and suddenly you’re emotionally attached to the entire batch. You’ll want to crank the heat to make things go fasterdon’t. A steady oil temperature is what keeps the inside fluffy instead of dense or oily. When you flip the donuts and see that even golden color, it’s honestly a little thrilling.
Filling them is the grand finale. You poke a hole, slide in the tip, and start piping. The donut grows heavier in your hand and you can feel it become “real.” Sometimes a little filling pushes back outthat’s your sign you nailed it. The first bite is what you came for: soft dough, gentle sweetness, then that chocolate center that makes you stop talking mid-sentence. If you serve them slightly warm, the filling tastes even more intense, and the contrast between fluffy exterior and creamy interior feels straight-up bakery-level.
And here’s the best part: even if they’re not perfectly uniform, they still taste like a victory. Homemade donuts don’t need to look identicalthey just need to be tender, filled generously, and eaten with zero shame.


