Table of Contents >> Show >> Hide
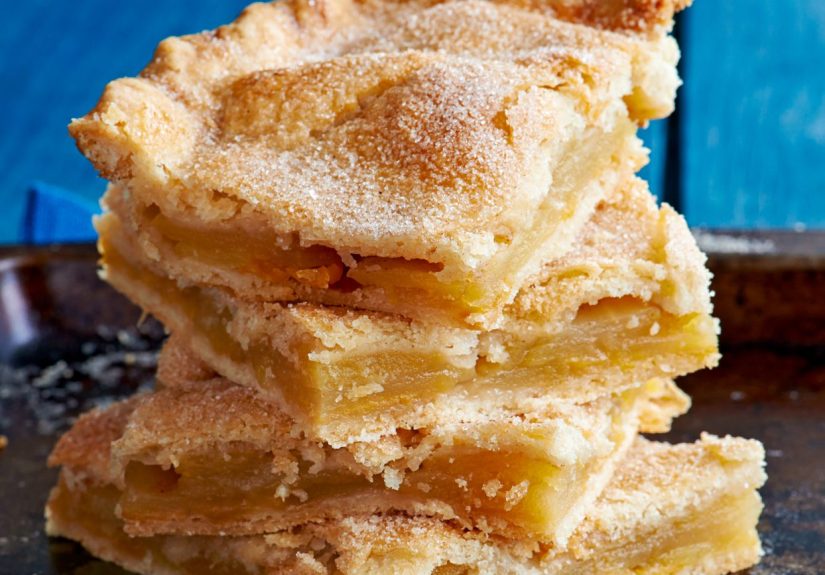
Imagine if your grandma’s best apple pie met a buttery Danish pastry in a 9×13 pan and decided to stay forever.
That’s what these Danish pastry apple pie bars taste like: all the cozy flavors of apple pie, but with a tender,
flaky crust, a generous layer of cinnamon-kissed apples, and a simple vanilla glaze that makes the whole pan
look bakery-level fancy with almost zero drama.
Classic Danish apple bars are beloved across the Midwest and beyond: a soft but flaky pastry dough on the bottom,
a layer of crushed cornflakes or similar crumbs to keep things crisp, a mound of tart apples tossed with sugar
and cinnamon, and another sheet of pastry on top, baked until golden and finished with a sweet glaze.
The result is a crowd-pleasing dessert that cuts neatly into bars, travels well, and feeds everyone from your
neighbors to your coworkers.
What Are Danish Pastry Apple Pie Bars?
Danish pastry apple pie bars are essentially apple pie in bar form, built on a tender pastry crust rather than a
crumbly shortbread or oat base. While many apple pie bar recipes use press-in crusts, streusel toppings, or puff
pastry, this version leans into that old-fashioned Danish-style dough: flour, salt, cold fat, an egg yolk, and
milk, gently handled to keep it flaky.
The bars typically include:
- A two-layer pastry crust (bottom and top).
- A thin layer of cornflakes or similar cereal to absorb excess juices.
- Tart apples (like Granny Smith or other baking apples) sliced or thinly wedged.
- A simple cinnamon-sugar mixture instead of a complicated cooked filling.
- A powdered sugar glaze drizzled over the cooled bars.
Because everything bakes in a rectangular pan, you get all the comfort of apple pie without having to fuss over
crimping edges or perfectly shaping a round pie crust. It’s ideal when you want a nostalgic apple dessert for a
crowd with less hands-on work.
Key Ingredients and Why They Work
The Pastry Dough
Most traditional Danish pastry apple bar recipes start with a fairly simple pastry formula: about 2½ cups all-purpose
flour, 1 teaspoon salt, and 1 cup cold butter or shortening, cut in until the mixture looks like coarse crumbs.
An egg yolk is beaten with milk to reach about ⅔ cup total liquid, which binds the dough and adds richness.
Why this works:
- Cold fat creates steam pockets as it melts, giving the pastry its flaky layers.
- Egg yolk adds tenderness, color, and a bit of structure.
- Milk makes the dough more flavorful and slightly softer than a straight-water pastry.
The Apple Filling
These bars are traditionally made with tart baking applesthink Granny Smith, Jonathan, Honeycrisp, or a mixpeeled,
cored, and sliced fairly thin. You’ll want roughly 6–8 cups of apples for a 9×13 pan, tossed with ¾ to 1 cup sugar
and about 1 teaspoon cinnamon.
There’s usually no need to pre-cook the filling; the apples soften as the bars bake. Unlike some apple pie bar recipes
that cook the apples on the stovetop first to control moisture, this old-fashioned method relies on the cornflake layer
and a well-baked crust to keep things from getting soggy.
The Secret Cornflake Layer
One charming hallmark of Danish pastry apple bars is a thin layer of crushed cornflakes scattered over the bottom
crust before adding the apples. This idea shows up in numerous vintage recipes and modern updates alike.
The cereal acts as a moisture sponge, soaking up excess apple juices so the bottom crust stays crisp and flaky rather
than soggy.
You’ll need about 1 cup of lightly crushed cornflakes (or a similar plain or frosted flake cereal). Sprinkle it evenly
over the rolled-out bottom crust in the panit will basically disappear into the filling as the bars bake, but it
makes a huge difference in texture.
Glaze for That Bakery Finish
Once the bars are cool, a simple glaze made from powdered sugar, milk, and a touch of vanilla gets drizzled over the
top crust. Most recipes use about 1 cup powdered sugar, 3–4 teaspoons milk, and ½ to 1 teaspoon vanilla.
It adds sweetness, shine, and that “I totally bought this from a fancy bakery” look.
Step-by-Step: Danish Pastry Apple Pie Bars Recipe
Ingredients
For the Pastry
- 2½ cups all-purpose flour
- 1 teaspoon salt
- 1 cup cold unsalted butter (or shortening), cut into cubes
- 1 large egg, separated (you’ll use the yolk in the dough, the white as a wash)
- ⅔ cup milk (you may need a little less; start with ½ cup and add as needed)
For the Filling
- 1 cup crushed cornflakes cereal
- 6–8 cups tart apples, peeled, cored, and thinly sliced
- ¾–1 cup granulated sugar (adjust to the sweetness of your apples)
- 1 teaspoon ground cinnamon
- 1 tablespoon lemon juice (optional, for brightness)
For the Glaze
- 1 cup powdered sugar
- 3–4 teaspoons milk
- ½ teaspoon vanilla extract
Make the Pastry Dough
-
In a large bowl, whisk together flour and salt. Cut in the cold butter with a pastry blender or your fingertips
until the mixture looks like coarse crumbs with pea-sized bits of butter remaining. -
In a measuring cup, beat the egg yolk lightly, then add enough milk to reach ⅔ cup total liquid. Pour this into the
flour mixture and stir gently with a fork until the dough just comes together. Avoid overmixingsome shaggy bits
are fine. -
Divide the dough into two portions, one slightly larger than the other. Shape each into a rectangle, wrap in plastic,
and chill for at least 30 minutes. Chilling helps the fat firm up and the gluten relax, which means flakier layers
and easier rolling.
Prepare the Filling
-
In a large bowl, toss the sliced apples with sugar, cinnamon, and lemon juice (if using) until evenly coated.
Set aside while you prepare the crust; the apples will release a bit of juice, which is normal. - Lightly crush the cornflakes and keep them ready to sprinkle over the bottom crust.
Assemble the Bars
- Preheat your oven to 375°F (190°C). Grease a 9×13-inch baking pan or line it with parchment for easier slicing.
-
On a lightly floured surface, roll out the larger portion of dough into a rectangle just slightly bigger than the pan.
Carefully transfer it to the pan, pressing it into the corners and allowing a small overhang up the sides. - Sprinkle the crushed cornflakes evenly over the bottom crust. This layer will help keep the pastry from becoming soggy.
-
Spread the apple mixture over the cornflakes, arranging the slices in a roughly even layer. Don’t be shythese bars
are supposed to be generously filled. -
Roll out the remaining dough to roughly the size of your pan and gently lay it over the apples. Press the edges of the
top and bottom crust together to seal, trimming or folding in any excess. Cut a few small slits in the top crust to let
steam escape while baking. - Lightly beat the reserved egg white and brush it over the top crust for shine and color.
Bake and Glaze
-
Bake the bars for 35–45 minutes, or until the crust is golden brown and you can see the apple filling bubbling slightly
through the vent slits. If the edges brown too quickly, cover them loosely with foil during the last 10 minutes. - Transfer the pan to a wire rack and let the bars cool almost completely. This helps the filling set so you get clean slices.
-
Whisk together powdered sugar, milk, and vanilla until smooth. Adjust with a few drops of milk or extra sugar for a drizzleable
consistency. Drizzle the glaze over the cooled bars in thin zigzags. -
Once the glaze sets, cut into bars and serve. Expect silence at the table for the first few bites, followed by requests
for the recipe.
Tips for Perfectly Flaky Danish Pastry Apple Bars
-
Keep everything cold. Use cold butter, cold milk, and handle the dough as briefly as possible. Warm dough
smears the fat and sabotages the flakiness. -
Don’t skip the rest time. Chilling the dough before rollingand even briefly chilling the assembled bars
before bakinghelps prevent shrinkage and tough crust. -
Use the right apples. Tart, firm apples (like Granny Smith) hold their shape and balance the sweetness.
A mix of tart and sweet varieties gives a more complex flavor, similar to modern apple pie techniques. -
Vent the top crust. A few small slits allow steam to escape, which helps avoid a soggy top and prevents
the crust from puffing up wildly. -
Let them cool before slicing. Warm bars are delicious, but if you cut too early, the filling will ooze.
Letting them set gives you tidy squares that still taste cozy at room temperature.
Serving, Storage, and Easy Variations
These Danish pastry apple pie bars are incredibly versatile. Serve them slightly warm with vanilla ice cream for a
dinner-party dessert, or at room temperature on a brunch buffet. Because they cut cleanly and travel well, they’re ideal
for potlucks, bake sales, and holiday gatherings.
Leftover bars keep well at room temperature (loosely covered) for about a day, or in the refrigerator for 3–4 days. The
pastry will soften slightly over time, but the flavors deepen. To revive the texture, warm individual bars briefly in a
low oven or toaster oven.
If you want to play with variations:
-
Almond twist: Swap some of the milk in the glaze for cream and add a splash of almond extract. Top
with sliced toasted almonds. -
Caramel drizzle: Inspired by caramel apple pie bar recipes, you can drizzle warm salted caramel sauce
over each serving for extra decadence. -
Quick puff pastry version: When you’re short on time, some modern recipes use store-bought puff pastry
or crescent dough with apple pie filling. You’ll get more of a Danish vibe and less of the classic old-fashioned pastry,
but it’s a great shortcut.
Baking Experiences and Real-Life Tips with Danish Pastry Apple Pie Bars
Once you’ve made these Danish pastry apple pie bars a couple of times, you start to understand why they show up in so many
church cookbooks and family recipe boxes. They’re the kind of dessert that quietly steals the show at every gathering and
earns you the very important title of “person in charge of dessert” from here on out.
One of the best things about this recipe is how forgiving it is in real life. Maybe your pastry cracks a little as you lay
it over the applesno problem. Just patch it with scraps and remember that glaze covers a multitude of sins. You don’t need
bakery-level rolling skills to create something that tastes and looks fantastic. In fact, the slightly rustic, uneven top
often makes the bars look even more homemade and inviting.
If you’re baking with kids, this recipe is surprisingly family-friendly. Little hands can help crush the cornflakes, arrange
the apple slices, and drizzle the glaze. It’s also a great way to show them the difference between a press-in crust and a
rolled pastry dough. You can talk through why the butter needs to stay cold, what “coarse crumbs” actually look like, and
how to roll dough without turning your counter into a flour snowstorm.
These bars also shine when you’ve somehow acquired a mountain of applesmaybe from an orchard trip, maybe from a generous
neighbor, or maybe because you forgot you already bought some and did it again (no judgment). Apple pies are lovely, but
they only feed so many people and can be fussy to transport. Danish pastry apple bars, on the other hand, can easily serve
a crowd. Set a pan of these on the office kitchen counter or at a potluck and watch them disappear one tidy square at a time.
Another real-world perk is how flexible the flavor can be while still feeling traditional. If your apples are very tart,
you can edge closer to the full cup of sugar in the filling; if they’re sweeter, pull back a bit. A squeeze of lemon brightens
everything, but if you’re out, the bars will still be delicious. Some bakers like to grate a little nutmeg into the cinnamon
sugar or add a pinch of cardamom for a faintly Scandinavian twist. Others fold in a handful of raisins or chopped walnuts for
extra texture. None of these small tweaks break the recipethey just make it more your own.
Texture-wise, you’ll quickly learn what your crew prefers. If you bake the bars closer to the 35-minute mark, the apples stay
a bit softer and juicier. Pushing the bake closer to 45 minutes develops deeper caramelized edges, a firmer filling, and an
even crisper base. If you’re worried about sogginess, you can be extra generous with the cornflakes or even borrow a trick
from modern pie makers and sprinkle a few graham cracker crumbs under the filling to absorb juices.
Over time, many home bakers end up with their own “house” version of Danish pastry apple bars. Maybe you always add almond
extract to the glaze because it reminds you of your favorite bakery. Maybe you switch half the apples to a sweeter variety
so you can cut back the sugar. Maybe you double the recipe and bake it on a big sheet pan for holiday brunch so everyone can
grab a square between the scrambled eggs and the coffee.
However you adapt them, these bars have a way of becoming part of your baking story. They’re humble enough for a Tuesday
night dessert, yet special enough to show up on Thanksgiving or at a baby shower. Every time you roll out that dough and
pile on the apples, you’re not just following a Danish pastry apple pie bars recipeyou’re continuing a tradition that’s
been keeping kitchens warm and homes smelling like cinnamon for generations.
Conclusion
Danish pastry apple pie bars are the sweet spot between classic apple pie and easy, slice-and-serve dessert bars. With a
flaky, buttery crust, a generous layer of spiced apples, and a simple vanilla glaze, they deliver big comfort with relatively
little effort. The cornflake layer keeps the bottom crisp, the pastry dough stays tender when handled gently, and the bars
themselves are endlessly customizable to suit your crowd and your pantry.
Whether you’re feeding a weekend brunch crew, stocking the dessert table for a potluck, or just trying to use up a pile of
apples, this Danish pastry apple pie bars recipe is a reliable, nostalgic, and impressively delicious solution. One pan,
many happy eatersand a new go-to fall dessert added to your personal baking lineup.


