Table of Contents >> Show >> Hide
- What Is an Industrial Rustic Monogram Sign?
- Best Materials for a DIY Industrial Rustic Monogram Sign
- Planning the Design Before You Cut or Paint
- Step-by-Step: How to Make a DIY Industrial Rustic Monogram Sign
- How to Hang the Sign Securely
- Design Variations for Every Room
- Common Mistakes and How to Avoid Them
- Budget-Friendly Tips
- Real DIY Experience: What Actually Matters When Making This Sign
- Conclusion
A DIY industrial rustic monogram sign is one of those projects that looks boutique-shop expensive but can be made with a few humble supplies, a little patience, and the noble willingness to get sawdust on your shirt. It blends warm stained wood, bold lettering, metal accents, and a personalized initial into one statement piece that says, “Yes, I decorate with intention,” while quietly admitting, “I also own a glue gun.”
The beauty of this project is its flexibility. You can hang it in an entryway, style it over a mantel, place it in a home office, add it to a gallery wall, or make it as a wedding, housewarming, anniversary, or holiday gift. A monogram gives it personal meaning, rustic wood gives it warmth, and industrial details such as black hardware, faux rivets, galvanized metal, pipe-style brackets, or dark wax give it that reclaimed-loft personality without requiring you to actually move into a warehouse.
This guide walks through the complete process: choosing materials, designing the layout, staining and distressing the wood, adding the monogram, attaching industrial accents, sealing the finish, and hanging the sign safely. You will also find troubleshooting tips, styling ideas, and real-world project experience at the end to help you avoid the classic DIY plot twist: “It looked easier on the internet.”
What Is an Industrial Rustic Monogram Sign?
An industrial rustic monogram sign is a personalized wall decor piece that combines three design ideas. The rustic part comes from natural wood grain, weathered stain, distressed paint, uneven texture, and handmade charm. The industrial part comes from darker tones, metal details, exposed fasteners, black iron-inspired accents, and simple geometric structure. The monogram is the personal centerpiece, usually a large letter, family initial, surname design, or layered typography.
Think of it as farmhouse decor’s slightly moodier cousin. It still loves wood, but it also owns matte black hardware and probably drinks cold brew from a metal tumbler. The style works especially well because it balances contrast: rough and refined, warm and cool, handmade and architectural.
Best Materials for a DIY Industrial Rustic Monogram Sign
You do not need exotic lumber or professional shop equipment for this project. In fact, common boards are often better because they are affordable, easy to cut, and full of character once stained. Pine is a popular choice for DIY signs because it is lightweight and easy to work with, though it can absorb stain unevenly if you skip proper preparation. Plywood, cedar fence pickets, pallet wood, and reclaimed boards can also work beautifully, depending on your desired finish.
Recommended Supplies
- Wood board, plywood panel, or joined planks
- Sandpaper in medium and fine grits
- Wood stain in walnut, espresso, gray, driftwood, or weathered oak tones
- Pre-stain wood conditioner for soft woods such as pine
- Foam brush, stain pad, or lint-free cloth
- Acrylic paint, chalk-style paint, or stencil paint
- Vinyl stencil, reusable stencil, printed template, or wooden letter
- Painter’s tape and transfer tape if using vinyl
- Metal accents such as corner braces, washers, upholstery tacks, nail heads, or pipe straps
- Wood glue, brad nails, screws, or construction adhesive
- Clear topcoat, polyurethane, wax, or matte sealer
- D-rings, sawtooth hanger, keyhole hanger, or French cleat
- Level, tape measure, pencil, drill, and stud finder
- Safety glasses, gloves, and a dust mask or respirator when sanding
If you want a cleaner modern-industrial look, choose a smooth plywood panel and crisp black lettering. If you want a rugged reclaimed look, use joined planks with knots, saw marks, and a slightly uneven surface. The “perfectly imperfect” style is your friend here. A knot in the wood is not a flaw; it is rustic personality with a better publicist.
Planning the Design Before You Cut or Paint
Before touching stain, map out the sign. A good size for an entryway or living room wall is about 16 by 20 inches, 18 by 24 inches, or 24 by 24 inches. For a porch or large mantel, go bigger. For a shelf, mudroom nook, or bedroom door, a smaller 10 by 12 inch sign may be enough.
The monogram should be the visual anchor. A single oversized letter is bold and timeless. A split-letter monogram with a family name through the center feels more traditional. A circular badge layout gives the sign a maker’s-mark look. For industrial rustic style, choose fonts with weight and structure: slab serif, bold sans serif, vintage block, condensed lettering, or stencil-style type. Avoid fonts that are too curly unless you want the sign to drift into wedding invitation territory.
Layout Ideas That Work
- Classic large initial: One big letter centered on stained wood.
- Family name monogram: Large initial behind a smaller surname banner.
- Industrial badge: Circle, rectangle, or shield shape with date and name.
- Layered wood letter: Raised wooden monogram attached over a painted or stained panel.
- Metal-letter look: Painted chipboard, MDF, or wood letter finished in black, bronze, or galvanized silver.
When in doubt, keep the design simple. Industrial rustic decor loves restraint. One strong initial, a dark stained background, and four metal corners can look far more expensive than a sign overloaded with scrolls, arrows, vines, dates, coordinates, and a motivational quote about coffee. Let the monogram breathe.
Step-by-Step: How to Make a DIY Industrial Rustic Monogram Sign
Step 1: Cut and Assemble the Wood Base
Start with your wood base. If you are using a single panel, cut it to size or buy a pre-cut craft board. If you are using multiple planks, arrange them face down and connect them with two thin support strips across the back. Use wood glue and short screws or brad nails, making sure the fasteners do not poke through the front.
For a chunky framed look, add a simple border using 1×2 trim. Mitered corners look polished, but straight butt joints are easier and still fit the rustic style. Paint or stain the frame darker than the center panel for extra contrast. A black outer frame against warm walnut stain gives instant industrial attitude.
Step 2: Sand the Surface Smooth
Sanding determines whether your finish looks intentional or like the board survived a small furniture-related tornado. Begin with medium-grit sandpaper if the board is rough, then move to a finer grit for the final pass. Sand with the grain whenever possible. Round over sharp edges slightly so the sign feels worn rather than freshly sliced from the lumber aisle.
Do not over-sand if you plan to stain. Extremely smooth wood may not absorb stain as deeply, especially with pigment-heavy stains. The goal is smooth enough to avoid splinters, but not so polished that the wood refuses color like a stubborn toddler refusing vegetables.
Step 3: Condition the Wood
If you are using pine, fir, birch, maple, or another soft or porous wood, apply a pre-stain wood conditioner before staining. This helps the wood absorb stain more evenly and reduces blotchy areas. Brush or wipe it on, let it penetrate according to product directions, then remove any excess. This step is especially helpful when you want a rich industrial rustic finish rather than random dark patches that look like the board had a bad afternoon.
Step 4: Apply the Stain
Choose a stain color that supports the mood of the room. Dark walnut, espresso, and jacobean tones feel dramatic and industrial. Weathered gray, driftwood, and brown-gray stains feel softer and more farmhouse rustic. Warm honey or provincial tones work well if your space already has black metal accents and you need the wood to bring balance.
Apply stain in the direction of the grain using a cloth, brush, or stain pad. Work in manageable sections and wipe away excess stain before it becomes sticky. For a deeper finish, let the first coat dry and add a second coat if needed. Always test on scrap wood first, because stain can look very different depending on wood species, sanding level, and how long it sits before wiping.
Step 5: Add Distressing for Rustic Character
Distressing is optional, but it gives the sign that aged, collected-over-time charm. Lightly sand the edges, corners, and raised grain after staining. Focus on areas that would naturally wear first. You can also tap the wood gently with a chain, screw, or hammer for dents, but use restraint. The goal is vintage texture, not “attacked by raccoon.”
For a layered finish, paint the board first, let it dry, then sand through areas before staining or glazing. Black paint under brown stain can create a smoky industrial tone. White or cream under gray stain creates a weathered barnwood effect. Chalk-style paint can be distressed easily and gives a matte, aged surface that pairs well with metal details.
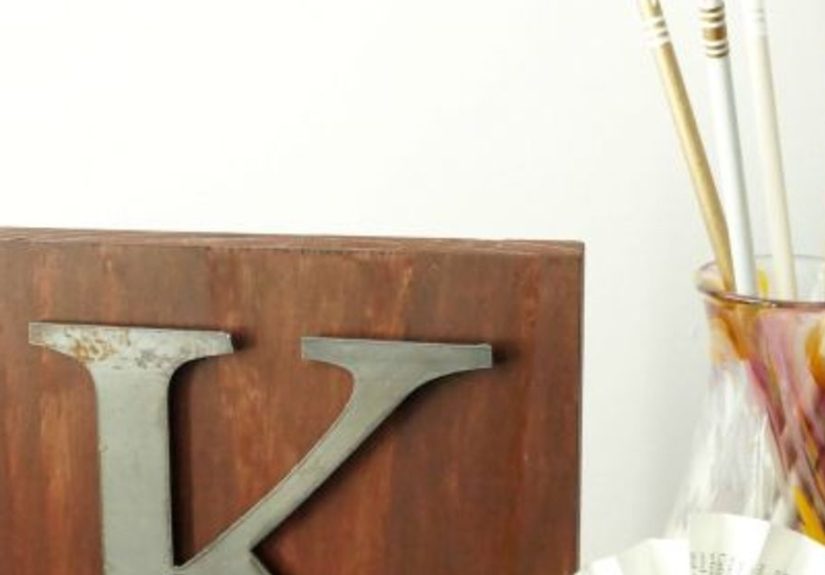
Step 6: Create the Monogram
You have several options for the monogram. A vinyl stencil gives crisp painted lettering. A reusable stencil works well if you prefer traditional craft methods. A wooden letter creates dimension. A printed paper template can be traced and hand-painted. If you own a cutting machine, design the letter digitally and cut stencil vinyl or adhesive vinyl.
For a painted stencil, press the stencil firmly to the wood and seal the edges with your fingers, a scraper, or painter’s tape. Use very little paint on the brush or sponge. Dab off excess paint before touching the sign. Paint bleed usually happens because there is too much paint, too much brushing, or not enough edge pressure. Use a dabbing motion from the outside edge toward the center, then remove the stencil while the paint is slightly wet for cleaner edges.
If using a raised wooden letter, paint it matte black, aged bronze, charcoal gray, or faux galvanized silver. Attach it with wood glue and a few small brad nails from the front or back. Raised letters cast natural shadows and make the sign feel more substantial, especially on large wall pieces.
Step 7: Add Industrial Accents
This is where the project earns its industrial badge. Add black corner brackets, small L-braces, flat washers, upholstery tacks, decorative screw heads, metal straps, or pipe-style details. You can use real hardware or lightweight decorative pieces painted to look like metal.
Try placing four metal corner plates on the sign, adding a horizontal metal strip behind the surname, or using small black screws around the monogram to mimic rivets. If you want a faux metal effect, paint wooden or chipboard shapes in black, then dry-brush bronze, silver, or pewter over the raised areas. A little metallic paint goes a long way. Too much and the sign may start looking like a robot’s name tag.
Step 8: Seal the Sign
Seal the finished sign to protect the stain, paint, and lettering. A matte or satin topcoat usually looks best for industrial rustic decor because it keeps glare low and preserves the aged look. Glossy finishes can work, but they may make rustic distressing look less authentic.
Apply thin coats and let each coat dry fully. Sand lightly between coats if the surface feels rough, then remove dust before adding another layer. For indoor signs, a clear matte sealer or furniture wax may be enough. For covered porch decor, use an exterior-rated topcoat and avoid placing the sign where rain or direct sun will punish it daily.
How to Hang the Sign Securely
Choose hanging hardware based on the weight of your sign. Small lightweight signs can use a sawtooth hanger. Medium signs often do well with D-rings and picture wire. Heavy signs, framed signs, or signs made from thick planks are best hung with a French cleat or directly into wall studs.
Use a level and tape measure before making holes. For a gallery wall, trace the sign on paper, tape the paper to the wall, and adjust placement before drilling. When hanging on drywall without a stud, use anchors rated for more than the sign’s actual weight. Hardware ratings matter. Gravity is not impressed by optimism.
Design Variations for Every Room
Entryway Monogram Sign
Use a large family initial, surname, and established date. Add hooks below the sign for keys, dog leashes, or hats. Black hooks against warm wood create a useful industrial rustic entry station.
Bedroom Monogram Sign
Choose a softer stain and a simple raised letter. A dark bronze or muted charcoal monogram looks elegant without feeling too heavy. Pair it with linen bedding, leather accents, or black bedside lamps.
Living Room Statement Sign
Go bigger and bolder. A 24-inch square sign with a framed border, large initial, and metal corner brackets can anchor a mantel, console table, or sofa wall. Add greenery nearby to soften the industrial edges.
Wedding or Housewarming Gift
Create a split-letter monogram with the couple’s surname and year. Keep the color palette neutral so it works in different homes. A handmade sign feels personal without being too fragile or overly sentimental.
Common Mistakes and How to Avoid Them
Skipping sanding: Rough boards can make lettering uneven and stain blotchy. Even rustic signs need basic prep.
Using too much stencil paint: A dry brush or sponge gives cleaner lines. Heavy paint causes bleeding under the stencil.
Choosing a thin font: Delicate letters can disappear on textured wood. Bold lettering reads better from across the room.
Forgetting contrast: Dark letters on dark stain may look muddy. Use black on medium wood, white on dark wood, or metallic accents on deep brown backgrounds.
Over-distressing: A few worn edges look charming. Too many dents and scratches can make the sign look accidental.
Ignoring safety: Wear eye protection when cutting or drilling, and protect your lungs when sanding. Work in a ventilated area when staining, painting, or sealing.
Budget-Friendly Tips
A DIY industrial rustic monogram sign can be surprisingly affordable. Use scrap wood from another project, leftover stain, or old hardware from a drawer. Thrift stores often have outdated signs or framed art that can be sanded, painted, and transformed into a new monogram piece. Old cabinet pulls, hinges, brackets, or metal straps can become decorative accents.
If you do not have a cutting machine, print a large letter at home or at a copy shop, rub pencil graphite on the back, tape it to the board, and trace the outline. The graphite transfers lightly to the wood so you can paint the letter by hand. It is slower than vinyl, but it worksand it gives you full bragging rights.
Real DIY Experience: What Actually Matters When Making This Sign
The most important lesson from making a DIY industrial rustic monogram sign is that the surface tells the truth. If the wood is dusty, oily, rough, or uneven, the stain and lettering will reveal it. A beautiful sign begins before the fun part. Sanding, wiping away dust, testing stain, and planning the letter placement may feel like warm-up chores, but they are the difference between “handmade decor” and “I got into a fight with a board.”
One helpful experience is to make a mini sample board before committing to the final piece. Use the same wood, same stain, same paint, and same sealer. Test the monogram color on top of the stain. A white letter may look crisp on dark walnut, while black may look stronger on honey brown. Metallic bronze may look amazing in your imagination but strangely invisible in low evening light. A sample board saves the main project from becoming a very decorative regret.
Another practical tip is to place all the design elements on the sign before attaching anything permanently. Lay down the stencil, letter, brackets, screws, and frame pieces. Step back at least six feet. Take a phone photo. Odd spacing becomes easier to see in a photo than when you are hovering over the table. Many DIY signs fail not because the technique is bad, but because the design is crowded. Industrial rustic style looks best when the layout feels confident, not crammed.
Stencil work deserves patience. The brush should feel almost too dry. Dab lightly, build the color slowly, and resist the urge to sweep paint back and forth like you are painting a fence. If a little paint bleeds, do not panic. Let it dry, then touch up with a small artist brush or lightly distress that area so it blends into the rustic finish. Rustic projects are forgiving when you treat mistakes as texture instead of tragedy.
Hardware is another detail that changes the whole mood. Shiny silver screws can look too new unless that is the style you want. Matte black, oil-rubbed bronze, aged pewter, or darkened steel tones usually fit better. If your hardware looks too bright, lightly scuff it and add a thin coat of dark spray paint or craft paint. For a faux rivet look, washers and upholstery tacks are inexpensive and convincing. Just keep them symmetrical unless you are intentionally going for a salvage-yard collage.
Finally, do not rush the drying time. Stain that feels dry on the surface may still be curing underneath. Applying stencil vinyl too soon can pull up finish or leave marks. Adding topcoat too early can smear lettering. Give each layer time to settle. A sign that takes two days and looks great is better than a sign finished in two hours and hidden behind a plant. The best DIY decor has a handmade soul, but it also benefits from grown-up patience.
Conclusion
A DIY industrial rustic monogram sign is more than a weekend craft. It is a personal piece of wall decor that combines warm wood, bold typography, and rugged metal-inspired details in a way that feels custom and timeless. Whether you make one for your own entryway, a cozy bedroom, a living room gallery wall, or a thoughtful gift, the project gives you plenty of room to customize the size, stain, lettering, and hardware.
The best results come from simple decisions done well: choose a sturdy wood base, sand carefully, test your stain, use a bold monogram, apply stencil paint sparingly, add just enough industrial detail, and seal the finished sign. The result is a handmade piece that looks polished, personal, and full of characterwithout requiring a giant budget or a professional workshop. In other words, it is DIY decor with style, substance, and just the right amount of sawdust drama.