Table of Contents >> Show >> Hide
- Why This Dollar Tree Halloween Candelabra Works So Well
- Materials for a Budget-Friendly Halloween Candelabra
- Step-by-Step Dollar Tree Halloween Candelabra Tutorial
- Design Variations to Try
- Common Mistakes to Avoid
- Safety Tips for a Better DIY
- How to Style Your Finished Halloween Candelabra
- Final Thoughts
- Real-World Experiences With This Project
If Halloween decorating had a love language, it would probably be “dramatic lighting on a very small budget.” That is exactly why a Dollar Tree Halloween candelabra tutorial has become such a favorite among DIY lovers. It delivers the whole haunted-mansion mood without asking your wallet to enter the spirit world. With a few inexpensive supplies, a little glue, and a willingness to spray-paint things black like a responsible autumn goblin, you can create a spooky centerpiece that looks far more expensive than it is.
The beauty of this project is that it works whether your style leans gothic, vintage, glam, or full “a witch definitely owns this dining room.” Some crafters build Halloween candle displays from stacked glass holders, some use bottles for a potion-lab vibe, and others create dripping candle clusters for a more theatrical look. This tutorial combines the smartest ideas into one approachable project that feels custom, polished, and surprisingly easy to pull off.
Below, you’ll learn how to make a Halloween candelabra from affordable Dollar Tree supplies, how to choose the right materials, how to avoid the most common mistakes, and how to style the finished piece so your home looks spooky in a chic way instead of like a craft explosion happened in aisle seven.
Why This Dollar Tree Halloween Candelabra Works So Well
A good Halloween craft needs three things: atmosphere, affordability, and just enough chaos to make it memorable. This one checks every box. A DIY Halloween candelabra instantly adds height to a table, mantel, shelf, or entry console. It creates that layered, moody look decorators love, and it does it with materials that are easy to find at discount stores.
Even better, this project is flexible. You can make it tall and dramatic for a dining table centerpiece, short and creepy for a bookshelf, or wide and layered for a fireplace mantel. You can spray it matte black for classic haunted-house style, brush on metallic gold for a glam gothic look, or distress it with gray and bronze for an old-world finish that says, “Yes, I absolutely inherited this from my mysterious great-aunt.”
Another big advantage is that you do not need advanced crafting skills. If you can stack, glue, paint, and patiently wait for things to dry without poking them every three minutes, you can make this project.
Materials for a Budget-Friendly Halloween Candelabra
Core supplies
For a classic Dollar Tree candelabra look, gather the following:
3 to 5 Dollar Tree glass candleholders or candlesticks
1 small tray, charger, plate, or sturdy base
3 to 5 battery-operated tea lights or LED taper candles
Hot glue gun and glue sticks
Black spray paint or matte finish spray paint
Optional metallic paint for dry brushing
Plastic skulls, skeleton hands, ravens, spiders, or faux roses
Faux moss, black ribbon, lace, or creepy cloth for styling
Optional upgrade materials
If you want a more detailed or “high-end dupe” finish, add these:
Black acrylic paint for touch-ups
Rub-on wax or metallic craft paint
Fine sandpaper for prepping slick surfaces
Foam pumpkins or mini skull accents
Flickering LED candles for a more realistic glow
The exact mix depends on your design. If you want more height, stack different glass holders. If you want more drama, use wider spacing and cluster embellishments around the base. If you want the project to whisper “elegant haunted estate” instead of scream “budget bin panic,” stick to a controlled color palette: black, gray, gold, cream, and maybe a touch of dark plum.
Step-by-Step Dollar Tree Halloween Candelabra Tutorial
Step 1: Plan your shape before gluing anything
Before the hot glue gun enters the chat, lay out all your candleholders and base pieces on a flat surface. Try different combinations of heights and widths. A strong candelabra usually looks best with a tallest center point and shorter sides, or with three staggered levels that feel balanced but not too symmetrical.
This step matters more than people think. A Halloween centerpiece can go from “vintage gothic elegance” to “wobbly tower of doom” very quickly if the proportions are off. Stand back and look at it from a distance. If one side looks awkward, fix it now while your project is still judgment-free.
Step 2: Clean and prep your surfaces
Wipe glass, plastic, or metal pieces so they are free of dust, oils, and sticker residue. If any pieces are extra glossy, lightly scuff them with fine-grit sandpaper. This helps paint and glue hold better and keeps you from discovering later that your masterpiece is peeling like a haunted sunburn.
If you are painting plastic decorative elements like skeleton hands or ravens, surface prep is especially important. Clean pieces dry more evenly and give you a smoother finish.
Step 3: Build the structure
Start with the base, then glue the largest candleholder or pedestal in the center. Add side holders one at a time, checking balance as you go. Hold each piece in place long enough for the glue to grab. If your design includes stacked glass holders, keep the widest pieces lower and the narrowest pieces higher. Gravity is a real critic, and she is not forgiving.
For a wider candelabra effect, use a plate or tray base and attach candleholders at different points rather than stacking everything vertically. This creates a fuller silhouette and gives you room for skulls, spiders, moss, or faux flowers between the candle stems.
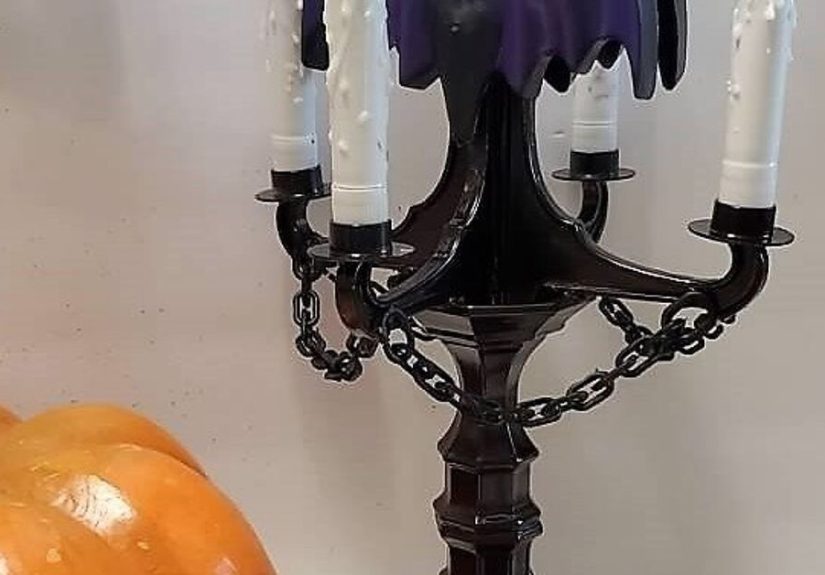
Step 4: Add spooky architectural details
Now comes the fun part: making it look less like stacked glassware and more like intentional Halloween decor. Glue on skeleton hands so they appear to cradle candle cups. Attach mini skulls at the base. Wind black lace around the center. Add faux roses for a romantic gothic look, or spiders if you want guests to lean in and immediately regret it.
If you are making a dripping-wax-inspired version, you can create faux drips with hot glue. Work slowly, letting the glue trail down the side of the candleholder or around the candle cup. Do not overdo it. A few convincing drips look eerie and stylish; too many make it look like your candelabra sneezed.
Step 5: Spray paint for a unified finish
Once the structure is fully assembled and cooled, take it outside or to a well-ventilated area for painting. Spray the entire piece in light, even coats. Matte black is the easiest choice and almost always looks good. It instantly hides mismatched materials and makes the whole piece feel cohesive.
Let each coat dry before applying the next. Thin coats create a cleaner, more professional finish and help prevent drips. After the black coat dries, you can dry-brush metallic gold, bronze, or silver over raised edges for an aged effect. This tiny extra step can make your budget Halloween decor look dramatically more expensive.
Step 6: Add candles and final styling
Place LED tea lights or LED tapers into each holder. Then style the base with your chosen accents. A few faux ravens, black roses, or skeletal details can make the display feel complete. Keep the surrounding decor balanced. You want a spooky focal point, not a yard sale hosted by Dracula.
If your candelabra is going on a mantel, pair it with stacked books, old frames, potion bottles, or dark greenery. If it is for a table centerpiece, place it on a runner with mini pumpkins and gauzy black fabric. If it is headed to an entry table, let it stand mostly on its own so it gets the attention it deserves.
Design Variations to Try
Classic gothic black candelabra
Use all-black paint, flickering LED candles, and minimal embellishments. This version feels elegant, simple, and dramatic. It works well in modern homes because it adds Halloween mood without looking cartoonish.
Vintage haunted-house style
Start with black paint, then dry-brush bronze, gold, or pewter over the edges. Add faux moss, dusty florals, and a few old-looking labels or apothecary bottles nearby. This version looks like it belongs in a creepy manor where someone definitely says, “We don’t go into the east wing.”
Glam Halloween centerpiece
Use black, gold, and a touch of purple. Add metallic skulls, black feathers, or glossy roses. This is perfect for party tables or anyone who likes their spooky season with a little sparkle and zero shame.
Ghostly candle display
Instead of focusing heavily on the stand, use bent white candles, simple faces, or white-painted details to create a softer ghost-inspired look. This version is playful and works well for family spaces or lighter Halloween decorating themes.
Common Mistakes to Avoid
Using too many different shapes: Just because the store has seventeen types of candleholders does not mean your project needs all seventeen.
Skipping the layout step: Dry-fitting your design first saves time, glue, and emotional damage.
Painting too heavily: Thick coats can pool, drip, and make details disappear. Slow and light wins this race.
Ignoring stability: A Halloween candelabra should look dramatic, not dangerous. Test it on the surface where it will be displayed.
Overcrowding with embellishments: One raven, a few spiders, or two mini skulls can be effective. Twenty-seven random decorations make it look confused.
Safety Tips for a Better DIY
The smartest version of this project uses battery-operated candles. They give you the same warm flicker without the risk of open flame near glue, paint, faux florals, lace, or plastic pieces. That makes them especially ideal for Halloween displays, party setups, and homes with kids or pets.
When spray painting, work in a ventilated area and use light coats. Let pieces dry fully before handling them. When using hot glue, protect your workspace, avoid touching the nozzle, and allow glued sections to cool before moving the project. In other words, spooky is good; emergency room chic is not.
How to Style Your Finished Halloween Candelabra
A great candelabra deserves a little staging. Place it where it can create contrast against a wall, mirror, or dark runner. Add height nearby with frames, branches, or stacked books. Keep surrounding colors muted so the candlelight effect stands out. Small pumpkins, skull accents, and potion bottles make good supporting players, but the candelabra should remain the star.
This project looks especially strong in these spots:
Dining table centerpiece
Fireplace mantel
Entry table or foyer console
Bookshelf vignette
Halloween party buffet
If you make more than one, vary the height and repeat the same color palette. That repetition makes your decor feel intentional and polished rather than random.
Final Thoughts
A Dollar Tree Halloween candelabra tutorial is proof that memorable seasonal decor does not have to be expensive, complicated, or suspiciously sponsored by a luxury retailer. With a few humble supplies and some smart styling, you can create a centerpiece that looks dramatic, eerie, and custom-made for your space.
The best part is that this project invites creativity. You can keep it dark and moody, playful and ghostly, or glam and theatrical. No matter which direction you choose, the result feels personal. And that is the real magic of Halloween crafting: turning everyday bargain-store pieces into something that makes people stop, stare, and ask, “Wait… you made that?”
Yes. Yes, you did. And for less than the cost of one overpriced seasonal candle. That, frankly, is the kind of haunting we support.
Real-World Experiences With This Project
One reason this project keeps showing up in Halloween decorating circles is that it solves a very real decorating problem: people want something dramatic for fall entertaining, but they do not want to spend a fortune on a centerpiece they will only display for a few weeks. A Dollar Tree Halloween candelabra hits the sweet spot. It looks intentional, photographs beautifully, and can be customized to match nearly any home style.
Many crafters find that the first attempt teaches them the most. At first, there is a temptation to buy every spooky item in sight and glue it all onto one brave little structure. Then reality steps in. The strongest versions are usually the ones with restraint. A balanced arrangement, two or three carefully chosen embellishments, and a unified paint finish almost always look better than a crowded design. That lesson tends to arrive right around the moment someone holds up a plastic spider and realizes the project does not, in fact, need thirteen of them.
Another common experience is discovering how much the paint finish changes everything. Before painting, the project can look like exactly what it is: stacked discount-store supplies having an identity crisis. After a few light coats of matte black, though, the entire piece suddenly looks cohesive. Add a tiny bit of metallic dry brushing and it can take on a surprisingly upscale, old-world character. It is one of those rare craft moments where you actually say, “Oh wow, that worked.”
People also tend to underestimate how useful LED candles are in this kind of display. The flicker adds mood without the stress of real flames near glue, faux florals, or painted surfaces. That means the candelabra can stay out longer, move from room to room more easily, and work for parties, family spaces, or late-night porch styling without everyone nervously monitoring it like a tiny fire marshal convention.
There is also a social side to this project that makes it memorable. It is the kind of craft that starts as a budget DIY and ends up becoming a conversation piece. Guests notice it. Kids point at it. Friends ask where it came from. And there is a special kind of satisfaction in answering, “Dollar Tree,” and watching people process that information as if you just revealed a supernatural talent.
Over time, many DIYers start making small variations every year. One season might feature skeleton hands and black roses. Another might lean ghostly with pale candles and softer details. Some make matching side pieces for a mantel. Others create a whole Halloween tablescape around the original candelabra. That is part of the appeal: the project is affordable enough to experiment with, but stylish enough that it does not feel disposable.
In the end, the experience of making a Dollar Tree Halloween candelabra is about more than saving money. It is about taking simple materials, trusting your eye, and building something with real personality. It is messy in places, funny in others, and deeply satisfying when the final lights flicker on. For a seasonal DIY, that is a pretty magical return on a very tiny investment.


