Table of Contents >> Show >> Hide
- The quick rule: harvest like a responsible roommate
- Why cutting “too much” actually hurts aloe
- What “safe harvesting” looks like step-by-step
- How often can you harvest aloe?
- Signs you’ve cut too much (and what to do next)
- Best practices that keep your aloe harvest-friendly
- “We asked a gardener” the practical harvesting guideline
- Common questions (because aloe makes people brave)
- Extra: of real-world experience (the aloe lessons you only learn once)
- Conclusion
Aloe vera is basically the friend who’ll give you a ride to the airport at 4 a.m., but only if you don’t
treat them like a free taxi service. Yes, aloe is tough. Yes, it bounces back. But if you keep “borrowing”
leaves like you’re harvesting coupons, eventually the plant runs out of stored water and energyand it shows
(slower growth, skinny leaves, flop-city, and the kind of sadness you can feel from across the windowsill).
So how much aloe can you cut off before causing real damage? The gardener answer is delightfully specific:
you can harvest leaves, but you need to leave the plant with enough “solar panels” (and water-storage tissues)
to keep powering new growth. Let’s break down what that means in normal-people terms, with practical rules you
can actually follow.
The quick rule: harvest like a responsible roommate
Rule #1: Don’t harvest until your aloe has at least 6 healthy leaves
According to an aloe grower quoted by The Spruce, wait until the plant has at least six leaves before
you cut anythingbecause smaller plants need every leaf they’ve got to photosynthesize and store water.
Rule #2: Leave 7–8 full leaves on the plant after you cut
Here’s the headline guidance we asked a gardener to clarify: for ongoing health, be conservative and leave
about seven to eight whole leaves intact, including the newer center growth. If your plant only has 8–10
leaves total, that means you’re taking one leaf (maybe two if it’s huge) and calling it a day.
Rule #3: Take the outermost, most mature leaves first
Mature outer leaves are the best candidates because they’re older, thicker, and already “paid into”
the plant’s savings account. The center leaves are the aloe’s futureleave them alone unless they’re
damaged or rotting.
Rule #4: As a percentage, aim for < 25–33% at one time (and less is better)
If you prefer a simple math rule: don’t remove more than about a quarter to a third of the plant’s
total leaves at once, and for indoor aloes, it’s often smartest to stick to 1–2 leaves per harvest.
Heavy harvesting slows recovery and can weaken structure for months.
Why cutting “too much” actually hurts aloe
Aloe leaves aren’t just decorative spikes that happen to contain gel. They’re the plant’s pantry and
water tank. Aloe stores water in thick leaf tissues (hello, succulent superpower), and it uses leaf
surface area to capture light and fuel growth. When you remove too many leaves at once, you reduce:
- Water reserves (the plant has less stored moisture to ride out dry periods)
- Photosynthesis (less leaf area = less energy production)
- Structural balance (the plant can tip, lean, or “open up” awkwardly)
That’s why overharvested aloes often respond by growing slowly and producing smaller new leaves. Think of it
like cutting off half your phone charger cable and then wondering why charging takes forever.
What “safe harvesting” looks like step-by-step
Step 1: Pick the right leaf
Choose a thick, outer leaf that’s firm, upright, and at least several inches long. Avoid very young center
leaves. If the plant looks stressed (thin leaves, drooping, pale color), skip harvesting and fix care first.
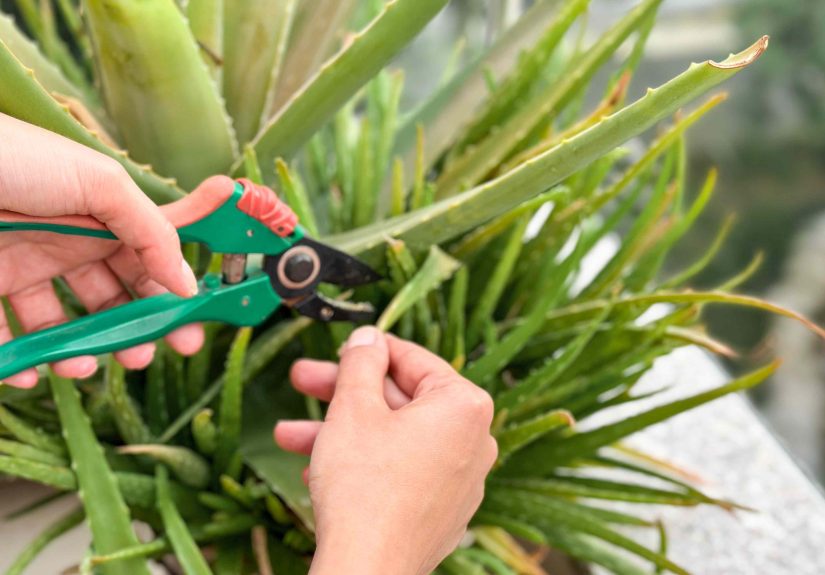
Step 2: Use a clean, sharp tool (and make one clean cut)
Use a clean knife or pruners and cut the leaf as close to the base as you can without gouging neighboring
leaves. A clean cut heals better than a jagged tear. Avoid snapping leaves off by forcealoe can bruise.
Step 3: Don’t “mid-cut” a healthy aloe leaf
If you only need a little gel, it’s tempting to slice off the top half and leave the rest attached. Many
plant-care sources warn against cutting an aloe leaf in the middle because it doesn’t heal neatly and can
invite rot or just leave you with a forever-bent, sad-looking leaf. If you’re going to harvest, harvest the
whole leaf at the base.
Step 4: Let the leaf drain (the “yellow stuff” matters)
Aloe leaves contain a yellow latex layer (often associated with compounds like aloin) between the skin and
inner gel. It can be irritating for some people. Stand the cut leaf upright for about 10–15 minutes so the
yellow liquid can drain out, then rinse the cut end.
Step 5: Harvest gel safely (and store it like it’s food)
Wash the leaf, slice it open lengthwise, and scoop out the clear gel. Refrigerate what you’ll use soon.
If you’re applying it to skin, patch test firsttopical aloe is generally well tolerated, but irritation
and allergic reactions can happen.
How often can you harvest aloe?
Frequency depends on how fast your aloe grows, which depends on light, pot size, soil drainage, and watering.
Indoors, most aloes grow slowly. A practical schedule for a healthy, established plant is:
- Light use: 1 leaf every few weeks to once a month
- Moderate use: 1–2 leaves per month (only if the plant is large and thriving)
- Heavy use: not recommended for houseplantsgrow multiple aloes instead
If you cut a leaf and your aloe takes months to look “full” again, that’s your plant voting “no” on your
harvesting pace.
Signs you’ve cut too much (and what to do next)
Red flags
- New growth slows dramatically
- Leaves look thinner or more curled than usual
- The plant leans, flops outward, or feels unstable
- Leaf tips brown faster than normal
- Soft, mushy areas near the base (possible rot)
Recovery plan
- Pause harvesting until you see multiple new leaves.
- Check light: bright light is key; acclimate slowly if moving to stronger sun.
- Check soil/drainage: aloe wants well-drained, sandy potting mix and a pot with holes.
- Adjust watering: let soil dry between waterings; reduce watering in winter.
Missouri Botanical Garden and several extension resources emphasize bright light and careful watering
(moderate in growing season, minimal in winter), plus well-drained soil. Overwatering is the classic aloe
“kindness” that becomes betrayal.
Best practices that keep your aloe harvest-friendly
Give it the right light (this is where “gel thickness” is born)
Aloe generally does best in bright light; many varieties prefer full sun outdoors in warm seasons, but indoor
plants need the brightest window you’ve got. If you move aloe outside, increase sun exposure gradually to
prevent sunburn.
Water like a succulent, not a fern
Let soil dry between waterings, then water thoroughly and let excess drain. In winter, back off further.
A consistent pattern of “soak, dry, repeat” is better than frequent sips.
Use the right pot and mix
A pot with drainage holes and a gritty, fast-draining mix helps prevent rot. If your aloe sits in wet soil,
it may grow softer leavesand harvesting soft leaves is like trying to scoop Jell-O with a fork.
Rotate your harvest (don’t always cut from the same side)
For a balanced shape, alternate which outer leaves you remove. If you always harvest from one side, aloe can
start leaning toward the uncut side like it’s trying to escape your scissors.
“We asked a gardener” the practical harvesting guideline
Here’s the gardener-approved takeaway in one sentence: Harvest only mature outer leaves, cut them at
the base, and always leave at least 7–8 healthy leaves (including the center growth) so the plant can keep
powering itself.
If you regularly need aloe gel, the most plant-friendly solution is surprisingly simple: grow more than one
aloe. One plant is a household helper. Three plants is a tiny aloe co-op.
Common questions (because aloe makes people brave)
Can I trim brown tips without removing the whole leaf?
Yes. If it’s just a crispy tip, you can snip it off for looks. But if a leaf is badly damaged, soft, or
diseased, remove the entire leaf at the base to reduce the chance of rot spreading.
Will the cut spot on the plant “seal”?
Typically, aloe wounds dry and callus over. Keep the plant in good conditions (bright light, not soggy soil)
and avoid getting water sitting in the crown. If you notice softness or a bad smell near the base, investigate
for rot.
Is the yellow aloe latex dangerous?
It can be irritating and is associated with laxative compounds when ingested. For skin use, many people prefer
to drain and rinse it off before using the gel. Topical aloe gel is generally well tolerated, but patch testing
is smartespecially for sensitive skin.
My aloe is huge. Can I harvest more aggressively?
Bigger plants can handle more, but the “leave 7–8 healthy leaves” rule still applies. If you remove a large
portion, expect recovery to take months. If you want frequent harvesting, multiple plants beats one overworked
plant every time.
Extra: of real-world experience (the aloe lessons you only learn once)
The first time I “harvested” aloe, I treated it like a roll of paper towels: pull off what you need, keep the
rest, pretend it’s fine. I had a decent-sized plant, a minor kitchen burn, and the confidence of someone who
once kept a cactus alive for six months. I didn’t choose an outer leaf. I didn’t cut at the base. I just
sliced a chunk off the side of a leaf, grabbed some gel, and congratulated myself for being both practical
and botanical.
Two weeks later, that leaf looked like a deflated pool toy. The cut edge browned, the leaf sagged, and the
plant started opening outward like it was trying to socially distance from me. That’s when the “solar panel”
idea finally clicked: aloe leaves aren’t storage containers you can partially empty and zip back up. Once you
cut into a leaf that’s still attached, the plant can’t magically re-seal it like a snack bag.
The next lesson came from enthusiasm. After a sunny weekend, my aloe looked plump and powerful, so I harvested
three big leaves in one gobecause more gel equals more good decisions, right? Wrong. The plant didn’t die, but
it sulked. New growth slowed, the remaining leaves got thinner, and the whole plant seemed less sturdy. It took
months to look “full” again. That’s exactly why gardeners emphasize moderation and leaving a solid number of
leaves intact: aloe can survive rough treatment, but “survive” isn’t the same as “thrive.”
Now my harvesting routine is boring in the best way. I wait until the plant is clearly growing wellfirm leaves,
good color, and that classic upright rosette shape. I choose one thick outer leaf, sanitize a knife, and cut it
close to the base. I let the leaf drain upright for a bit (because the yellow latex is… a vibe, and not a good
one), rinse it, then store the gel like a perishable ingredient. If I need more gel than one leaf provides, I
don’t “solve” that by stripping the plant. I solve it by growing a second aloe.
The most helpful change, honestly, was thinking like a plant manager instead of a plant customer. Aloe isn’t a
gel dispenser. It’s a living water tank powered by light. When you harvest respectfullyouter leaves only, cut
at the base, leave plenty of healthy leaves behindthe plant keeps growing, keeps looking good, and keeps being
useful. And that’s the whole point: your aloe should be a long-term teammate, not a short-term resource you
accidentally exhaust.
Conclusion
If you remember nothing else, remember this: don’t harvest an aloe until it has at least six leaves,
and always leave around 7–8 healthy leaves (including center growth) after you cut. Stick to mature
outer leaves, cut at the base with a clean tool, and harvest slowly enough that your plant stays plump and
stable. Aloe is generousbut like all generous friends, it appreciates boundaries.


