Table of Contents >> Show >> Hide
- What Are Transitions in iMovie?
- Why Add Transitions in iMovie?
- How to Add Transitions in iMovie on Mac
- How to Add a Cross Dissolve in iMovie on Mac
- How to Turn Automatic Transitions On or Off in iMovie
- How to Change Transition Style in iMovie on Mac
- How to Change Transition Duration in iMovie on Mac
- How to Apply the Same Transition to All Clips
- How to Move a Transition in iMovie
- How to Add Transitions in iMovie on iPhone
- How to Add Transitions in iMovie on iPad
- How to Remove Transitions in iMovie
- How to Add Fade-In and Fade-Out Effects
- Do Transitions Affect Audio in iMovie?
- Best iMovie Transitions for Different Video Types
- Common Mistakes When Adding Transitions in iMovie
- Practical Tips for Better iMovie Transitions
- Specific Example: Editing a Travel Montage in iMovie
- Specific Example: Editing a YouTube Tutorial in iMovie
- of Real Editing Experience: What Actually Works When Adding Transitions in iMovie
- Conclusion
Transitions are the tiny pieces of movie magic that help one clip move smoothly into the next. Used well, they make your video feel polished, natural, and easy to watch. Used too often, they can make your vacation montage look like it was edited by a caffeinated slideshow machine. The good news? iMovie makes transitions simple enough for beginners, while still giving you enough control to create a clean, professional-looking project.
Whether you are editing a family video, YouTube vlog, class project, wedding recap, travel montage, product demo, or social media reel, learning how to add transitions in iMovie can instantly improve the flow of your story. This guide walks you through how to add transitions in iMovie on Mac, iPhone, and iPad, how to change transition styles, how to adjust timing, how to remove transitions, and how to avoid the most common beginner mistakes.
By the end, you will know not only which buttons to click, but also when a transition actually helps your videoand when a simple cut is the better choice. Because yes, sometimes the most cinematic thing you can do is absolutely nothing fancy.
What Are Transitions in iMovie?
In iMovie, a transition controls how one video clip or photo changes into the next. Instead of one clip ending suddenly and the next appearing instantly, a transition can fade, dissolve, wipe, slide, or use a theme-based effect to move between scenes.
The most common transition is the cross dissolve. This makes the first clip fade out while the next clip fades in, creating a smooth overlap. It is subtle, friendly, and usually behaves better than your average group chat. Other iMovie transitions can feel more playful, dramatic, or stylized, depending on your project.
Transitions are useful when you want to show a change in time, location, mood, scene, or topic. For example, a fade through black can suggest that time has passed. A wipe can add energy to a travel video. A clean cross dissolve can soften a jump between two similar shots.
Why Add Transitions in iMovie?
Adding transitions in iMovie is not just about decoration. A good transition helps guide the viewer. It says, “We are moving somewhere new,” without forcing you to write a giant title card that says, “Three hours later, after snacks.”
Transitions can help your video in several ways:
- They smooth out the movement between two clips.
- They make photo slideshows feel less static.
- They help show changes in time, place, or subject.
- They add style to intros, outros, and highlight reels.
- They make beginner edits look more intentional.
Still, transitions work best when they support the story. If every clip spins, slides, wipes, and explodes into the next, your audience may focus more on the editing than the actual video. The best iMovie transitions are often the ones viewers barely notice.
How to Add Transitions in iMovie on Mac
If you are using iMovie on a Mac, adding transitions is straightforward. The Mac version gives you a dedicated Transitions browser, where you can preview and drag effects into your timeline.
Step 1: Open Your iMovie Project
Launch iMovie on your Mac and open the movie project you want to edit. Make sure your clips are already placed in the timeline in the order you want them to appear. You can always rearrange clips later, but transitions are easier to manage when your basic structure is already in place.
Step 2: Open the Transitions Browser
Above the media browser, click Transitions. This opens iMovie’s collection of available transition styles. You can move your pointer over a transition to preview how it looks before applying it. This quick preview is helpful because some transitions are subtle, while others arrive with the confidence of a marching band.
Step 3: Drag a Transition Between Two Clips
To add a transition manually, drag the transition you want from the browser and drop it between two clips in the timeline. When the transition is placed correctly, a small transition icon appears between the clips.
This is the most common way to add transitions in iMovie on Mac. It gives you control over exactly where the effect appears, which is useful when you only want transitions in certain parts of the video.
Step 4: Add a Transition to Both Ends of a Clip
You can also add a transition to both ends of a selected clip. Select the clip in the timeline, then double-click a transition in the Transitions browser. iMovie applies that transition to the beginning and end of the selected clip, which can be useful for standalone title cards, photo inserts, or cutaway shots.
Step 5: Preview the Edit
After adding a transition, play your project from a few seconds before the transition begins. This helps you see whether the transition feels natural. A transition that looks good in isolation may feel too slow, too flashy, or too distracting when placed inside a real video sequence.
How to Add a Cross Dissolve in iMovie on Mac
The cross dissolve is one of the most useful transitions in iMovie. It creates a soft blend between two clips, making it ideal for emotional scenes, travel montages, interviews, memorial videos, romantic moments, and peaceful B-roll.
To add a cross dissolve on Mac, select the edge of either clip where two clips meet. Then choose Edit > Add Cross Dissolve, or press Command-T. iMovie places a cross dissolve between the two clips.
This shortcut is especially useful when you are editing quickly. Instead of opening the Transitions browser every time, you can use Command-T to add a clean transition in seconds. It is one of those small editing shortcuts that makes you feel suspiciously productive.
How to Turn Automatic Transitions On or Off in iMovie
iMovie can add transitions automatically depending on your project settings and theme. Automatic transitions can be helpful when you want iMovie to quickly create a polished sequence, but they can also get in the way if you want precise control.
On Mac, open your project and click Settings in the upper-right corner of the timeline. If Automatic content is selected, iMovie may insert transitions automatically. To manually control transitions, deselect Automatic content.
When you turn off automatic transitions, iMovie stops adding new automatic transitions as you add more clips. Existing transitions and titles remain in your timeline, so you do not lose work you have already done.
How to Change Transition Style in iMovie on Mac
Changed your mind about a transition? Good. That means you are editing like a real human. iMovie lets you replace one transition style with another without rebuilding the whole timeline.
Open the Transitions browser and find the new transition you want to use. Then drag it over the existing transition icon in the timeline. The new transition replaces the old one.
This is useful when your first choice feels too dramatic. For example, a bold wipe might work in a sports highlight video but feel strange in a quiet interview. Replacing it with a cross dissolve can make the edit feel smoother and more professional.
How to Change Transition Duration in iMovie on Mac
Transition duration controls how long the effect lasts. A shorter transition feels quick and crisp. A longer transition feels slower and more emotional. Neither is automatically better; the right duration depends on the mood and pacing of your video.
To change transition duration on Mac, double-click the transition icon in the timeline. In the transition controls, enter the number of seconds you want in the Duration field, then click Apply.
If iMovie does not allow the duration you entered, the clips beside the transition may not have enough extra footage. A transition needs overlapping media from both clips. If there is not enough hidden footage at the clip edges, iMovie cannot create a longer overlap.
What to Do If iMovie Will Not Make a Transition Longer
If iMovie says the clips do not have enough media to change the length of a transition, trim the clips next to the transition. In simple terms, you need to shorten one or both clips slightly so iMovie has extra material to use for the overlap.
Hover near the edge of a clip until the trim tool appears, then drag the clip edge inward toward the center. After trimming, double-click the transition again, enter your preferred duration, and click Apply. If the warning appears again, trim a little more.
This can feel confusing at first, but it is normal video editing logic. Transitions are not magic portals; they need footage to blend. Even iMovie, friendly as it is, cannot fade into frames that do not exist.
How to Apply the Same Transition to All Clips
If you want a consistent look across your whole project, iMovie lets you apply the same transition style and duration to all transitions in your movie.
On Mac, double-click a transition in the timeline. In the transition controls, click Apply to All. This updates the other transitions in your project to match the selected transition.
This is helpful for slideshows, real estate tours, educational videos, and simple business presentations where consistency matters. However, use this carefully in story-based videos. Not every scene change needs the same emotional treatment.
How to Move a Transition in iMovie
On Mac, you can move a transition by dragging it from one space between clips to another space that does not already have a transition. This is handy when you realize a transition belongs later in the video, or when you accidentally placed it in the wrong spot.
Before moving transitions around, zoom in on your timeline if needed. A closer view makes it easier to grab the correct transition icon, especially in projects with short clips.
How to Add Transitions in iMovie on iPhone
iMovie on iPhone works a little differently from iMovie on Mac. Instead of dragging transitions from a browser, you tap the transition icon between clips in the timeline and choose an option from the controls that appear.
Step 1: Open Your Movie Project
Open iMovie on your iPhone and choose the movie project you want to edit. In the timeline, look between two clips. You will see a small transition icon between them.
Step 2: Tap the Transition Icon
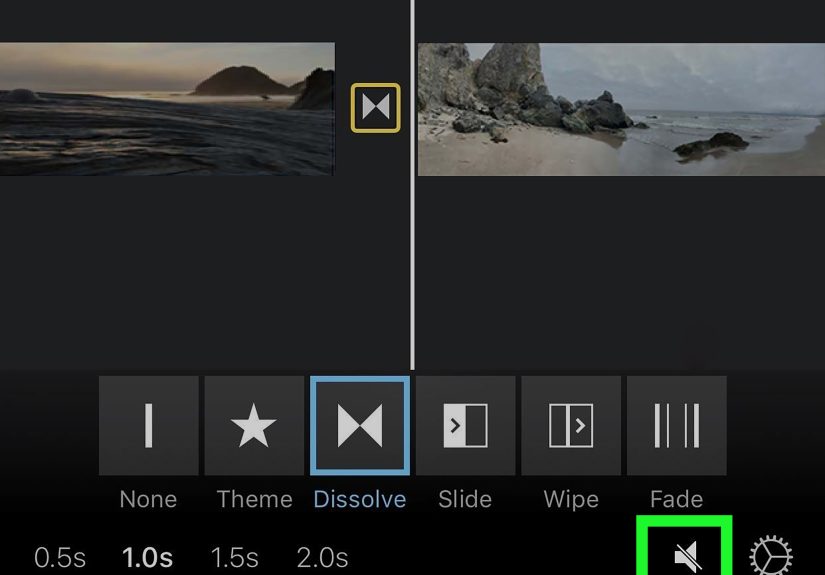
Tap the transition icon between the clips. iMovie opens transition options at the bottom of the screen. From there, you can choose the type of transition you want.
Step 3: Choose a Transition Type
Common options include None, Theme, Dissolve, Slide, Wipe, and Fade. The exact options can depend on your project and theme settings.
None creates a direct cut. Dissolve blends clips together. Slide moves one clip into another. Wipe pushes across the frame in a chosen direction. Fade can create a more dramatic visual pause.
Step 4: Adjust the Duration
On iPhone, transition durations are selected from available preset options. These commonly include short durations such as half a second, one second, one and a half seconds, or two seconds, depending on the clips around the transition.
For fast social videos, shorter transitions usually work best. For sentimental videos, photo montages, or slower music, longer transitions can feel more natural.
How to Add Transitions in iMovie on iPad
Adding transitions in iMovie on iPad is similar to the iPhone process, but the larger screen makes the timeline easier to manage. If you are editing a longer project on a mobile device, the iPad can feel much more comfortable.
Open your movie project, tap the transition icon between two clips, and use the inspector at the bottom of the screen to choose a transition style. You can select options such as None, Theme, Dissolve, Slide, Wipe, or Fade. You can also adjust the transition duration when available.
The iPad version also lets you add or mute transition sound effects for certain transition styles. This can add a playful touch, but use it carefully. A sound effect can make a transition feel fun, but too many swooshes can turn your video into a digital wind tunnel.
How to Remove Transitions in iMovie
Sometimes the best way to improve a video is to remove a transition. If a transition feels awkward, distracting, or unnecessary, switch it to None. This creates a clean cut from one clip to the next.
On Mac, select the transition and delete it, or replace it with another style. On iPhone or iPad, tap the transition icon between clips and choose None. The clips will cut directly from one to the other without an added visual effect.
Clean cuts are not boring. In fact, most professional videos rely heavily on cuts. Transitions are seasoning, not the whole meal. A little can improve the flavor; too much and suddenly your video tastes like a confetti cannon.
How to Add Fade-In and Fade-Out Effects
Fade-in and fade-out effects are excellent for giving your movie a polished beginning and ending. A fade in from black can make the opening feel intentional. A fade out to black can give the ending a soft, complete feeling.
On iPhone or iPad, open your movie project and tap the project settings button. Turn on Fade in from black or Fade out to black. When enabled, iMovie adds fade icons to the first or last clip in your timeline.
These effects are especially useful for travel videos, memorial videos, school projects, personal documentaries, and music-driven edits. They help your video avoid starting or ending too abruptly.
Do Transitions Affect Audio in iMovie?
Video transitions affect the way clips visually change from one to another, but audio may need separate attention. If the sound cuts too sharply, your video can still feel rough even when the picture looks smooth.
On Mac, you can create audio fades by revealing the fade handles on an audio clip and dragging them inward. This lets the sound gradually increase or decrease. Audio fades are useful for background music, voiceovers, room tone, and clips with sudden noise changes.
A smooth visual transition paired with a harsh audio cut can feel strange. For the best result, watch and listen. Editing is both an eye job and an ear job.
Best iMovie Transitions for Different Video Types
Travel Videos
For travel videos, use cross dissolves, wipes, and occasional slides. These can help show movement from one place to another. For example, a wipe can work nicely when moving from an airport shot to a beach scene.
YouTube Videos
For YouTube talking-head videos, use fewer transitions. Clean cuts, jump cuts, and occasional cross dissolves usually feel more natural. Overusing stylized transitions can make the video feel less professional.
Photo Slideshows
Photo slideshows benefit from simple dissolves and gentle fades. Apply a consistent transition duration so the slideshow feels calm and organized. This is especially useful for weddings, birthdays, graduations, and family memories.
Business or Educational Videos
For business presentations, product explainers, and tutorials, keep transitions clean and predictable. Cross dissolve and fade are usually safe choices. The goal is clarity, not fireworks.
Sports and Action Videos
Sports videos can handle faster cuts, quick wipes, and energetic transitions. Still, let the action do most of the work. If the footage is already exciting, you do not need to wrestle it into excitement with too many effects.
Common Mistakes When Adding Transitions in iMovie
Using Too Many Transitions
The most common mistake is adding a transition between every single clip. This can slow down the pace and make the video feel repetitive. Use transitions where they add meaning, not just because the button is sitting there looking clickable.
Choosing the Wrong Style
A playful slide transition may work in a family vacation video, but it may feel odd in a serious interview. Match the transition style to the tone of your project.
Making Transitions Too Long
Long transitions can feel elegant in slow videos, but they can also drag down the pacing. If your video feels sleepy, shorten the transitions before blaming the footage.
Ignoring Audio
Visual smoothness is only half the job. If the audio jumps suddenly from one clip to another, add audio fades or adjust volume levels to make the edit feel cleaner.
Using Transitions to Hide Weak Edits
A transition can smooth a scene change, but it cannot fix every problem. If two clips do not work together, trimming, rearranging, or replacing one clip may be better than throwing a fancy transition on top and hoping nobody notices.
Practical Tips for Better iMovie Transitions
Use transitions with purpose. Before adding one, ask yourself what it communicates. Does it show time passing? Does it soften an emotional moment? Does it separate two sections? If the answer is yes, the transition probably belongs.
Keep your timing consistent. In many projects, transitions between 0.5 and 1 second feel natural. Longer transitions can work for slow music or dramatic scenes, but they should be used intentionally.
Preview your project often. A transition may look great when you test it alone, but the real question is how it feels inside the full sequence. Watch a few seconds before and after every transition.
Use fewer styles. Mixing too many transition types can make your video feel messy. Choose one or two styles and repeat them where appropriate. Consistency makes your edit feel more mature.
Think about rhythm. If your video uses music, try placing transitions on musical beats or phrase changes. Even simple dissolves feel more polished when they match the soundtrack.
Specific Example: Editing a Travel Montage in iMovie
Imagine you are editing a weekend travel video. The first clip shows your suitcase on the bed. The second clip shows the airport. The third clip shows a plane window. The fourth clip shows the hotel view. You could use clean cuts between the packing and airport clips to keep the pace moving. Then you might add a cross dissolve between the plane window and hotel view to suggest the passage of time.
Later, when the video moves from daytime sightseeing to an evening restaurant scene, a fade through black can help signal a shift in time. At the end, you can use a fade out to black as the final shot holds on a sunset or city skyline.
This approach uses transitions as storytelling tools. They are not randomly sprinkled around like digital glitter. They help the audience understand the journey.
Specific Example: Editing a YouTube Tutorial in iMovie
For a YouTube tutorial, transitions should usually be subtle. Suppose you are teaching viewers how to organize a desk. You might use clean cuts between talking-head sections and close-up shots. A quick cross dissolve can soften the jump from the introduction to the first step. A fade out can end the video cleanly after the final tip.
Avoid dramatic wipes or slides unless they match your brand style. In tutorials, viewers want information quickly. If a transition delays the lesson, it is probably not helping.
of Real Editing Experience: What Actually Works When Adding Transitions in iMovie
After editing many simple videos in tools like iMovie, one lesson becomes obvious: transitions are most powerful when they are almost invisible. Beginners often open the Transitions panel and feel like they have discovered a secret treasure chest. Suddenly every clip wants a dissolve, a wipe, a slide, and maybe a dramatic fade because why not? But after watching the finished video, the excitement can wear off quickly. Too many transitions make a video feel slower, busier, and less confident.
The best experience is to build the video first with basic cuts. Put the clips in order, trim out the boring parts, fix the pacing, and listen to the audio. Once the story works without transitions, then add transitions only where the viewer needs a little help moving from one moment to another. This approach keeps the edit clean. It also prevents transitions from becoming a bandage for weak structure.
One useful habit is to watch the video with no transitions at all. If a cut feels smooth, leave it alone. If a cut feels too sudden because the scene changes location, time, or emotion, try a cross dissolve or fade. For example, when moving from a bright outdoor clip to a quiet indoor scene, a fade through black can feel natural. When moving between two scenic shots, a dissolve can create a relaxed mood. When cutting between action shots, a direct cut often feels stronger than any effect.
Another practical experience is that transition duration matters more than people think. A transition that is too long can make a video feel like it is walking through mud. A transition that is too short may barely register. For many everyday edits, a short dissolve around one second or less is enough. For emotional montages, longer fades can work, especially if the music is slow. The trick is to match the transition to the rhythm of the footage.
Audio is another area where beginners get surprised. A video can have beautiful visual transitions but still feel rough because the sound jumps abruptly. If one clip has loud background noise and the next is quiet, the viewer notices. Adding audio fades, lowering harsh volume changes, or using background music underneath can make transitions feel much smoother. In many cases, fixing the audio does more for the final video than changing the visual transition.
It also helps to think of transitions as punctuation. A cut is like a comma: quick and useful. A dissolve is like a soft semicolon. A fade to black is more like a period at the end of a chapter. If every sentence ends with fireworks, the reader gets tired. The same is true in video editing. Use transitions to shape the viewer’s experience, not to prove that you found the effects menu.
Finally, always export and watch the full video before sharing it. Transitions can feel different on a phone screen, laptop, or TV. What looked subtle while editing may feel slow in the final version. What looked fun once may feel repetitive after five uses. A final review helps you catch these issues before your audience does. And your audience, bless them, may not know what a cross dissolve isbut they will know whether the video feels smooth.
Conclusion
Learning how to add transitions in iMovie is one of the fastest ways to make your videos feel more polished. On Mac, you can drag transitions from the Transitions browser, use Command-T for a quick cross dissolve, change duration, replace styles, and apply one transition to all clips. On iPhone and iPad, you can tap the transition icon between clips, choose a transition type, adjust available durations, remove effects, and add fade-ins or fade-outs.
The real skill is not adding the fanciest transition. It is knowing when to use one. Simple cuts often work best for fast pacing. Cross dissolves are great for smooth changes. Fades help mark beginnings, endings, and time shifts. Audio fades can make the whole edit feel more professional. Keep transitions clean, purposeful, and matched to the mood of your project, and iMovie will help your video look like it had a bigger editing budget than “free app and determination.”


