Table of Contents >> Show >> Hide
- What “timing” means before you grab a wrench
- Tools you should have ready
- How to Adjust Timing in 12 Steps
- Step 1: Confirm your engine allows manual timing adjustment
- Step 2: Find the factory timing specification
- Step 3: Bring the engine to normal operating temperature
- Step 4: Locate and mark the timing pointer and timing marks
- Step 5: Connect the timing light correctly
- Step 6: Disconnect vacuum advance if the spec says to
- Step 7: Check the current timing reading
- Step 8: Loosen the distributor hold-down just enough
- Step 9: Rotate the distributor in very small increments
- Step 10: Recheck the marks after each change
- Step 11: Tighten the distributor and verify nothing moved
- Step 12: Reconnect everything and do a careful road test
- Common timing mistakes that trip people up
- Signs your timing is still off
- Experience: what adjusting timing teaches you in the real world
- Conclusion
If you have ever stared at an older engine bay and thought, “This looks like a history exam with hoses,” welcome to the club. Adjusting ignition timing is one of those old-school maintenance tasks that sounds wildly intimidating until you understand what is actually happening. In plain English, ignition timing is the moment the spark plug fires in relation to the piston’s position. Too early, and the engine may knock, buck, or act like it drank three espressos on an empty stomach. Too late, and it can feel lazy, rough, and thirsty.
The good news is that on many older distributor-equipped gasoline engines, timing can still be checked and adjusted with basic tools, patience, and the discipline to make tiny changes instead of heroic ones. The less-good news is that many newer vehicles do not allow manual timing adjustment because the computer handles it automatically. So before you go full backyard wizard, make sure your engine is the adjustable kind.
This guide walks through the process in a clear, practical way. You will learn how to tell whether your timing is adjustable, what tools you need, how to use a timing light, and how to dial in the setting without turning your driveway into a science project. Let’s get into it.
What “timing” means before you grab a wrench
In this article, “timing” means ignition timing, not valve timing or timing chain alignment. Ignition timing controls when the spark happens. Valve timing controls when the valves open and close. Same word, very different headaches.
On classic and older distributor-style engines, base timing is often measured in degrees BTDC, which means before top dead center. That is simply a fancy way of saying the spark happens just before the piston reaches the very top of its compression stroke. The engine needs that little head start because combustion is fast, but not magic-fast.
Correct ignition timing can improve idle quality, throttle response, fuel economy, and drivability. Incorrect timing can lead to pinging, rough idle, hard starting, weak acceleration, overheating tendencies, or emissions issues. In other words, yes, this little adjustment can make a big difference.
Tools you should have ready
- Timing light
- Wrench or socket for the distributor hold-down bolt
- Vehicle service manual or factory timing specification label
- Chalk, paint marker, or white correction pen for timing marks
- Tachometer if your timing light does not display RPM
- Safety glasses and gloves
- Wheel chocks and a well-ventilated workspace
One small but important note: if your vehicle uses coil-on-plug ignition, crankshaft sensors, or a fully computer-controlled ignition system with no distributor adjustment, this is probably a check timing situation, not an adjust timing situation. That means diagnostics, not twisting parts and hoping for poetry.
How to Adjust Timing in 12 Steps
Step 1: Confirm your engine allows manual timing adjustment
Start with the obvious question too many DIYers skip: can your engine’s timing actually be adjusted? If the engine has a distributor with a hold-down clamp, there is a decent chance the answer is yes. If it is a modern distributorless setup controlled by the ECU, the answer is usually no. Check the repair manual, under-hood emissions label, or factory service data before doing anything else.
Step 2: Find the factory timing specification
Timing is not a vibe. It is a number. Look for the exact base timing specification for your engine, such as 6° BTDC at idle, often with instructions about engine temperature, idle speed, and whether the vacuum advance line should be disconnected. Different engines want different settings, so never assume your friend’s small-block Chevy spec belongs on your Ford, Toyota, or mystery project car named “Thunder Bucket.”
Step 3: Bring the engine to normal operating temperature
Start the engine and let it warm up fully. Timing should be checked under the conditions specified by the manufacturer, and that usually means normal operating temperature. A cold engine can idle differently, pull different vacuum, and make your reading less reliable. If the spec requires accessories off, follow that too.
Step 4: Locate and mark the timing pointer and timing marks
Find the timing marks on the harmonic balancer, crank pulley, or flywheel, along with the fixed timing pointer or scale. These marks are often dirty, faint, or hiding like they owe someone money. Clean them and highlight the relevant mark with chalk or a paint pen so the timing light can catch it easily.
Step 5: Connect the timing light correctly
Hook the timing light’s power leads to the battery, then clamp the inductive pickup onto the number-one spark plug wire. That wire is the usual reference point for timing checks. Route the light’s wires safely away from belts, fans, and anything else that spins fast enough to ruin your afternoon.
Step 6: Disconnect vacuum advance if the spec says to
Many older engines require the vacuum advance hose to be disconnected and plugged when checking base timing. This prevents the reading from being altered by vacuum-assisted advance at idle. If your service information says leave it connected, leave it connected. The key word in timing work is not “confidence.” It is “specification.”
Step 7: Check the current timing reading
With the engine idling at the specified RPM, point the timing light at the timing marks. The flashing light freezes the marks visually, making them appear still. Compare the highlighted mark to the scale. If the mark lines up with the specified degree, congratulations: you may be done already. Feel free to look knowledgeable and nod at the engine.
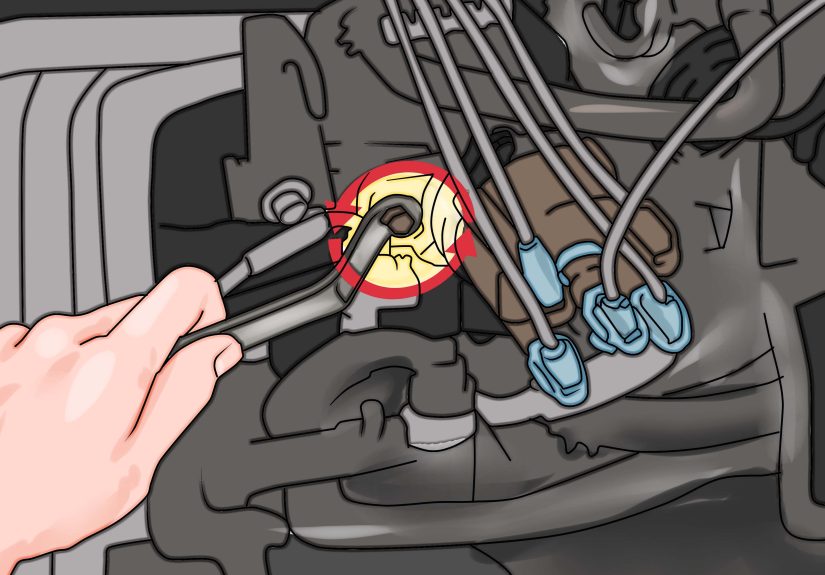
Step 8: Loosen the distributor hold-down just enough
Shut the engine off if needed for safer access, then loosen the distributor hold-down bolt slightly. The distributor should be snug enough not to flop around, but loose enough that you can rotate it in tiny increments. Tiny is the operative word. This is a precision task, not a strong-opinion task.
Step 9: Rotate the distributor in very small increments
Restart the engine if the adjustment is meant to be made while running, and rotate the distributor housing a little at a time. A tiny movement can change timing more than most people expect. If the timing number moves the wrong way, simply reverse direction. Do not swing the distributor dramatically like you are opening a safe in a movie. Sneak up on the target.
Step 10: Recheck the marks after each change
After each small adjustment, aim the timing light at the marks again and confirm the new reading. If you are using a dial-back or digital timing light, follow its instructions carefully. The goal is simple: line up the reading with the factory spec, or with your chosen conservative performance setting if you are tuning a modified engine and know exactly what you are doing.
Step 11: Tighten the distributor and verify nothing moved
Once the timing is on target, tighten the hold-down bolt and immediately check the timing again. This is one of those sneaky moments where settings often shift while being tightened. If it moved, loosen slightly, correct it, and verify again. Precision now saves confusion later.
Step 12: Reconnect everything and do a careful road test
Reconnect the vacuum advance hose if you removed it. Make sure all tools are out of the engine bay, then take the vehicle for a careful test drive. Listen for pinging or knocking under load, especially when accelerating uphill or pulling in a higher gear. If you hear knock, the timing may be too advanced or another issue may be present, such as low-octane fuel, carbon buildup, or excessive engine temperature. When in doubt, back off and recheck.
Common timing mistakes that trip people up
Confusing ignition timing with valve timing
If the engine jumped a timing chain, stripped teeth, or has a camshaft issue, distributor adjustment will not magically solve it. Ignition timing and valve timing are related to engine operation, but they are not the same repair.
Ignoring idle speed
If idle RPM is too high, the mechanical or vacuum advance may already be influencing the reading. That can make base timing appear different from what it really is. Always verify idle speed first.
Over-advancing for “free power”
Yes, advancing timing can sharpen response on some engines. No, that does not mean more is always better. Too much advance can cause spark knock, poor drivability, overheating, and eventually expensive noises that sound like regret.
Forgetting fuel quality
Fuel octane matters. An engine that tolerates a little extra advance on premium may rattle angrily on regular fuel. If the engine pings after adjustment, do not ignore it and call it “character.”
Signs your timing is still off
- Rough or unstable idle
- Sluggish acceleration
- Hard starting
- Pinging or knocking under load
- Poor fuel economy
- Engine feels hotter than normal
- Backfiring through the intake or exhaust on some setups
If those symptoms remain after careful adjustment, the real issue may be worn distributor components, a sticking mechanical advance, a vacuum advance problem, fouled plugs, sensor trouble, carbon deposits, or an engine timing issue unrelated to ignition timing.
Experience: what adjusting timing teaches you in the real world
One of the most interesting things about adjusting timing is that it teaches patience faster than almost any other driveway repair. People often start the job expecting a dramatic transformation with one bold twist of the distributor. What usually happens instead is a series of tiny adjustments, repeated checks, and the gradual realization that engines reward precision more than enthusiasm. That is not a bad lesson to learn.
In real-world DIY work, the first challenge is usually not the adjustment itself. It is finding the timing marks. They are often buried under grime, hidden behind accessories, or so faint that they look like accidental scratches. The second challenge is getting a stable reading while the engine is idling and the cooling fan is trying to audition for an action movie. Once you finally see the marks clearly under the timing light, though, the whole system starts to make sense. The engine stops feeling mysterious and starts feeling mechanical, which is exactly what it is.
Another common experience is discovering how sensitive ignition timing can be. New DIYers are often shocked that moving the distributor just a hair changes the reading noticeably. That is why experienced mechanics make tiny adjustments and recheck often. Timing work teaches respect for small changes. It also teaches humility, because many people have “improved” an engine only to realize they forgot to reconnect a vacuum line or tightened the distributor enough to move the setting off target. Engines are excellent teachers, and their grading policy is immediate.
There is also the test-drive lesson. A car can sound fine in the driveway and still complain on the road. Under load, improper timing reveals itself with pinging, hesitation, or lazy throttle response. That moment teaches another important truth: a timing light gives you a number, but the engine gives you feedback. The best adjustments respect both. Factory specs are the foundation, and real-world drivability is the final exam.
For people working on older classics, adjusting timing often becomes part of a bigger tune-up rhythm. Spark plugs, plug wires, dwell on point-style ignitions, idle mixture, idle speed, then timing. Each change affects the others. That is why experienced tuners rarely rush. They know one bad assumption can send you in circles for an hour. On the bright side, when you finally get it right, the reward is wonderfully old-school: a smoother idle, cleaner throttle response, easier starting, and the satisfying sense that you fixed something with your brain instead of just replacing parts until the problem surrendered.
Maybe that is the real appeal of learning how to adjust timing. It is not only about degrees BTDC or the perfect alignment mark. It is about understanding the engine’s rhythm and learning to work with it instead of against it. Also, let’s be honest, it feels pretty great when the car idles better after your adjustment and you get to pretend that was the plan all along.
Conclusion
Adjusting ignition timing is one of the most useful old-school skills a DIY car owner can learn. It is not complicated once you understand the goal: set the spark to happen at the right moment, under the right conditions, using the right specification. Follow the 12 steps carefully, make small adjustments, and verify everything twice. Your engine will usually tell you when you are getting warmer, and occasionally when you are getting too brave.
If your vehicle has a manually adjustable distributor, this job can improve idle quality, throttle response, fuel economy, and overall drivability. If your vehicle uses computer-controlled ignition timing, the lesson is different but just as valuable: not every timing problem is a timing adjustment problem. Sometimes the smartest wrench move is knowing when to stop turning things.


