Table of Contents >> Show >> Hide
- What Is a Washer Game?
- Best Washer Game Design for Beginners
- Materials Needed to Build a Washer Game
- Recommended Dimensions for a DIY Washer Game
- How to Build a Washer Game Step by Step
- How to Build a Three-Hole Washer Game
- Basic Washer Game Rules
- Washer Game Setup Tips
- Common Mistakes to Avoid
- Customization Ideas for Your Washer Game
- Maintenance and Storage
- Experience Notes: What Building a Washer Game Teaches You
- Conclusion
Some backyard games require a trailer, a rulebook thicker than a tax manual, or a cousin named Brad who insists he “basically went pro.” A washer game is not one of them. Also called washer toss, washer pitching, or simply washers, this classic lawn game is easy to build, cheap to customize, and dangerously good at turning a calm cookout into a full-blown family championship.
The idea is simple: players toss metal washers toward a wooden box or board with a cup or holes. Land a washer in the target, score points, celebrate like you just sank a buzzer-beater. Miss entirely, blame the wind. This guide shows you how to build a washer game using basic materials, practical measurements, and a beginner-friendly process that gives you a sturdy set for tailgates, camping trips, backyard parties, beach days, and weekend tournaments.
This article focuses mainly on the popular one-hole washer box design, then explains how to adapt the project for a three-hole washer board. You will also find setup tips, scoring rules, finishing ideas, safety notes, and real-world building experience at the end.
What Is a Washer Game?
A washer game is an outdoor tossing game where players throw small metal washers toward a target. The target may be a square wooden box with a center cup, a recessed ground pit, or a long board with three holes. It is often compared to cornhole, horseshoes, and ladder toss, but washers has its own personality. Cornhole is friendly. Horseshoes is old-school. Washer toss is the cousin who shows up with a cooler, a tape measure, and suspiciously good aim.
The most common backyard version uses two wooden boxes placed several feet apart. Each box has a cup in the middle, often made from PVC pipe. A washer that lands inside the box scores, and a washer that drops into the cup scores more. Many families play to 21 points, though house rules are part of the fun. The game can be played one-on-one or with two teams of two.
Best Washer Game Design for Beginners
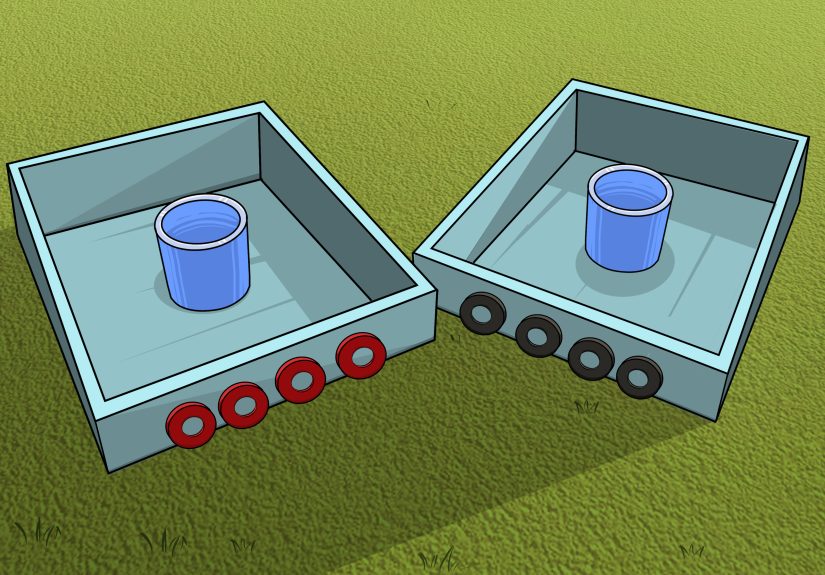
For a first build, the best design is a pair of square washer toss boxes. A practical size is about 16 inches by 16 inches, with a wood frame, plywood base, carpet or felt lining, and a short PVC cup in the center. This size is portable, easy to store, and large enough to feel fair without making every toss a guaranteed point.
There are many regional versions of washer games. Some rule sets use 15-inch boxes, some use larger boxes, some place cups 20 to 25 feet apart, and some three-hole boards are 4 feet long by 1 foot wide. The good news is that washer toss is forgiving. As long as both targets match and everyone agrees on the rules before the first washer flies, you are officially in business.
Materials Needed to Build a Washer Game
To build a durable two-box washer game set, gather these materials:
- One sheet or project panel of 1/2-inch plywood, enough for two 16-inch by 16-inch bases
- Four 1×4 boards cut to 16 inches
- Four 1×4 boards cut to about 14 1/2 to 14 5/8 inches, depending on board thickness
- One piece of 4-inch PVC pipe, cut into two sections about 3 to 3 1/2 inches tall
- Indoor/outdoor carpet, felt, artificial turf, or outdoor fabric
- Wood screws, usually 1 1/4-inch to 1 1/2-inch
- Wood glue
- Construction adhesive or strong outdoor adhesive for the cup and surface material
- Sandpaper or sanding block
- Exterior paint, stain, polyurethane, or spar urethane
- Six to eight metal washers, divided into two colors
- Optional handles, latches, rope, decals, stencils, or rubber feet
For tools, you will need a saw, drill, measuring tape, pencil, square, clamps, utility knife, and safety gear. Wear eye protection, keep your hands clear of cutting paths, and ask an experienced adult for help if you are not comfortable using power tools. Backyard glory is great; keeping all ten fingers is greater.
Recommended Dimensions for a DIY Washer Game
Here is a simple dimension plan for a one-hole washer toss set:
- Box size: 16 inches by 16 inches
- Frame height: about 3 1/2 inches, using standard 1×4 boards
- Base: 1/2-inch plywood cut into two 16-inch squares
- Cup: 4-inch PVC pipe, cut around 3 to 3 1/2 inches tall
- Washer size: commonly around 2 to 2 1/2 inches outside diameter for casual play
- Playing distance: 15 to 25 feet depending on skill level and rule preference
If you are building for kids, beginners, or a small backyard, start with the boxes 12 to 15 feet apart. For adults or more experienced players, 20 to 25 feet gives the game more challenge. The secret is to make the game fun, not to turn Uncle Mike’s first toss into a long-distance engineering exam.
How to Build a Washer Game Step by Step
Step 1: Cut the Wood Pieces
Start by cutting two 16-inch by 16-inch plywood squares for the bases. These will become the bottoms of the washer boxes. Next, cut four frame boards to 16 inches. Then cut four shorter frame boards to fit between them. If you are using standard 1×4 lumber, those shorter boards will usually be around 14 1/2 to 14 5/8 inches.
Dry-fit the pieces before adding screws. The frame should form a neat square around the plywood base. Do not panic if your first dry fit looks slightly more “modern art” than “precision woodworking.” That is what clamps, squares, and gentle adjustments are for.
Step 2: Sand the Edges
Sand the cut edges of all boards and plywood pieces. Focus on splinters, rough corners, and sharp spots. You do not need to round everything into a luxury yacht railing, but the boxes should be comfortable to handle and safe to transport.
Sanding also helps paint or stain adhere better. If you plan to add carpet or felt inside the box, lightly sand the plywood surface so adhesive can grip properly.
Step 3: Assemble the Wooden Frames
Build two square frames using the 1×4 pieces. Apply a small amount of wood glue at each joint, then drill pilot holes to prevent splitting. Fasten the corners with wood screws. Use a carpenter’s square or the plywood base itself to help keep the frame aligned.
For a stronger box, clamp the pieces before driving screws. If you skip the clamps, the boards may shift slightly, and your washer box may develop what builders politely call “character.” Character is charming in old barns. It is less charming when your cup sits crooked.
Step 4: Attach the Plywood Base
Place one frame on top of a plywood square. Align the corners carefully. Drill pilot holes through the plywood and into the frame, then fasten the base with screws. Repeat for the second box.
Some builders place the plywood on the bottom of the frame; others place it inside the frame as a recessed floor. Either method can work. A recessed floor helps the carpet sit slightly lower and may reduce bounce-outs. A bottom-mounted base is quick and sturdy. Choose the method that matches your tools and comfort level.
Step 5: Cut and Place the PVC Cup
Cut two sections of 4-inch PVC pipe, each about 3 to 3 1/2 inches tall. Sand the cut edges so they are smooth. Measure the center of each box by drawing light diagonal lines from corner to corner. Where the lines cross is the center point.
Place the PVC cup at the center and trace around it. Use a strong adhesive or epoxy to secure it to the plywood base. Some builders also fasten the cup mechanically, but adhesive is usually enough for casual backyard play when applied properly. Let the adhesive cure according to the product instructions before tossing washers at it like you are trying to settle a family inheritance dispute.
Step 6: Add Carpet, Felt, or Turf
Cut indoor/outdoor carpet, felt, fleece, or artificial turf to fit inside each box. You can either cut around the PVC cup or install the surface first and then trim the opening. A sharp utility knife gives the cleanest result.
The surface material matters more than many beginners expect. Bare plywood creates more bounce. Carpet softens the landing and makes the game feel smoother. Artificial turf looks sharp and works well outdoors, but thicker turf can make washers sit awkwardly near the cup. Felt is easy to apply but may wear faster if the game lives outside.
Step 7: Paint, Stain, or Seal the Boxes
Finish the exterior with paint, stain, or clear sealer. If the washer game will be used outdoors, choose a finish made for exterior conditions. Seal exposed wood edges especially well because plywood edges like to drink moisture as if they just crossed a desert.
Paint allows team colors, stripes, logos, and bold designs. Stain gives a cleaner, more classic look. Clear polyurethane or spar urethane can protect the wood while showing off the grain. For best results, apply multiple thin coats and let each coat dry fully.
Step 8: Paint the Washers
Each player or team needs washers in a different color. Spray paint works well if you clean the washers first and use light coats. You can also use colored tape, enamel paint, or powder-coated washers if you want a polished look.
Keep the washer colors easy to tell apart. Red versus blue is better than “slightly warm silver” versus “emotionally distant gray.” During a close game, nobody wants to debate metal undertones.
Step 9: Add Handles and Latches
If you want a portable washer game, attach a handle to the outside of one box and small latches so the two boxes can close together face-to-face. This creates a suitcase-style set that is easier to carry to the park, beach, campground, or neighbor’s yard.
You can also add a rope spacer between boxes to measure playing distance quickly. Attach the rope to the front of each box, stretch it out, and your game is ready without hunting for a tape measure.
How to Build a Three-Hole Washer Game
A three-hole washer game uses two long boards instead of square boxes. A common board size is 4 feet long by 1 foot wide, with three holes arranged in a line. The hole nearest the player often scores 1 point, the middle hole scores 3 points, and the farthest hole scores 5 points. Boards are commonly placed around 10 feet apart for this version.
To build one, cut two boards to 48 inches by 12 inches. Mark three evenly spaced holes down the centerline. Cut the holes with a hole saw or jigsaw, sand the edges, and finish the board with paint, sealant, or carpet. Add small feet underneath if you want the board raised slightly off the ground.
The three-hole version is excellent for players who like more scoring variety. It also moves faster because every hole has a different value. The one-hole box version feels more like horseshoes; the three-hole board version feels more like cornhole’s clever little cousin who studied math.
Basic Washer Game Rules
Because washer toss has many regional variations, agree on the rules before starting. Here is a simple rule set for a one-hole washer box game:
- Play with two players or two teams of two.
- Each player throws three or four washers per round.
- Players toss from behind or beside one box toward the opposite box.
- A washer inside the box scores 1 point.
- A washer inside the cup scores 3 points.
- Only one team scores per round, using cancellation scoring.
- The first player or team to reach exactly 21 points wins.
Cancellation scoring means equal results cancel each other out. For example, if Team A lands one washer in the cup and Team B lands one washer in the cup, neither cup scores. If Team A lands two washers in the cup and Team B lands one, Team A gets credit for one cup. This keeps games competitive and gives trailing players a chance to erase points.
Washer Game Setup Tips
Set the boxes on level ground with the cups facing upward. Grass, packed dirt, smooth gravel, and patio surfaces can all work, but the playing surface affects bounce. Short grass is usually friendly. Concrete is dramatic. Sand is fun but may require more cleaning later.
For casual games, place the boxes 15 feet apart for beginners and 20 to 25 feet apart for more skilled players. Measure from the front edge of one box to the front edge of the other, or from cup to cup if that is your chosen house rule. The most important part is consistency. If one player is throwing from a cozy patio while the other is launching washers from the next ZIP code, complaints will arrive quickly.
Common Mistakes to Avoid
Using Untreated or Unsealed Wood Outdoors
Washer boxes live a rough life. They sit in grass, ride in trunks, absorb sunshine, and occasionally get abandoned next to a sprinkler. Seal the wood well, especially the plywood edges.
Skipping Pilot Holes
Small boards can split when screws are driven too close to the ends. Pilot holes take a few extra minutes and save you from turning a clean frame into decorative firewood.
Making the Surface Too Bouncy
Bare plywood may look fine, but washers can bounce out like they have somewhere better to be. Carpet, felt, or turf helps control the landing.
Forgetting Portability
If you plan to take your washer game camping or tailgating, add handles and latches during the build. Retrofitting them later works, but it is easier before the boxes are finished.
Customization Ideas for Your Washer Game
A homemade washer game does not have to look homemade in the “I built this during a power outage” sense. Paint each box in team colors. Add vinyl decals, stenciled numbers, family names, or a clear-coated wood finish. Use contrasting carpet colors for each box. Paint washers in matching colors so the whole set feels intentional.
For night games, add glow tape around the box edges or use glow-in-the-dark paint on washers. For camping, attach a small storage pouch inside one box for washers. For a premium set, use hardwood trim, brass latches, and marine-grade finish. For a budget set, use scrap plywood and leftover paint. Both versions can produce the same glorious sound of a washer dropping into the cup.
Maintenance and Storage
After playing, wipe dirt and moisture from the boxes. Store the set indoors or in a dry garage when possible. If the carpet gets wet, let the boxes dry open before closing them. Touch up paint or sealer once a season if the game sees heavy outdoor use.
Check screws, handles, latches, and cup adhesive occasionally. Washers are small, but repeated impacts add up. A quick inspection keeps the game safe and sturdy.
Experience Notes: What Building a Washer Game Teaches You
The first thing you learn when building a washer game is that simple projects are only simple after you finish them once. On paper, this is just two boxes, two cups, and a handful of washers. In real life, you will spend at least five minutes wondering why one corner is not square, another five minutes looking for the pencil you just had, and a heroic amount of time deciding whether the carpet should be green, gray, or “whatever was cheapest.”
The best experience comes from dry-fitting everything before glue or screws enter the story. Lay the frame pieces around the plywood base and check the fit. If something is off by 1/8 inch, fix it early. Woodworking has a funny way of turning tiny errors into loud opinions later. A slightly crooked frame may still work, but the cup will look off-center, and someone will absolutely mention it during a game. Probably Brad.
Another lesson is that surface choice changes the personality of the game. Carpet creates a softer, more controlled landing. Felt feels smooth but can wear faster. Turf looks great and gives the box a backyard-sport vibe, but thick turf may lift the washer slightly and make edge shots behave differently. If you are building for competitive family play, test the surface with a few washers before permanently gluing it down.
Painting the washers is also more important than it seems. Plain washers disappear in grass, dirt, and shadows. Bright colors make scoring easier and reduce arguments. Use several light coats instead of one heavy coat. Heavy paint can chip quickly, and nobody wants a washer that looks like it survived a raccoon attack after two rounds.
Portability is another practical detail. A washer game becomes much more useful when the boxes latch together and carry like a small suitcase. Handles are worth the extra few dollars. So is a built-in rope for measuring distance. The fewer loose parts you have, the more often you will actually bring the game along.
Finally, building your own washer game makes the first match more satisfying. Store-bought games are convenient, but a DIY set carries a story. Every scuff becomes proof that the game gets used. Every cup shot sounds better because you installed that cup yourself. And every time someone asks where you bought it, you get to casually say, “I made it,” which is the backyard equivalent of wearing sunglasses in slow motion.
Conclusion
Learning how to build a washer game is a rewarding weekend project that gives you a portable, affordable, and highly replayable backyard game. With plywood, 1×4 boards, PVC pipe, carpet, screws, paint, and a little patience, you can build a set that works for family cookouts, camping trips, tailgates, and neighborhood tournaments.
The best part is flexibility. You can build a compact one-hole washer box, a longer three-hole washer board, a rustic stained set, or a loud team-color masterpiece. Just keep the targets consistent, seal the wood, choose clear scoring rules, and make sure everyone gets a fair shot. After that, the only thing left to do is toss, cheer, miss, blame gravity, and try again.


