Table of Contents >> Show >> Hide
- First: The Unsexy (Important) StuffSafety, Rules, and Placement
- Choose Your DIY Fire Pit Grill Style
- Materials and Tools
- Step-by-Step: Build the Fire Pit Base and Ring
- Now the Fun Part: Turn It Into a Fire Pit Grill
- How to Cook on Your Fire Pit Grill Without Guessing
- Fuel and Material Warnings (Read This Once, Avoid Regret Forever)
- Maintenance: Keep It Safe, Stable, and Not Rusty
- Realistic Cost and Timeline
- Troubleshooting: Fix the Stuff Everyone Learns the Hard Way
- Conclusion: Build Once, Cook Forever (or at Least Until Dessert)
- Extra: Field Notes and “Experience Lessons” DIYers Swear By (500+ Words)
A regular fire pit is basically a backyard conversation starter. A fire pit grill is a backyard conversation starter that also feeds peoplewhich is objectively the better kind of conversation. If you’ve ever stared at a circle of pavers and thought, “Cool… but where do the burgers go?” this guide is for you.
Below, you’ll learn how to build a safe, sturdy DIY fire pit and add a grill setup you can actually cook on: from the simple “drop a grate on it” approach to a more flexible adjustable grill arm. We’ll keep it practical, code-conscious, and mildly funny (because masonry dust already ruins enough moods).
First: The Unsexy (Important) StuffSafety, Rules, and Placement
Check local rules before you dig
Fire pits are one of those projects where your city (and sometimes your HOA, insurance company, or local fire department) may have opinions. Before you build, look up local open-burning rules, burn bans, and any permitting requirements. If you’re renting, double-check your leasenothing says “awkward” like explaining scorch marks to a landlord.
Pick a location that won’t turn into a headline
Place your fire pit on a level, noncombustible area (think gravel, pavers, stone, or bare mineral soil). A widely used guideline is keeping the pit at least 10 feet away from your house and anything that can burn, and farther is often better if you have the space. Avoid low-hanging branches, pergolas, fences, and anything that would prefer not to be on fire.
Build with a “spark mindset”
- Use a spark screen for wood fires whenever possible.
- Keep a hose, bucket of water, or sand nearby before you light anything.
- Never leave the fire unattended (yes, even “just for a minute”).
- Let everything cool completely before you clean up ash or move metal parts.
Choose Your DIY Fire Pit Grill Style
There are three popular “levels” of DIY fire pit grilling. Pick the one that matches your ambition, tool collection, and tolerance for small arguments with a bubble level.
Option A: The Simple Drop-In Grate (Beginner-Friendly)
Build a standard paver/retaining-wall-block fire pit with a steel ring insert, then add a heavy-duty cooking grate that sits on top or rests on supports. This is the easiest and fastest route to “fire pit that also makes food.”
Option B: The Adjustable Swing-Arm Grill (More Control, More Fun)
Add a side-mounted arm with a grate you can raise/lower or swing away from the heat. It’s great for controlling flare-ups, moving food off direct heat, and feeling like you own a tiny outdoor restaurant.
Option C: The Santa Maria–Style Adjustable Grill (Advanced Backyard Energy)
This is the iconic “crank-up/crank-down” live-fire setup. It can be DIY’d, but it’s more metalwork and more planning. If your dream includes tri-tip and dramatic lever pulls, file it under “next project” or “weekend that turns into a month.”
Materials and Tools
Fire pit materials (the foundation of your delicious plans)
- Retaining wall blocks or fire pit blocks (rated as heat resistant for fire pit use)
- Steel fire ring insert (commonly sized around 36–44 inches inside diameter)
- Drainage gravel (often 3/4-inch) and/or paver base for a stable, free-draining base
- Leveling sand (as needed for final leveling)
- Landscape block adhesive (for outer courses onlykeep adhesives away from direct flame zones)
- Capstones (optional but nice: cleaner look, more comfortable “leaning wall” height)
- Optional firebrick if you want an extra heat-protective inner lining
Grill materials (the part that turns “fire” into “dinner”)
- Cooking grate (stainless steel or plain, uncoated steel is common)
- Angle iron or flat steel bars to create grate supports (or a frame)
- Expanded metal (optional, if you’re fabricating a custom grate surface)
- Hardware (bolts, washers, lock nuts, handles, collars, etc., depending on design)
Tools you’ll actually use
- Measuring tape, stake + string, marking paint
- Shovel/spade, rake, hand tamper
- 2-foot or 4-foot level (your new best friend)
- Rubber mallet
- Chisel/brick hammer or saw with a masonry blade (for trimming blocks)
- Caulking gun (if using adhesive)
- Wire brush + grill brush (future-you will thank you)
- Heat-resistant gloves and long tongs (non-negotiable for grill life)
Step-by-Step: Build the Fire Pit Base and Ring
1) Decide the size and mark your layout
Many backyard fire pits land in the “about 3 to 4 feet across” range, which balances warmth, visibility, and the fact that you still want a yard afterward. Use a stake in the center, tie a string to it, and mark a circle with spray paint. Dry-lay your blocks around the outline to confirm spacing and adjust before you dig.
2) Excavate and prep a stable, drain-friendly base
Your goal is a base that stays level through weather, time, and that one friend who sits on the edge like it’s a stadium seat. Most reliable builds use compacted gravel/paver base because it drains well and is easier than pouring concrete.
- Remove sod and dig down to create a shallow “pad” area inside your circle. Depth varies by design, but plan for several inches of base material.
- Compact the soil with a hand tamper.
- Add gravel/paver base in layers, compacting each layer until the surface is flat and level.
- Spot-check level in multiple directions. Adjust nowfuture adjustments are harder and involve more sighing.
3) Lay the first course (dry first, then commit)
Place the first ring of blocks on your leveled base. Take your time here: the first course decides whether the rest of the build feels like a satisfying puzzle or a slow-motion prank.
- Tap blocks into place with a rubber mallet.
- Keep joints tight and consistent.
- Confirm level frequently. Tiny adjustments now prevent big wobbles later.
4) Add the steel fire ring insert
A steel ring insert helps protect block walls from high heat. Set it inside your block ring and make sure it’s centered and level. If there’s a gap between the ring and blocks, fill it with gravel to stabilize and improve drainage.
5) Build up additional courses (and cap it if you want)
Add 2–3 more layers of block, staggering seams like you would with bricks. If you’re using landscape adhesive, apply it between courses on the outer block layers (not where flames lick directly). Finish with capstones if you want a cleaner look and a more comfortable edge.
Now the Fun Part: Turn It Into a Fire Pit Grill
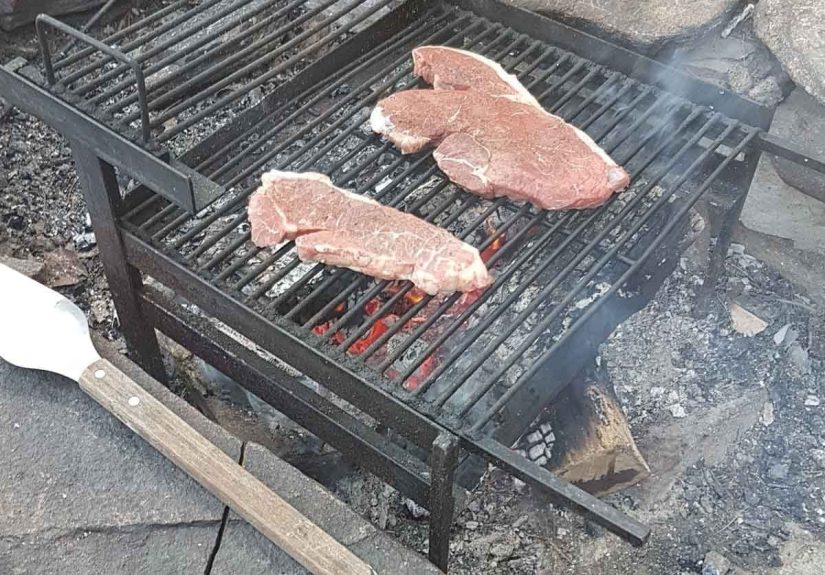
Method 1: The “Drop-In” Grate Setup (fastest path to burgers)
This is the simplest solution and often the most practical for most backyards: build the pit, then add a heavy-duty round cooking grate sized to your ring.
- Choose the grate: Look for a grate designed for fire pit cookingthicker steel holds up better and warps less.
- Create a stable ledge: Some steel inserts have built-in tabs. If yours doesn’t, you can rest the grate on 2–3 steel bars that span the opening.
- Test for stability: Press down on the grate in a few spots. If it rocks, fix it nowyour steak does not want a surprise floor drop.
Best for: hot dogs, burgers, kebabs, veggies, and anything you’re okay cooking mostly over direct heat.
Trade-off: you control heat mostly by moving coals, not by changing grate height.
Method 2: The Adjustable Swing-Arm Grill (control without a full metal shop)
If you want real heat control, an adjustable swing-arm is the sweet spot: raise the grate to slow cooking, lower it to sear, and swing it away when flare-ups get dramatic.
Basic concept: a vertical post anchored securely near the pit, a horizontal arm, and a grate that can slide up/down with a collar or friction bolt.
A practical DIY approach
- Build a grate frame: Make a rectangular or round grate frame with angle iron and an expanded steel surface. Add a small lip around the edge so food doesn’t roll into the fire (a surprisingly emotional event).
- Add an adjustable sleeve: Attach a sleeve/collar to the back of the grate so it can slide up/down a vertical pipe. A simple friction bolt can lock it in position.
- Stabilize the post: The post needs to be anchored so it won’t slowly tip toward the fire like it’s trying to join the party. A ground spike and a secondary stabilizer point help resist twisting.
- Keep metal choices food-smart: Use stainless steel or plain, uncoated steel for surfaces that will be near food or high heat. Avoid galvanized metal where it can be heated intensely or contact food.
Best for: steaks, chicken, fish baskets, cast-iron skillet cooking, and “I want it browned but not burned” people.
Trade-off: more parts, more fabrication, and you will suddenly care a lot about leverage.
Method 3: The Santa Maria–Style Height-Adjustable Grill (the showpiece)
A Santa Maria setup uses an overhead frame and a chain/crank mechanism to raise and lower the cooking grate. It’s fantastic for live-fire cooking because you can control heat instantly without rearranging coals. The simplest DIY version starts with a sturdy frame, a safe lifting mechanism, and a removable grate you can clean easily.
If you’re new to metalwork, consider building the fire pit first and using Method 1 or 2 while you plan this upgrade. Your future self can be “Crank Handle Person.” Today you can be “Dinner Is Ready Person.”
How to Cook on Your Fire Pit Grill Without Guessing
Use a two-zone fire
Pile coals to one side for high heat (searing zone) and keep the other side lower (finishing zone). This gives you control without fancy gear: sear over the hot side, then slide food over to finish gently.
Think in heat levels, not flames
For grilling, you usually want a bed of hot coalsnot tall flames licking your food like a cartoon villain. Let logs burn down, spread the coals, then cook. Your food tastes better, and you’ll stop sacrificing eyebrows.
Fuel and Material Warnings (Read This Once, Avoid Regret Forever)
Only burn clean, dry wood
Use dry, seasoned wood. Avoid wet or rotting wood (it smokes more and cooks less). Never burn garbage, plastic, or pressure-treated woodthose can create harmful chemicals in smoke and ash.
A note on galvanized metal
Galvanized steel has a zinc coating. While galvanized components exist in outdoor products, it’s a good rule not to use galvanized surfaces as a cooking grate or heat-intense food-contact surface, especially with acidic foods. Also, heating galvanized coatings can create zinc oxide fumesexactly the kind of “extra flavor” nobody asked for.
Maintenance: Keep It Safe, Stable, and Not Rusty
After each cook
- Let the fire burn down and fully extinguish the coals.
- Brush the grate while it’s warm (not blazing hot) and wipe lightly with cooking oil to reduce rust.
- Once everything is cold, remove excess ashash holds moisture and accelerates corrosion.
Seasonal checkups
- Check for shifted blocks or settling. Re-level if needed before it gets worse.
- Inspect the steel ring and grate for warping or sharp edges.
- If you use an adjustable arm, inspect bolts and locking points for wear.
Realistic Cost and Timeline
A basic paver fire pit can be a beginner-friendly build you finish in an afternoon, and many designs use a short list of materials: retaining wall blocks, gravel, and a metal ring. Costs vary by region and materials, but “under $100” builds exist for simple setups, while larger pits or premium blocks can raise the budget fast.
Troubleshooting: Fix the Stuff Everyone Learns the Hard Way
“My pit looks level… but it isn’t.”
That’s settlement. The fix is almost always the same: remove the top courses, re-level the base, compact again, and rebuild. It’s annoyingbut it beats a leaning tower of s’mores.
“It’s smoky and my guests look like they’re in a sad music video.”
You’re likely burning damp wood or choking airflow. Switch to seasoned wood, build a smaller fire, and make sure air can flow into the pit. (Some designs intentionally leave air gaps low in the structure.)
“My grate rusted.”
Plain steel rustsit’s not personal. Clean it, heat it, oil it, and store it dry when not in use. If you want lower maintenance, use a stainless grate.
Conclusion: Build Once, Cook Forever (or at Least Until Dessert)
A DIY fire pit grill is one of the best backyard upgrades because it’s both a gathering spot and a functional cooking tool. Start with a solid, drain-friendly base. Use a steel ring insert to protect your block walls. Then choose the grill method that fits your lifestyle: drop-in grate for simplicity, swing-arm for control, or a Santa Maria setup for maximum flair.
Do it right, and your backyard becomes the place where people “just happen to be nearby” around dinner time. Do it wrong, and you’ll learn how fast neighbors can run when they smell melting plastic. Choose wisely.
Extra: Field Notes and “Experience Lessons” DIYers Swear By (500+ Words)
Here’s the part nobody tells you in the clean, perfectly lit tutorial photos: building a DIY fire pit grill is less like assembling a toy and more like hosting a small, dusty reality show called So You Think You’re Level. The most common “experience” you’ll havewhether you’re a first-timer or a confident weekend warrioris discovering that the ground in your yard has opinions. It looks flat. It feels flat. But once you place that first ring of blocks, the bubble in your level will drift like it’s searching for a better life.
The smartest builders treat the first course as sacred. They dry-stack, walk away, come back, check again, and only then commit. Because the moment you glue or stack higher, every tiny mistake turns into a very visible “spiral” and you’ll spend the next hour tapping blocks like you’re trying to Morse-code an apology to the laws of physics. A good practical habit is to re-check level every few blocks and in multiple directions. It feels slow, but it’s faster than rebuilding.
Then comes the first fireyour “trial run”and it’s usually a comedy of expectations. People imagine huge flames and instant grilling. In reality, the best cooking heat comes from a bed of coals, and coals take patience. A lot of DIYers learn to start the fire earlier than they think, let it burn down, and cook over steady heat. The first time you do this right, you realize you can actually control the meal instead of chasing it around the grate while flames leap up like they’re auditioning.
Another classic experience: the “height problem.” With a fixed grate, you’ll quickly notice that some foods want high heat (searing), while others want a gentler finish (chicken thighs, thick burgers, veggies that you’d prefer not to carbonize). That’s why adjustable systems feel like a superpower. Even a simple swing-arm setup lets you lift the grate a few inches to calm flare-ups, or swing it away to add wood without turning your spatula into a sacrifice. DIYers who try adjustable cooking once tend to become evangelists about it.
You’ll also learn that cleaning is part of the cooking. The first time someone says “Let’s just leave the grate out here,” you’ll remember that dew exists. Plain steel will rust. Not because it hates you, but because it’s steel and weather is rude. The best “experienced builder” move is to brush the grate while it’s still warm, wipe it lightly with oil, and store it dry. It’s a two-minute habit that saves you a 20-minute scrub later (and prevents the awkward moment where you ask your guests to pretend the orange flakes are “smoke seasoning”).
Finally, there’s the social experiencearguably the whole point. A fire pit grill changes how people hang out. Instead of everyone disappearing into the kitchen, folks gather around the heat. Someone ends up on “coal duty.” Someone becomes overly proud of their tongs. And the person who brought the marshmallows will act like they invented dessert. When the pit is built safely and cooks well, it becomes an outdoor ritual: a place for weeknight burgers, fall s’mores, and that one friend who will forever tell the story of “the time we almost dropped a steak into the fire” like it was a war memoir. Build it right, and you’ll get years of those momentsplus dinner.


