Table of Contents >> Show >> Hide
- Why Properly Cleaning Clams Matters
- Before You Start: Quick Prep Checklist
- How to Clean Clams in 4 Easy Steps
- Pro Tips for Perfect, Safe, Grit-Free Clams
- Common Mistakes to Avoid
- Real-World Experiences: What Actually Works in Home Kitchens
- Conclusion: Four Steps to Cleaner, Safer, Better-Tasting Clams
Nothing ruins a gorgeous bowl of steamed clams, pasta alle vongole, or chowder faster than
that one rogue bite of sand. The good news? Getting perfectly clean, grit-free clams is
genuinely easy, fast, and safe when you follow a few smart steps that professional kitchens,
seafood experts, and food safety agencies agree on.
In this guide, you’ll learn exactly how to clean clams in four simple steps, why purging
matters, how salty your soaking water should be, how to spot bad clams before they ever hit
the pot, and the pro-level tips that make home-cooked clams taste like they came from a
coastal restaurant.
Why Properly Cleaning Clams Matters
Clams are filter feeders. That’s what gives them their sweet, briny flavorand also what fills
them with sand, silt, and microscopic bits of “not what you ordered” from their environment.
If you skip cleaning:
- You’ll get grit in your sauce, broth, or chowder.
- You increase the chance of off flavors from stressed, dying, or damaged clams.
- You risk foodborne illness if you accidentally cook clams that were already dead or mishandled.
Recommendations from U.S. seafood safety resources emphasize three things for shellfish at home:
buy from reputable sources, keep clams cold, and discard any that don’t behave like they’re alive
and well. Proper sorting, scrubbing, soaking in the right brine, and quick cooking are small steps
that have a big impact on flavor and safety.
Before You Start: Quick Prep Checklist
Before diving into the four steps, make sure you’re set up for success:
- Use live, hard-shell clams like littlenecks, cherrystones, manilas, or cockles.
- Keep them cold: store in the fridge in a shallow bowl, covered with a damp towel.
Never seal live clams in an airtight bag or store them submerged in fresh water. - Check for life: tightly closed shells are good; slightly open shells that snap shut
when tapped are good; clams that stay open, smell bad, or have cracked shells are out. - Have on hand:
- 1 large bowl or pot
- Coarse kosher salt or sea salt
- A colander
- A stiff brush or clean scrub pad just for shellfish
How to Clean Clams in 4 Easy Steps
Step 1: Sort & Inspect (30–60 seconds)
Pour the clams into a large bowl or onto a tray and give them a quick inspection.
- Discard any cracked, chipped, or broken shells.
- Tap any open clams on the counter:
if they don’t close within a few seconds, toss them. - If a clam smells sour or “fishy” instead of clean and oceany, toss it.
Think of this as your security check: only strong, lively clams get to board the pot.
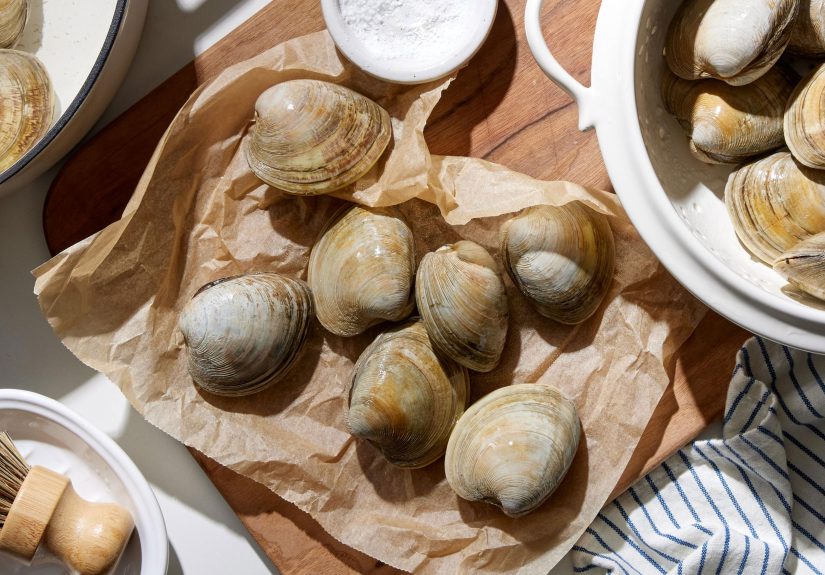
Step 2: Scrub the Shells (2–3 minutes)
Rinse clams under cold running water and scrub each shell with a brush.
This removes mud, sand, algae, and stray barnacles that would otherwise end up in your cooking liquid.
Don’t skip this. Even farm-raised clams, which are usually much cleaner, benefit from a fast scrub
to keep your broth clear and grit-free.
Step 3: Soak & Purge the Sand (20–45 minutes)
This is where the magicand mythslive. The goal is to let clams spit out the sand they’re holding.
Make a proper saltwater brine:
- Use cold water.
- Stir in enough salt to mimic seawater: about 3% salinity.
Practically speaking, that’s roughly 3 tablespoons of kosher or sea salt per quart
of water (or about 1/4 cup per liter).
Place clams in the brine in a single layer or light pile so they can breathe.
The water should just cover them. Transfer the bowl to the refrigerator.
Soak times (general home-cook rule):
- Farm-raised clams: 20–30 minutes is usually enough.
- Wild clams: 30–45 minutes; change the water once if it’s very sandy.
During soaking, clams filter the clean salted water and push out sand and grit.
When you’re done, lift the clams out of the bowl with your hands or a slotted spoon;
don’t pour them out with the sandy water or you’ll undo your hard work.
Skip the old-school tricks like tossing in flour or cornmeal. Modern testing and pro kitchens
lean on properly salted waternot pantry superstitionto get the job done.
Step 4: Final Rinse & Cook (5 minutes)
Give the purged clams one last quick rinse under cold running water in a colander.
Check for any newcomers that won’t close or that look damaged and discard them.
Now:
- Cook clams as soon as possible after cleaningideally within an hour.
- Keep them chilled until they hit the pan (never room temperature for long).
- During cooking, discard any clams that refuse to open.
That’s it. Four steps, zero grit, full flavor.
Pro Tips for Perfect, Safe, Grit-Free Clams
1. Choose the Right Clams for the Job
- Littlenecks & manilas: sweet, tender, ideal for steaming and pasta.
- Cherrystones: a bit larger; good for baked or stuffed clams.
- Quahogs: big and briny; better chopped for chowder than served whole.
Smaller farmed clams are usually cleaner and need less soaking, but still benefit from a short purge.
2. Stay in the Safe Zone
- Keep clams at or below 40°F (refrigerator-cold) before cooking.
- Store in a shallow dish, covered with damp paper towelsnever submerged in fresh water.
- Plan to cook live clams within 1–2 days of purchase for best quality.
- Always wash your hands, cutting boards, knives, and sinks after handling raw shellfish.
3. How to Tell If Your Cleaning Worked
After purging, check the soaking bowl. If you see a layer of sand on the bottom and the new
water runs mostly clear, you’re good. Cook a small test batch: if the broth is clean and
grit-free, the rest will be too.
Common Mistakes to Avoid
-
Using unsalted water: Fresh water can shock or kill clams if soaked too long.
Always use salted water for purging. -
Soaking for hours and hours: Over-soaking in cold brine can stress clams
and affect quality. Stick to 20–45 minutes for typical hard-shell clams. -
Pouring clams out with the sandy water: Always lift clams out so the grit
stays behind. -
Ignoring damaged or dead clams: One bad clam can ruin a whole potif in doubt,
throw it out. -
Skipping the scrub: Shell debris goes straight into your pot and broth
if you don’t clean the outside.
Real-World Experiences: What Actually Works in Home Kitchens
After hundreds of at-home clam nights, some patterns repeat themselves. Here are experience-based
insights you can weave into your own routine so “How do I clean clams?” becomes muscle memory.
First lesson: the tap test never lies. Home cooks consistently report that
any clam that made them nervous before cooking was the one that ruined the batch when they
tried to “trust it anyway.” If a clam is cracked, gaping, smelly, or stubbornly open, don’t
negotiatediscard it. The cost of one clam is nothing compared to tossing an entire dish.
Second: 3% salted water is the sweet spot. Cooks who measure their brine
(instead of “a splash of salt and hope”) almost always notice cleaner results. A properly salty
soak mimics the clam’s natural environment, so they stay alive and comfortable while purging.
Too little salt, and they sulk; too much, and you risk stressing them. Once you’ve watched a bowl
of clams spit out a shocking amount of silt into well-salted water, you never skip this step again.
Third: One soak is usually enoughif you buy good clams. Many U.S. markets
selling farmed clams already keep them in clean conditions. For these, a 20–30 minute soak plus
a scrub is perfect. If you’re dealing with wild clams from sandy beaches (where allowed and safe),
a second change of brine can turn murky water crystal clear. Experienced coastal cooks often judge
by eye: if the first soak leaves a thick sandy layer at the bottom, they repeat; if not, they move on.
Fourth: Don’t overcrowd your soak. Home cooks who dump five pounds of clams
into a tiny bowl end up disappointed. When clams are stacked too deep, those on top don’t purge
as effectively. Spreading them into a larger container or doing two batches takes only a few extra
minutes and dramatically cuts down on grit.
Fifth: Respect the cold chain. Real-world habit that works: transfer clams from
store bag to a shallow bowl the moment you get home, cover with a damp towel, and slide into the
coldest part of your fridge. Clean them close to cooking time, keep the soaking bowl in the fridge,
and move them straight from purge to pot. People who treat clams like a delicate proteinnot a pantry
itemenjoy sweeter flavor and better texture every time.
Finally, there’s the confidence factor. The more you clean clams, the more intuitive it becomes:
you recognize healthy shells at a glance, you eyeball the salt correctly, and you trust yourself
to toss anything suspicious. That quiet confidence is what turns:
“I hope these are okay” into “These are going to be the best clams I’ve made.”
Follow the four steps, add these field-tested habits, and your guests will think you secretly hired
a coastal restaurant to cater dinner.
Conclusion: Four Steps to Cleaner, Safer, Better-Tasting Clams
Cleaning clams doesn’t need to be dramatic, mystical, or messy. Sort out the bad ones, scrub the
shells, soak briefly in cold salted water, rinse, and cook while they’re fresh and lively.
Do that, and you get pure, briny sweetness in every biteno crunch, no worries, no wasted seafood.


